what are the tricks to adjusting door latch - 1960
 06-02-2010, 04:45 PM
#21
Le Mans Master

Member Since: Feb 2004
Location: Norcal CA
Posts: 6,717
Received 551 Likes
on
444 Posts
2018 C1 of Year Finalist

The doors are the worst ones... Now, my driver door lock will not disengage and I thought I was done with the doors. 
The doors, windshield, dash pad, gas tank straps and dash insert are all PITA!
The doors, windshield, dash pad, gas tank straps and dash insert are all PITA!
 06-02-2010, 06:38 PM
#22
Team Owner


Oh quit whining....folks on the '60s GM assembly lines did those little jobs in a few minutes...dozens of times a day.
06-02-2010, 07:10 PM
#23
Tech Contributor


Was that your positive-thinking Mantra you used while installing your dash pad? I said something similar when I installed mine - "It can't be this hard, it can't be this hard!"
06-03-2010, 04:24 AM
#24
Le Mans Master
Thread Starter
Member Since: Sep 2003
Location: Norwalk ohio
Posts: 8,927
Received 640 Likes
on
358 Posts
2019 Corvette of the Year Winner
St. Jude Donor '15
and I will take a look again. I also wonder if in the rebuild of the car if I got those switched between passenger and driver door.....wouldnt be the first time....there is something wrong though....and I am bound and determined to get it so that it works 90%+ of the time in stead of 10% of the time......thanks to Dave and everyone else....like was said before, this isnt rocket science, but when you are locked out and the door isnt locked, it sure seems like it is!
 06-03-2010, 06:36 AM
#26
Team Owner
Frank
 06-03-2010, 11:28 AM
#29
Team Owner
I have a pair of straight and curved hemostats for such tiny jobs:
http://www.google.com/imgres?imgurl=...ed=0CDwQ9QEwAw
I've had the same set for 35 years and every tool box should have a pair for electrical and other detail work.
http://www.google.com/imgres?imgurl=...ed=0CDwQ9QEwAw
I've had the same set for 35 years and every tool box should have a pair for electrical and other detail work.
06-03-2010, 11:37 AM
#30
Burning Brakes

The joys of old age...
06-03-2010, 11:54 AM
#31
Melting Slicks


"Even with cheaters my depth perception is a bit off.
The joys of old age..."
I can sure relate to that, I wear progressive trifocals! Makes jobs like this one inside the door or doing stuff under the dash a real adventure.
Good luck with this one Herb. I'm betting on your success!
Dave Z
The joys of old age..."
I can sure relate to that, I wear progressive trifocals! Makes jobs like this one inside the door or doing stuff under the dash a real adventure.
Good luck with this one Herb. I'm betting on your success!
Dave Z
Last edited by DZVette; 06-03-2010 at 12:52 PM.
 06-07-2010, 10:43 PM
#33
Le Mans Master
Thread Starter
Member Since: Sep 2003
Location: Norwalk ohio
Posts: 8,927
Received 640 Likes
on
358 Posts
2019 Corvette of the Year Winner
St. Jude Donor '15
however, if I compare the new rod (from Paragon) and the rod I had in the door, while they both look to result in the ends in the same place, there are differences in the bends and clearances. New rod on the LEFT.
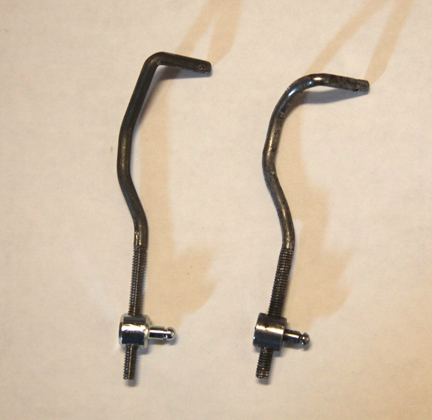
I am not sure if these differences contribute to difficultly in pressing the button and releasing the star or not....
I also did not previously install the washer and spring. Perhaps this aggregated the situation. Perhaps not. At any rate, I am trying to figure out what everyone did to keep the washer from sliding down the rod along with the spring.
I want to take the rod and try and lift a burr up where I want the washer to stop.
What did everyone else do? I saw in one of the PDF files that the spring and washer had slid down the rod and were not really doing anything.
Comments on what did you do to keep the washer and spring from sliding down the rod???
I also saw why the door handle button didn't work, the darn end of the rod had come off the latch mechanism. Fortunately I had bought some new clips since I think the old existing clip was a bit worn in terms of its spring retention.
Let me know what you did to keep the washer and spring in place......
thanks, Herb
06-08-2010, 06:52 AM
#34
Team Owner
I told you early on the rod might have slipped off!
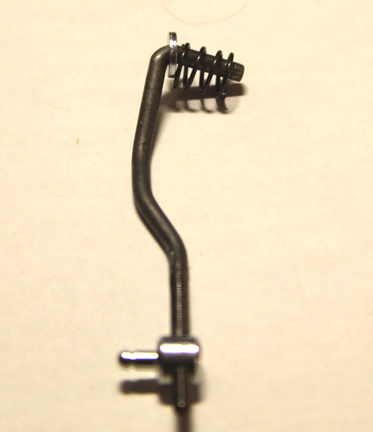
I saw the same deal with the washer and spring so I looked at the AIM and even that venerable document had two different means of installation (see attachment). I went with the method at the top of the picture that ensures the washer stays in place ... meaning the spring and washer components are on the 'cotter pin' side of the door button actuator plate.
Did it on both doors and there hasn't been a problem in 4 months.
I think the main point of the spring is to make sure the rod doesn't 'wallow around' in the hole and make for sloppy operation. Either means of installing the spring stabilizes the rod but only one makes sure the washer doesn't ride down the rod and make the ***'y ineffective.
Interestingly...in this additional PDF you will see the spring mounted as I recommend above (top photo on Page 2) and AFTER the new door handle reinforcement, etc. is done (bottom photo on Page 2) you will see it mounted in the manner that lets the washer and spring drop out of place. I'm betting the top photo is an original configuration.
Last edited by Frankie the Fink; 06-08-2010 at 09:09 AM.
06-08-2010, 01:05 PM
#35
Le Mans Master
Thread Starter
Member Since: Sep 2003
Location: Norwalk ohio
Posts: 8,927
Received 640 Likes
on
358 Posts
2019 Corvette of the Year Winner
St. Jude Donor '15
I told you early on the rod might have slipped off!
I saw the same deal with the washer and spring so I looked at the AIM and even that venerable document had two different means of installation (see attachment). I went with the method at the top of the picture that ensures the washer stays in place ... meaning the spring and washer components are on the 'cotter pin' side of the door button actuator plate.
Did it on both doors and there hasn't been a problem in 4 months.
I think the main point of the spring is to make sure the rod doesn't 'wallow around' in the hole and make for sloppy operation. Either means of installing the spring stabilizes the rod but only one makes sure the washer doesn't ride down the rod and make the ***'y ineffective.
Interestingly...in this additional PDF you will see the spring mounted as I recommend above (top photo on Page 2) and AFTER the new door handle reinforcement, etc. is done (bottom photo on Page 2) you will see it mounted in the manner that lets the washer and spring drop out of place. I'm betting the top photo is an original configuration.
I just wanted to make sure that the darn door opened and shut nicely.....
06-08-2010, 01:57 PM
#36
Team Owner
You'll get it done easily.....I mean; ain't likes its a hardtop or something
06-08-2010, 02:28 PM
#37
Burning Brakes
Herb,
Take a small thin piece of old pinstriping and use it like tape straight across the parts to make the washers and spring one piece. after the fastner is inserted just pull the pinstriping off.
If you have a big magnet or a magnet on a pole, place it at the inside bottom of the door. When / if pieces fall the magnet will usually suck it up as opposed to it bouncing and going under window stop or other bracketry.
Take your time and do not let it frustrate you. Always remember working on these are labors of love.
My bet is on you, I know you will be victorious!
06-08-2010, 03:17 PM
#38
Team Owner
Such things never seem to be that hard for me. Unlike my proctologist I have very skinny fingers.
06-08-2010, 09:17 PM
#39
Le Mans Master
Thread Starter
Member Since: Sep 2003
Location: Norwalk ohio
Posts: 8,927
Received 640 Likes
on
358 Posts
2019 Corvette of the Year Winner
St. Jude Donor '15
After trying to get the spring and washer on while assembly was inside the door panel, I decided there had to be an easier way.
So, I took the door handle off the car and assembled the rod and adjustable pin. This was much easier to get it put together. But now I had to get the door handle back in place, but before I did that I took the key lock out to make more room (this was a real good idea I had, made it much easier). But that darn spring had a mind of its own and I ended up having to wrestle with the rod as it was walking in the hole because of the spring. That made it not too much fun. But after I fussed and fussed, I was able to get the rod in the right position and in the clip.
All rods are in place and the door push button works great and I believe that it will be in good shape going forward.
On a side note, I installed the reproduction latch mechanism from Corvette Central and I give it two thumbs UP!
Thanks to everyone and their help!
06-08-2010, 09:22 PM
#40
Le Mans Master
Thread Starter
Member Since: Sep 2003
Location: Norwalk ohio
Posts: 8,927
Received 640 Likes
on
358 Posts
2019 Corvette of the Year Winner
St. Jude Donor '15
Herb,
Take a small thin piece of old pinstriping and use it like tape straight across the parts to make the washers and spring one piece. after the fastner is inserted just pull the pinstriping off.
If you have a big magnet or a magnet on a pole, place it at the inside bottom of the door. When / if pieces fall the magnet will usually suck it up as opposed to it bouncing and going under window stop or other bracketry.
Take your time and do not let it frustrate you. Always remember working on these are labors of love.
My bet is on you, I know you will be victorious!
Take a small thin piece of old pinstriping and use it like tape straight across the parts to make the washers and spring one piece. after the fastner is inserted just pull the pinstriping off.
If you have a big magnet or a magnet on a pole, place it at the inside bottom of the door. When / if pieces fall the magnet will usually suck it up as opposed to it bouncing and going under window stop or other bracketry.
Take your time and do not let it frustrate you. Always remember working on these are labors of love.
My bet is on you, I know you will be victorious!
thank you for your comments and insight!