






The $300 Stereo/CD upgrade.
Thread Starter
Melting Slicks

Joined: May 2007
Posts: 3,246
Likes: 4
From: Bay Area CA
 The $300 Stereo/CD upgrade.
The Goal was to upgrage the stock stereo to a "good" CD player and new speakers, while saving the original bezel, all for under 300 bucks.
The original kick panels, being available as after market reproductions, were used in the install to keep costs down.
Background:
I wanted to upgrade my 'Vette, while keeping costs down. (I got some cool CDs that will need to be played, once I complete the 'Vette upgrades- (esp. Barracuda, by Heart) Well, this is a serious situation.)
Method:
What I needed was a package to accomplish this goal. These had to be quality componants, and originality could not be sacrificed, not acceptable.
The Parts:
Reproduction Bezel: cost only $115, So I can save my original Bezel,, Corvette Central:

and
http://www.millionbuy.com/aifp306.html
Head Unit" $99,
I went to Circiut City and Listened to the 99-119 dollar units. the sony was tinny, the Pioneer really kicks ykw for the price, and looks good too. 25W a channel RMS. Pretty good in real world situations.

The Speakers: $49, they say 160W real big on the box,, but I geuss that's just when the sun spot are alligned correctly, because in the specs, and in smaller print on the box, they say 30W -continous,, that's RMS folks or Root mean square,, or real continous power, minute to minute. Perfect for the 25W a channel Pioneer dash unit.


Add 50' of 16 gauge speaker wire from Radio Shack at 10 bucks and 20 "red" butt splices from autozone at 2.99 for 10 and you get
115+99+49+15+10+6= $299. I made my target.
the Install:
Pulled the E-brake cover, then the shift consol and pulled the Enviromental switch. Cleaned it up really good, esp the Fan switch, which I ran WD 40 through 4 times as I worked the switch back and forth to get my fan to work on high speed again
One other thing to note, I noticed that on the back of the Hand Brake consul there is a bolt that goes through to inside of the rear three compartments space, below the "glove box" or tic tac case, as I like to call it. Mine was previously removed. It seems possible to remove the shift consol w/o removing the brake consol, and I would recomend it, unless your a gluton for punishment.
Switch:

Pulled the gauge bezel and pulled the old radio (free the radio from the bezel so you can remove the bezel at first). Be very carefull here if you have a 60s or early to mid 70s Car, as the OIL PRESSURE GUAGE USES A THIN PLASTIC FLEXABLE OIL TUBE FROM THE ENGINE. DO NOT BREAK OR KINK IT!!!
Ran the speaker wire and then used my handy red handle stripper/crimp tool the crimp the red butt splices to the speaker wires and the connector of the Pioneer head unit, and then ran a 14 gauge wire to the "Batt" terminal on the fuse box for the constant power it requires, butt spliced that in along with the ground (requires a Blue, larger butt splice) and the yellow for detection on: aka ACC. Done with the head unit:


Decided to reuse and not save the kick panels, they are widely available in correct color and my vette isn't an L88.
Measured the maximum height of the body mount hole and tranfered it to the kick panel with a sharpie. Cut the holes with a Dremmel tool disk below this line and centered, one small cut at a time and then smoothed the hole out with a sheet rock knife, Test fit the speakers, and THEN drilled the holes:


Installed the Speakers,, you have to install the kick panels first, then put the speakers in.


All that needs to be done is plug in the Head Unit and mount the kick panels. I also ran the rear speaker wires, Now, while the Concol is appart and will run a line level stub and bring out the blue controll wire, while it's appart. This Is Fun! Waiting on the Bezel with my Dremel tool, but it's plug and play, Now.
The original kick panels, being available as after market reproductions, were used in the install to keep costs down.
Background:
I wanted to upgrade my 'Vette, while keeping costs down. (I got some cool CDs that will need to be played, once I complete the 'Vette upgrades- (esp. Barracuda, by Heart) Well, this is a serious situation.)
Method:
What I needed was a package to accomplish this goal. These had to be quality componants, and originality could not be sacrificed, not acceptable.
The Parts:
Reproduction Bezel: cost only $115, So I can save my original Bezel,, Corvette Central:
and
http://www.millionbuy.com/aifp306.html
Head Unit" $99,
I went to Circiut City and Listened to the 99-119 dollar units. the sony was tinny, the Pioneer really kicks ykw for the price, and looks good too. 25W a channel RMS. Pretty good in real world situations.
The Speakers: $49, they say 160W real big on the box,, but I geuss that's just when the sun spot are alligned correctly, because in the specs, and in smaller print on the box, they say 30W -continous,, that's RMS folks or Root mean square,, or real continous power, minute to minute. Perfect for the 25W a channel Pioneer dash unit.
Add 50' of 16 gauge speaker wire from Radio Shack at 10 bucks and 20 "red" butt splices from autozone at 2.99 for 10 and you get
115+99+49+15+10+6= $299. I made my target.
the Install:
Pulled the E-brake cover, then the shift consol and pulled the Enviromental switch. Cleaned it up really good, esp the Fan switch, which I ran WD 40 through 4 times as I worked the switch back and forth to get my fan to work on high speed again
One other thing to note, I noticed that on the back of the Hand Brake consul there is a bolt that goes through to inside of the rear three compartments space, below the "glove box" or tic tac case, as I like to call it. Mine was previously removed. It seems possible to remove the shift consol w/o removing the brake consol, and I would recomend it, unless your a gluton for punishment.
Switch:
Pulled the gauge bezel and pulled the old radio (free the radio from the bezel so you can remove the bezel at first). Be very carefull here if you have a 60s or early to mid 70s Car, as the OIL PRESSURE GUAGE USES A THIN PLASTIC FLEXABLE OIL TUBE FROM THE ENGINE. DO NOT BREAK OR KINK IT!!!
Ran the speaker wire and then used my handy red handle stripper/crimp tool the crimp the red butt splices to the speaker wires and the connector of the Pioneer head unit, and then ran a 14 gauge wire to the "Batt" terminal on the fuse box for the constant power it requires, butt spliced that in along with the ground (requires a Blue, larger butt splice) and the yellow for detection on: aka ACC. Done with the head unit:
Decided to reuse and not save the kick panels, they are widely available in correct color and my vette isn't an L88.
Measured the maximum height of the body mount hole and tranfered it to the kick panel with a sharpie. Cut the holes with a Dremmel tool disk below this line and centered, one small cut at a time and then smoothed the hole out with a sheet rock knife, Test fit the speakers, and THEN drilled the holes:
Installed the Speakers,, you have to install the kick panels first, then put the speakers in.
All that needs to be done is plug in the Head Unit and mount the kick panels. I also ran the rear speaker wires, Now, while the Concol is appart and will run a line level stub and bring out the blue controll wire, while it's appart. This Is Fun!
Waiting on the Bezel with my Dremel tool, but it's plug and play, Now.
Last edited by RunningMan373; Jul 21, 2007 at 03:51 AM.

Race Director


Joined: Apr 2007
Posts: 14,062
Likes: 602
From: Henderson Nv-Rohnert Park/Sonoma C o. ca/born in NY Rockaway Beach.
I just purchased a new bezel on ebay for 70.00. I have a 77 so like you im gonna cut my kicks and try to put a set of 6 x 9 in the rear for now. I think im going with the Alpine head unit. It controls the ipod and then in time ill get a sub and amp...... Good luck with your set up... More pics We love lics

Instructor


Joined: May 2004
Posts: 167
Likes: 4
From: Glenmont NY
Would it look awful to match the color and paint the new speaker screan to match the kick panels or is it better to just go with the factory finish of the black speakers? Just curious for others' opinions.
Drifting

Joined: Jul 2005
Posts: 1,891
Likes: 2
From: Baltimore MD
Looks like what you showed for a radio is the modern "1 DIN" height radio; the bezel on the other hand was a reproduction stock bezel which would require a dremel tool to cut out where the posts and ***** went in. Guess you didn't realize that for around the same $115.00 you could have gotten a reproduction bezel with the "1 DIN" opening already cut out. I bought all the parts a year ago and finally installed the radio plus sound bridge. The bridge costs around $199.00 so my install was a little more expensive if you include new front speakers, bezel and Kenwood radio. I'll post some pics once I move them off my home system onto Photobucket.
Just check on Photobucket, Imove a pic of the sound bridge already - here is what it looks like installed:
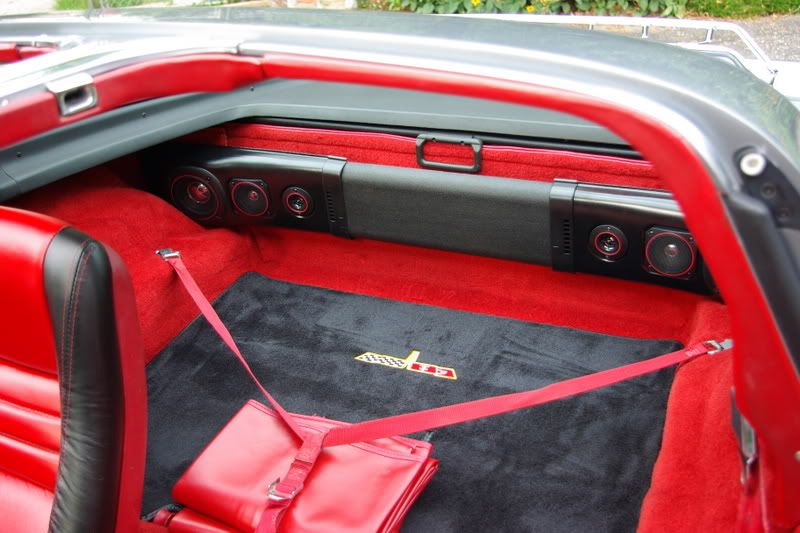
I went with the Bridge because I did not have the back speaker grills, in retrospect I guess I should have looked harder for them at the time. This Bridge rides high enough on the back panel to still allow room for my T-Tops.
Just check on Photobucket, Imove a pic of the sound bridge already - here is what it looks like installed:
I went with the Bridge because I did not have the back speaker grills, in retrospect I guess I should have looked harder for them at the time. This Bridge rides high enough on the back panel to still allow room for my T-Tops.

Team Owner


Joined: Oct 2004
Posts: 23,831
Likes: 10
From: Springfield MO
St. Jude Donor '07
Looks like what you showed for a radio is the modern "1 DIN" height radio; the bezel on the other hand was a reproduction stock bezel which would require a dremel tool to cut out where the posts and ***** went in. Guess you didn't realize that for around the same $115.00 you could have gotten a reproduction bezel with the "1 DIN" opening already cut out.
Thread Starter
Melting Slicks
Joined: May 2007
Posts: 3,246
Likes: 4
From: Bay Area CA
Looks like what you showed for a radio is the modern "1 DIN" height radio; the bezel on the other hand was a reproduction stock bezel which would require a dremel tool to cut out where the posts and ***** went in. Guess you didn't realize that for around the same $115.00 you could have gotten a reproduction bezel with the "1 DIN" opening already cut out.
Yes, I did relize that, butr 115 is not 200. Check the title of the post as for why i didn't use a precut one. My dremel awaits.


Team Owner
Joined: Aug 2006
Posts: 24,125
Likes: 15
From: Columbia Missouri
I just purchased a new bezel on ebay for 70.00. I have a 77 so like you im gonna cut my kicks and try to put a set of 6 x 9 in the rear for now. I think im going with the Alpine head unit. It controls the ipod and then in time ill get a sub and amp...... Good luck with your set up... More pics We love lics
Just a suggestion. When planning the rear speakers I would suggest 6.5" round speakers instead of oval 6x9" speakers. Round always sound better and are easier to install.
Oh, and that repro bezel was about $40 more than it needed to be.
Corvette Stories
The Best of Corvette for Corvette Enthusiasts

Top 10 Most Explosive Corvettes Ever Made: Power-to-Weight Ratio Ranked!
Joe Kucinski
150 hp to 1,250 hp: Every Corvette Generation Compared by the Specs That Matter
Joe Kucinski
8 Coolest Corvette Pace Cars (and Replicas) of All Time
Verdad Gallardo
Top 10 Corvette Engines RANKED by Peak Torque (70+ Years of Muscle!)
Joe Kucinski
Corvette ZR1X Will Be Pacing the Indy 500, And Could Probably Race, Too!
Verdad Gallardo
Top 10 Corvettes Coming to Mecum Indy 2026!
Brett Foote
Top 10 C9 Corvette MUST-HAVES to Fix These C8 Generation Flaws!
Michael S. Palmer
10 Revolutionary 'Corvette Firsts' Most People Don't Know
Joe Kucinski
5 Reasons to Upgrade to an LS6-Powered Corvette; 5 Reasons to Stay LT2
Michael S. Palmer
Race Director
Joined: Aug 2004
Posts: 10,628
Likes: 132
From: Duvall, WA
I did this last year, with Polk speakers and Blaupunkt head unit, last year because my better half was complaining about the sound quality. It is nice to have the iPod input, but the install really made me realize I how much more I enjoy working on performance upgrades rather than audio.
Race Director
Joined: Apr 2007
Posts: 14,062
Likes: 602
From: Henderson Nv-Rohnert Park/Sonoma C o. ca/born in NY Rockaway Beach.
bezel
I have been looking for a while now and 55 was the cheapest i could find. total was 70 inc shipping..
Now on the rear speakers what is the best way to mount to 6 1/2 ?? any pics ??
Team Owner
Joined: Aug 2006
Posts: 24,125
Likes: 15
From: Columbia Missouri
Well that all depends. You can make some panels that close the gap between the rear bulkhead and the wheel wells and install the speakers in those. Or, you can make a box that houses both of them.
Thread Starter
Melting Slicks
Joined: May 2007
Posts: 3,246
Likes: 4
From: Bay Area CA
Not for the 68 - 76s, unless you have a source I don't know about, very likely, as I just did a quick E-bay and internet search. ? Tell me where I can get one for cheap, and I'll send this one back, once it shows up. C.
Team Owner
Joined: Aug 2006
Posts: 24,125
Likes: 15
From: Columbia Missouri
Oh for '77. For some reason I was thinking you had a '73. I guess it was you're name with the 373.

Le Mans Master


Joined: Oct 2004
Posts: 5,269
Likes: 54
From: Orlando Florida
St. Jude Donor '05
Le Mans Master
Joined: Oct 2004
Posts: 5,269
Likes: 54
From: Orlando Florida
St. Jude Donor '05
These speakers seem to have very small magnets, I found it almost impossible to install 6.5" speakers in the kickpanels - I installed my speakers in the doors instead and still had to use a 1" spacer ring. I did not want to use a spacer ring on the kickpanel because I have a 5spd and a clutch pedal .... probably no big deal if you have a auto trans and no clutch....
Team Owner
Joined: Aug 2006
Posts: 24,125
Likes: 15
From: Columbia Missouri
These speakers seem to have very small magnets, I found it almost impossible to install 6.5" speakers in the kickpanels - I installed my speakers in the doors instead and still had to use a 1" spacer ring. I did not want to use a spacer ring on the kickpanel because I have a 5spd and a clutch pedal .... probably no big deal if you have a auto trans and no clutch....
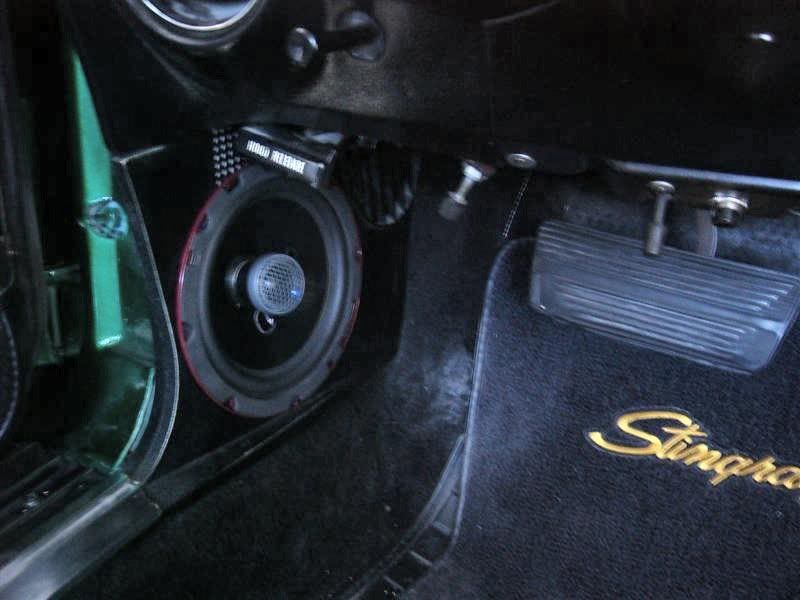
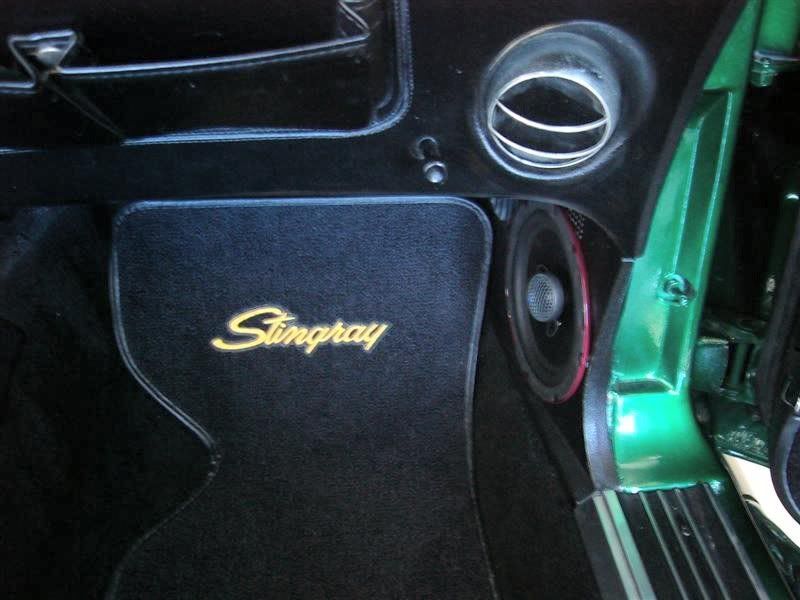
Here are some CDT 6.5" speakers in kick panels. They had a very large magnet.
Thread Starter
Melting Slicks
Joined: May 2007
Posts: 3,246
Likes: 4
From: Bay Area CA

DB, that install looks good. Did you cut the existing kick panels or use the pre-shaped ones on that install?
Last edited by RunningMan373; Jul 19, 2007 at 11:53 PM.
Thread Starter
Melting Slicks
Joined: May 2007
Posts: 3,246
Likes: 4
From: Bay Area CA
These speakers seem to have very small magnets, I found it almost impossible to install 6.5" speakers in the kickpanels - I installed my speakers in the doors instead and still had to use a 1" spacer ring. I did not want to use a spacer ring on the kickpanel because I have a 5spd and a clutch pedal .... probably no big deal if you have a auto trans and no clutch....
I had no problem,, just put them in today. There seemed to be plenty of space back there. Don't know what may have caused your clearance problem,, were they too wide in diameter? well, they're in your are in the doors now, anyhow. Probably a better place for them anyhow.
Last edited by RunningMan373; Jul 19, 2007 at 11:58 PM. Reason: misspellings and other sudry errors. lol.
Thread Starter
Melting Slicks
Joined: May 2007
Posts: 3,246
Likes: 4
From: Bay Area CA
One other thing to note, peoples,, I noticed that on the back of the Hand Brake consul there is a bolt that goes through to inside of the rear three compartments space, below the "glove box" or tic tac case, as I like to call it. Mine was previously removed. It seems possible to remove the shift consol w/o removing the brake consol, and I would recomend it, unless your a gluton for punishment. C. 