


Help on Gauge Bezel
Thread Starter
Instructor

Joined: Jul 2008
Posts: 144
Likes: 0
From: Camp Hill PA
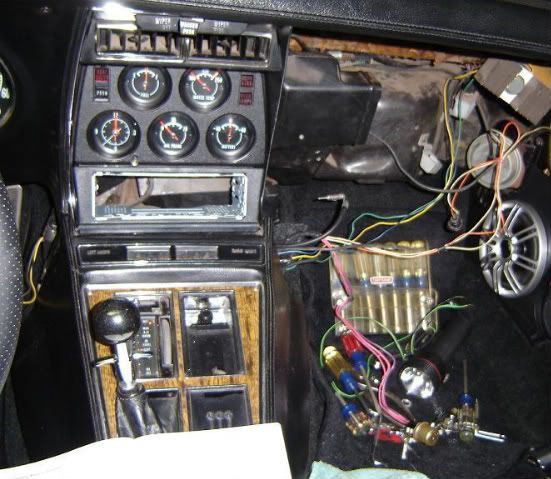
Hi guys, working on my radio upgrade. Got the old bezel out. Now I'm trying to get the gauges un-hooked. Here is a photo of where I am at:

1. The far red/orange wire is the fuel gauge - I can't seem to get the connector off. Trying not to pull too much harder but its tight.
2. There are 5 wires coming into black connections (not sure what they are called). I'll guess and say its the lights for the gauges? How do I disconnect those wires?
3. Oil pressure gauge - I just un-screw the nut at the back? I thought I read I needed to clamp the line. If so can I just pop a regular clamp on there (do I need to worry about damaging the line)?
4. Clock connector is fighting with me just like the fuel gauge.
I'll keep working at least on the fuel and clock gauges.
Thanks
Rick
Le Mans Master


Joined: Mar 2001
Posts: 6,640
Likes: 287
From: Ann Arbor Michigan
Most all connectors have a lock that stops it from coming apart. Look at the connector close and you should see some type of lock fingers. Don't just pull on the wires as you will break something.
Race Director

Joined: May 2006
Posts: 16,528
Likes: 53
From: Dayton, Ohio
Rick they all just pull off.I usually pry them off gently with a screwdrive but make sure your battery is disconnected.
On the gauge lights pull on the black plastic bulb holder(dont pull on the gray wire)
On the oil line just remove the nut and gently wiggle the line and it will pull out of the gauge.No need to clamp or block the line UNLESS you intend to start the motor.
On the clock connector you can remove the nut and then use a pair of pliers to pull the male blade out of the connector.
Thread Starter
Instructor
Joined: Jul 2008
Posts: 144
Likes: 0
From: Camp Hill PA
Rick they all just pull off.I usually pry them off gently with a screwdrive but make sure your battery is disconnected.
On the gauge lights pull on the black plastic bulb holder(dont pull on the gray wire)
On the oil line just remove the nut and gently wiggle the line and it will pull out of the gauge.No need to clamp or block the line UNLESS you intend to start the motor.
On the clock connector you can remove the nut and then use a pair of pliers to pull the male blade out of the connector.
On the gauge lights pull on the black plastic bulb holder(dont pull on the gray wire)
On the oil line just remove the nut and gently wiggle the line and it will pull out of the gauge.No need to clamp or block the line UNLESS you intend to start the motor.
On the clock connector you can remove the nut and then use a pair of pliers to pull the male blade out of the connector.
Team Owner


Joined: Jan 2006
Posts: 37,637
Likes: 3,118
From: Crossville TN
1. DO NOT clamp-off the oil supply line. If you plan on starting the engine before you reinstall the bezel/gauges, get a plug for the line fitting at Lowe's (it should match what the gauge threaded connector looks like). Clamping a plastic line will crack/break/damage it; clamping a copper line will seal it off...but then you can't un-seal it.
2. Before you do anything else, tag each wire, etc. that you are removing from the bezel and also a like tag where it is connected. There are at least 5 identical gray light wires/sockets and you need to know exactly where they go (the wires are NOT the same length).
3. The black bulb housing will just pop out of its hole with a little help from your fingernail or a small screwdriver. Then, I would recommend that you refurbish ALL of those bulb sockets. The metal 'ring' on the bulb-side will easily pull out of the socket (if it didn't already when you pulled the socket out) and will give you fits. Remove bulb, remove metal ring {it's pins are just pressed into the black plastic socket}, put a drop of 2-part epoxy glue on the slots where those pins go, push the ring back in place and let cure. NO MORE SOCKET PROBLEMS!
4. Look for any locking tabs on the other wiring connectors. You may need to gently pull those tabs away from the body of the connector to pull them off. If no tabs, they're just old and sticky.
5. I don't recall having any problem with the wiring on the clock???
Thread Starter
Instructor
Joined: Jul 2008
Posts: 144
Likes: 0
From: Camp Hill PA
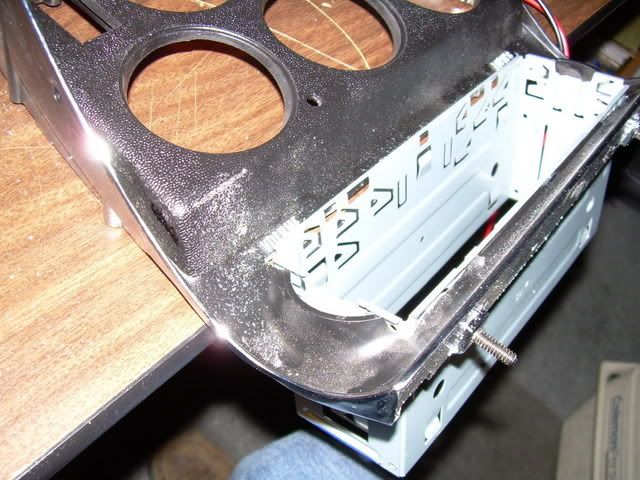
I finally got them all off and I did tag (and take pictures) of everything so I would know how to put it back together. I was going to clean up as much of the back as possible. What should I clean the contacts with (that the connector plugs go onto)? I am also sitting here in heavy debate on the clock. I should probably just replace it now with a quartz clock while I have it pulled apart. Didn't really want to spend another $140 on the project, but memories of getting that bezel out will haunt me if I don't! I'll decide tomorrow.
Thanks for the tip on the sockets. You're right, I pulled two tabs off and the bulbs disappeared into the dark abyss of the bezel. I guess it wouldn't be a bad idea to replace all the bulbs while I have it open?
Now I actually get to start putting it back together with the new stereo system.
Thanks for the tip on the sockets. You're right, I pulled two tabs off and the bulbs disappeared into the dark abyss of the bezel. I guess it wouldn't be a bad idea to replace all the bulbs while I have it open?
Now I actually get to start putting it back together with the new stereo system.
Melting Slicks

Joined: May 2007
Posts: 3,246
Likes: 4
From: Bay Area CA
Sorry to say it at the point your at, but there is no reason to unplug all the gauges. You just take our the small hex head screws holding the gauge back cluster to the front bezel, and leave it in place, in the car, support it if you need to with some type of wire, or just let it hang, it's light. when your done cutting the bezel, take it to the car, and screw it back together. Watch the dust particles, Q-tips are good for that.  .. ..
.. .. 
(don't bend tabs in until you have the plastic F/P in place, this is just a test fit.) C.
.. .. (don't bend tabs in until you have the plastic F/P in place, this is just a test fit.) C.
Last edited by RunningMan373; Aug 31, 2008 at 02:27 AM.
Corvette Stories
The Best of Corvette for Corvette Enthusiasts

Top 10 Most Expensive Corvettes Ever Sold on Bring A Trailer
Brett Foote
10 Things Every Corvette Owner Needs (2026 Edition)
Michael S. Palmer
8 Most "Only Corvette Owners Understand" Quirks and Problems
Pouria Savadkouei
10 Reasons the C6 Z06 is Still A Performance Benchmark After 20 Years
Joe Kucinski
How Much Horsepower Every Corvette Engine "LOST" in 1972
Joe Kucinski
Top 10 DOs and DON'Ts for Protecting Your Convertible Top!
Michael S. Palmer
Top 10 Most Explosive Corvettes Ever Made: Power-to-Weight Ratio Ranked!
Joe Kucinski
150 hp to 1,250 hp: Every Corvette Generation Compared by the Specs That Matter
Joe Kucinski
8 Coolest Corvette Pace Cars (and Replicas) of All Time
Verdad Gallardo
Thread Starter
Instructor
Joined: Jul 2008
Posts: 144
Likes: 0
From: Camp Hill PA
Not sure I could of gotten those hex screws out without disconnecting gauges. Some of the wires didn't offer much play. At any rate, I can get it cleaned up now.
Looking for recommendations to clean contacts and rust off of screws as well as previous questions.
Thanks for tips on tabs, although not sure which tabs they are. I haven't gotten that far yet. I decided to replace the bezel. No need to cut and I can save the old one (although it was broken at the thin metal locations) in case I go back to stock someday.
Melting Slicks
Joined: May 2007
Posts: 3,246
Likes: 4
From: Bay Area CA
Hit the contacts (tabs) that are corroded/rusty with some fine sand papper, and when you put them back together, slather them with some electrical grease, before you plug the connectors back in. Grease available in the 3M isle. Tabs would be the ones on the stereo sleeve that hold it into the bezel.
Team Owner
Joined: Jan 2006
Posts: 37,637
Likes: 3,118
From: Crossville TN
Use a #000 or #0000 steel wool to clean off the contacts; dielectric grease coating on them is OK [don't know if you really need it or not in the 'cockpit']. Definitely put in new bulbs and DON'T put in a cheap 'off-brand' of bulb....get a good brand name so they will last (money is not the issue on light bulbs). Clean the parts well and you might want to polish the plastic lens OR apply a coating of Nu-Vinyl or Meguiar's polymer plastic protectant coating (NOT oily Armor-all type product). Both polymer coatings dry completely and clear for long term clarity and can be re-done [when installed] whenever you like.
You can repair your clock with a direct repair movement from ZIP products, or you can replace it with a quartz movement. Quartz is the better long-term fix; new mechanism will repair it to work like factory model (that's what I did and glad I did).
You can repair your clock with a direct repair movement from ZIP products, or you can replace it with a quartz movement. Quartz is the better long-term fix; new mechanism will repair it to work like factory model (that's what I did and glad I did).
Thread Starter
Instructor
Joined: Jul 2008
Posts: 144
Likes: 0
From: Camp Hill PA
Use a #000 or #0000 steel wool to clean off the contacts; dielectric grease coating on them is OK [don't know if you really need it or not in the 'cockpit']. Definitely put in new bulbs and DON'T put in a cheap 'off-brand' of bulb....get a good brand name so they will last (money is not the issue on light bulbs). Clean the parts well and you might want to polish the plastic lens OR apply a coating of Nu-Vinyl or Meguiar's polymer plastic protectant coating (NOT oily Armor-all type product). Both polymer coatings dry completely and clear for long term clarity and can be re-done [when installed] whenever you like.
You can repair your clock with a direct repair movement from ZIP products, or you can replace it with a quartz movement. Quartz is the better long-term fix; new mechanism will repair it to work like factory model (that's what I did and glad I did).
You can repair your clock with a direct repair movement from ZIP products, or you can replace it with a quartz movement. Quartz is the better long-term fix; new mechanism will repair it to work like factory model (that's what I did and glad I did).


Race Director
Joined: May 2006
Posts: 16,528
Likes: 53
From: Dayton, Ohio
Buy them in a box of 10.Its lots cheaper.They will have to go in the back and get them.Those are for wholesale customers but they will sell them to you that way.
Thread Starter
Instructor
Joined: Jul 2008
Posts: 144
Likes: 0
From: Camp Hill PA
Sorry to say it at the point your at, but there is no reason to unplug all the gauges. You just take our the small hex head screws holding the gauge back cluster to the front bezel, and leave it in place, in the car, support it if you need to with some type of wire, or just let it hang, it's light. when your done cutting the bezel, take it to the car, and screw it back together. Watch the dust particles, Q-tips are good for that. .. ..
(don't bend tabs in until you have the plastic F/P in place, this is just a test fit.) C.
.. .. (don't bend tabs in until you have the plastic F/P in place, this is just a test fit.) C.
Rick