




Removing luggage Rack

Thread Starter
Heel & Toe

Joined: May 2008
Posts: 23
Likes: 0
From: New Berlin WI
 Removing luggage Rack
I have a 1969 corvette with a luggage rack, which I would like to remove.The problem is none of the body shops will touch this job. I been told that you can't do this job and guarantee that I won't shrink, and show. The paint is 4 years old. Is this correct????
Thank You Jim
Thank You Jim
Burning Brakes


Joined: Feb 2008
Posts: 993
Likes: 44
From: Jefferson Hills PA
Afriend had his removed when he had his car painted by a very good paint shop. His shows pretty badly. The main thing to keeping it from showing is to let the filler sit as long as possible before painting. You have to let all the solvents out. If it were me Id have the holes filled now in the winter and let it sit till spring before painting.

Former Vendor
Joined: Aug 2006
Posts: 76,656
Likes: 1,851
From: Jeffersonville Indiana 812-288-7103
St. Jude Donor '08-'09-'10-'11-'12-'13-'14-'15
Jim,
The hardest thing to hide in a Corvette is a hole. If you put a hole in the fiberglass and fill it. . . it will shrink over time.
Why? When you have a panel hole repaired, the filler material will not have the same expansion/contraction ratio as the original panel. (The same reason you see bonding strip lines on the quarter panels and fenders). Compounding this issue is the fact that the filler material will continue to harden and shrink long after the panel is filled.
While some repairs may take a year to show but over time, they will show!
I have talked with may people over the years that claimed they could do this, but no one has ever showed me a repaired hole that did not shrink. This is one of the main reasons when hanging a new panel on a car you do not want to drill holes and rivet it. We always clamped new panels when I had my body shop.
Now with this in mind, materials are always changing. We have had good luck in hiding the bonding strip seems with a combination of two different materials. However, this is not a hole just a skim coating which can be hide.
My advice is just as I did. I never cared for the racks, but I have a 72 with one on it. I put a new rack on the car and lived with it.
Willcox
The hardest thing to hide in a Corvette is a hole. If you put a hole in the fiberglass and fill it. . . it will shrink over time.
Why? When you have a panel hole repaired, the filler material will not have the same expansion/contraction ratio as the original panel. (The same reason you see bonding strip lines on the quarter panels and fenders). Compounding this issue is the fact that the filler material will continue to harden and shrink long after the panel is filled.
While some repairs may take a year to show but over time, they will show!
I have talked with may people over the years that claimed they could do this, but no one has ever showed me a repaired hole that did not shrink. This is one of the main reasons when hanging a new panel on a car you do not want to drill holes and rivet it. We always clamped new panels when I had my body shop.
Now with this in mind, materials are always changing. We have had good luck in hiding the bonding strip seems with a combination of two different materials. However, this is not a hole just a skim coating which can be hide.
My advice is just as I did. I never cared for the racks, but I have a 72 with one on it. I put a new rack on the car and lived with it.
Willcox

Burning Brakes


Joined: Oct 2006
Posts: 1,220
Likes: 299
From: Cleburne Texas
The way to fix it so it will not show is, if you can get to the back of the hole glue a piece of fiberglass to the back side of each hole. Then dish the hole with a grinder down to the the plate you glued in. Now with fiberglass mat layer up to the original height of the deck. Let dry and lightly grind and finish with plastic filler. It will always show if you use primer surfacer. The trick is to use gel coat instead! There is a trick to using gel coat also! If you want to know more you can email me! I did my vette this way and 5 years later no repair shows.
Last edited by 64Corvette; Oct 5, 2008 at 10:55 AM.

Team Owner


Joined: Sep 2006
Posts: 31,221
Likes: 4,312
From: Westminster Maryland
Hi Jim,
Here's a picture of the repair on my 71. Note how big the repaired area is compared to the hole and that no filler was used. It's all glass and resin. No matter how hard I look I can't see the repair.
Regards,
Alan
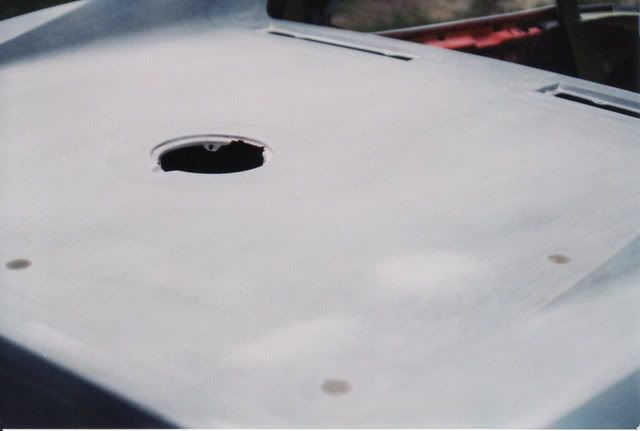
Here's a picture of the repair on my 71. Note how big the repaired area is compared to the hole and that no filler was used. It's all glass and resin. No matter how hard I look I can't see the repair.
Regards,
Alan
Corvette Stories
The Best of Corvette for Corvette Enthusiasts

Top 10 Most Explosive Corvettes Ever Made: Power-to-Weight Ratio Ranked!
Joe Kucinski
150 hp to 1,250 hp: Every Corvette Generation Compared by the Specs That Matter
Joe Kucinski
8 Coolest Corvette Pace Cars (and Replicas) of All Time
Verdad Gallardo
Top 10 Corvette Engines RANKED by Peak Torque (70+ Years of Muscle!)
Joe Kucinski
Corvette ZR1X Will Be Pacing the Indy 500, And Could Probably Race, Too!
Verdad Gallardo
Top 10 Corvettes Coming to Mecum Indy 2026!
Brett Foote
Top 10 C9 Corvette MUST-HAVES to Fix These C8 Generation Flaws!
Michael S. Palmer
10 Revolutionary 'Corvette Firsts' Most People Don't Know
Joe Kucinski
5 Reasons to Upgrade to an LS6-Powered Corvette; 5 Reasons to Stay LT2
Michael S. Palmer
Team Owner
Joined: Sep 2006
Posts: 31,221
Likes: 4,312
From: Westminster Maryland
I think the clue here is to have only one material... fiberglass... so you don't have materials expanding and contractig at different rates. At least that's what I was taught.
Regards,
Alan
Regards,
Alan

Safety Car


Joined: Nov 1999
Posts: 4,466
Likes: 0
From: Paducah KY
Cruise-In I Veteran
Cruise-In II Veteran
Cruise-In III Veteran
Cruise-In IV Veteran
St. Jude Donor '03
my .02
Dave

Melting Slicks


Joined: Jan 2003
Posts: 2,817
Likes: 21
From: Somerset, NJ
You are correct Alan. Start with fiberglass backing from the underneath side. When it cures, grind out the original hole down to the new backing layers and cut them into bevel up to the top surface about 3 times the diameter of the original hole. Cut mat material in stepped diameters ie. 1/2", 3/4", 1", etc to fill the concave area. The last layer should be above the original surface until rolled to remove air bubbles. Once sanded (to slightly below the original surface) cover the new and surrounding area with a skim coat of Vette Panel adhesive/filler. The filler while not exactly the same, has a very similar thermal expansion/contraction rate to the fiberglass.
my .02
Dave
my .02
Dave

