


Need to replace speedometer bulb in 72 Vette

Thread Starter
3rd Gear

Joined: Nov 2008
Posts: 3
Likes: 1
From: Seaford NY
If someone could help me, I would appreciate it. I need to replace the speedometer bulb in the left instrument cluster. What do I need to do to lower the steering column so I can pull the cluster forward to change the bulb?
Team Owner

Joined: Aug 2006
Posts: 24,125
Likes: 15
From: Columbia Missouri
You're in for a battle. That dash is the hardest to get out. I found it easier to remove the passenger side dash, reach though and undo everything, and remove the upper dash. This may not be your best option but I was able to remove the driver's side dash a lot easier with no upper dash installed. As I said, the upper dash is hard to get out and prone to cracking so that may not work best for you.
Le Mans Master


Joined: Jan 2007
Posts: 5,485
Likes: 7
From: Peekskill NY
I need to do the same thing, and in a past thread it was suggested to drop the steering col, vacuum switches etc..., then loosen the instrument panel so it could be lowered a bit to reach in and might as well replace all the bulbs while you can get in there.
Let us know how it goes.
Glenn
Let us know how it goes.
Glenn
Race Director

Joined: May 2006
Posts: 16,528
Likes: 53
From: Dayton, Ohio
I need to do the same thing, and in a past thread it was suggested to drop the steering col, vacuum switches etc..., then loosen the instrument panel so it could be lowered a bit to reach in and might as well replace all the bulbs while you can get in there.
Let us know how it goes.
Glenn
Let us know how it goes.
Glenn

If its a coupe its a little easier.I generally just loosen everything and lower the column.Take the tach cable loose from the dist.Remove the drivers seat,lay on my back with feet in the back well area and start cussing.Take 4-5 Advil and go to bed.
Thread Starter
3rd Gear
Joined: Nov 2008
Posts: 3
Likes: 1
From: Seaford NY
Thanks for all your replies. One more question, what's involved in lowering the steering column so I can pull the left instrument panel out a little and hopefully reach behind it to replace the bulb. I know there are 2large bolt underneath the steering column; I removed them but the column didn't lower very much. What else do I have to remove in order to lower it enough?
Racer
Joined: Nov 2008
Posts: 364
Likes: 0
From: Anaheim California
Several years ago I went through my 1971 coupe dash and refurbished everything and put in new lenses and all new bulbs of which none of the origionals were bad. Within a short time I had a tach bulb go out. Decided to live with it with all I went through. Incidently I hooked up the vaccum lines on the headlight switch per the Assembley Manuel and after getting it all back togather the lights would not function because the Manuel was wrong! I was able to trouble shoot the problem and switch hoses by loosening the upper screws on the tach/speedometer panel and changes the hoses thru the small opening. Ed
Corvette Stories
The Best of Corvette for Corvette Enthusiasts

Top 10 Most Expensive Corvettes Ever Sold on Bring A Trailer
Brett Foote
10 Things Every Corvette Owner Needs (2026 Edition)
Michael S. Palmer
8 Most "Only Corvette Owners Understand" Quirks and Problems
Pouria Savadkouei
10 Reasons the C6 Z06 is Still A Performance Benchmark After 20 Years
Joe Kucinski
How Much Horsepower Every Corvette Engine "LOST" in 1972
Joe Kucinski
Top 10 DOs and DON'Ts for Protecting Your Convertible Top!
Michael S. Palmer
Top 10 Most Explosive Corvettes Ever Made: Power-to-Weight Ratio Ranked!
Joe Kucinski
150 hp to 1,250 hp: Every Corvette Generation Compared by the Specs That Matter
Joe Kucinski
8 Coolest Corvette Pace Cars (and Replicas) of All Time
Verdad GallardoMelting Slicks


Joined: Aug 2002
Posts: 3,334
Likes: 4
From: Midland TX
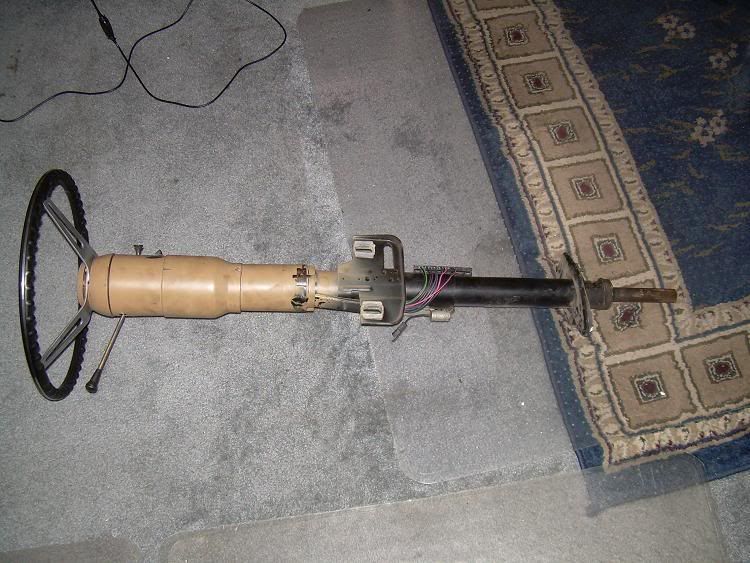
To lower the steering column the most you need to unbolt the rag joint on the steering box. You don't need to remove the 2 pieces, just unbolt the 2 bolts that hold them together so you can pull the steering column back and let it pivot down.
Next unbolt the bracket at the firewall. There are 2 nuts on the inside (1 on each side of the steering column). If you have a stand transmission, you want to unhook the gorilla spring that goes from the clutch linkage to the bracket first - it is under tension. You can remove the bracket on the engine side of the firewall. On standards there is an interlock cable that goes from the steering column to the trans. Not sure on autos.
Remove the lower steering column cover and override switches on the bottom of the steering column / dash. You can see two bolts that hold the steering column to the dash. You can then lower the steering column.
You might be able to lower the column enough by just loosening the firewall bracket and leaving the rag joints connected. But I could not get much clearance for the dash and to me you are putting the rag joint and fiberglass firewall in a bind. It takes a little longer to unhook the extra stuff but to me it's worth it.
There are 3 screws to the upper dash - 2 screws in the door frame - and 2 screw in the center bezel to remove. Then you can pull the dash out enough to reach behind the dash and feel for the bulbs. You may want to unhook the tach cable from the tach so you don't put it in a bind.
OR you might just want to drive during daylight hours so you don't need the dash lights.
Good luck.
Team Owner


Joined: Jan 2006
Posts: 37,637
Likes: 3,118
From: Crossville TN
You will also find that several of the bulb sockets will come apart when you change bulbs. The metal retaining ring will come loose from the plastic housing. The solution to this is to clean the two tangs on the retaining ring and mix up some 2-part epoxy. Put just a dab of epoxy on the plastic housing where the ring tangs are pressed in. Then re-seat the ring in the housing. You'll never have to worry about them coming loose again. [You might as well do all of them while you have it apart.]


Senior Member


Joined: Jan 2008
Posts: 12,146
Likes: 2,038
From: Easton, PA
St. Jude Donor '10
It wasn't as hard as they suggest here. I just took out a couple of parts and it was easy.

Of course getting the parts back together was a real PITA.
Seriously, go easy on the lower left dash pad, I broke mine and had to replace it. Talk about a set back, that cost me two months on my interior rebuild schedule.
Good luck.
David
Of course getting the parts back together was a real PITA.
Seriously, go easy on the lower left dash pad, I broke mine and had to replace it. Talk about a set back, that cost me two months on my interior rebuild schedule.
Good luck.
David
Le Mans Master


Joined: May 2006
Posts: 5,814
Likes: 414
From: Pittsburgh suburbs Pa.
You will also find that several of the bulb sockets will come apart when you change bulbs. The metal retaining ring will come loose from the plastic housing. The solution to this is to clean the two tangs on the retaining ring and mix up some 2-part epoxy. Put just a dab of epoxy on the plastic housing where the ring tangs are pressed in. Then re-seat the ring in the housing. You'll never have to worry about them coming loose again. [You might as well do all of them while you have it apart.]
Burning Brakes

Joined: Oct 2006
Posts: 1,044
Likes: 0
From: Henrico VA
Guys,
You're making this more work than you have to. You can get to the clusters without dropping the column. Take the two screws out of the left side, the three out of the top, and the three that go to the middle gauge cluster, and if you have a tilt steering wheel, lower it (but you don't have to). Now you can sick your hand through the top. You just have to be careful not to knock the bulbs into the speedo when you disconnect the plastic retainers. I use a flathead screwdriver to pry the metal clip out (be careful not to pry it on the weak parts that stick out when you stick the screwdriver under the inner part of the clip) and I do recommend using superglue when you are done. This has to be the worst lighting design I've ever seen in my life!
-69
Melting Slicks
Joined: May 2007
Posts: 3,246
Likes: 4
From: Bay Area CA
You can be done in an hour and a half. Dropping the steering column is easy, once you've done i once.
Separate rag joint in center by the two longitudinal bolts
Remove lock out cable from column in engine bay
remove column to fire wall plate by bolts inside pass compartment behind pedals
remove two large hold up bolts under dash--Don't let the column fall on you! --- Done
Now you can drop the instrument cluster and pull it out as far as it goes and access the bulbs. change all of them,, watch out for your vac lines on your head light switch,,, button it back up,, paying attention to column alignment--
loosely connect rag joint bolts, loosely put column hold up bolts under dash back in, tighten up rag bolts, tighten up hold up bolts (15ft/lbs only), tighten up fire wall plat bolts.
Done. not really bad at all, just kinda weird for a instrument lamp..
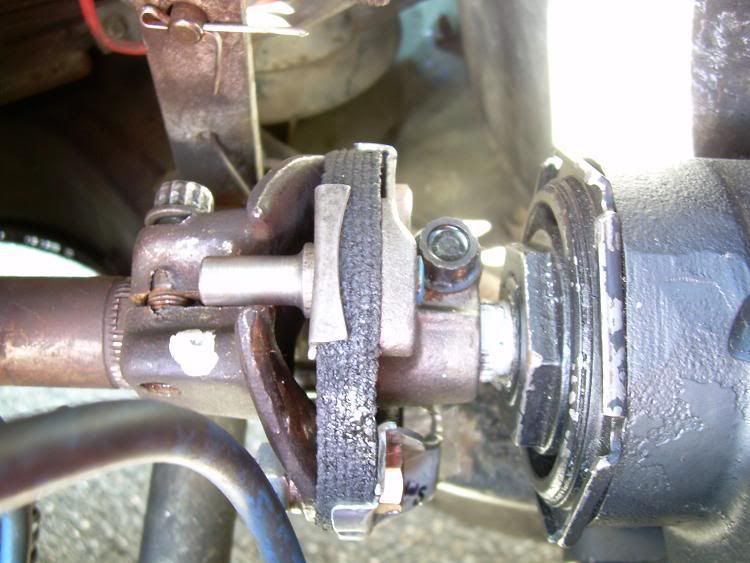
Last edited by RunningMan373; Nov 19, 2008 at 05:26 PM.

Safety Car


Joined: Apr 2000
Posts: 3,802
Likes: 61
From: Wichita KS
Having taken my dash apart a couple of times, I'm thinking taking the top dash pad off is the best way to do this. Let it sit out in the sun to soften up because you will need to bend it in the middle to get it out.
It's a half day job if you dismantle the dash pads and steering column then put it back together.
cc
It's a half day job if you dismantle the dash pads and steering column then put it back together.
cc