




Installing New Rearend Components. Need Help!

Thread Starter
Intermediate

Joined: May 2007
Posts: 43
Likes: 0
From: Woodbridge Virginia
 Installing New Rearend Components. Need Help!
Good morning all. My father and I are about to start installing all the new components for the rear suspension of our '70 Vette. A quick overview of our story is that we purchased this car about 2 years ago. Started tearing it all down and rebuilding it. We rebuilt/replaced all the frontend components, then pulled the motor/trans. And then have an idea to just pull the body off. So we did and then began refurbashing the frame, come to find out that the rear section of the frame was no good. We had a new frame thanks to some very helpful gentlemen on this site and we transfered all the frontend components from the old frame to the new. We are not ready to reinstall the diff and all the rear suspension components. However, the removal of all these parts was roughly a year ago. Our memories on how it all goes back is not something I'd like to rely on. We do have several manuals and the build books. However, they don't tell you how to put it all back together and in what order, when you have NOTHING on the frame. So I was hoping someone might have a link or a tutorial somewhere that would help us out with the order of reinstallation. I'd hate to get started and about half way through realize that something wasn't installed in the proper sequence and now we have to take it all apart again.
Any help would be greatly appreciated!
Any help would be greatly appreciated!

Former Vendor
Joined: Aug 2006
Posts: 76,656
Likes: 1,851
From: Jeffersonville Indiana 812-288-7103
St. Jude Donor '08-'09-'10-'11-'12-'13-'14-'15
Patrick,
Do you have an assembly manual? If not I would suggest getting one.
You can start by hanging the trailing arms on the car or the rear end assembly (less the half shafts).
For me it seems to be easier to install the rear end cross member with the rear end attached to it. It makes it easier to get to the top four bolts that hold the rear end to this cross member. This assembly is held in place with the two end bolts and then the front snubber cushion.
Once you have this in you can then hang the rear spring, and the half shafts. If you did not mount the trailing arms in the front you can then do this and then attach the rear spring to the trailing arms.
I'll be online off and on today, so if you have questions post again.. I'm sure there may be others that will do this in a different manner. Maybe someone will post behind me and if you need some assembly pictures post again too.
Willcox Inc.
Do you have an assembly manual? If not I would suggest getting one.
You can start by hanging the trailing arms on the car or the rear end assembly (less the half shafts).
For me it seems to be easier to install the rear end cross member with the rear end attached to it. It makes it easier to get to the top four bolts that hold the rear end to this cross member. This assembly is held in place with the two end bolts and then the front snubber cushion.
Once you have this in you can then hang the rear spring, and the half shafts. If you did not mount the trailing arms in the front you can then do this and then attach the rear spring to the trailing arms.
I'll be online off and on today, so if you have questions post again.. I'm sure there may be others that will do this in a different manner. Maybe someone will post behind me and if you need some assembly pictures post again too.
Willcox Inc.

Team Owner


Joined: Sep 2006
Posts: 31,229
Likes: 4,321
From: Westminster Maryland
Hi Patrick,
Besides the AIM that Willcox mentioned I'll ask if you have the GM CHASSIS SERVICE MANUAL for your 70. The sections #4, Rear Suspension and Driveline, and #5, Brakes, have lots of assembly sequence information and pictures.
I'm hoping you bagged and tagged the fasteners when you took it all apart. That'll be a BIG help.
I'd love to see some pictures of your project!
Regards,
Alan
Here's a few pictures of what it looks like back together.
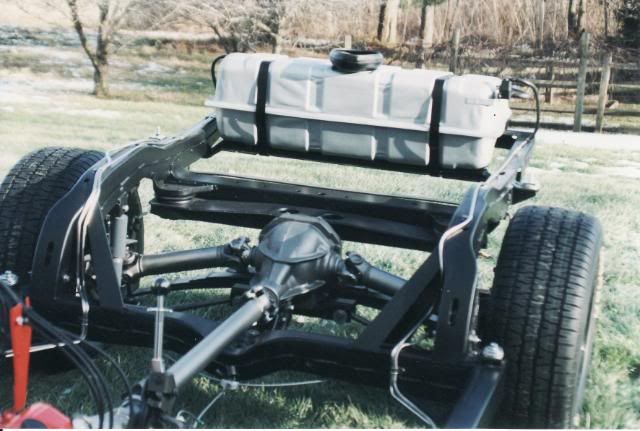
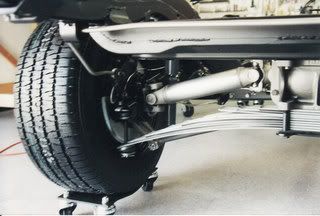
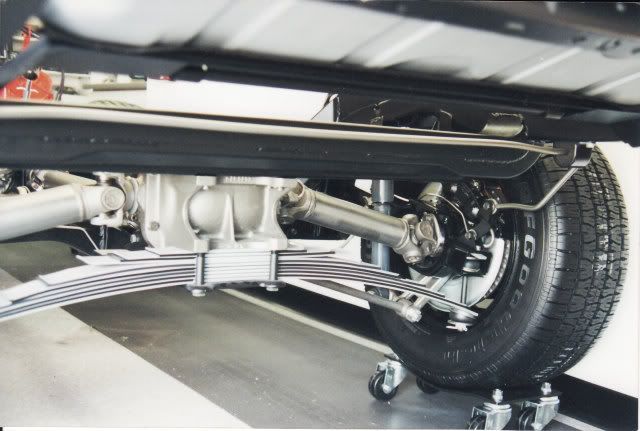
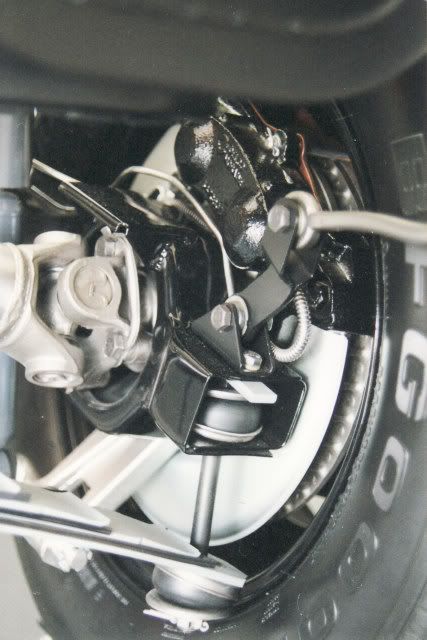
Besides the AIM that Willcox mentioned I'll ask if you have the GM CHASSIS SERVICE MANUAL for your 70. The sections #4, Rear Suspension and Driveline, and #5, Brakes, have lots of assembly sequence information and pictures.
I'm hoping you bagged and tagged the fasteners when you took it all apart. That'll be a BIG help.
I'd love to see some pictures of your project!
Regards,
Alan
Here's a few pictures of what it looks like back together.
Last edited by Alan 71; Nov 22, 2009 at 12:57 PM.

Drifting


Joined: Jul 2007
Posts: 1,889
Likes: 23
From: Kansas
Yes Sir: Van Steel Suspension Video 1-800-418-5397 www.vansteel.com This video will show you every step of the way, worth it's weight in gold. Wilcox sells them I'm sure. Have a great day. Gene
Thread Starter
Intermediate
Joined: May 2007
Posts: 43
Likes: 0
From: Woodbridge Virginia
As an update to my original post, I wanted to let you all know where we are at now, what we got done, and ask another question.
We worked for a few hours on the car today and got all the rear end components mounted up and finished up by putting the wheels on to finally have a rolling chassis. We still have the brake and fuel hard lines to run, but we got the main components on.
Which leads me to my question: Does anyone have a technique I can use to get the ends of the leaf spring connected to the control arms? Because there is really no weight to the frame at this point I can't jack up the end of the spring without eventually lifted the whole frame itself up. Thats the only component we couldn't complete the install on.
We put the rear wheels on and dropped it down on the ground and even had two people sitting on the frame, which helped, but still didn't get it close enough to mount up the remaining rubber, washer, and nut.
Any suggestions?
We worked for a few hours on the car today and got all the rear end components mounted up and finished up by putting the wheels on to finally have a rolling chassis. We still have the brake and fuel hard lines to run, but we got the main components on.
Which leads me to my question: Does anyone have a technique I can use to get the ends of the leaf spring connected to the control arms? Because there is really no weight to the frame at this point I can't jack up the end of the spring without eventually lifted the whole frame itself up. Thats the only component we couldn't complete the install on.
We put the rear wheels on and dropped it down on the ground and even had two people sitting on the frame, which helped, but still didn't get it close enough to mount up the remaining rubber, washer, and nut.
Any suggestions?

Racer


Joined: Apr 2009
Posts: 330
Likes: 44
From: Cincinnati Ohio
You can use a long 2x3 or similar bar and put one end on the lower end of the rear shock mount and use it as a fulcrum to push up against the spring to allow you to get the spring bolt and nut threaded together. It is much easier if you have two people, but it has been done with one and using something like a jack stand to support the other end of the bar while you install the bolt and nut. Be careful as all this is under load.
Bob
Bob

Racer

Joined: Nov 2005
Posts: 409
Likes: 5
From: Orange County CA
I added some weight on top of the very back of the car such as the spare tire, some cases of bottled water, etc. and jacked up the very end of the spring with the floor jack. Once it was up where I wanted it , I put a chain around the upper crossmember and the spring and put a bolt to hold it. I then removed the jack and installed the bushing and washer.
Make sure you get the bolt started in the hole in the spring before you jack it up or you will not be able to get it in the spring as the spring will be offset from the traling arm a little bit.
You may need to put the jack back under it and jack up the spring with all of the body weight on it and pull down a little to get the nut started.
If you put the jack on the chain when you jack up the spring, the chain prevents the jack from slipping.
I tried the c clamp and block of wood further back on the spring as per the factory shop manual and had the smae problem you are having. There is a huge difference when you jack up the very end of the spring.
Make sure you get the bolt started in the hole in the spring before you jack it up or you will not be able to get it in the spring as the spring will be offset from the traling arm a little bit.
You may need to put the jack back under it and jack up the spring with all of the body weight on it and pull down a little to get the nut started.
If you put the jack on the chain when you jack up the spring, the chain prevents the jack from slipping.
I tried the c clamp and block of wood further back on the spring as per the factory shop manual and had the smae problem you are having. There is a huge difference when you jack up the very end of the spring.
Corvette Stories
The Best of Corvette for Corvette Enthusiasts

Top 10 Most Explosive Corvettes Ever Made: Power-to-Weight Ratio Ranked!
Joe Kucinski
150 hp to 1,250 hp: Every Corvette Generation Compared by the Specs That Matter
Joe Kucinski
8 Coolest Corvette Pace Cars (and Replicas) of All Time
Verdad Gallardo
Top 10 Corvette Engines RANKED by Peak Torque (70+ Years of Muscle!)
Joe Kucinski
Corvette ZR1X Will Be Pacing the Indy 500, And Could Probably Race, Too!
Verdad Gallardo
Top 10 Corvettes Coming to Mecum Indy 2026!
Brett Foote
Top 10 C9 Corvette MUST-HAVES to Fix These C8 Generation Flaws!
Michael S. Palmer
10 Revolutionary 'Corvette Firsts' Most People Don't Know
Joe Kucinski
5 Reasons to Upgrade to an LS6-Powered Corvette; 5 Reasons to Stay LT2
Michael S. Palmer
Team Owner
Joined: Sep 2006
Posts: 31,229
Likes: 4,321
From: Westminster Maryland
Hi Patrick,
Here's few pictures that shows a method similar to Todd's
I used a block of wood and a large c-clamp to stop the jack from sliding toward the center of the spring as I jacked the spring up. It takes quite a bit of weight. I used some packs of roof shingles and boxes of Corvette magazines for weight.
Good Luck!
Regards,
Alan

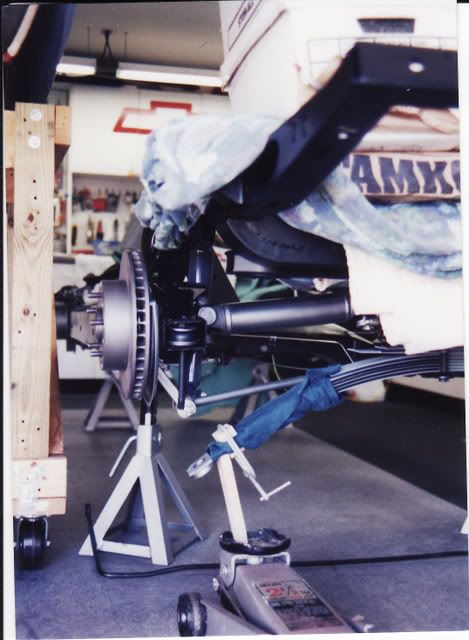
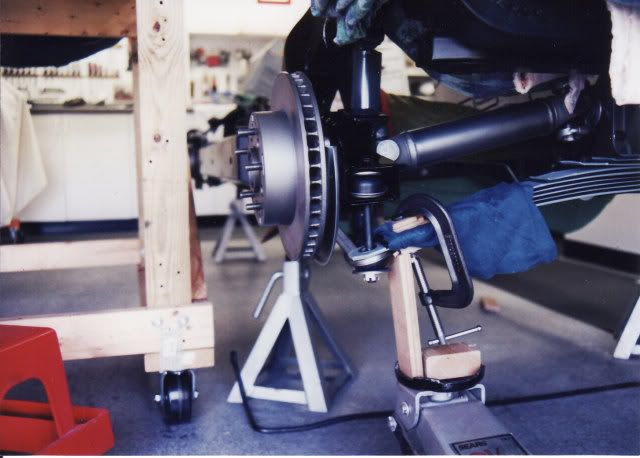
Here's few pictures that shows a method similar to Todd's
I used a block of wood and a large c-clamp to stop the jack from sliding toward the center of the spring as I jacked the spring up. It takes quite a bit of weight. I used some packs of roof shingles and boxes of Corvette magazines for weight.
Good Luck!
Regards,
Alan
Former Vendor
Joined: Aug 2006
Posts: 76,656
Likes: 1,851
From: Jeffersonville Indiana 812-288-7103
St. Jude Donor '08-'09-'10-'11-'12-'13-'14-'15
The easiest way I've found is ratchet strap used on a trailer to secure a load. (or a car)
Wrap it around the end of the spring and the cross member and draw it up. Works like a champ and the strap won't slip.
Willcox
Wrap it around the end of the spring and the cross member and draw it up. Works like a champ and the strap won't slip.
Willcox

Burning Brakes


Joined: Aug 2004
Posts: 802
Likes: 1
Steve L
73 coupe since new