


Maxjax Install
Le Mans Master


Joined: Sep 2002
Posts: 5,236
Likes: 898
From: Myrtle Beach SC
Noonie
Heard from MaxJax re the recommendation for the epoxy dropped anchors. The recommended anchor is the Wej-it Epoxy Set Anchor # PS2-58 used in conjunction with Wej-it Epoxy ECA8...a Inject-TITE� Fast-Set Epoxy. Still waiting on pricing. do you still recommend the original anchors for my application?
Heard from MaxJax re the recommendation for the epoxy dropped anchors. The recommended anchor is the Wej-it Epoxy Set Anchor # PS2-58 used in conjunction with Wej-it Epoxy ECA8...a Inject-TITE� Fast-Set Epoxy. Still waiting on pricing. do you still recommend the original anchors for my application?
Race Director


Joined: Mar 2006
Posts: 14,112
Likes: 28
From: Florida
Looks great so far

Noonie
Heard from MaxJax re the recommendation for the epoxy dropped anchors. The recommended anchor is the Wej-it Epoxy Set Anchor # PS2-58 used in conjunction with Wej-it Epoxy ECA8...a Inject-TITE� Fast-Set Epoxy. Still waiting on pricing. do you still recommend the original anchors for my application?
Heard from MaxJax re the recommendation for the epoxy dropped anchors. The recommended anchor is the Wej-it Epoxy Set Anchor # PS2-58 used in conjunction with Wej-it Epoxy ECA8...a Inject-TITE� Fast-Set Epoxy. Still waiting on pricing. do you still recommend the original anchors for my application?
Here are some specs page 29 �31.
http://www.ankr-tite.com/images/prod...alog_Proof.pdf
Here is a crude, exaggerated pic and description of what I would try with your existing slab.
Referring to post earlier #13
The blue area is the lack of concrete thickness and/or the conical shape blown out by hammer drilling.
The blue is also the area filled with liquid epoxy.
The brown is the packed base under the slab.
The red is the outline of the original wedge anchors supplied.
The green are the loads in tension applied by the wedge.
I would
-clean the concrete dust from drilling.
-rinse with lacquer thinner
-pour so liquid epoxy to solidify the base material and let set (few hours)
-go back and pour the blue cavity up to the part of the drilled hole that is a consistant hole (so the blowout or cavity is filled when cured) The epoxy is good for at least 12,000psi compression.
-After complete curing, drill rgw epoxy with a metal drill bit (same size as the od of the anchor (7/8�?)
-mix more liquid epoxy or use paste epoxy to set the anchor as per original anchor instructions with the top collar 1/2� below the surface.
-You can test one for strength after curing by using a spacer larger than the hole drilled and tightening the bolt with a torque wrench to around 100 ft/lbs and then seeing if the anchor slipped by feel and/or by observing if the collar raised in the hole.
You could only do one hole if you just wanted to test the method.
Check with local boat people for best local prices on the liquid epoxy comparable to West Systems. If not you can mail order it from a place like this.

Le Mans Master
Joined: Sep 2002
Posts: 5,236
Likes: 898
From: Myrtle Beach SC
Le Mans Master
Joined: Sep 2002
Posts: 5,236
Likes: 898
From: Myrtle Beach SC
Noonie, I've been pouring thru the tech specs on the epoxy and hydraulic cement and think I prefer the hydraulic cement to work with to build up the initial area. But can't seem to to locate a place to buy other than online. I've read the Quik Rok tech sheet and it seems easier to work with than mixing epoxy and hardeners in the right quantities. But quite impressive stuff.
Race Director
Joined: Mar 2006
Posts: 14,112
Likes: 28
From: Florida
I just googled your area, call these guys and ask them about the hydraulic cement or setting grout (used for setting railings on high rise balconies).
They should carry it or know someone local that does.
Definitely cheaper than the epoxy.
Concrete Supply Co, Dispatch
Myrtle Beach, SC 29572
Phone: (843) 839-3400
Concrete Supply-South Carolina
(843) 839-9920
4714 Oleander Dr, #A, Myrtle Beach, SC 29577
Ready Mix Concrete
2511 Big Block Rd
Myrtle Beach, SC 29588
843-650-2900
You can also try swimming pool builders, they regularily use hydraulic cement to patch pools.
Grainger carries it, if near you.
This is a poor picture, but the epoxy I use accepts pumps in both jugs and you just count the number of pumps for each part ratio and end up with a perfect mix every time. Pumps are only a couple bucks a piece.
Le Mans Master
Joined: Sep 2002
Posts: 5,236
Likes: 898
From: Myrtle Beach SC
I stopped by Home Depot and they have Sakrete's version in the bucket, premixed.
Le Mans Master
Joined: Sep 2002
Posts: 5,236
Likes: 898
From: Myrtle Beach SC
I'm finding that the setup time varies on these products. Sakrete has a 2-3 minute setup while Quick Rok has 10-15 minutes. What's best to shoot for with this stuff
Corvette Stories
The Best of Corvette for Corvette Enthusiasts

Top 10 Most Expensive Corvettes Ever Sold on Bring A Trailer
Brett Foote
10 Things Every Corvette Owner Needs (2026 Edition)
Michael S. Palmer
8 Most "Only Corvette Owners Understand" Quirks and Problems
Pouria Savadkouei
10 Reasons the C6 Z06 is Still A Performance Benchmark After 20 Years
Joe Kucinski
How Much Horsepower Every Corvette Engine "LOST" in 1972
Joe Kucinski
Top 10 DOs and DON'Ts for Protecting Your Convertible Top!
Michael S. Palmer
Top 10 Most Explosive Corvettes Ever Made: Power-to-Weight Ratio Ranked!
Joe Kucinski
150 hp to 1,250 hp: Every Corvette Generation Compared by the Specs That Matter
Joe Kucinski
8 Coolest Corvette Pace Cars (and Replicas) of All Time
Verdad GallardoRace Director
Joined: Mar 2006
Posts: 14,112
Likes: 28
From: Florida
The setup time varies with the amount of water mixed, but it was anywhere from a couple minutes to ten minutes.
Most I've used are pretty much the same.
The biggest problem you will have is for the mix to stay fluid enough to go thru the hole and flow throughout the underneath void. It's very important that the concrete hole is wet, not flooded, as well as the dirt underneath.
I would mix a test batch even if only a few tablespoon size and put it on a damp piece of concrete and see how it sets up, just to get a feel for it.
When ready, have a wooden dowel ready to clear the hole and tamp or vibrate with and as a last resort you can quickly add a minute amount of water in the hole and retemper the mix to assure completely filling the void. A cooler temperature of around 50 to 60� helps too.
Le Mans Master
Joined: Sep 2002
Posts: 5,236
Likes: 898
From: Myrtle Beach SC
Le Mans Master
Joined: Sep 2002
Posts: 5,236
Likes: 898
From: Myrtle Beach SC
The biggest problem you will have is for the mix to stay fluid enough to go thru the hole and flow throughout the underneath void. It's very important that the concrete hole is wet, not flooded, as well as the dirt underneath.
I would mix a test batch even if only a few tablespoon size and put it on a damp piece of concrete and see how it sets up, just to get a feel for it.
When ready, have a wooden dowel ready to clear the hole and tamp or vibrate with and as a last resort you can quickly add a minute amount of water in the hole and retemper the mix to assure completely filling the void. A cooler temperature of around 50 to 60� helps too.
Had to sacriface an anchor since couldn't get it out and it would not set without rising too high. Just buried it into the substrate. I did better with the first hole as the expoxy was much more fluid and flowed nicely. Left enough depth to go back after an hour and bring it up halfway into the hole with a second batch.
The other hole, got the mix probably closer to the instructions but it did not flow as well and had to resort to the "tamper" that I had handy. I would say the thickier consistency did not allow me to judge the quantity that had poured into the substrate. This hole only got one batch and partially filled the hole.
But ended it using Rockite which set nicely, I would say 30 minutes and it was set...not cured but set. On the hole where I did a second batch, when I tapped on its substrate surface, it sounded solid but a sort of hollow echo from underneath.
I'll let set and drill to the desired depth tomorrow and than set the anchor using the other epoxy I picked up. At that time I should be set to drill the balance of the base holes and move on with this project.
Race Director
Joined: Mar 2006
Posts: 14,112
Likes: 28
From: Florida
I'm a little unclear as to what you used and when.
If you are using the cement, then you should wait a week for it to cure better and let the concrete loose some moisture. The spreading of the anchor sleeve will break the new cement or at least crumble it anc of course the epoxy has no strength until cured either. That's probably the reason of the failure of the first anchor. You did the right thing to recover.
A heat lamp will help. You want it cold and wet to flow when installing but at least 70� or higher to cure and dry it out.
When installing the anchor into a fresh hole, have as few a threads as possible engaged, so the sleeve will pull up less. It's a common error on all types of anchors. You can always revert to a longer bolt later if you feel necessary.
Le Mans Master
Joined: Sep 2002
Posts: 5,236
Likes: 898
From: Myrtle Beach SC
Thus far have only used the Rockite.
Got it! Thought one day would do it but understand the wait period. So once cured (week out), than I'll used the Simpson expoxy anchoring adhesive to set and secure the anchor.
Installation instructions recommend 5/8" below surface. I recall from the sacrifaced anchor, it did not take much for the sleeve to spread and hold. I tried to remove from the top with a crow bar under a washer secured by the nut and it wouldn't budge upward...but it was tight! So when you state "have as few threads as possible engaged" how would you quantify few threads in terms of inch exposure below surface?
If you are using the cement, then you should wait a week for it to cure better and let the concrete loose some moisture. The spreading of the anchor sleeve will break the new cement or at least crumble it and, of course the epoxy has no strength until cured either.
When installing the anchor into a fresh hole, have as few a threads as possible engaged, so the sleeve will pull up less. It's a common error on all types of anchors. You can always revert to a longer bolt later if you feel necessary.
Race Director
Joined: Mar 2006
Posts: 14,112
Likes: 28
From: Florida
Installation instructions recommend 5/8" below surface. I recall from the sacrifaced anchor, it did not take much for the sleeve to spread and hold. I tried to remove from the top with a crow bar under a washer secured by the nut and it wouldn't budge upward...but it was tight! So when you state "have as few threads as possible engaged" how would you quantify few threads in terms of inch exposure below surface?
When torquing and expanding the sleeve, I would only go until it's just fairly snug (so the wedge has expanded, maybe 50 ft/lbs), then wait for the epoxy to cure and come back and torque it tight. I always grease the sleeve threads, just in case the epoxy leaks in.
It sounds like a straight forward installation, but a lot of little failures can occur and a lot of little tricks to prevent them.
Sounds like you have it under control.
I've seen a lot of people rush thru this, end up with loose anchors, unable to torque up and spend many, many hours trying to recoup.
Le Mans Master
Joined: Sep 2002
Posts: 5,236
Likes: 898
From: Myrtle Beach SC
Needless to say, I started over. I mixed a cup to the consistency of pancake batter and poured it slowly, while watching it spread underneath. I used the entire cup and came up into the hole about two inches.
Today, I used a hammer drill and only the drill mode drilling a good 4" inches down. I only had a 3/4 bit so had to use the makita 7/8 rotary hammer drill that does not have a drill only mode so just took it easy to clean it out to the 7/8 spec. Readied two holes and both turned out nice.
I went ahead with the EZ Simpson expoxy. Punched down the anchor, tightened it until snug and left it.
It sounds like a straight forward installation, but a lot of little failures can occur and a lot of little tricks to prevent them.
Sounds like you have it under control.
I've seen a lot of people rush thru this, end up with loose anchors, unable to torque up and spend many, many hours trying to recoup.
Sounds like you have it under control.
I've seen a lot of people rush thru this, end up with loose anchors, unable to torque up and spend many, many hours trying to recoup.
Last edited by hunt4cleanair; Mar 5, 2011 at 02:34 PM.
Race Director
Joined: Mar 2006
Posts: 14,112
Likes: 28
From: Florida
Glad I'm in no hurry with this stuff but I am. So, last week after drilling the expoxy out, I concluded two problems. One, the hammer drill pounded the expoxy into pieces. Second, the expoxy was too thick and did not flow properly to fill the conical void upward. So there was space between the under surface (if that's a word) and the low lying epoxy.
Needless to say, I started over. I mixed a cup to the consistency of pancake batter and poured it slowly, while watching it spread underneath. I used the entire cup and came up into the hole about two inches.
Today, I used a hammer drill and only the drill mode drilling a good 4" inches down. I only had a 3/4 bit so had to use the makita 7/8 rotary hammer drill that does not have a drill only mode so just took it easy to clean it out to the 7/8 spec. Readied two holes and both turned out nice.
I went ahead with the EZ Simpson expoxy. Punched down the anchor, tightened it until snug and left it.
I'm patient but I can see where some experience would make this a lot easier. But I had two nice 4" holes and the anchors are set. I'll test tomorrow.
It�s hard to give directions without pics etc and perhaps I didn�t do a very good job at detailing them.
If you refer back to Post 23 under the �I would� part, when I referred to liquid epoxy, it should flow into the hole easily. In fact that is why I suggested to do it twice, once to let it penetrate the base material to make it impermeable for the next filler epoxy application. The epoxy I use most has a viscosity similar to synthetic 90wt gear oil and my biggest concern was that it is too viscose and would just penetrate the base rather than filling the void. Once the base is set with the first application, then it should fill the void up into the hole with no problem.
I also use a bit of the same liquid to set the actual anchor, making sur the threads are greased.
Mine runs about 53 bucks/gal but is a little better than the West System epoxy.
Concrete drill bits are great for concrete, brick and stone but useless for anything else. Epoxy drills best with a regular metal bit. I�m fortunate in that almost all my concrete bits are 8 or12� long and have a HILTI hammer drill that can be used in regular mode with a splined chuck adapter for regular drill bits.
You should still be able to use the liquid epoxy method to recover from any damaged holes.
Good luck.
Le Mans Master
Joined: Sep 2002
Posts: 5,236
Likes: 898
From: Myrtle Beach SC
If you refer back to Post 23 under the “I would” part, when I referred to liquid epoxy, it should flow into the hole easily. In fact that is why I suggested to do it twice, once to let it penetrate the base material to make it impermeable for the next filler epoxy application.
The epoxy I use most has a viscosity similar to synthetic 90wt gear oil and my biggest concern was that it is too viscose and would just penetrate the base rather than filling the void. Once the base is set with the first application, then it should fill the void up into the hole with no problem.
I also use a bit of the same liquid to set the actual anchor, making sur the threads are greased.
Mine runs about 53 bucks/gal but is a little better than the West System epoxy.
Concrete drill bits are great for concrete, brick and stone but useless for anything else. Epoxy drills best with a regular metal bit. I’m fortunate in that almost all my concrete bits are 8 or12” long and have a HILTI hammer drill that can be used in regular mode with a splined chuck adapter for regular drill bits. You should still be able to use the liquid epoxy method to recover from any damaged holes.
Last edited by hunt4cleanair; Mar 7, 2011 at 04:20 AM.
Le Mans Master
Joined: Sep 2002
Posts: 5,236
Likes: 898
From: Myrtle Beach SC
Somehow my blog entry to this thread yesterday did not post so here's an update from yesterday.
Testing the anchors from the previous day, one held up nicely and I had it torxed down to 50/lb of torque. That was much tighter than I was able to get with the 1/2" ratchet and 7/8" socket. The other hole while snug, when the torque wrench was applied at 40 lb/in, I could feel the give from underneath. This test was with the column base plate in place so the anchor was stilling setting, or rising up into the column plate. I let it rest there.
I proceeded to drill out the other eight holes using the base plate as the template per instructions. The drill only mode was not very efficient but hammer/drill worked nicely. Had a few nice holes that measured nearly 4.25 but most seemed to come in at the 3.5-3.75 range.
I mixed up the epoxy but made it wetter than any previous batch and used it to set the substrate, leaving space between the underneath surface and the epoxy surface. It was race time and a good time to break for the day.

Thread Starter
Intermediate


Joined: Oct 2010
Posts: 28
Likes: 1
From: Hallsville TX
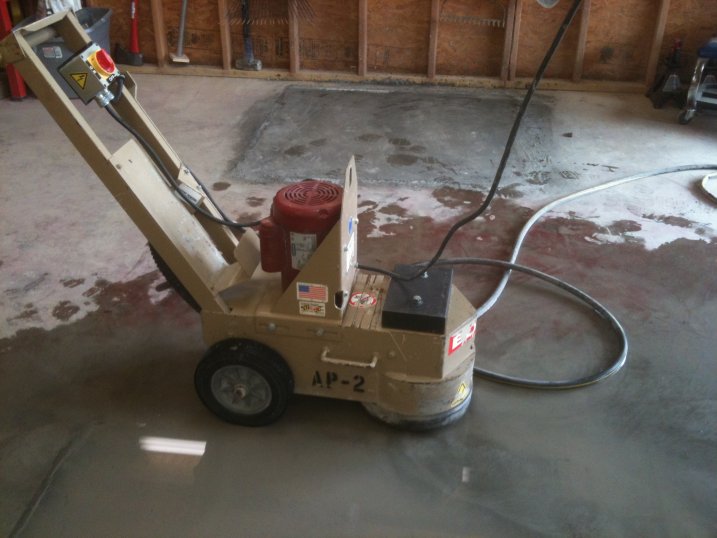
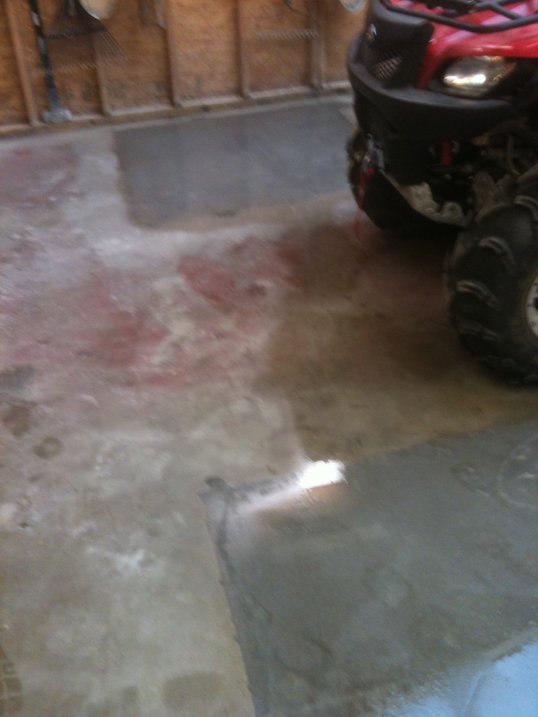
Thought I would finish up my thread about my Maxjax install.
After 30 days of curing time, I rented a concrete grinder to smooth the edges between the new and old concrete. Out of 10 holes drilled I hit rebar 8 times. Five times it was dead on and once I hit right were two pieces of rebar where criss-crossing. It took forever to drill the holes, even with a rebar cutter bit I purchased off Amazon. I also used a Hilti bit to get through some of the rebar. In total I spent about $150.00 on drill bits.
Initially when drilling I used the pilot hole method, but soon found that putting the 7/8 drill bit in the base of the Maxjax and drilling a bit was better than using the pilot bit. Then just move the Maxjax out of the way and finish the hole.
I placed my two Maxjax columns 125 inches apart, measured from the backside of each base plate.
I epoxied the anchors in place and everything seems to be holding.
I had to modify the pump stand which you can learn more about by searching the thread titled Maxjax pump.


Best of luck to you with your Maxjax install
After 30 days of curing time, I rented a concrete grinder to smooth the edges between the new and old concrete. Out of 10 holes drilled I hit rebar 8 times. Five times it was dead on and once I hit right were two pieces of rebar where criss-crossing. It took forever to drill the holes, even with a rebar cutter bit I purchased off Amazon. I also used a Hilti bit to get through some of the rebar. In total I spent about $150.00 on drill bits.
Initially when drilling I used the pilot hole method, but soon found that putting the 7/8 drill bit in the base of the Maxjax and drilling a bit was better than using the pilot bit. Then just move the Maxjax out of the way and finish the hole.
I placed my two Maxjax columns 125 inches apart, measured from the backside of each base plate.
I epoxied the anchors in place and everything seems to be holding.
I had to modify the pump stand which you can learn more about by searching the thread titled Maxjax pump.
Best of luck to you with your Maxjax install