


Maxjax Install

Thread Starter
Intermediate


Joined: Oct 2010
Posts: 28
Likes: 1
From: Hallsville TX
Hey Gang,
I have started my Maxjax install project. Today we cut two 4x4 sections of my shop slab with the centers of the 4x4 about 125" apart. I plan on digging down about 1 foot for the new cement. I based the dimensions off of hunt4cleanair's floor plan located in the following thread. http://forums.corvetteforum.com/c6-c...tion-tips.html His floor pan is very helpful.
I was thinking about digging out from under the existing concrete about 6 to 8 inches and running rebar up under the existing concrete about 1 foot. Should I place some wire mesh in the upper 4 inches of the new concrete?
Thanks for help.
Trent

Pro


Joined: Dec 2003
Posts: 676
Likes: 36
From: Usa
If the existing slab is at least 4" thick I would drill horizontaly into the existing slab on 12" to 18" centers 18" deep and insert 36" long pieces of rebar into the holes with epoxy. Then install a piece of rebar from with tie from one dowel to the dowel on the opposite side. This will tie the new foundation into the existing slab for added strength. I would also dig down a couple of feet as you mentioned and place another rebar mat midway with and connect both upper and lower rebar mats together with rebar. You can get the appropriate epoxy from Hilti or possibly Lowes or Home Depot. I think this would give you plenty of strength but I am not a civil engineer so those who are more knowledgeable my want to chime in.

Burning Brakes

Joined: Jun 2009
Posts: 840
Likes: 4
From: Syracuse IN
Looks like alot of extra work, I am just asking a question. If you are worried about support strength, why not just increase the base footprint of the jack? A 2' square piece of 1/2" plate steel located under the jack, bolt the plate to the jack utilizing studs and then bolt the plate down to the concrete? Now I do not have a 2 post lift, but I was just wondering. I measured the floor in my shop be drilling a test hole, 6" concrete, I just don't have enough to buy the lift yet. Al
Race Director


Joined: Mar 2006
Posts: 14,112
Likes: 28
From: Florida
Looks like you're planning on a proper installation.
With the thickness of your original floor there is no benefit of doweling into it, undercutting and placing the rebar as you suggested is more than sufficient. Wet and tamp any dirt you disturb.
Additionally, you should place more rebar or mesh above that lower layer. If using mesh, cut it bigger and just bend the sides to tie into the lower rebar. Literally the more steel the better. Bottom rods should be #5 bar and the rest can be #2 (pencil rod) as it's easy to bend yourself.
A top layer at 2" below the finished surface would be best.
Concrete is very, very weak in tension, and reinforcement above the locking sleeve of the anchors is a must and will increase the strength many fold.
By the same token placing the anchors deeper into the concrete and using longer bolts will substantially increase the tension load. I would set the anchors so the anchoring sleeve (bottom) is around 8" deep minimum. Other types, such as Jhook flush anchors set in place are ideal, but not needed since you already have supplied anchors.
Rinse the side of the existing concrete with a 50/50 mix of muriatic acid and then water rinse.
For little extra, you can also get 5000psi concrete, try and wait at least 7 days or 30 days is best before anchoring.
When finished you will be able to lift anything the hydraulics of the lift can handle.
I was thinking about digging out from under the existing concrete about 6 to 8 inches and running rebar up under the existing concrete about 1 foot. Should I place some wire mesh in the upper 4 inches of the new concrete?
Additionally, you should place more rebar or mesh above that lower layer. If using mesh, cut it bigger and just bend the sides to tie into the lower rebar. Literally the more steel the better. Bottom rods should be #5 bar and the rest can be #2 (pencil rod) as it's easy to bend yourself.
A top layer at 2" below the finished surface would be best.
Concrete is very, very weak in tension, and reinforcement above the locking sleeve of the anchors is a must and will increase the strength many fold.
By the same token placing the anchors deeper into the concrete and using longer bolts will substantially increase the tension load. I would set the anchors so the anchoring sleeve (bottom) is around 8" deep minimum. Other types, such as Jhook flush anchors set in place are ideal, but not needed since you already have supplied anchors.
Rinse the side of the existing concrete with a 50/50 mix of muriatic acid and then water rinse.
For little extra, you can also get 5000psi concrete, try and wait at least 7 days or 30 days is best before anchoring.
When finished you will be able to lift anything the hydraulics of the lift can handle.
Racer
Joined: Aug 2006
Posts: 287
Likes: 0
From: N. Alabama
Not trying to throw out safety but I had the same problem with my garage. When I first checked depth between slabs I had 4". I drilled my holes and only came up with 3" on most and 3.5" on a few. I told my buddy what I was planning to do by digging up and pouring new concrete. He told me his slab was only 3" and we have been working on car and HEAVY trucks (9000lbs) for close to 8 years under his 2 post lift. Never any sign of cracking or pulling through.
Given that the anchors supplied with the Maxjax only have a 2.75" working area, I decided to just try mine out . Haven't had time to get in the garage this week but I should this week or next. I plan to raise some vehicle enough to put pressure on the anchors and see what happens.
Given that the anchors supplied with the Maxjax only have a 2.75" working area, I decided to just try mine out . Haven't had time to get in the garage this week but I should this week or next. I plan to raise some vehicle enough to put pressure on the anchors and see what happens.
Melting Slicks


Joined: Jan 2005
Posts: 3,347
Likes: 9
From: Salinas Ca.
If the existing slab is at least 4" thick I would drill horizontaly into the existing slab on 12" to 18" centers 18" deep and insert 36" long pieces of rebar into the holes with epoxy. Then install a piece of rebar from with tie from one dowel to the dowel on the opposite side. This will tie the new foundation into the existing slab for added strength. I would also dig down a couple of feet as you mentioned and place another rebar mat midway with and connect both upper and lower rebar mats together with rebar. You can get the appropriate epoxy from Hilti or possibly Lowes or Home Depot. I think this would give you plenty of strength but I am not a civil engineer so those who are more knowledgeable my want to chime in.
 Muddy
Muddybtw: If you go down to a tool rental, rent a medium jack hammer... sure would make your day!!
Last edited by Muddywaters; Jan 23, 2011 at 12:18 AM.
Corvette Stories
The Best of Corvette for Corvette Enthusiasts

Top 10 Most Expensive Corvettes Ever Sold on Bring A Trailer
Brett Foote
10 Things Every Corvette Owner Needs (2026 Edition)
Michael S. Palmer
8 Most "Only Corvette Owners Understand" Quirks and Problems
Pouria Savadkouei
10 Reasons the C6 Z06 is Still A Performance Benchmark After 20 Years
Joe Kucinski
How Much Horsepower Every Corvette Engine "LOST" in 1972
Joe Kucinski
Top 10 DOs and DON'Ts for Protecting Your Convertible Top!
Michael S. Palmer
Top 10 Most Explosive Corvettes Ever Made: Power-to-Weight Ratio Ranked!
Joe Kucinski
150 hp to 1,250 hp: Every Corvette Generation Compared by the Specs That Matter
Joe Kucinski
8 Coolest Corvette Pace Cars (and Replicas) of All Time
Verdad GallardoLe Mans Master

Joined: Sep 2002
Posts: 5,236
Likes: 898
From: Myrtle Beach SC
Not trying to throw out safety but I had the same problem with my garage. When I first checked depth between slabs I had 4". I drilled my holes and only came up with 3" on most and 3.5" on a few.
Given that the anchors supplied with the Maxjax only have a 2.75" working area, I decided to just try mine out . Haven't had time to get in the garage this week but I should this week or next. I plan to raise some vehicle enough to put pressure on the anchors and see what happens.
Given that the anchors supplied with the Maxjax only have a 2.75" working area, I decided to just try mine out . Haven't had time to get in the garage this week but I should this week or next. I plan to raise some vehicle enough to put pressure on the anchors and see what happens.
I'm at same with installation as you...finding inconsistency as I drill holes. My first one went in but the anchor did not catch and the hex nut is tight againtst the jacket. I may try my other hole and see what happens but very discouraging. Keep us posted on your installation.
Le Mans Master
Joined: Sep 2002
Posts: 5,236
Likes: 898
From: Myrtle Beach SC
I based the dimensions off of hunt4cleanair's floor plan located in the following thread. http://forums.corvetteforum.com/c6-c...tion-tips.html His floor pan is very helpful.
Thanks for the "shout out."
Le Mans Master
Joined: Sep 2002
Posts: 5,236
Likes: 898
From: Myrtle Beach SC
Just got off the phone with Steve from MaxJet and explained my situation. He asked if I used a rotary hammer and I said yes. He explained that what they have learned where concrete floors are at a minimum, the last 1/2 inch or so chips from use of the rotary drill in hammer mode. Thus leaving a depth less than originally thought and therefore less for the anchor to grip. Instead of a 3 3/4" depth, the floor reduces to say 3 1/4 inch. He suggests taking it off hammer mode and allow the bit to ease on thru the concrete as one step.
Also, MaxJet has tested and sells an epoxy-dropped anchor system tested to 11k psi, and that's one anchor tested. He said once set, its epoxies to the original floor and is as good, or strong as the original floor. I'm suppose to get pricing tomorrow but sounds like its in the $150.00 range. It includes their manufacturers recommended epoxy (two tubes) along with the anchors. It is a different type of anchor. The ones shipped with the lift are intended to hold up within the concrete.
Also, MaxJet has tested and sells an epoxy-dropped anchor system tested to 11k psi, and that's one anchor tested. He said once set, its epoxies to the original floor and is as good, or strong as the original floor. I'm suppose to get pricing tomorrow but sounds like its in the $150.00 range. It includes their manufacturers recommended epoxy (two tubes) along with the anchors. It is a different type of anchor. The ones shipped with the lift are intended to hold up within the concrete.
Thread Starter
Intermediate
Joined: Oct 2010
Posts: 28
Likes: 1
From: Hallsville TX
Noonie, thanks for the great reply. I will attach some pictures of how you describe doing the rebar in a few days.
hunt4cleanair, thank you for the great drawing. Let me know what you learn about the epoxy anchors. You said, "MaxJet, did you mean Maxjax?
Hey BryanB75, was your friends concrete using the same anchor system as the Maxjax or the "J" anchors you set in place when the concrete is poured?
Thanks for all the help.
Trent
Race Director
Joined: Mar 2006
Posts: 14,112
Likes: 28
From: Florida
Also, MaxJet has tested and sells an epoxy-dropped anchor system tested to 11k psi, and that's one anchor tested. He said once set, its epoxies to the original floor and is as good, or strong as the original floor. I'm suppose to get pricing tomorrow but sounds like its in the $150.00 range. It includes their manufacturers recommended epoxy (two tubes) along with the anchors. It is a different type of anchor. The ones shipped with the lift are intended to hold up within the concrete.
The manufacturers specs are tested around 11000psi, but that is for 6000psi concrete AND the continuous load rating is 1/4 of the 11000psi.
You most likely have 2500 psi concrete and only being set 2-1/2" deep doesn't leave much for concrete strength. Be aware that drop in anchors are traditionally used on concrete ceilings for suspending pipe such as sprinkler systems etc.
You can do a lot better on the price too.
Personally, I wouldn't use them for this application.
In the holes that are less deep than for the supplied anchors, consider doing this.
1:
Buy a 100% solids pourable epoxy such as used in glass layup (eg West Systems). Fill the shallow holes that you drilled 1/3 way up. Redrill your hole with a metal bit after 24 hours and then set your anchor with the epoxy you had originally purchased. The good epoxy has a compressive strength of around 12000psi and will fill the conical void blown out by drilling. If the complete actual thickness was really less than the 3-3/4" depth needed then you can vacuum out a little void (pocket) underneath the short holes
2:
Buy pourable hydraulic cement and do virtually the same process. It starts to set in about 5 minutes so you must work quickly and one hole at a mix. The base and concrete should be washed and very wet as opposed to dry for the epoxy. Hydraulic cement commonly has a compressive strength of around 5000-6000psi.
3:
With the anchor you have that didn't pull tight, you can just put a spacer collar around the anchor sleeve and tighten until it locks, then just grind the protruding part of the anchor flush with the finished floor. It still should be deeper than the drop ins.
If you were doing this installation legally here in Miami-Dade, Maxjax would have to supply the anchoring design and testing specs for these anchors stamped with a seal from a structural professional engineer for approval. He would take the full responsibility of his testing.
Here's some reading.
http://www.us.hilti.com/holus/page/m...ProdOid=308866
http://www.simpsonanchors.com/catalo...sion.html#coil
http://www.confast.com/products/tech...in-anchor.aspx
Sample Prices
http://www.confast.com/products/drop-in-anchor.aspx
Values shown are average ultimate values and are offered only as a guide and are not guaranteed. A safety factor of 4:1 or 25% is generally accepted as a safe working load. Reference should be made to applicable codes for the specific working ratio. Critical applications (vibratory loads, overhead installations, etc.) may require a safety factor of as much as 10:1, or more.
Thread Starter
Intermediate
Joined: Oct 2010
Posts: 28
Likes: 1
From: Hallsville TX
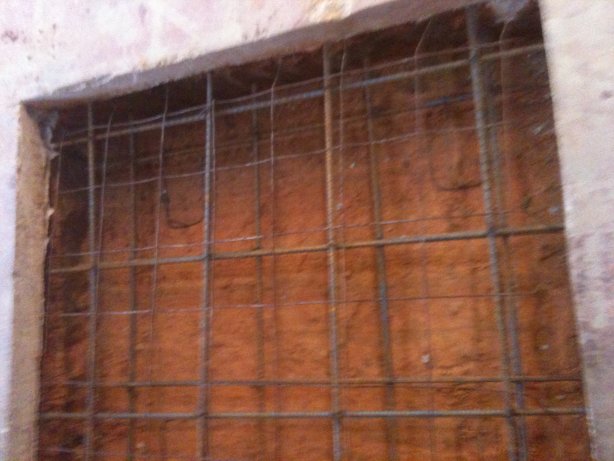
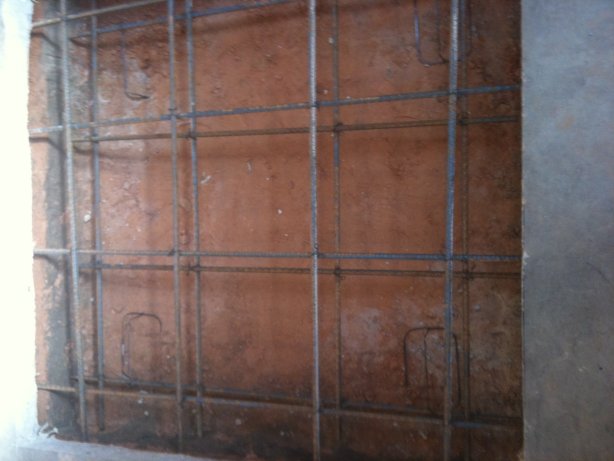
I placed rebar about 3" from the bottom, then I placed rebar just under the existing concrete, then I have wire mesh for the top 4 inches. The picture below shows what I described, but it is hard to make out in the photo. I will try to take some pictures during each step when I do the other section.
Couple of questions. The wire mesh I have has been behind my shop for 6 years, and has a fair amount of rust on it. Should I scrap it and get some new?
When its time for the cement I have to wheel barrow it about 100 feet. I was thinking about renting a small bobcat and filling the bucket with cement. I'm guessing it would hold twice as much as my wheel barrow.
What are your thoughts?
Thanks,
Trent
Race Director
Joined: Mar 2006
Posts: 14,112
Likes: 28
From: Florida
Couple of questions. The wire mesh I have has been behind my shop for 6 years, and has a fair amount of rust on it. Should I scrap it and get some new?
When its time for the cement I have to wheel barrow it about 100 feet. I was thinking about renting a small bobcat and filling the bucket with cement. I'm guessing it would hold twice as much as my wheel barrow.
What are your thoughts?
Thanks,
Trent
When its time for the cement I have to wheel barrow it about 100 feet. I was thinking about renting a small bobcat and filling the bucket with cement. I'm guessing it would hold twice as much as my wheel barrow.
What are your thoughts?
Thanks,
Trent
Just knock off the loose rust, surface rust is fine. Should have come off just by handling it. Only oil is a no no. You can easily double the amount of steel if you just wanted to get rid of some. If you really wanted to over prepare, you can spray the concrete edges and steel with a 50/50 mix of muriatic acid, then rinse.
The base should be watered down to compact the loose dirt and the dirt damp when pouring the concrete.
Contact a concrete company about pumping the concrete with 5000psi pump mix. The extra portland makes the mix more slick in the hoses and the gunite sand prevents seizures, plus the concrete will be stronger when set.
By far the easiest method, but compare prices vs bobcat. Not common everywhere.
You can also cut some mesh or rebar or both mesh with rebar tied flat to it, to lay in and just push down into the wet concrete after filling the hole. Approx 1-1/2" of concrete cover would be fine. Object is to have reinforcement to strengthen concrete above the anchor locking wedges.
You may also want to make a small template of the bolt pattern base out of some scrap wood to insure you won't be drilling thru any rebar, not impossible drilling, just a pain.

Racer
Joined: Feb 2007
Posts: 270
Likes: 1
From: Niceville Fl
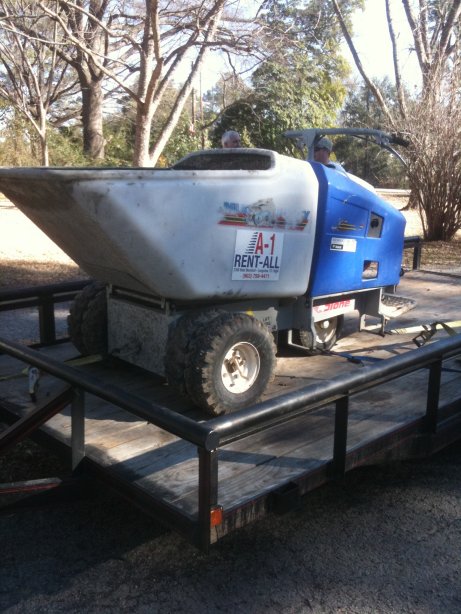
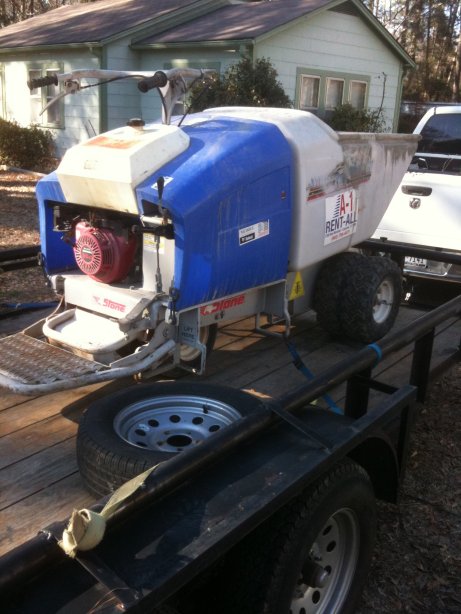
If your local rental company rents what is commonly referred to as a "Georgia buggy, it has a dump-type bucket on it that is much narrower than a bobcat, which allows you to dump all the concrete into the hole rather than having some end up on either side of it. Typically much cheaper to rent than a bobcat as well.
Thread Starter
Intermediate
Joined: Oct 2010
Posts: 28
Likes: 1
From: Hallsville TX
Thanks for all the great help. The Georgia buggy was a great idea. I have one reserved for tomorrow. I did not know those things existed. Half the price of the bobcat.
Thought I would give some prices for those planning this type of project.
1. Concrete saw (walk behind type) for the day which included the diamond blade. - $85.00
2. Rebar - (11 pcs) - $55.00
3. Diamond blade from my angle grinder to get clean up after the concrete saw. - $12.00
4. Wire mesh - I had some left over from my slab. $0.00
5. Sledge hammer - $25.00
6. Milwaukee hammer drill - $160.00
7. Georgia Buggy rental - $80.00
8. Concrete 5000psi (2 yds) - $350.00
9. Muriatic Acid- $5.00
10. Maxjax - I have not ordered yet
Picture without mesh installed yet.
Trent
Last edited by Zazoos; Jan 26, 2011 at 10:10 PM.
Thread Starter
Intermediate
Joined: Oct 2010
Posts: 28
Likes: 1
From: Hallsville TX
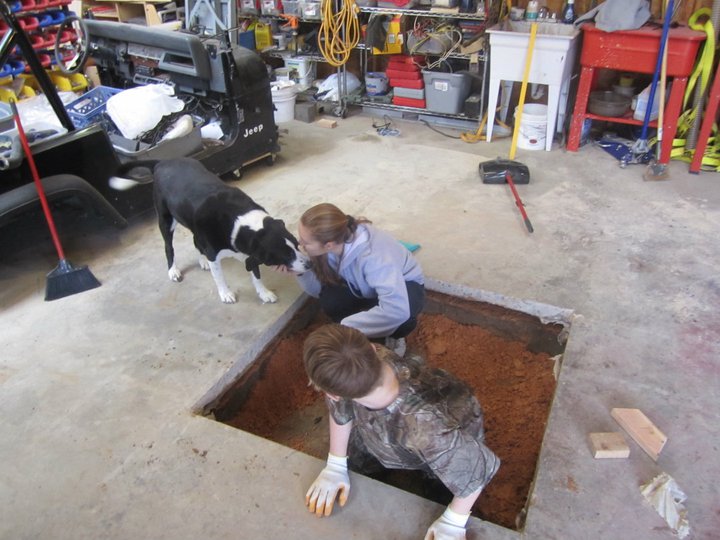
Filled in the holes today.
The Georgia buggy was awesome! Spent another $27.00 bucks today on a magnesium trowel.
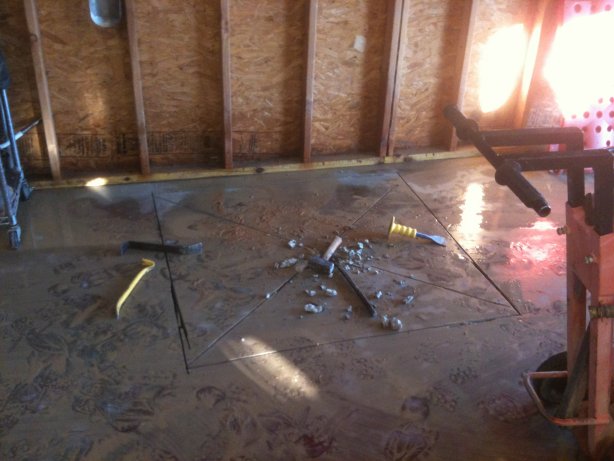
Sorry the concrete picture is lousy.
Should I wet the concrete tomorrow? How often should I wet it?
How long before I can drive on it?
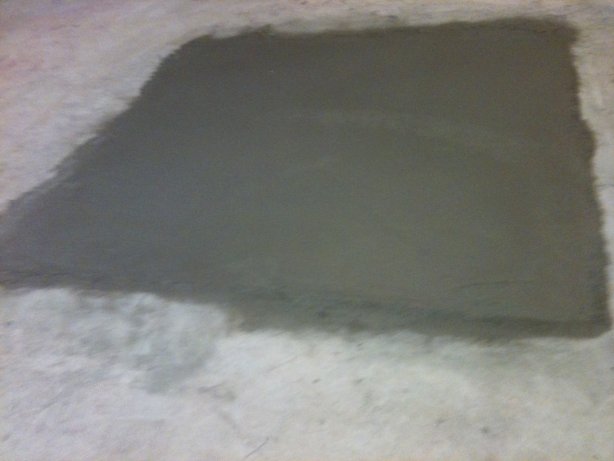
Thanks,
Trent
The Georgia buggy was awesome! Spent another $27.00 bucks today on a magnesium trowel.
Sorry the concrete picture is lousy.
Should I wet the concrete tomorrow? How often should I wet it?
How long before I can drive on it?
Thanks,
Trent

Burning Brakes
Joined: May 2006
Posts: 857
Likes: 1
From: Morrisonville Illinios
also try not to bolt the unit down for 30 days so it will cure out correctly. I syour shop heated if not try to put some insulation on it to help it cure out better. You have been following some GOOD sound advice for the intallation and PROPER set-up for the concrete, I hope others will see this. One of the guys in town bought a used unit from a service station repair shop (sells used equiptment) and the dealer said "heck 2-4" is good enough" , well all he is doing is selling equiptment I tried to tell my freind that you should go a little bit more than that.
Once you start to use it you will wonder how in the H@$@#$ you ever got along without it.
Good Luck wro87