


My Corvette Journey

Thread Starter
Intermediate

Joined: Jul 2011
Posts: 30
Likes: 0
From: Somerset IN
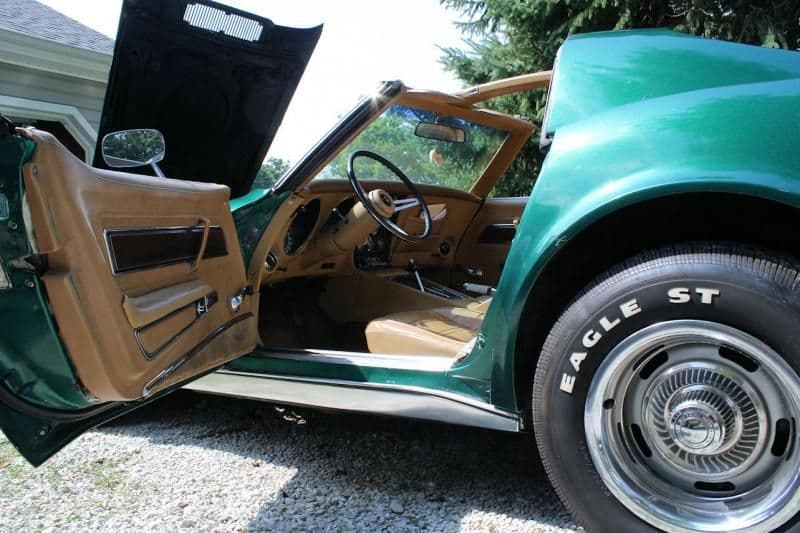
Is really just beginning. Couple years ago, I sort of impulsively purchased a 1974 L48 coupe. A friend of my dad's had it just down the road from me for most of its life. Just under 62K miles, and it showed some wear. Knew it would need some work, but thought I could drive it as is for a bit.
First real trip out and about, I lost half the back bumper cover! Since then, I've removed the rest, and it's sat in the garage. Have also removed most of the front bumper cover as well. They were both pretty rotten.
Today, I decided I wanted to get the car out and at least wash the dust off. Well, I made the kids help, as my arm's in a sling from a shoulder surgery. So we got a battery and got it in and hooked up. Fired right up, and my son backed it out in the driveway. (I think he's hooked now - he's 12.)
I don't think I have the space, patience or skills to do a full restoration. And I think that's cost prohibitive on this car anyway. I believe I would rather do some brake work (got a leak at one tire somewhere), and just some detail work in the engine compartment, and have the car painted and interior done professionally. And enjoy driving it.
So, I found the forum and joined hoping it to be a good resource. I welcome any comments on my direction, suggestions, parts sources, etc. And here are some pics we took today.
Last edited by usmcdjb; Jul 16, 2011 at 10:18 PM.
Team Owner


Joined: Sep 2006
Posts: 31,301
Likes: 4,389
From: Westminster Maryland
Hi u,
This looks like it could be a VERY nice project for the 3 of you!
I think it would be a good idea for you to get some vender's catalogues, (ZIP, Corvette Central, Paragon Reproductions, plus others), so you can see what's available and the price of 'stuff'.
Also, consider buying the factory 74 ASSEMBLY INSTRUCTION MANUAL, (it was used on the production lie in St. Louis), and the 74 CHASSIS SERVICE MANUAL, (it was used in the service department at the dealerships). They will both be a big help as you get to know and begin work on your car.
Good Luck!
Regards,
Alan
TheCorvetteBen


Joined: Feb 2007
Posts: 4,987
Likes: 144
From: Van Alstyne, TX
Looks like you three have your hands full! Well I would give you the advice to leave the interior and paint for last, while you get the mechanicals good on this car. Check the brakes suspension and running gear all first. You can have the cleanest interior and nicest paint job, and still have a crappy corvette underneath all that. good luck to you guys!
Last edited by chstitans42; Aug 7, 2011 at 02:28 PM.
Thread Starter
Intermediate
Joined: Jul 2011
Posts: 30
Likes: 0
From: Somerset IN
Fortunately, the previous owner had the AIM, so I have that already. And I've already gotten and looked through many vendor catalogs, and their online stores. Zip and Corvette Central seem to have quite a bit and look very professional. Are there others I should be looking at?
Not sure about the tires. Is there a way to tell their age? I don't think it's seen much driving time in the last several years, and actually at all if you consider 62K miles on a 37 year old car. I don't know that I'd trust them on a long trip, but to just run around here they are ok for now. I'm pretty sure replacing them will be the least of my expenses when things get rolling.
So, my plan is to replace the entirety of the brakes. New calipers, rotors, pads, hoses, lines, master cylinder. Have to do something, because I already know there's a leak at the right rear somewhere. And I know I want the brakes to work, so figure this is a good project and that's one of the initial priorities. Today we are going to start doing some cleaning up and poking around under the hood. Got a bum arm because of shoulder surgery, so hopefully will do the brakes this fall sometime when I have use of the arm back and get to drive the car some before winter. Then see what else comes up. But agree, will wait until I'm comfortable with the engine, transmission, suspension and brakes before I do the paint, then the interior. At least that's the plan.
Pro

Joined: Oct 2006
Posts: 734
Likes: 0
From: Bryan Texas
At the end of the DOT info probably on the "in" side of the tire there should be a 3 or 4 number sequence. Before 2000 it should be a 3 digit number.. week, then last digit of the year, I don't know how to tell decade. After 2000 there should be a 4 digit number.. week, then last 2 digits of the year.
Race Director

Joined: May 2003
Posts: 11,814
Likes: 9
From: Science Bitch! Mississauga, Ontario
Canadian Events Coordinator
As far as the interior is concerned, many recommend alknochinteriors.com
Good Luck and be patient!
 Les
Les
Good Luck and be patient!
Les
Drifting

Joined: Jul 2002
Posts: 1,944
Likes: 20
From: The only Corvettes in Highett Victoria
[QUOTE=
So, my plan is to replace the entirety of the brakes. New calipers, rotors, pads, hoses, lines, master cylinder. QUOTE]
G'day,
Should be nothing wrong with those calipers, other than some rust build up from dissolved water in the brake fluid. The cheapest fix, and you should remove all four calipers, is to clean them out and check for rust damage. If some 600 wet & dry cleans it up, just replace the rubbers and reassemble. More than likely, the aluminum pistons will be corroded, so you might have to buy new ones. Remember, the fronts and rears are different sizes.
If the rust in the piston bores is too deep for polishing out, then the smart thing to do is to have stainless steel sleeves fitted by a competent vendor. Then reassemble with new rubbers/pistons as required. This way, you have your original calipers and you know what's inside them. You should then not need to pull them apart for a very long time.
You can even put a stainless steel sleeve in your original MC but it's likely that you can buy a new MC for less money. Don't replace any brake lines unless they are leaking or show some external wear due to rubbing. They are easy enough to pull out but it's a different story putting new ones in. Well, with the body on, anyway.
Obviously, replace the flexible lines with new ones, even pay extra for the braided SS ones, but first check if your local DMV will register a car with "non-standard" brake lines.
I could comment more on other things to do, but with your arm in a sling for some time, and the fact that you can't drive it until your arm's better, just do the brakes and take your time. At least you know that the car will stop when you get to take it for its first drive.
Get well, and
Regards from Down Under
aussiejohn
Corvette Stories
The Best of Corvette for Corvette Enthusiasts

Every 2027 Corvette Engine Explained
Joe Kucinski
Designer Imagines A Corvette That Looks More Like a Corvette Than the Corvette
Verdad Gallardo
10 Ugly Corvettes That We Still Kinda Love
Joe Kucinski
Top 10 Most Expensive Corvettes Ever Sold on Bring A Trailer
Brett Foote
10 Things Every Corvette Owner Needs (2026 Edition)
Michael S. Palmer
8 Most "Only Corvette Owners Understand" Quirks and Problems
Pouria Savadkouei
10 Reasons the C6 Z06 is Still A Performance Benchmark After 20 Years
Joe Kucinski
How Much Horsepower Every Corvette Engine "LOST" in 1972
Joe Kucinski
Top 10 DOs and DON'Ts for Protecting Your Convertible Top!
Michael S. PalmerMelting Slicks

Joined: Oct 2005
Posts: 2,056
Likes: 8
From: Redruth Cornwall
Willcox Corvette for parts. Ernie is on the forum and always posts great info and is very helpful.
Looks like a great project. Keep the pics coming.
Good luck and wishing you a speedy recovery!
Looks like a great project. Keep the pics coming.
Good luck and wishing you a speedy recovery!
Thread Starter
Intermediate
Joined: Jul 2011
Posts: 30
Likes: 0
From: Somerset IN
Finally have some limited use of my right arm as things heal up a bit. So I got the motivation to at least start tinkering under the hood this weekend.
Here's what it looked like at the start.

Was leaking around the valve covers, so pulled them first thing. Found no gasket on either one. Just a bead of some kind of goo.

Took some work to get all that off and clean things up, and did some sanding. I'm not going for a full resto here, just clean things up some. So, a little bit at a time.
Here's some parts waiting to go back on when the paint has cured.

Repainted the air cleaner too, and put new crankcase filter and rubber seal on it (no pic). Would like to do something with the intake manifold, but it will wait for another day's (or several) project.
Here's what it looked like at the start.
Was leaking around the valve covers, so pulled them first thing. Found no gasket on either one. Just a bead of some kind of goo.
Took some work to get all that off and clean things up, and did some sanding. I'm not going for a full resto here, just clean things up some. So, a little bit at a time.
Here's some parts waiting to go back on when the paint has cured.
Repainted the air cleaner too, and put new crankcase filter and rubber seal on it (no pic). Would like to do something with the intake manifold, but it will wait for another day's (or several) project.
Thread Starter
Intermediate
Joined: Jul 2011
Posts: 30
Likes: 0
From: Somerset IN
Got a question maybe someone can help with.
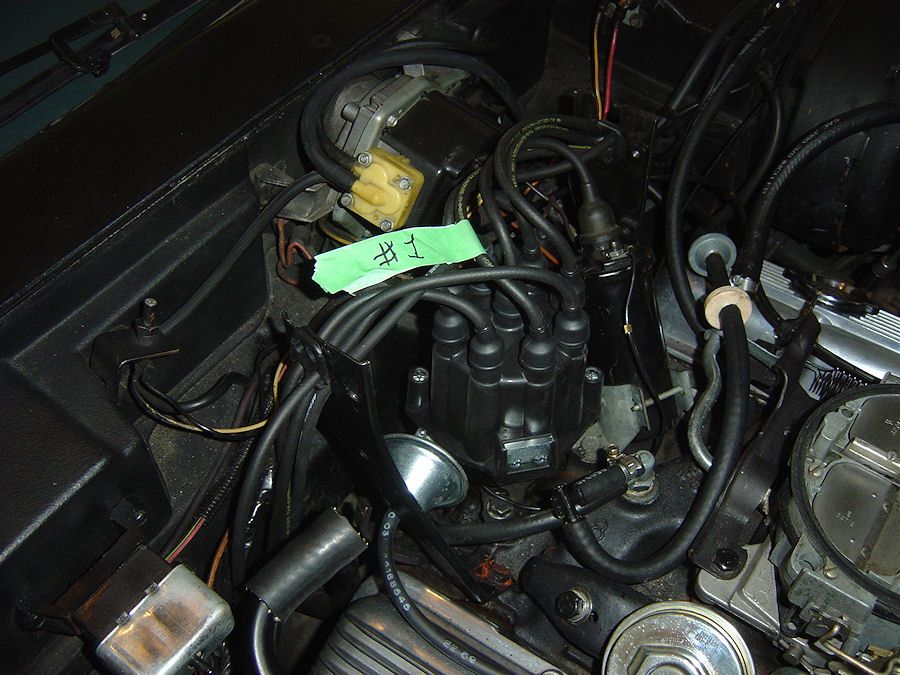
In the top picture, right behind the carb, you can see a vacuum fitting that screws into the intake manifold. It has 2 connectors on it, with a hose on the top one. And someone has threaded a machine screw into the bottom.
What's supposed to be there????? Because I'm pretty sure this isn't right.
Thanks!

Team Owner
Joined: Aug 1999
Posts: 30,995
Likes: 99
From: Ontario
Got a question maybe someone can help with.
In the top picture, right behind the carb, you can see a vacuum fitting that screws into the intake manifold. It has 2 connectors on it, with a hose on the top one. And someone has threaded a machine screw into the bottom.
What's supposed to be there????? Because I'm pretty sure this isn't right.
Thanks!
The problem with the 1974 is that the two snouts on the fitting point only in one direction, unlike other years where they are polar opposites. So with a vacuum straight shot to the transmission, the hose for body vacuum must be installed with a 180* bend to get to the driver's side. And that crimps the hose, cutting off air flow). My solution (using both snouts and a 90* joint) is far from ideal (and looks like heck) but it does work. The proper solution is to get a polar opposite fitting from another year but I have not done so.
Team Owner

Joined: Jan 2006
Posts: 37,637
Likes: 3,118
From: Crossville TN
Well, sir...you have the perfect opportunity for cementing a great father/son relationship with your son (or sons/daughters, if that is the case). If your car is in decent condition mechanically, then all you need is time and helpers to get work done on the car. And, it seems, you have at least one potential helper who has a strong interest in the car.
Put together (along with your son) a list of things that need to be done on the car. Then, prioritize the list in some order that makes sense [I would put the operational and safety-related items first, so that it could safely be driven as soon as those items were completed.] I recommend that you leave the 'appearance' items (the bumpers are safety items, BTW) till last. If you do them first, and then you can't drive it, you will become frustrated and risk losing interest in it.
Critical item>>>> When your son is helping you, decide (with him) what task he is working on, then let him do that task on his own unless he asks for your guidance. If you over-manage him, he will quit helping you. Remember, he is a pre-teen and he needs to be self-sufficient. This "project" is just what a pre-teen needs. Yes, he will mess up. But, so will you. Consider any minor damage from "learning" mistakes as a justifyable expense of you guys sharing a great project.
Thread Starter
Intermediate
Joined: Jul 2011
Posts: 30
Likes: 0
From: Somerset IN
Finally took a couple of the tires off - trying to get easier access to the plug wires and look the brakes over.
At any rate, following the DOT on the inner sidewall, it has the following:
MKUU 2B0R 230
I'm assuming the 230 is the date coding? 23d week of 1990??
Tires look good, but if I'm understanding right, that's 21 years old and I assume not very safe.
At any rate, following the DOT on the inner sidewall, it has the following:
MKUU 2B0R 230
I'm assuming the 230 is the date coding? 23d week of 1990??
Tires look good, but if I'm understanding right, that's 21 years old and I assume not very safe.
Burning Brakes


Joined: Jul 2010
Posts: 810
Likes: 48
From: West Chester Pennsylvania
From what I can see, that vette will clean up nicely.
The interior, from what I can see is the deluxe package --
The door panels have the wood trim... I suspect you console around the shifter has wood to match . The seat covers appear to have the side to side pattern which would be original. That engine compartment -- based on what you've just started painting -- will clean up nice.
Order up the front & rear bumpers -- have em' painted and installed and you'll be on your way.
Definitely get the fluids changed in the engine & tranny and make sure the brakes work. Time to get that car out to a local cruise night with the kids !
Burning Brakes
Joined: Sep 2005
Posts: 1,198
Likes: 0
From: staten island new york
St. Jude Donor '10
Finally took a couple of the tires off - trying to get easier access to the plug wires and look the brakes over.
At any rate, following the DOT on the inner sidewall, it has the following:
MKUU 2B0R 230
I'm assuming the 230 is the date coding? 23d week of 1990??
Tires look good, but if I'm understanding right, that's 21 years old and I assume not very safe.
At any rate, following the DOT on the inner sidewall, it has the following:
MKUU 2B0R 230
I'm assuming the 230 is the date coding? 23d week of 1990??
Tires look good, but if I'm understanding right, that's 21 years old and I assume not very safe.
 to drive on those
Thread Starter
Intermediate
Joined: Jul 2011
Posts: 30
Likes: 0
From: Somerset IN
As I have said, I started under the hood just cleaning some things up. Thanks to the advice so far, I was able to get the plug wires in and routed right. Plugs changed. Decided while I was doing this to put a new water pump in (and just finished doing it the second time - leaked the first after we struggled with it the first time because of some casting marks on the pump keeping the brackets from lining up right). New vacuum lines (motor, not headlights yet). Found the master cylinder was leaking, and the brake booster was pretty corroded. Cleaned the booster up some and painted and replaced the MC. I think the MC is more correct than what was on there anyway, from all the C3 motor pix I've seen. New belts and upper radiator hose (probably should have done lower too, but it didn't look bad - hopefully I won't HAVE to replace it soon). Here's what it looks like today versus what it started as.

Still not going anywhere until I get the brake parts from Vette Brakes and Products and spend some time getting them in. Pulled all the calipers, the back rotors already had the rivets drilled out so they've obviously been out. On one side, the rivets aren't drilled all the way out of the hub. Should they be? Will it cause any problems if they are not?
Had a couple broken springs fall out of the parking brakes, so I guess I'll learn how to change those. Is ok, because when you pull on the lever, the cables don't pull so they aren't working at all. They needed work.
Also found the fittings on the hard brake lines were well rounded from a previous owner, so have some lines ordered.
So far, I'm finding it therapeutic working on this. I do what I feel like doing, and don't do anything when I don't feel like it. It's different than when I was a kid working on my own car, and I NEEDED it to be running so I could be running! But there is a bit of anxious energy to get the brakes done and go down the road. Haven't driven it more than 10 miles since I bought it 3 years ago.
Now, about those bumper covers.........thoughts? I had intended to drive it as is once the brakes were done. I mean, the bumpers are there, so is there really a safety concern? Figured whoever I turned to for the body/paint work would do that.


