


Headlight switch replacement
Thread Starter
Instructor

Joined: Feb 2008
Posts: 211
Likes: 2
1970 convertible...Anyone have a step by step to replacing the interior headlight switch including the pull **** and the box behind the dash? Hoping I can replace without removing any dash or interior parts.Thanks
Le Mans Master

Joined: Feb 2012
Posts: 6,644
Likes: 479
From: OK
You pull your Corvette Headlight switch **** out and your lights go on. All of a sudden they go out, then come back on for no apparent reason. Maybe all of the dash lights have gone out or they only come on at one position on the ****. Do not fear. Your Corvette is not possessed. You just need a new headlight switch. The internals of the switch may have become damaged or worn causing the switch to overheat and the lights to go out. As the switch cools, the lights come back on. Overheats again and out they go. The dash lights may work in only one position or not at all because the rheostat has gone bad in the switch and it no longer makes good contact. A new Corvette headlight switch is the answer and it is only a call away at Zip Corvette Parts, 8067 Fast Lane, Mechanicsville, VA 23111, (800) 962-9632. They can supply you with the correct Corvette Parts to get you back out on the road and out of the darkness.
Now let's get those lights back on!
Corvette Headlight Switch pic 01: This is our new 78 – 82 Corvette Headlight Switch. The only other tool you will need is a large flat blade screwdriver and a few minutes.
Corvette Headlight Switch pic 02: Start by disconnecting the battery. If your Corvette has air conditioning, you will have to remove this duct from under the dash. In most cases, it will slide out or only be held in by one or two screws.
Corvette Headlight Switch pic 03: Reach up behind the dash and feel for the headlight switch. When you find it, feel for this small button on the bottom of the switch. Push it all the way in and at the same time pull the **** and shaft out. It doesn't always come right out the first time. Sometimes you just have to keep trying until you hit the right spot. Do not force the **** and shaft out. When the button is in all the way, the **** and shaft will easily slide out of the switch. Note: This can be very frustrating but this is the only way you can get the **** and shaft out without damage. So do not give up. Just keep trying. It will come out, I promise.
Corvette Headlight Switch pic 04: With the **** and shaft removed, unscrew the center headlight switch retainer with a large flat blade screwdriver. This will release the switch and it will fall behind the dash.[IMG] [/IMG]
Corvette Headlight Switch pic 05: Pull the switch down towards the floor. Remove the vacuum lines and unplug the switch. Connect the new switch to the plug. Re-connect the vacuum lines and feed the switch up behind the dash. Align it with the dash opening and install the bezel and center retainer. Hold the switch and tighten the retainer.
Corvette Headlight Switch pic 06: With the switch in place slide the **** and shaft into the switch. You will feel it clip into place. It is a good idea to clean the shaft before you re-install it. A little steel wool will work wonders. Or if the chrome **** shows sings of wear - Zip Corvette has correct reproduction headlamp rod and ***** for an 1986-1982 Corvette applications. Re-connect your battery and be ready to venture OUT OF THE DARKNESS!
Personally on our 73 I think it is much simpler and safer as far as breaking something to just pull the dash pad.......just sayin.. not necessarily suggesting......
Now let's get those lights back on!
Corvette Headlight Switch pic 01: This is our new 78 – 82 Corvette Headlight Switch. The only other tool you will need is a large flat blade screwdriver and a few minutes.
Corvette Headlight Switch pic 02: Start by disconnecting the battery. If your Corvette has air conditioning, you will have to remove this duct from under the dash. In most cases, it will slide out or only be held in by one or two screws.
Corvette Headlight Switch pic 03: Reach up behind the dash and feel for the headlight switch. When you find it, feel for this small button on the bottom of the switch. Push it all the way in and at the same time pull the **** and shaft out. It doesn't always come right out the first time. Sometimes you just have to keep trying until you hit the right spot. Do not force the **** and shaft out. When the button is in all the way, the **** and shaft will easily slide out of the switch. Note: This can be very frustrating but this is the only way you can get the **** and shaft out without damage. So do not give up. Just keep trying. It will come out, I promise.
Corvette Headlight Switch pic 04: With the **** and shaft removed, unscrew the center headlight switch retainer with a large flat blade screwdriver. This will release the switch and it will fall behind the dash.[IMG]
[/IMG]Corvette Headlight Switch pic 05: Pull the switch down towards the floor. Remove the vacuum lines and unplug the switch. Connect the new switch to the plug. Re-connect the vacuum lines and feed the switch up behind the dash. Align it with the dash opening and install the bezel and center retainer. Hold the switch and tighten the retainer.
Corvette Headlight Switch pic 06: With the switch in place slide the **** and shaft into the switch. You will feel it clip into place. It is a good idea to clean the shaft before you re-install it. A little steel wool will work wonders. Or if the chrome **** shows sings of wear -
Zip Corvette has correct reproduction headlamp rod and ***** for an 1986-1982 Corvette applications. Re-connect your battery and be ready to venture OUT OF THE DARKNESS!Personally on our 73 I think it is much simpler and safer as far as breaking something to just pull the dash pad.......just sayin.. not necessarily suggesting......
Last edited by 73Corvette; Apr 16, 2012 at 02:24 PM.
Team Owner


Joined: Sep 2006
Posts: 31,274
Likes: 4,366
From: Westminster Maryland
Hi,
That's a really nice description!
On my 71, non a/c car, the duct doesn't come out without removing the bracket for the hood release handle and cable, and the bracket for the courtesy light and odometer reset cable.
I REALLY think the column needs to be dropped, and the lower pad pulled back a couple of inches, so there's access from the top.
Honest!
Regards,
Alan
Melting Slicks


Joined: Mar 2008
Posts: 2,023
Likes: 6
From: Austin Tx
Hi,
That's a really nice description!
On my 71, non a/c car, the duct doesn't come out without removing the bracket for the hood release handle and cable, and the bracket for the courtesy light and odometer reset cable.
I REALLY think the column needs to be dropped, and the lower pad pulled back a couple of inches, so there's access from the top.
Honest!
Regards,
Alan
 - That's EXACTLY how I swapped out the switch in my 72.
 Also, if you are as impatient/cheap as I am, and unwilling to wait/pay for a switch from one of the vendors, you can buy one without the vacuum port from an auto parts store, and transfer the backplate from the old switch to the new one. But if you decide to do this, you need to make a couple of changes to allow the backplate to fit. First, the top of the rheostat insolator is a little different, so I used the rheastat insulator from the old switch - this is not a waer part, so using the old one should be OK. And there is a little tab on the backplate that fits into the 'sled', it slides to open the vacuum port. The 'sled' has a little grove in it that the tab fits into. Since the 'sled' is a wear piece, I used a dremel to cut a matching groove into the new 'sled'. The new switch works perfect, I had it installed that night, and it only cost me around $12.
Corvette Stories
The Best of Corvette for Corvette Enthusiasts

Top 10 Most Expensive Corvettes Ever Sold on Bring A Trailer
Brett Foote
10 Things Every Corvette Owner Needs (2026 Edition)
Michael S. Palmer
8 Most "Only Corvette Owners Understand" Quirks and Problems
Pouria Savadkouei
10 Reasons the C6 Z06 is Still A Performance Benchmark After 20 Years
Joe Kucinski
How Much Horsepower Every Corvette Engine "LOST" in 1972
Joe Kucinski
Top 10 DOs and DON'Ts for Protecting Your Convertible Top!
Michael S. Palmer
Top 10 Most Explosive Corvettes Ever Made: Power-to-Weight Ratio Ranked!
Joe Kucinski
150 hp to 1,250 hp: Every Corvette Generation Compared by the Specs That Matter
Joe Kucinski
8 Coolest Corvette Pace Cars (and Replicas) of All Time
Verdad GallardoTeam Owner


Joined: Jun 2000
Posts: 38,923
Likes: 1,482
From: Southbound
Cruise-In II Veteran

Le Mans Master
Joined: Feb 2012
Posts: 6,644
Likes: 479
From: OK
Safety Car


Joined: Sep 2005
Posts: 4,062
Likes: 103
From: Southeast, Tennessee
St. Jude Donor '09 thru '26
Racer


Joined: Apr 2009
Posts: 393
Likes: 0
From: Holcomb Mississippi
I replaced my switch 2 years ago. The new one turned out to be defective and the lights would go out while driving. Vendor replaced it at no cost. then I removed the engine and did lots of other fun stuff and haven't really driven the car at night or used my "new" switch. Well guess what, turns out this switch is bad as well so I get to do it all over again.
andy
andy
Le Mans Master
Joined: Feb 2012
Posts: 6,644
Likes: 479
From: OK
I replaced my switch 2 years ago. The new one turned out to be defective and the lights would go out while driving. Vendor replaced it at no cost. then I removed the engine and did lots of other fun stuff and haven't really driven the car at night or used my "new" switch. Well guess what, turns out this switch is bad as well so I get to do it all over again.
andy
andy

Racer

Joined: Apr 2011
Posts: 471
Likes: 3
Hi,
That's a really nice description!
On my 71, non a/c car, the duct doesn't come out without removing the bracket for the hood release handle and cable, and the bracket for the courtesy light and odometer reset cable.
I REALLY think the column needs to be dropped, and the lower pad pulled back a couple of inches, so there's access from the top.
Honest!
Regards,
Alan
That's a really nice description!
On my 71, non a/c car, the duct doesn't come out without removing the bracket for the hood release handle and cable, and the bracket for the courtesy light and odometer reset cable.
I REALLY think the column needs to be dropped, and the lower pad pulled back a couple of inches, so there's access from the top.
Honest!
Regards,
Alan
Le Mans Master

Joined: Feb 2011
Posts: 5,783
Likes: 400
From: Paoli, IN
St. Jude Donor '17, '19
You pull your Corvette Headlight switch **** out and your lights go on. All of a sudden they go out, then come back on for no apparent reason. Maybe all of the dash lights have gone out or they only come on at one position on the ****. Do not fear. Your Corvette is not possessed. You just need a new headlight switch. The internals of the switch may have become damaged or worn causing the switch to overheat and the lights to go out. As the switch cools, the lights come back on. Overheats again and out they go. The dash lights may work in only one position or not at all because the rheostat has gone bad in the switch and it no longer makes good contact. A new Corvette headlight switch is the answer and it is only a call away at Zip Corvette Parts, 8067 Fast Lane, Mechanicsville, VA 23111, (800) 962-9632. They can supply you with the correct Corvette Parts to get you back out on the road and out of the darkness.
Now let's get those lights back on!
Corvette Headlight Switch pic 01: This is our new 78 � 82 Corvette Headlight Switch. The only other tool you will need is a large flat blade screwdriver and a few minutes.
Corvette Headlight Switch pic 02: Start by disconnecting the battery. If your Corvette has air conditioning, you will have to remove this duct from under the dash. In most cases, it will slide out or only be held in by one or two screws.
Corvette Headlight Switch pic 03: Reach up behind the dash and feel for the headlight switch. When you find it, feel for this small button on the bottom of the switch. Push it all the way in and at the same time pull the **** and shaft out. It doesn't always come right out the first time. Sometimes you just have to keep trying until you hit the right spot. Do not force the **** and shaft out. When the button is in all the way, the **** and shaft will easily slide out of the switch. Note: This can be very frustrating but this is the only way you can get the **** and shaft out without damage. So do not give up. Just keep trying. It will come out, I promise.
Corvette Headlight Switch pic 04: With the **** and shaft removed, unscrew the center headlight switch retainer with a large flat blade screwdriver. This will release the switch and it will fall behind the dash.[IMG][/IMG]
Corvette Headlight Switch pic 05: Pull the switch down towards the floor. Remove the vacuum lines and unplug the switch. Connect the new switch to the plug. Re-connect the vacuum lines and feed the switch up behind the dash. Align it with the dash opening and install the bezel and center retainer. Hold the switch and tighten the retainer.
Corvette Headlight Switch pic 06: With the switch in place slide the **** and shaft into the switch. You will feel it clip into place. It is a good idea to clean the shaft before you re-install it. A little steel wool will work wonders. Or if the chrome **** shows sings of wear - Zip Corvette has correct reproduction headlamp rod and ***** for an 1986-1982 Corvette applications. Re-connect your battery and be ready to venture OUT OF THE DARKNESS!
Personally on our 73 I think it is much simpler and safer as far as breaking something to just pull the dash pad.......just sayin.. not necessarily suggesting......
Now let's get those lights back on!
Corvette Headlight Switch pic 01: This is our new 78 � 82 Corvette Headlight Switch. The only other tool you will need is a large flat blade screwdriver and a few minutes.
Corvette Headlight Switch pic 02: Start by disconnecting the battery. If your Corvette has air conditioning, you will have to remove this duct from under the dash. In most cases, it will slide out or only be held in by one or two screws.
Corvette Headlight Switch pic 03: Reach up behind the dash and feel for the headlight switch. When you find it, feel for this small button on the bottom of the switch. Push it all the way in and at the same time pull the **** and shaft out. It doesn't always come right out the first time. Sometimes you just have to keep trying until you hit the right spot. Do not force the **** and shaft out. When the button is in all the way, the **** and shaft will easily slide out of the switch. Note: This can be very frustrating but this is the only way you can get the **** and shaft out without damage. So do not give up. Just keep trying. It will come out, I promise.
Corvette Headlight Switch pic 04: With the **** and shaft removed, unscrew the center headlight switch retainer with a large flat blade screwdriver. This will release the switch and it will fall behind the dash.[IMG]
[/IMG]Corvette Headlight Switch pic 05: Pull the switch down towards the floor. Remove the vacuum lines and unplug the switch. Connect the new switch to the plug. Re-connect the vacuum lines and feed the switch up behind the dash. Align it with the dash opening and install the bezel and center retainer. Hold the switch and tighten the retainer.
Corvette Headlight Switch pic 06: With the switch in place slide the **** and shaft into the switch. You will feel it clip into place. It is a good idea to clean the shaft before you re-install it. A little steel wool will work wonders. Or if the chrome **** shows sings of wear -
Zip Corvette has correct reproduction headlamp rod and ***** for an 1986-1982 Corvette applications. Re-connect your battery and be ready to venture OUT OF THE DARKNESS!Personally on our 73 I think it is much simpler and safer as far as breaking something to just pull the dash pad.......just sayin.. not necessarily suggesting......
Team Owner
Joined: Sep 2006
Posts: 31,274
Likes: 4,366
From: Westminster Maryland
Hi ID,
For the column the 2 bolts under the column at the dash pad, (easy to get to) and the 2 bolts on the columnar the firewall (not as easy to get to), need to come out. Drop the column as far as it will go, (4" ?), but don't let it 'hang'; it needs to be supported.
Then the driver's side kick panel needs to come out.
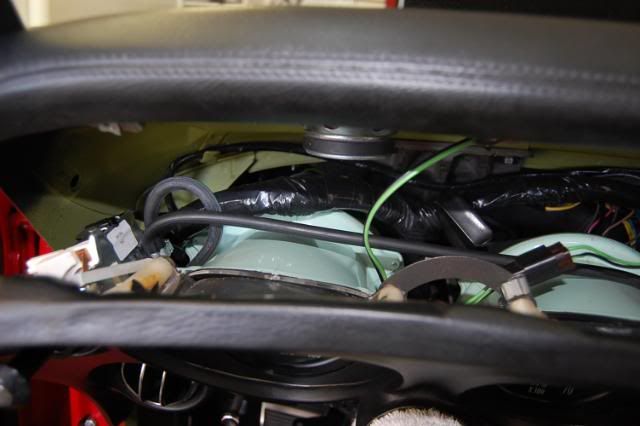
All the dash pad screws need to come out. Then the pad can be moved down and rearward to gain the access shown in my picture.
Under the BEST of circumstances it's not easy.
You have to be VERY careful with the upper dash pad and the lower pad they're VERY fragile.
Good Luck!
Regards,
Alan
For the column the 2 bolts under the column at the dash pad, (easy to get to) and the 2 bolts on the columnar the firewall (not as easy to get to), need to come out. Drop the column as far as it will go, (4" ?), but don't let it 'hang'; it needs to be supported.
Then the driver's side kick panel needs to come out.
All the dash pad screws need to come out. Then the pad can be moved down and rearward to gain the access shown in my picture.
Under the BEST of circumstances it's not easy.
You have to be VERY careful with the upper dash pad and the lower pad they're VERY fragile.
Good Luck!
Regards,
Alan
Racer
Joined: Apr 2011
Posts: 471
Likes: 3
Hi ID,
For the column the 2 bolts under the column at the dash pad, (easy to get to) and the 2 bolts on the columnar the firewall (not as easy to get to), need to come out. Drop the column as far as it will go, (4" ?), but don't let it 'hang'; it needs to be supported.
Then the driver's side kick panel needs to come out.
All the dash pad screws need to come out. Then the pad can be moved down and rearward to gain the access shown in my picture.
Under the BEST of circumstances it's not easy.
You have to be VERY careful with the upper dash pad and the lower pad they're VERY fragile.
Good Luck!
Regards,
Alan

Former Vendor
Joined: Aug 2006
Posts: 76,656
Likes: 1,853
From: Jeffersonville Indiana 812-288-7103
St. Jude Donor '08-'09-'10-'11-'12-'13-'14-'15
We updated this about two months ago... it will show you how to pull the pad!
Corvette Left Hand Dash Pad Removal Made Easy 1968-1977
On the 78-82 cars, I've found it is way easier to remove the speedo and tach housing and reach through the hole to remove the switch vs. trying to get your hand on it from behind, push the button, and attempt to hold it in place while trying to start the spanner nut.
What the 1968-1977 customers do not want to do is remove the side screws and the three across the top and pull the outer edge of the left pad to gain room to the switch... .
This will in most cases crack and break the sub-straight of the dash pad. Sure some have done it this way and some will say no problem but what you won't see is the cracks in the plastic.. until it is too late.
Last edited by Willcox Corvette; Jul 24, 2012 at 01:07 PM.
Racer
Joined: Apr 2011
Posts: 471
Likes: 3
We updated this about two months ago... it will show you how to pull the pad!
Corvette Left Hand Dash Pad Removal Made Easy 1968-1977
On the 78-82 cars, I've found it is way easier to remove the speedo and tach housing and reach through the hole to remove the switch vs. trying to get your hand on it from behind, push the button, and attempt to hold it in place while trying to start the spanner nut.
What the 1968-1977 customers do not want to do is remove the side screws and the three across the top and pull the outer edge of the left pad to gain room to the switch... .
This will in most cases crack and break the sub-straight of the dash pad. Sure some have done it this way and some will say no problem but what you won't see is the cracks in the plastic.. until it is too late.
Corvette Left Hand Dash Pad Removal Made Easy 1968-1977
On the 78-82 cars, I've found it is way easier to remove the speedo and tach housing and reach through the hole to remove the switch vs. trying to get your hand on it from behind, push the button, and attempt to hold it in place while trying to start the spanner nut.
What the 1968-1977 customers do not want to do is remove the side screws and the three across the top and pull the outer edge of the left pad to gain room to the switch... .
This will in most cases crack and break the sub-straight of the dash pad. Sure some have done it this way and some will say no problem but what you won't see is the cracks in the plastic.. until it is too late.