




Rear carpet install help

Racer


Joined: Sep 2012
Posts: 259
Likes: 6

Just go on and start cussing now and get that part behind you. Also don't allow anyone to be around you and by all means don't call the folks who sold you that cheap made bunch of crap that's called replacement carpet no matter who you got it from cause they don't care that it won't fit. You will get through it but you'll never be the same again.

Drifting

Joined: Dec 2012
Posts: 1,360
Likes: 59
From: Meldrim Georgia
Just go on and start cussing now and get that part behind you. Also don't allow anyone to be around you and by all means don't call the folks who sold you that cheap made bunch of crap that's called replacement carpet no matter who you got it from cause they don't care that it won't fit. You will get through it but you'll never be the same again.

Race Director


Joined: Feb 2006
Posts: 12,239
Likes: 19
From: Chino CA
It is the hardest part of installing the capet....I'll actually be doing this in a week or three...!
Alan is soooooo right...better too long than too short...don't ask how I know...!
I will post pics, but results may vary...lol !
Alan is soooooo right...better too long than too short...don't ask how I know...!
I will post pics, but results may vary...lol !

Burning Brakes

Joined: Dec 2011
Posts: 844
Likes: 6
From: Fort Wayne, IN
you just have to be patient and test fit.....alot.
I think I test fitted about 6 times per side to get all of the holes right and it turned out pretty good....except for the drivers side rear panel. I think I went up too far on that side:

I think I test fitted about 6 times per side to get all of the holes right and it turned out pretty good....except for the drivers side rear panel. I think I went up too far on that side:
Racer
Joined: Sep 2012
Posts: 259
Likes: 6
Thats nice work, I just think that as long as the cars didn't change a lot from one to another at the factory when built then it should be that a car could be digitized inside and then the carpet cut to those dimensions and it should fit like a glove. I know wheater tech does that for their floor mats and they really do fit well.

Racer
Joined: Mar 2012
Posts: 353
Likes: 3
From: cincinnati oh
i'm the vp sales for ACC, own an 80 and 75, carpeted them both. before u start, u need a can of spray 3M trim cement and a roll of double face house carpet seam tape. i used the door pieces we provided. the doors were original, but i bought new trim pieces. had to glue carpet to doors, then fitted trim to doors. had to trim the doors down to get the trim to fit. there are two wheel wells provided. there is a front roll molded into both, the rears go back without a drop off. wiring should go in the crease between the deck floor and the wheel well if possible. do not trim them at this point. lay the deck carpet in next. the ears should be tucked in place on each side. coupes are squared off across the top. convertible are rounded off there. the deck should easily reach the storage holes. once you have the deck squared off and laying over the wheel wells, run a chalk line along the bound edges on both sides of the wheel wells and the edge of the storage holes. you'll need at least 2'' of carpet under the deck carpet and riser piece so no floor shows. take deck out. hold the rear wheel well carpet at the back half with your hand, fold front back and spray a light coat of glue on carpet and wheel well. lightly pat it down. glue rear same way. pat it down. locate the loops for the ttop belts before final trim and pat down. mark the seat belt retractor bolt holes also and cut the hole. trim top of wheel well last.
re-install deck and locate the interior light on back wall. spray a 6'' stripe of glue just aft of storage holes, side to side. lightly press it down, pull the deck forward, run a strip od dble face tape at base of rear wall. work the deck back front to back and press to tape. drop rear wall carpet down, spray with contact cemet. lightly press in place and check your light opening hole. finish pressing rear deck in place. hope that helps.
re-install deck and locate the interior light on back wall. spray a 6'' stripe of glue just aft of storage holes, side to side. lightly press it down, pull the deck forward, run a strip od dble face tape at base of rear wall. work the deck back front to back and press to tape. drop rear wall carpet down, spray with contact cemet. lightly press in place and check your light opening hole. finish pressing rear deck in place. hope that helps.
Corvette Stories
The Best of Corvette for Corvette Enthusiasts

Top 10 Most Explosive Corvettes Ever Made: Power-to-Weight Ratio Ranked!
Joe Kucinski
150 hp to 1,250 hp: Every Corvette Generation Compared by the Specs That Matter
Joe Kucinski
8 Coolest Corvette Pace Cars (and Replicas) of All Time
Verdad Gallardo
Top 10 Corvette Engines RANKED by Peak Torque (70+ Years of Muscle!)
Joe Kucinski
Corvette ZR1X Will Be Pacing the Indy 500, And Could Probably Race, Too!
Verdad Gallardo
Top 10 Corvettes Coming to Mecum Indy 2026!
Brett Foote
Top 10 C9 Corvette MUST-HAVES to Fix These C8 Generation Flaws!
Michael S. Palmer
10 Revolutionary 'Corvette Firsts' Most People Don't Know
Joe Kucinski
5 Reasons to Upgrade to an LS6-Powered Corvette; 5 Reasons to Stay LT2
Michael S. Palmer
Instructor
Joined: Apr 2012
Posts: 135
Likes: 1
From: Kirbyville Texas


Drifting
Joined: Dec 2012
Posts: 1,360
Likes: 59
From: Meldrim Georgia
Advanced
Joined: Jan 2013
Posts: 99
Likes: 3
From: Salem Ohio
Has anyone on here done a convertible? If you have a picture of the rear wall I would like to see how someone else handled the area where the rear deck springs are and the drain tubes on the back wall. I can just see my self being very OCD about this and my back already hurts.

Team Owner


Joined: Sep 2006
Posts: 31,225
Likes: 4,312
From: Westminster Maryland
Hi 1969,
The original bulkhead carpet for convertibles was different than that for coupes. The convertible carpet had a 'two-step' tab in place of the coupe's one step.
I'm not sure if anyone is making the proper configuration for the convertible.
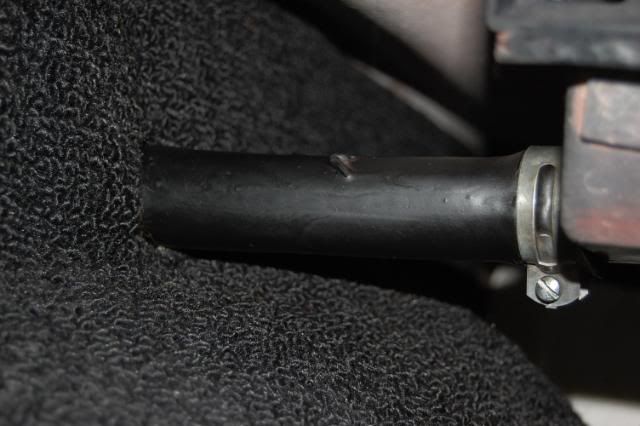
The cutting of the wheel well carpet for the drain tubes is really a matter of fitting the carpet in place, (NOT easy), and then marking and carefully making the cuts for the tubes. (time consuming but possible).
Good Luck!
Regards,
Alan
This is a coupe astro drain... a convertible's is similar.
The original bulkhead carpet for convertibles was different than that for coupes. The convertible carpet had a 'two-step' tab in place of the coupe's one step.
I'm not sure if anyone is making the proper configuration for the convertible.
The cutting of the wheel well carpet for the drain tubes is really a matter of fitting the carpet in place, (NOT easy), and then marking and carefully making the cuts for the tubes. (time consuming but possible).
Good Luck!
Regards,
Alan
This is a coupe astro drain... a convertible's is similar.


Instructor

Joined: Jan 2004
Posts: 242
Likes: 4
From: deland fl
Has anyone on here done a convertible? If you have a picture of the rear wall I would like to see how someone else handled the area where the rear deck springs are and the drain tubes on the back wall. I can just see my self being very OCD about this and my back already hurts.
I did my 75 convertible with ACC carpet from Wilcox. Check photos in album in my profile. Didn't use a drop of glue anywhere, great fit and not that difficult. Also no drain tubes.
Enjoy !
Larry

Race Director
Joined: Apr 2011
Posts: 11,183
Likes: 3,335
From: North of Toronto - Ontario
Then again, that's sooooo far off I'll forget all about this by then
Mooser

Melting Slicks


Joined: Jun 2005
Posts: 2,239
Likes: 74
From: Palatine, Peoples Republic of Illinois
St. Jude Donor '09-'10-'11-12-'13-'14-'15-'16-'17-‘18
NCM Sinkhole Donor

Advanced
Joined: Jan 2013
Posts: 99
Likes: 3
From: Salem Ohio
Thanks, guys I thought that the Carpet would have worked better in a coupe.lol I did things differently than what Alan posted, His looks great! However I started doing it this morning before he responded.lol
This wasn't that bad just time consuming and I took my time
I took some pictures of mine and they are on my garage page. The back portion is finished now I will remove the front carpet and put the heat barrier down then the front carpet next weekend. I did glue the sides as I want them to stay put because they look pretty good
This wasn't that bad just time consuming and I took my time
I took some pictures of mine and they are on my garage page. The back portion is finished now I will remove the front carpet and put the heat barrier down then the front carpet next weekend. I did glue the sides as I want them to stay put because they look pretty good