


Small Garage Restoration
Thread Starter
Racer

Joined: Oct 2007
Posts: 420
Likes: 4
From: Ft Myers Fl
I've got an original (and rough) 75 in the garage and I'm going to pull the body off to begin a long term project restoration. My challenge is to do it in a 1 1/2 car garage with a lower ceiling. I'm going to store the body in a storage garage while I work on the frame motor etc. So, anyone out there ever do this in a smaller garage? I've seen a number of threads with 2 or 3 car garages.
So far, I've got the windshield out so I could assess the cage/frame (it needs a fair amount of new metal welded in). I've got body mount bolts 2-4 loose on both sides. Mount 4 on the driver's side had a previous (crappy) repair. Someone cut the fiberglass to get to the nut and then layered some soft sheet metal to cover the hole. Basically the car was sitting on the mount but it wasn't attached to anything solid. Mount #1 nuts are soaking with penetrating oil.
Here pic of the space I'm working in and mount #4. There is actually plenty of room to work on a car, all around the car. But, no room for the body and frame side by side.


Last edited by bwinterstine; Sep 15, 2013 at 03:22 PM. Reason: Re-Post Pictures that were moved to another address.

Pro

Joined: Nov 2012
Posts: 672
Likes: 0
From: Chesapeake Virginia
I'm in the middle of a frame off right now and here's some lessons I've learned so far:
*get a few large plastic tote bins, label them with what is in them, use one or two for parts you don't plan on re-using but may be suitable for re-sale.
*don't sell any of the original parts till your completely done, you'd be suprised how many little things you'll need to finish up.
*the smaller your work area the more organized you'll have to be.
*get lots of quart size zip lock bags and a few good sharpies, bag EVERYTHING in groups and label the bags with what they go to (THIS IS A MUST),
*take tons of pictures of each area before you disasemble it, they will come in handy when putting it back together.
*get your hands on as many books and manuals as you can, the most important is the AIM for your car. PRICELESS
*what every you decide as a budget, add 20% to it for real life. shipping can add up quick.
*don't be in a hurry, this stuff takes lots of time.
*buy paper towls by the case, you will use LOTS of them.
*allow plenty of lead time when ordering parts, (it took about a month to get my fuel and brake lines after I ordered them).
*Willcox doesn't supply tracking info on their stuff -- Ecklers Does--- Just an FYI
*E-Bay can be your friend (Sometimes)
*invest in a good air compressor and at least an impact gun (you will need it).
*consider buying a blasting cabinet, they come in very hand and you can always re-sell it when your done, check craigslist in your area, you will probably find one that someone else has done the same thing.
all this I've learned and I'm just to the point of putting the body back on the car. I'm sure I'll learn more as I go
Last edited by Jig A Low; May 19, 2013 at 09:10 AM.
Team Owner


Joined: Sep 2006
Posts: 31,266
Likes: 4,361
From: Westminster Maryland
Hi B,
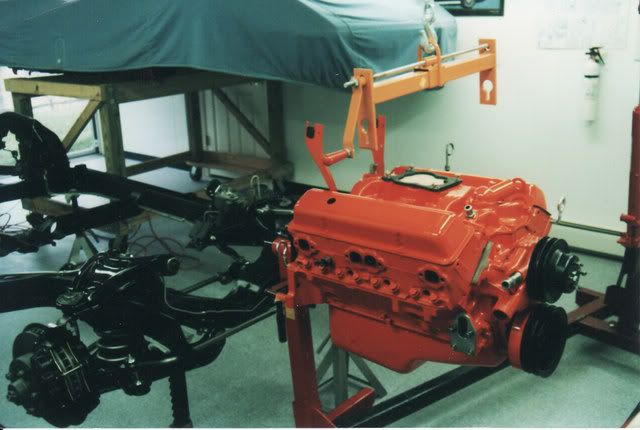
I restored my 71 in a garage in my basement. It's about 14' wide and only about 7'-6" high.
I built a tall dolly to put the body on after I lifted it. This allowed me to work next to the body while I restored the chassis and running gear.
I would push the dolly forward and backward to gain access to the chassis as I worked on it. If you'll notice the front clip and rear clip were unsupported so I could work on the chassis sitting on a rolling stool.
Jig's list is very good. BAG & MARK EVERYTHING. There will be an incredible amount of small parts and fasteners. A boxing/bagging system is the only hope you have of finding what you need when you need it.
Regards,
Alan


Melting Slicks

Joined: Mar 2007
Posts: 2,520
Likes: 11
From: Hinckley OH
One thing I did when possible I would put a nut back onto its stud (like lug nuts) or a bolt back into its threaded hole (like water pump bolts). When the hardware was separate, sometimes I was ready to put a part back on only to discover that the hardware needed work or replacement. That always resulted in holding up progress. When the bolts/nuts were threaded into/onto the part they always were ready when the part was because they were restored or replacements were obtained while I was working on the part. I also had a lot fewer zip lock bags to look through to find the nuts and bolts that were in those.
Thread Starter
Racer
Joined: Oct 2007
Posts: 420
Likes: 4
From: Ft Myers Fl
All good advice. I'm already collecting the parts and keeping the nuts and bolts with the larger part it belongs to. I'm wrapping them in paper and masking tape and then taping the bundle to the part it goes with. When I can, for example, the two plates that attach to the wheel well/fender; I had to remove them to get to body mount #1 and also a vacuum canister ... keeping all the bolts threaded into these parts. I'm taking lots of pictures and will need to spend time each week naming them ... sometimes its tough to tell what the heck the thing is.
I'm encouraged by Alan71, my garage is 15ft wide but I'm using some of the width for a work bench, storage, etc. I've rented a 10x20 storage unit so anything I take off and other stuff will need to be stored there. I've tried to keep everything off the floor but the compressor, welder and bench take up space.
I've learned a lot from this forum already ... this is my first C3. All 4 body mounts are out ... I know there's a checklist of other stuff to disconnect/remove ... next weekend I'll have at it some more.
Thanks for the advice!
Race Director

Joined: Mar 2006
Posts: 14,112
Likes: 28
From: Florida
You did a nice job of rocking the garage.
A nice coat of white paint would have made it a lot brighter in there.
Move as much stuff into storage as you can.
Keeping the floor clear is great. A hose is the best broom ever.
A nice coat of white paint would have made it a lot brighter in there.
Move as much stuff into storage as you can.
Keeping the floor clear is great. A hose is the best broom ever.
Corvette Stories
The Best of Corvette for Corvette Enthusiasts

Top 10 Most Expensive Corvettes Ever Sold on Bring A Trailer
Brett Foote
10 Things Every Corvette Owner Needs (2026 Edition)
Michael S. Palmer
8 Most "Only Corvette Owners Understand" Quirks and Problems
Pouria Savadkouei
10 Reasons the C6 Z06 is Still A Performance Benchmark After 20 Years
Joe Kucinski
How Much Horsepower Every Corvette Engine "LOST" in 1972
Joe Kucinski
Top 10 DOs and DON'Ts for Protecting Your Convertible Top!
Michael S. Palmer
Top 10 Most Explosive Corvettes Ever Made: Power-to-Weight Ratio Ranked!
Joe Kucinski
150 hp to 1,250 hp: Every Corvette Generation Compared by the Specs That Matter
Joe Kucinski
8 Coolest Corvette Pace Cars (and Replicas) of All Time
Verdad GallardoTeam Owner
Joined: Sep 2006
Posts: 31,266
Likes: 4,361
From: Westminster Maryland
Hi B,
The garage is 22 feet long minus 2 feet for the work surfaces and cabinets.
I found being able to move the body forward and backward as well as be able to move the chassis gave me enough flexibility.
I don't have a compressor or welder so that saved some space. In addition I set up shelves in another area of the basement for storage for parts.
The only storage I had in the garage were shelves for shoe box sized plastic boxes for fasteners and small parts. A dozen boxes shoe box sized, and six boxes the size of four shoe boxes.
I bagged and labeled EVERYTHING. I found that was the only way I could quickly locate things when the car was still apart and the parts and fasteners were being restored.
When I was doing really filthy things like stripping the frame I found I was taking at least 1 day in 8 to clean the garage.
BIG FUN!
Regards,
Alan

Drifting


Joined: Jun 2010
Posts: 1,781
Likes: 15
From: Oxford Ohio
*get lots of quart size zip lock bags and a few good sharpies, bag EVERYTHING in groups and label the bags with what they go to (THIS IS A MUST),
*take tons of pictures of each area before you disasemble it, they will come in handy when putting it back together
This is a must, or you'll be looking for things forever. Or you'll end up buying things you already have.
*what every you decide as a budget, add 20% to it for real life. shipping can add up quick.
*don't be in a hurry, this stuff takes lots of time.
*consider buying a blasting cabinet, they come in very hand and you can always re-sell it when your done, check craigslist in your area, you will probably find one that someone else has done the same thing.
A cabinet will make life so much easier when you start doing the small parts.
There is a thread on here called Pics of my 69 or look at my 69 domrthing like that. He has photos of about everypart he's restored to date.
Good Luck and enjoy the experience. When you get frustrated quit for the day and come back another time.
Instructor
Joined: Mar 2013
Posts: 215
Likes: 0
From: Sunshine Coast Qld
Where theres a will, theres a way. I wouldn't let the size of my garage stop me
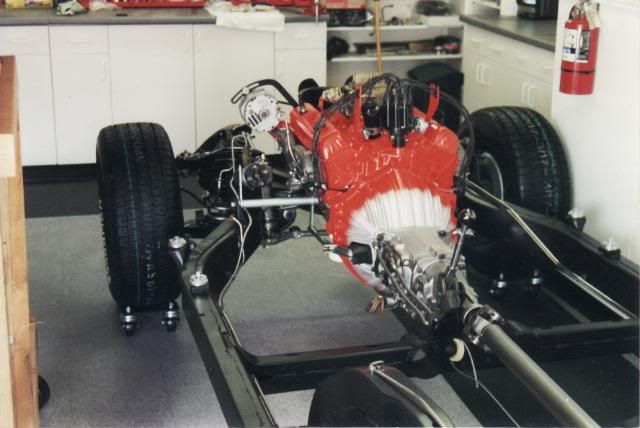
Alan71, that's awesome, i love seeing corvettes in their underwear. I guess being a mechanic for 20 odd years means i prefer looking at the workings, rather than the shiny bits.
Alan71, that's awesome, i love seeing corvettes in their underwear.
I guess being a mechanic for 20 odd years means i prefer looking at the workings, rather than the shiny bits.
Thread Starter
Racer
Joined: Oct 2007
Posts: 420
Likes: 4
From: Ft Myers Fl
I found the checklist and will spend some time this week adding to it from all the comments found on this site. I have plenty of storage bins in the attic...time to bring them down.
Highlight of this week was vacuuming out the dried mouse body from the #3 body mount area.
Highlight of this week was vacuuming out the dried mouse body from the #3 body mount area.

Melting Slicks
Joined: Jun 2009
Posts: 2,709
Likes: 3
From: Savannah GA
My 1977 came to me in piles, nevermind boxes. I probably have as much time invested identifying, locating or procuring all the various fasteners involved in reassembling this thing as I do in the actual refurbishment. Use masking tape to label your baggies, Sharpies rub off the bags themselves. Invest in a wire labeling sticker kit and use it to mark all your harnesses and vacuum lines as you disassemble them; this will save several days of frustration IDing them in a year or more as you reassemble... hose 1 mates to tee 1 etc.
Melting Slicks


Joined: May 2005
Posts: 2,486
Likes: 71
From: Elkhart Lake, Wisconsin
When I did my 69, I bagged and labeled everything then put into large bins. The mistake I made was I did not keep track of what parts are in what bins, so sometimes I would have to go through 5 big bins to find the part I wanted.
If I were to do it again, I would put in an Excel sheet what is in each bin so I would only have to search through one.
I also blasted and painted etc each part as I took it off, so dis-assembly took longer, but then I knew what I was keeping was ready to put back on, or if I needed to order new, I would know then, not later.
Melting Slicks
Joined: May 2005
Posts: 2,486
Likes: 71
From: Elkhart Lake, Wisconsin
I found the checklist and will spend some time this week adding to it from all the comments found on this site. I have plenty of storage bins in the attic...time to bring them down.
Highlight of this week was vacuuming out the dried mouse body from the #3 body mount area.
Highlight of this week was vacuuming out the dried mouse body from the #3 body mount area.
This was the mouse nest under my passenger seat:

Le Mans Master


Joined: Sep 2002
Posts: 5,236
Likes: 898
From: Myrtle Beach SC
I've got a 78 I keep toying with a frame off and find this a useful discussion...always impressed with what Alan can get done in small spaces and Jigs list is a perfect start. I took on an engine compartment refresh and found this tip helpful suggested by a forum member. Use AIM pages and as you removed nuts/bolts, mark their length on the AIM sheet. It has the schematics that were used for assembly plus part numbers which will come in handy in the event you find a need to replace parts.
I would than use styrofoam cups (another forum suggestion) I could write a description (like A/C brackets) and reference the AIM to keep nuts and bolts instead of baggies. I did some baggies but liked working with the cups easier. Probably paper cups would have been cheaper but tired of looking for the right size.
I have a two-car garage and thought it best to get a storage unit onsite to store stuff as you have done. A blast cabinet is incredibily helpful that I used all the time so it occupys space.
Good luck and I'm always encouraged by those like yourself that take on these projects in limited space. Its much easier when one has 3-4 bays but one to two bays is a real challenge!
I would than use styrofoam cups (another forum suggestion) I could write a description (like A/C brackets) and reference the AIM to keep nuts and bolts instead of baggies. I did some baggies but liked working with the cups easier. Probably paper cups would have been cheaper but tired of looking for the right size.
I'm encouraged by Alan71, my garage is 15ft wide but I'm using some of the width for a work bench, storage, etc. I've rented a 10x20 storage unit so anything I take off and other stuff will need to be stored there. I've tried to keep everything off the floor but the compressor, welder and bench take up space.
Good luck and I'm always encouraged by those like yourself that take on these projects in limited space. Its much easier when one has 3-4 bays but one to two bays is a real challenge!
Thread Starter
Racer
Joined: Oct 2007
Posts: 420
Likes: 4
From: Ft Myers Fl
I just received the aim last week and have had only a brief chance to look thru it. Wow! I'll try to keep this thread open for anything interesting or problems i can't find the answer to.
My progress will be slow...i can only devote a few hours per week...slow and steady.
My progress will be slow...i can only devote a few hours per week...slow and steady.
Thread Starter
Racer
Joined: Oct 2007
Posts: 420
Likes: 4
From: Ft Myers Fl
Here is a picture of the "yahoo" repair someone did on the #4 driver side body mount...the nut is worn thru the fiberglass and the metal brace is not attached to anything. I bent the right side down to reveal the hole someone cut in the fiberglass.
http://i241.photobucket.com/albums/f...pse19300a9.jpg
http://i241.photobucket.com/albums/f...pse19300a9.jpg