


Doorgunner's '68 Convertible Project
Thread Starter
2026 Loser of the Year


Joined: Sep 2013
Posts: 36,607
Likes: 7,053
From: New Or-leens Loo-z-anna
The moderators should keep my thread directly below RVZIO's thread at all times.
They could subtitle his threads as "How to do it".........and my thread as "How NOT to do it!"

Burning Brakes


Joined: Dec 2013
Posts: 997
Likes: 210
From: Schaumburg IL

Thread Starter
2026 Loser of the Year
Joined: Sep 2013
Posts: 36,607
Likes: 7,053
From: New Or-leens Loo-z-anna
That too!
After the recent boil over, I pulled all the spark plugs to check for water in the cylinders or on the plugs....didn't find any
Now Ill follow members advice and reduce the gap to .035 since the old plugs/engine did great at .035.....also---Like M.W, said---"find out why the spark is weak".
Annnnnnnnd reinstall the engine on the Harley......... Of course, it only took 4 hours to dig the bike out of the storage room and reorganize the room so I could actually walk around in it.......again

Last edited by doorgunner; Aug 6, 2014 at 11:27 PM.
Thread Starter
2026 Loser of the Year
Joined: Sep 2013
Posts: 36,607
Likes: 7,053
From: New Or-leens Loo-z-anna
RATS!
The Harley re-assembly is going to take up all of next week....then it will be sold.......that will give me plenty of $$$ to finish the '68, correct the front/rear bumper panels from Bubba's '78 left-over mods!
BUT......I will also try to install those nearly-new-looking door panels while I'm in the garage (these 96*/98* days keep the garage like a sauna!)
EDIT: Update on the "sandbag repair" that I began 4 days ago by placing a bag of grit-blasting sand on the warped/bulged edge of the hood (I should have taken a "before pic" but forgot.........and----since the paint is shot, I didn't bother placing a towel under the bag)...........

This is day 4 after removing the bag----it's not easy to see, but there still is a small difference with the hood still about 3/16" higher......so the bag will be put back on the spot for another 2 days (I also placed a bag on the passengers side of the hood to prevent it from lifting/twisting)..........

NOT an ideal way to repair a warped hood.....but it's working!
The Harley re-assembly is going to take up all of next week....then it will be sold.......that will give me plenty of $$$ to finish the '68, correct the front/rear bumper panels from Bubba's '78 left-over mods!
BUT......I will also try to install those nearly-new-looking door panels while I'm in the garage (these 96*/98* days keep the garage like a sauna!)
EDIT: Update on the "sandbag repair" that I began 4 days ago by placing a bag of grit-blasting sand on the warped/bulged edge of the hood (I should have taken a "before pic" but forgot.........and----since the paint is shot, I didn't bother placing a towel under the bag)...........
This is day 4 after removing the bag----it's not easy to see, but there still is a small difference with the hood still about 3/16" higher......so the bag will be put back on the spot for another 2 days (I also placed a bag on the passengers side of the hood to prevent it from lifting/twisting)..........
NOT an ideal way to repair a warped hood.....but it's working!
Last edited by doorgunner; Aug 10, 2014 at 05:36 PM.
Thread Starter
2026 Loser of the Year
Joined: Sep 2013
Posts: 36,607
Likes: 7,053
From: New Or-leens Loo-z-anna
I added/included the "sand-bag" repair since I made this post originally.
Thanks for checking up on me.....I just went through the entire thread.....it seems I've "lost" nearly six months of working on the car due to "situations".
After the Harley is re-assembled and sold, maybe the pace can pick up!

Melting Slicks

Joined: Aug 2012
Posts: 3,487
Likes: 83
From: Titusville Florida
I added/included the "sand-bag" repair since I made this post originally.
Thanks for checking up on me.....I just went through the entire thread.....it seems I've "lost" nearly six months of working on the car due to "situations".
After the Harley is re-assembled and sold, maybe the pace can pick up!
Thanks for checking up on me.....I just went through the entire thread.....it seems I've "lost" nearly six months of working on the car due to "situations".
After the Harley is re-assembled and sold, maybe the pace can pick up!
don't beat yourself up for the "situations", the important thing is you pick yourself up and get back at it.
Now get that Harley done so you can get back at the 68
Thread Starter
2026 Loser of the Year
Joined: Sep 2013
Posts: 36,607
Likes: 7,053
From: New Or-leens Loo-z-anna
The garage has been crowded the last four daze......
I'm having to do a rebuild on the rear Harley brake caliper (which is about the same as a Vette brake job).....
and of course---touch-up paint is necessary while the swing-arm is removed!
After the bike sitting for 4 years (because of my son's death), I'll go through everything to make sure it's roadworthy again before putting a "For Sale" sign on it.
I did manage to take a pic of the traffic jam in the garage though---the Vette is back there------somewhere.........

EDIT: Ohhhhhh.....and the weights (sandbags) will be removed from the hood edges tomorrow......the bulges (from the hood resting on left-overscrewdrivers for many years) should be flattened out and slightly lower than the fender edges.
25625
I'm having to do a rebuild on the rear Harley brake caliper (which is about the same as a Vette brake job).....
and of course---touch-up paint is necessary while the swing-arm is removed!
After the bike sitting for 4 years (because of my son's death), I'll go through everything to make sure it's roadworthy again before putting a "For Sale" sign on it.
I did manage to take a pic of the traffic jam in the garage though---the Vette is back there------somewhere.........
EDIT: Ohhhhhh.....and the weights (sandbags) will be removed from the hood edges tomorrow......the bulges (from the hood resting on left-overscrewdrivers for many years) should be flattened out and slightly lower than the fender edges.
25625
Last edited by doorgunner; Aug 15, 2014 at 01:01 AM.
Corvette Stories
The Best of Corvette for Corvette Enthusiasts

Every 2027 Corvette Engine Explained
Joe Kucinski
Designer Imagines A Corvette That Looks More Like a Corvette Than the Corvette
Verdad Gallardo
10 Ugly Corvettes That We Still Kinda Love
Joe Kucinski
Top 10 Most Expensive Corvettes Ever Sold on Bring A Trailer
Brett Foote
10 Things Every Corvette Owner Needs (2026 Edition)
Michael S. Palmer
8 Most "Only Corvette Owners Understand" Quirks and Problems
Pouria Savadkouei
10 Reasons the C6 Z06 is Still A Performance Benchmark After 20 Years
Joe Kucinski
How Much Horsepower Every Corvette Engine "LOST" in 1972
Joe Kucinski
Top 10 DOs and DON'Ts for Protecting Your Convertible Top!
Michael S. Palmer
Thread Starter
2026 Loser of the Year
Joined: Sep 2013
Posts: 36,607
Likes: 7,053
From: New Or-leens Loo-z-anna
Here's an update on the "Bubba Sandbag" hood repair:
The sandbags have been on the hood about 12 days....I have removed them every 4 days to check the "decrease in the bulge"....it gradually lowered about 1/4" every 4 days.
For a visual reference as to how high the bulge originally was, I laid a similar size screwdriver next to the spot where the hood edge was bulged...(don't worry about the sand/the car needs new paint).....

That screwdriver would easily fit under the hood edge before the sandbags were placed over the "lump".....if the bulge does try to return, I'll use a heat lamp under the hood for a few hours to reform the fiberglass with a lighter sandbag in place(the temperature will have to be kept below 200*F to keep from separating the fiberglass bracing----but I don't expect that I will have to use the heat)
Now.....back to rebuilding the Harley.
The sandbags have been on the hood about 12 days....I have removed them every 4 days to check the "decrease in the bulge"....it gradually lowered about 1/4" every 4 days.
For a visual reference as to how high the bulge originally was, I laid a similar size screwdriver next to the spot where the hood edge was bulged...(don't worry about the sand/the car needs new paint).....
That screwdriver would easily fit under the hood edge before the sandbags were placed over the "lump".....if the bulge does try to return, I'll use a heat lamp under the hood for a few hours to reform the fiberglass with a lighter sandbag in place(the temperature will have to be kept below 200*F to keep from separating the fiberglass bracing----but I don't expect that I will have to use the heat)
Now.....back to rebuilding the Harley.

Thread Starter
2026 Loser of the Year
Joined: Sep 2013
Posts: 36,607
Likes: 7,053
From: New Or-leens Loo-z-anna
I wasn't sure that the "Bubba Treatment" would help...
but it looks like it was worth the effort of resorting to "foolishness".......LOL!
I'll be confident in another week that the spot will remain flat....then I can repair the chip on the front of the hood/wet-sand and respray it....
(while I have the gloss black out of the cabinet to respray the Harley frame )
25800
but it looks like it was worth the effort of resorting to "foolishness".......LOL!
I'll be confident in another week that the spot will remain flat....then I can repair the chip on the front of the hood/wet-sand and respray it....
(while I have the gloss black out of the cabinet to respray the Harley frame
)25800
Last edited by doorgunner; Aug 17, 2014 at 01:02 AM.
Thread Starter
2026 Loser of the Year
Joined: Sep 2013
Posts: 36,607
Likes: 7,053
From: New Or-leens Loo-z-anna
I'm just checking in. Since I'm dealing with the PTSD constantly, I left the sandbags on the hood they will come off tomorrow so I can pressure test the cooling system to make sure the head gaskets are o k. Then refill and take the car out / fill the tank for the 3rd test drive on the new front tires. I replaced the mechanical fan with a 1650 rpm electric fan that I removed from the FRONT of the radiator (overkill) the 2200rpm puller fan works great on the back of the radiator. The engine just needed more ambient air thru the two 4" cold air ducts than the 700rpm fan could provide. Experimenting on my previously Bubba'd car/1step forward at a time!
EDIT: everyone encourage Rvzio to continue on his great project/he's had a setback.
26000
EDIT: everyone encourage Rvzio to continue on his great project/he's had a setback.
26000
Last edited by doorgunner; Aug 20, 2014 at 08:09 PM.

Pro

Joined: Sep 2013
Posts: 657
Likes: 99
From: Slidell Louisiana
RATS! I forgot to try out the spare camera to get some sound/video of the dual exhaust! And running more errands hasn't helped either.
I did manage to finish installing new heater hoses......[I]
Manifold outlet to heater hose valve to lower heater core inlet.....
Heater core upper outlet to aftermarket manual open/closed-valve to outboard expansion tank pipe......
Inboard expansion tank pipe to water pump inlet[/I]
I opened both valves so the entire system would be "burped" and filled with water....
So far it's taken 3 & 1/2 gallons of water to replace what was lost in the "boil-over" after parking in the driveway.
Annnnnd on top of that, the engine is/was varying rpm at idle from 400 to 900 rpm-------with a nice-loud-rapid ticking sound coming from the distributor about 5 minutes before the temp needle began leaning to the right side of the gauge....which could explain the overheating.....
......................................I think
So tomorrow I'll remove the distributor cap and get some pics of whatever came loose.......repair it....and finish adding coolant to the system......
Here is my heater....


Thread Starter
2026 Loser of the Year
Joined: Sep 2013
Posts: 36,607
Likes: 7,053
From: New Or-leens Loo-z-anna
War story: the Agent Orange in Nam diluted my blood to the point that I wear a long sleeve shirt in my house to stay comfortable.....anything below 74*F is chilly to me/cockpit heater is needed........Br-r-r-r-r-r-r--r--r !
Last edited by doorgunner; Aug 23, 2014 at 09:48 PM.
Thread Starter
2026 Loser of the Year
Joined: Sep 2013
Posts: 36,607
Likes: 7,053
From: New Or-leens Loo-z-anna
RATS!
RVZIO called my bluff about flopping in the easy chair and accomplishing NOTHING!
So I rented a coolant system pressure tester (afraid of what I might find)................................... .........
Great news..........2 hours later, and no loss of pressure at 15 lbs. ( I was concerned about a leaking headgasket).

I followed other thread-advice and used a mighty-vac to open the heater-core valve so the whole system would be tested........I also removed that NEW 180* thermostat to make sure it was sticking and preventing good coolant flow at highway speeds....
I also am picking up a roll of thick foam insulation to seal the area between the hood and the Bubba'd top radiator support.
Ohhhhhhh......and I finally removed the sandbags off the hood edges after about 3 weeks---the bags did a great job of flattening the hump caused by a previous owner's screwdriver forgotten for years under the driver's side hood edge
"Gotta go buy some stuff now!"
RVZIO called my bluff about flopping in the easy chair and accomplishing NOTHING!
So I rented a coolant system pressure tester (afraid of what I might find)................................... .........
Great news..........2 hours later, and no loss of pressure at 15 lbs. ( I was concerned about a leaking headgasket).
I followed other thread-advice and used a mighty-vac to open the heater-core valve so the whole system would be tested........I also removed that NEW 180* thermostat to make sure it was sticking and preventing good coolant flow at highway speeds....
I also am picking up a roll of thick foam insulation to seal the area between the hood and the Bubba'd top radiator support.
Ohhhhhhh......and I finally removed the sandbags off the hood edges after about 3 weeks---the bags did a great job of flattening the hump caused by a previous owner's screwdriver forgotten for years under the driver's side hood edge
"Gotta go buy some stuff now!"
Last edited by doorgunner; Aug 25, 2014 at 05:22 PM.
Pro
Joined: Sep 2013
Posts: 657
Likes: 99
From: Slidell Louisiana
Finally.......here's a 10 foot pic of the less-than-perfect-daily-driver seat covers install and in the car!
Hmmmmmm....the passenger's seat is missing the chrome release ****.....
Seems as though I forgot to drill out a couple broken seat mounting bolts before I installed the heat/sound proofing/carpet.......
THAT turned out to be a fun project!
BUT......it's history now................
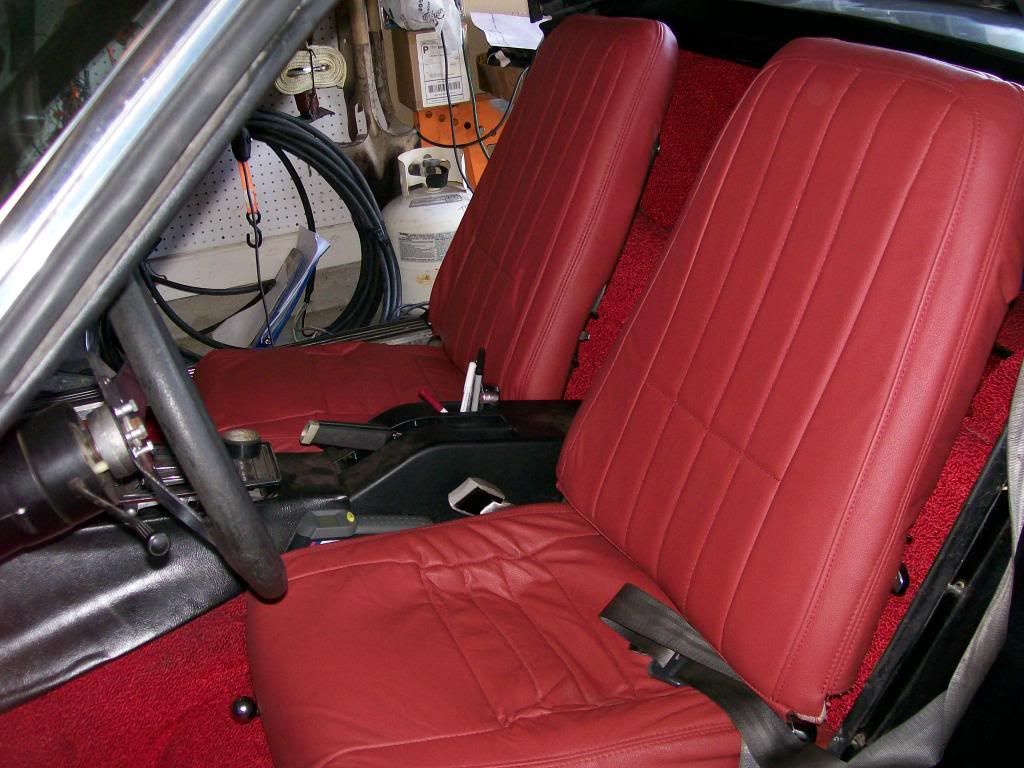
Now for a pair of color-matching 3-point seat belts...........and floor mats.
Maybe tomorrow I can install the new horn button assembly and finish installing the console/shifter assembly.....maybe....probably.
Hmmmmmm....the passenger's seat is missing the chrome release ****.....
Seems as though I forgot to drill out a couple broken seat mounting bolts before I installed the heat/sound proofing/carpet.......
THAT turned out to be a fun project!
BUT......it's history now................
Now for a pair of color-matching 3-point seat belts...........and floor mats.
Maybe tomorrow I can install the new horn button assembly and finish installing the console/shifter assembly.....maybe....probably.
Thread Starter
2026 Loser of the Year
Joined: Sep 2013
Posts: 36,607
Likes: 7,053
From: New Or-leens Loo-z-anna
Yes.........red seats, red carpet, red seat belts.......black console, black door panels, black dash top and panels.....I didn't plan it that way---it just happened! (V.A. meds don't help the thinking process LOL)
I installed the off-color driver's seat belt temporarily so the car would pass the State safety inspection (I could not road-test the car without the seat belt installed and the Inspection Sticker in the bottom corner of the windshield)
But.....I'm starting to like the weird red/black color combination of the interior!
(My wife said definitely buy two sets of "RED Seatbelts" though/We should ALWAYS listen to our wives!)
26400
Last edited by doorgunner; Aug 25, 2014 at 10:59 PM.

Safety Car


Joined: Mar 2007
Posts: 3,518
Likes: 37
Yes.........red seats, red carpet, red seat belts.......black console, black door panels, black dash top and panels.....I didn't plan it that way---it just happened! (V.A. meds don't help the thinking process LOL)
I installed the off-color driver's seat belt temporarily so the car would pass the State safety inspection (I could not road-test the car without the seat belt installed and the Inspection Sticker in the bottom corner of the windshield)
But.....I'm starting to like the weird red/black color combination of the interior!
(My wife said definitely buy two sets of "RED Seatbelts" though/We should ALWAYS listen to our wives!)
26400
I installed the off-color driver's seat belt temporarily so the car would pass the State safety inspection (I could not road-test the car without the seat belt installed and the Inspection Sticker in the bottom corner of the windshield)
But.....I'm starting to like the weird red/black color combination of the interior!
(My wife said definitely buy two sets of "RED Seatbelts" though/We should ALWAYS listen to our wives!)
26400
The pictures in the ads look like there is no big issue with the different quality but there is and it is worth getting the real ones.
Thread Starter
2026 Loser of the Year
Joined: Sep 2013
Posts: 36,607
Likes: 7,053
From: New Or-leens Loo-z-anna
Getting new seat belts: They cost either about $350 for as stock ones or about $199 for second best. I got the second best and regret it. They work fine but are thin, look cheap, and also always a bother to put on right. Don't retract nicely like new stock ones. I would rather have stock ones that just work like new and look like new stock ones.
The pictures in the ads look like there is no big issue with the different quality but there is and it is worth getting the real ones.
The pictures in the ads look like there is no big issue with the different quality but there is and it is worth getting the real ones.
thanks for the info.....my project only had ruined/rusty lap belts...
Rookie question: Would I be able to use the shoulder belts on the upper seat (1968/no head-rests/no guides for shoulder belts)?
26700
Last edited by doorgunner; Aug 27, 2014 at 03:31 AM.
Le Mans Master


Joined: Oct 2010
Posts: 6,943
Likes: 850
From: melbourne florida
2023 C3 of the Year Finalist - Modified
mine is more like what the hell was that idiot thinking.