When you click on links to various merchants on this site and make a purchase, this can result in this site earning a commission. Affiliate programs and affiliations include, but are not limited to, the eBay Partner Network.
Doorgunner, I was looking at your gill replacement starting on page 251. I see you installed your 68/69 gills with the front clip removed, do you think this could be done with the front clip still bonded to the car?
I think You have the skill to install the gills while the clip is on the car....but I do not know if there is an "airbox" behind your '76 fender? Who knows---your car may be easier to modify than mine!
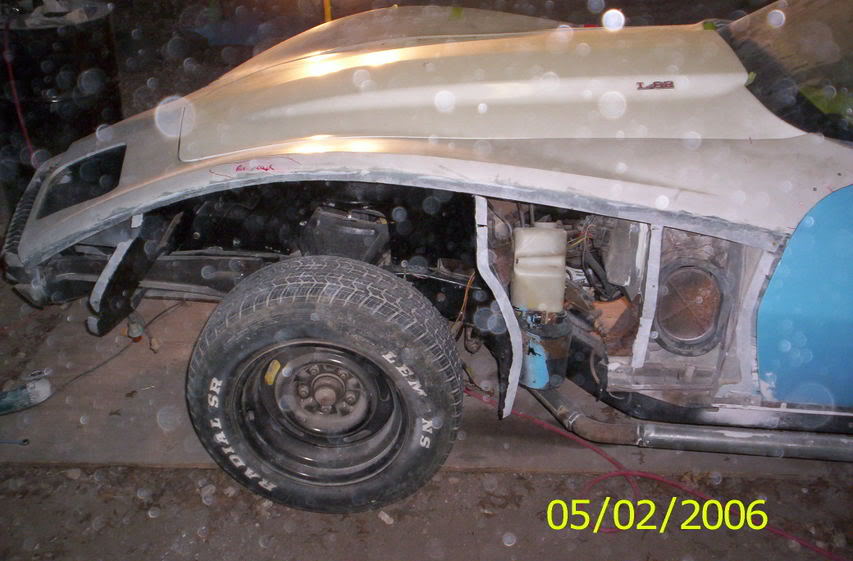
I'm guessing the problem would be the #4 gill on my car. The front of it rests against the "airbox" on my '68.
Below are pics and a couple measurements of my clip-less '68.
I think....the angled piece of fiberglass that the white arrow is pointing at is actually a remnant of the original #4 gill that the original owner did not remove when he installed the '76 "vent" into the fender.........
You can see in both pics below the 8 inch "mark"....right or wrong, that was my reference point for installing the gills....
The #4 gill normally is a "dummy-gill"....it is sealed-off so that water and dust will not be sucked into the oval vent door.......
I MAY make the #4 gill functional, but I would have to "notch" the airbox and seal the notch to keep water and dust out of the kickpanel door-vent.
When I set the clip onto the car "just to see where I am at"...I will decide about the #4 gill.
Sorry I couldn't help you very much as your car may be different behind the fender.
BUT...to repeat....I'm sure you can handle it.
Last edited by doorgunner; Jun 22, 2021 at 02:20 AM.
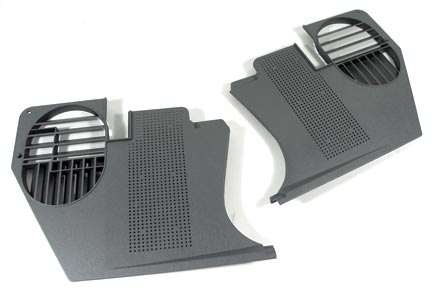
I assume that big darker oval in the pictures is a flapper valve for interior ventilation?
Yep...it's a metal "door" with a rubber seal around the edges. It allows "cool" air to blow through the louvers in the kick-panel onto your shoes when you slide the lever on the console.
If your car doesn't have that door assembly you are probably better-off/less hassle doing your gill mod. (I had those in my '69 vert Camaro and always liked the airflow ...that's the only reason I am not deleting the door-vent assemblies).
In other news...the A.D.D. kicked in as I was about to finish the garage door insulation.
I saw the box of parts for the headlite Relay and decided to test-fit the piston and rod assemblies.....
I bought the 5/16" brass washers and mocked-up the piston assembly.......
one end of piston/o-ring/brass washer........
o-ring is inserted into piston-lip-seal cavity/brass washer is placed on o-ring to hold it inside the lip-seal....the other end of the piston is stacked the same way. (not shown)....
The assembly is placed onto the diaphram rod and held in place with the 4-40 tpi nut rather than risk re-crimping the tip of the rod..........
Note: As another member said...the I.D./hole in the brass washers is slightly oversize and slips past the lower crimp on the left end of the rod....
The brass washer holes will be filled with silver-solder and re-drilled to .096" so the washer will fit tightly on the rod and firmly against the lower crimp. The nut will hold the brass washer on the right end of the piston in place . (I did not try to re-crimp the right-end assembly onto the rod since I was afraid the new crimp would possibly cause the tip of the rod to break off from being too thin in the crimped area)
4 correct size washers. kind of pricey for washers but come with some other stuff too. https://www.ebay.com/itm/233850947256 the used set i bought seem good. seller says these are good. really easy to lose those itty bitty washers...
Last edited by derekderek; Jun 22, 2021 at 02:57 PM.
Yep...it's a metal "door" with a rubber seal around the edges. It allows "cool" air to blow through the louvers in the kick-panel onto your shoes when you slide the lever on the console.
If your car doesn't have that door assembly you are probably better-off/less hassle doing your gill mod. (I had those in my '69 vert Camaro and always liked the airflow ...that's the only reason I am not deleting the door-vent assemblies).
Yes, I don't think my 79 has that. I'll see if I can find some pictures of the 78-82 cars with the front clip removed to see what I might be up against.
the vents draw the air from the wiper trough. supposed to be a piece of screen keeping the life forms out. pull the kick panel and it is right there with a vacuum can on my 75. about 100% sure it wasn't deleted from 75 to 79. possibly with nose change in 80.
Yes, I don't think my 79 has that. I'll see if I can find some pictures of the 78-82 cars with the front clip removed to see what I might be up against.
I don't know the year of this car......maybe you recognize the crash-bumper. IF your car has vent louvers in the kick panels it probably has the vent-door assemblies.....
4 correct size washers. kind of pricey for washers but come with some other stuff too. https://www.ebay.com/itm/233850947256 the used set i bought seem good. seller says these are good. really easy to lose those itty bitty washers...
ITTY BITTY???? I dropped an original washer on the floor...I'd need a telescope to find it
I ended up buying a pack of 10 bras washers 5/16" O.D.(perfect) & 1/8" I.D.( )...but couldn't find any with the ITTY BIDDIER hole in them....hence, soldering gun.
Originally Posted by Priya
My car does not have vent louvers in the kick panel.
You may have dodged a big hassle if you install gills.
MEANWHILE......it took only 3 weeks to do 8 hours work/$80 worth of insulation and Aluminum HVAC tape......
TAAAA DAAA (per recovery room nurse).....
I'ma need sunglasses when I look that way
Last edited by doorgunner; Jun 22, 2021 at 06:45 PM.
NEXT Question: Do you EVER use the vents...Huhhhhh?
I think the early C3's have a cable direct to the vents, but not on my 79 that I know of. I think jts all operated through the heater/ac controls beside the fan on the centre console.
i took a pic last night of the vent with vacruator in front of it. (new word!) tried to load it 3 times. and it jumps back to the 4l60 page. it will probably work later. there it is! and now i know what i have to do to my new garage door in north port florida if and when i get in there in the next few weeks. builders are idiots. they fail an inspection and don't do what the town failed them for before they try to have it reinspected. it is really dragging on, but these inspectors are working for ME! keeping the builders from passing on stupidity to the buyer.
Last edited by derekderek; Jun 23, 2021 at 07:11 AM.
The insulated garage door looks GREAT!! Maybe you could start a new profession? I would pay to have mine done like that. Interested in traveling to S.W. Fla. for a long weekend?? No jambalaya, but lots of conch chowder.....
The insulated garage door looks GREAT!! Maybe you could start a new profession? I would pay to have mine done like that. Interested in traveling to S.W. Fla. for a long weekend?? No jambalaya, but lots of conch chowder.....
I'll drive "down there" in the Vette when it's finished
Designer Imagines A Corvette That Looks More Like a Corvette Than the Corvette
Slideshow: A Jaguar designer's personal project imagines what a modern front-engined Corvette might look like if Chevrolet revisited the golden age of the Stingray.


 )...but couldn't find any with the ITTY BIDDIER hole in them....hence, soldering gun.


