


Doorgunner's '68 Convertible Project
Pro


Joined: Feb 2006
Posts: 502
Likes: 6
From: Chesterfield Virginia
DOORGUNNER,
What the heck happened here. I can not view any of your pictures!!! Looks like Photobucket slammed your door shut. Time to release the pit bull again and get somebodies attention. Love reading your thread but man we need pictures. LOL
NORM
What the heck happened here. I can not view any of your pictures!!! Looks like Photobucket slammed your door shut. Time to release the pit bull again and get somebodies attention. Love reading your thread but man we need pictures. LOL
NORM
Thread Starter
2026 Loser of the Year


Joined: Sep 2013
Posts: 36,607
Likes: 7,053
From: New Or-leens Loo-z-anna
makes me want to ********!!!!
EDIT: I managed to find/transfer a few pics back to this thread.......
Last edited by doorgunner; Jan 10, 2014 at 01:25 AM.
Thread Starter
2026 Loser of the Year
Joined: Sep 2013
Posts: 36,607
Likes: 7,053
From: New Or-leens Loo-z-anna
O.K.
Here we go again....
Sorry, Men.....in May of 1968 I didn't like the green tinted paint on the rims---so I finally did something about it.....
I hit it with some satin black....it's a go....I'll sand/respray it & buff the scratches off the trim ring/cap tomorrow.....

This little monster gave me a fit.....the front brakes would not pump up.....the piston was seized.....

An hour later......buffing wheel/clearcoat/......

Final step....... .004 T.I.R on 46 year old un-touched rotors....they're done.......I'm happy

Here we go again....
Sorry, Men.....in May of 1968 I didn't like the green tinted paint on the rims---so I finally did something about it.....
I hit it with some satin black....it's a go....I'll sand/respray it & buff the scratches off the trim ring/cap tomorrow.....
This little monster gave me a fit.....the front brakes would not pump up.....the piston was seized.....
An hour later......buffing wheel/clearcoat/......
Final step....... .004 T.I.R on 46 year old un-touched rotors....they're done.......I'm happy
Thread Starter
2026 Loser of the Year
Joined: Sep 2013
Posts: 36,607
Likes: 7,053
From: New Or-leens Loo-z-anna
Rebuilding the rear brakes---------------and everything that touches them.......
it took 2 hours to get all the bolts aloose/another 1&1/2 hours to break the crossmember/trailing arms aloose without pinning myself under the assembly......
I kept using longer pry bars---I finally ended up practically standing on the pry bat that extended out of the wheel well (that was good advice someone gave about leaving the mounting bolts slightly threaded into the frame!) Also.....my motorcycle jack caught the assembly perfectly so I could lower it a little to roll it out from under the body.
(Rats---I've got some scrubbing to do on the garage floor after the rear suspension is re-installed)................

Ohhh wait.........they're over here on a clean spot........

The rear calipers look about as cruddy as the fronts did...the rotors also appear to have never been "turned".......

It's all in fun.....lots of cleaning/sandblasting/ and a few coats of paint
ought to have it in daily driver condition.
it took 2 hours to get all the bolts aloose/another 1&1/2 hours to break the crossmember/trailing arms aloose without pinning myself under the assembly......
I kept using longer pry bars---I finally ended up practically standing on the pry bat that extended out of the wheel well (that was good advice someone gave about leaving the mounting bolts slightly threaded into the frame!) Also.....my motorcycle jack caught the assembly perfectly so I could lower it a little to roll it out from under the body.
(Rats---I've got some scrubbing to do on the garage floor after the rear suspension is re-installed)................
Ohhh wait.........they're over here on a clean spot........
The rear calipers look about as cruddy as the fronts did...the rotors also appear to have never been "turned".......
It's all in fun.....lots of cleaning/sandblasting/ and a few coats of paint
ought to have it in daily driver condition.
Last edited by doorgunner; Jan 15, 2014 at 08:18 AM.
Thread Starter
2026 Loser of the Year
Joined: Sep 2013
Posts: 36,607
Likes: 7,053
From: New Or-leens Loo-z-anna
I managed to get another 2 hours work done today..........


 The previous owner rebuilt the differential/emergency brakes (except the cable)/bearings and seals/u-joints/one trailing arm......

Maybe tomorrow I can start cleaning everything/repacking all the u-joints/bearings/replacing seals (from sitting up so long).
The previous owner rebuilt the differential/emergency brakes (except the cable)/bearings and seals/u-joints/one trailing arm......Maybe tomorrow I can start cleaning everything/repacking all the u-joints/bearings/replacing seals (from sitting up so long).
Thread Starter
2026 Loser of the Year
Joined: Sep 2013
Posts: 36,607
Likes: 7,053
From: New Or-leens Loo-z-anna


Sure......it's a MickeyMouse cabinet 36" wide by 24" high by 24" deep/portable blasting container to supply the sand/media....but the $$$ that I saved will get a pair of chrome rear bumpers (daily-driver grade)
To hold the weight of the differential, I'll need to make a support stand for the sandblasting cabinet that I built from spare sheetmetal......
Then do a few push-ups so I can load the differential into it...LOL!
OFF to the garage......Pics tonight....hopefully.
EDIT: GOOD NEWS!
The differential parts came back from the paint shop this afternoon.


(Actually, the parts never left my garage)

Last edited by doorgunner; Jan 15, 2014 at 03:11 PM.
Thread Starter
2026 Loser of the Year
Joined: Sep 2013
Posts: 36,607
Likes: 7,053
From: New Or-leens Loo-z-anna
I "escaped" for about 2 hours and managed to get the final part of the differential puzzle done......the diff. crossmember is cleaned and painted (lots of little pock-marks, but no thin areas).....

Maybe I can have everything reassemble by tomorrow night (excluding the trailing arm assemblies--they still need reworking/painting)
Maybe I can have everything reassemble by tomorrow night (excluding the trailing arm assemblies--they still need reworking/painting)
Corvette Stories
The Best of Corvette for Corvette Enthusiasts

Every 2027 Corvette Engine Explained
Joe Kucinski
Designer Imagines A Corvette That Looks More Like a Corvette Than the Corvette
Verdad Gallardo
10 Ugly Corvettes That We Still Kinda Love
Joe Kucinski
Top 10 Most Expensive Corvettes Ever Sold on Bring A Trailer
Brett Foote
10 Things Every Corvette Owner Needs (2026 Edition)
Michael S. Palmer
8 Most "Only Corvette Owners Understand" Quirks and Problems
Pouria Savadkouei
10 Reasons the C6 Z06 is Still A Performance Benchmark After 20 Years
Joe Kucinski
How Much Horsepower Every Corvette Engine "LOST" in 1972
Joe Kucinski
Top 10 DOs and DON'Ts for Protecting Your Convertible Top!
Michael S. Palmer
Thread Starter
2026 Loser of the Year
Joined: Sep 2013
Posts: 36,607
Likes: 7,053
From: New Or-leens Loo-z-anna
I'm going to blame the "thick" black paint on low blood sugar....LOL!
But....better thick with a few runs than thin paint with rust in a year.
(Annnnd....I still spend a lot of time at my daughter's house since my great Son-in-law passed away at Thanksgiving.....so, progress is erratic)
EDIT: The only thing car-related was the DIY/ALEVE pouring of concrete for a parking "spot" for the "Vette Only"....I added 10' by 10' of concrete today to our driveway...with another 10' by 10' section of the form waiting for concrete to be poured into it next week.
It should make the new homeowners very happy to have an extra parking space (My darling wife decided that I needed a new home with a third partitioned bay in the garage for my "project")!
Last edited by doorgunner; Jan 20, 2014 at 12:37 PM.
Drifting


Joined: Aug 2006
Posts: 1,612
Likes: 230
From: Fort Myers, Florida
It sure is coming along....I give all of your guys that do most if not all of the work yourself all the credit in the world...wish I had the room/tools/know how. Can't wait to see how the project progresses!! 
Last edited by canuck9; Jan 19, 2014 at 12:50 PM.
Thread Starter
2026 Loser of the Year
Joined: Sep 2013
Posts: 36,607
Likes: 7,053
From: New Or-leens Loo-z-anna
My dad bought a brand-new lawn mower from Sears & Roebuck...He was on the road for a week and I needed to know what was under the engine cover. Four hours later using my new 20-piece tool set, the engine was completely dis-assembled!
That was back in the day when spankings were LEGAL. (Did you know a competent spanking involves not being able to sit down for 1/2 hour?)
So....that next Monday I took the BOX of engine parts to shop-class at school---by that Friday I was mowing grass.
EDIT: Maybe this week I will get more work done on the car...............MAYBE!
Last edited by doorgunner; Jan 29, 2014 at 12:07 PM.
Thread Starter
2026 Loser of the Year
Joined: Sep 2013
Posts: 36,607
Likes: 7,053
From: New Or-leens Loo-z-anna
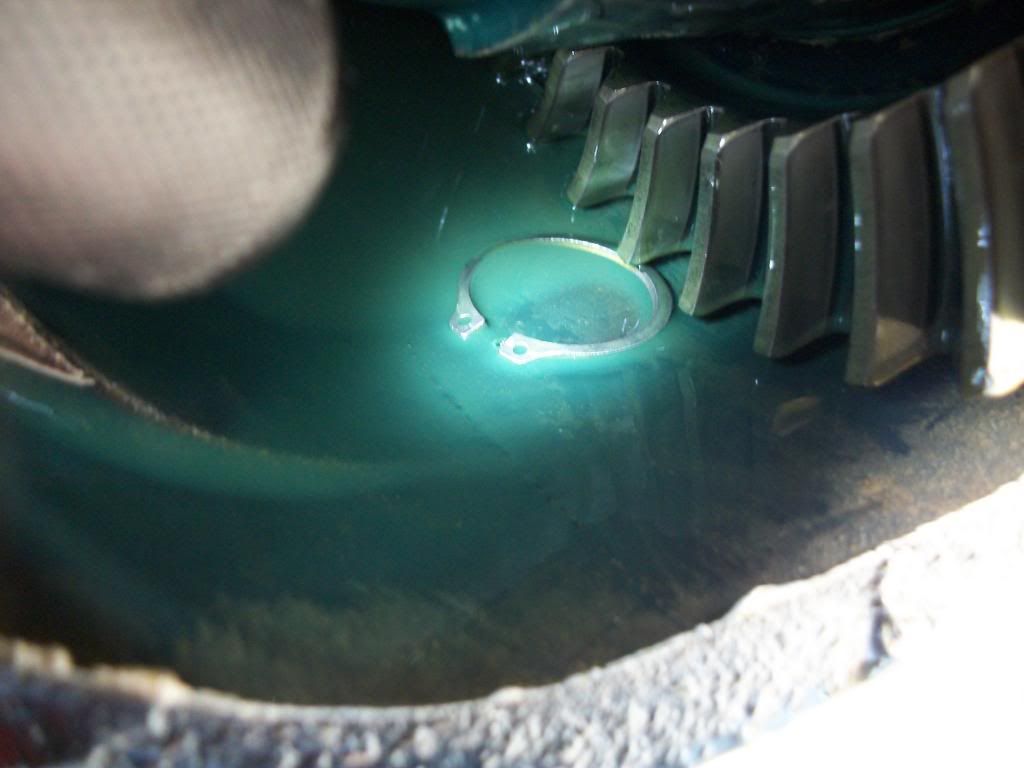
That little clunk in the area of the differential didn't sound very important..............but just in case.....
When I removed the differential for cleaning and painting...this caught my rookie attention.....(not the missing bolts--I just removed them)

The cover has been removed/The splined yoke has been pushed into place/ and a mini-flashlight is shining on the problem area.....

According to forum members, it is no huge deal if someone previously forgot to install the retaining snap-ring. My concern is.....what if they installed the snap-ring backwards.....and it worked it's way off the shaft.
I couldn't find anything loose inside the housing by using my magnetic pick-up tool...so I emptied the oil out of the differential.......and there it was......A $1 retaing ring that could have gotten into the gears and destroyed (Murphy's Law) the Differential.....

The snap-ring on the other shaft is just starting to become deformed...so it will be replaced also....which will DOUBLE the cost of new parts--------now $2 !!!
(I will also spend about 30 minutes with a dremel touching/squaring up the shoulders that the snap-rings rubbed against)
Both snap rings were installed backwards.....an easy-to-do mistake
The gear backlash was well within tolerance and the oil was clean with no metal particles of any size....I'll pick up a new cover gasket this week when my seal kit arrives at the parts store.
When I removed the differential for cleaning and painting...this caught my rookie attention.....(not the missing bolts--I just removed them)
The cover has been removed/The splined yoke has been pushed into place/ and a mini-flashlight is shining on the problem area.....
According to forum members, it is no huge deal if someone previously forgot to install the retaining snap-ring. My concern is.....what if they installed the snap-ring backwards.....and it worked it's way off the shaft.
I couldn't find anything loose inside the housing by using my magnetic pick-up tool...so I emptied the oil out of the differential.......and there it was......A $1 retaing ring that could have gotten into the gears and destroyed (Murphy's Law) the Differential.....
The snap-ring on the other shaft is just starting to become deformed...so it will be replaced also....which will DOUBLE the cost of new parts--------now $2 !!!
(I will also spend about 30 minutes with a dremel touching/squaring up the shoulders that the snap-rings rubbed against)
Both snap rings were installed backwards.....an easy-to-do mistake
The gear backlash was well within tolerance and the oil was clean with no metal particles of any size....I'll pick up a new cover gasket this week when my seal kit arrives at the parts store.
Burning Brakes


Joined: Dec 2013
Posts: 997
Likes: 210
From: Schaumburg IL
That little clunk in the area of the differential didn't sound very important..............but just in case.....
When I removed the differential for cleaning and painting...this caught my rookie attention.....(not the missing bolts--I just removed them)

The cover has been removed/The splined yoke has been pushed into place/ and a mini-flashlight is shining on the problem area.....

According to forum members, it is no huge deal if someone previously forgot to install the retaining snap-ring. My concern is.....what if they installed the snap-ring backwards.....and it worked it's way off the shaft.
I couldn't find anything loose inside the housing by using my magnetic pick-up tool...so I emptied the oil out of the differential.......and there it was......A $1 retaing ring that could have gotten into the gears and destroyed (Murphy's Law) the Differential.....
The snap-ring on the other shaft is just starting to become deformed...so it will be replaced also....which will DOUBLE the cost of new parts--------now $2 !!!
(I will also spend about 30 minutes with a dremel touching/squaring up the shoulders that the snap-rings rubbed against)
Both snap rings were installed backwards.....an easy-to-do mistake
The gear backlash was well within tolerance and the oil was clean with no metal particles of any size....I'll pick up a new cover gasket this week when my seal kit arrives at the parts store.
When I removed the differential for cleaning and painting...this caught my rookie attention.....(not the missing bolts--I just removed them)
The cover has been removed/The splined yoke has been pushed into place/ and a mini-flashlight is shining on the problem area.....
According to forum members, it is no huge deal if someone previously forgot to install the retaining snap-ring. My concern is.....what if they installed the snap-ring backwards.....and it worked it's way off the shaft.
I couldn't find anything loose inside the housing by using my magnetic pick-up tool...so I emptied the oil out of the differential.......and there it was......A $1 retaing ring that could have gotten into the gears and destroyed (Murphy's Law) the Differential.....
The snap-ring on the other shaft is just starting to become deformed...so it will be replaced also....which will DOUBLE the cost of new parts--------now $2 !!!
(I will also spend about 30 minutes with a dremel touching/squaring up the shoulders that the snap-rings rubbed against)
Both snap rings were installed backwards.....an easy-to-do mistake
The gear backlash was well within tolerance and the oil was clean with no metal particles of any size....I'll pick up a new cover gasket this week when my seal kit arrives at the parts store.
Just trying to learn something here.
Thread Starter
2026 Loser of the Year
Joined: Sep 2013
Posts: 36,607
Likes: 7,053
From: New Or-leens Loo-z-anna
(Copied from a sent-email.......)
That's the same thing that I thought...but in helicopter maintenance training in the military...the instructor showed us that one face of a snap ring has a slightly rounded shoulder around the hole....and the opposite face has a sharp shoulder around the hole to "grab" the shoulder of the groove that it fits in as it is "forced" against the grooved shoulder.
What he said never seemed important to me, but I did as I was instructed (As they say "You can make mistakes on the ground, but you don't get the opportunity to correct mistakes in mid-air").
Last edited by doorgunner; Jan 21, 2014 at 09:11 AM.
Burning Brakes
Joined: Dec 2013
Posts: 997
Likes: 210
From: Schaumburg IL
(Copied from a sent-email.......)
That's the same thing that I thought...but in helicopter maintenance training in the military...the instructor showed us that one face of a snap ring has a slightly rounded shoulder around the hole....and the opposite face has a sharp shoulder around the hole to "grab" the shoulder of the groove that it fits in as it is "forced" against the grooved shoulder.
What he said never seemed important to me, but I did as I was instructed (As they say "You can make mistakes on the ground, but you don't get the opportunity to correct mistakes in mid-air").
That's the same thing that I thought...but in helicopter maintenance training in the military...the instructor showed us that one face of a snap ring has a slightly rounded shoulder around the hole....and the opposite face has a sharp shoulder around the hole to "grab" the shoulder of the groove that it fits in as it is "forced" against the grooved shoulder.
What he said never seemed important to me, but I did as I was instructed (As they say "You can make mistakes on the ground, but you don't get the opportunity to correct mistakes in mid-air").
Thanks for the info
Pat
Thread Starter
2026 Loser of the Year
Joined: Sep 2013
Posts: 36,607
Likes: 7,053
From: New Or-leens Loo-z-anna
Some PFC probably noticed that the failure rate of snap-rings was high when the rounded edge was placed against the load-bearing shoulder!
Last edited by doorgunner; Jan 21, 2014 at 09:55 PM.
Thread Starter
2026 Loser of the Year
Joined: Sep 2013
Posts: 36,607
Likes: 7,053
From: New Or-leens Loo-z-anna
The snap ring shoulders on the output shafts get squared again using a carbide encrusted dremel wheel....(another reason for snap ring failure/groove damage---the grooves are not deep enough---guaranteed work for the dealership mechanics/guaranteed sales for the Parts Department...LOL)

The housing gets 3 new seals (only 1 shown).....

The new snap rings are installed "sharp edges" against load-shoulder...

The new pinion seal has been installed and the nut is tightened down to the notched alignment marks on the yoke/shaft/nut plus a little "extra".......(I will need to clean the overspray from all close tolerance fits and faces before re-assembly)

I spun the gears to about 50 mph (LOL) using adapters on the drill (the camera "froze" the action/good thing that ratchet didn't get into the output yoke)---no leaks/no bearing noise/no gear noise/minimum backlash......

Since the highways are covered with ice (whatever happened to "sunny/75*F ??)....I might start reinstalling the differential assembly back into the car this afternoon.
Well.......while I was in the garage......this happened.............(bizarre weather for South Louisiana).....


The housing gets 3 new seals (only 1 shown).....
The new snap rings are installed "sharp edges" against load-shoulder...
The new pinion seal has been installed and the nut is tightened down to the notched alignment marks on the yoke/shaft/nut plus a little "extra".......(I will need to clean the overspray from all close tolerance fits and faces before re-assembly)
I spun the gears to about 50 mph (LOL) using adapters on the drill (the camera "froze" the action/good thing that ratchet didn't get into the output yoke)---no leaks/no bearing noise/no gear noise/minimum backlash......
Since the highways are covered with ice (whatever happened to "sunny/75*F ??)....I might start reinstalling the differential assembly back into the car this afternoon.
Well.......while I was in the garage......this happened.............(bizarre weather for South Louisiana).....
Last edited by doorgunner; Oct 1, 2016 at 06:45 AM.
Thread Starter
2026 Loser of the Year
Joined: Sep 2013
Posts: 36,607
Likes: 7,053
From: New Or-leens Loo-z-anna
Since the roads are iced-over again....it's giving me a chance to do some work on the rear suspension. I managed to install the differential without mashing any fingers (or my head).....

The P.O. had a rebuilt driver's trailing arm assembly already installed, so after removing it and checking run-out and end-play I cleaned/repainted it (probably will not be dry until tomorrow since the humidity is high--as always.....and it's 28*F outside).....

I hope to install it tomorrow and clean up/repaint the passenger's trailing arm assembly.
The P.O. had a rebuilt driver's trailing arm assembly already installed, so after removing it and checking run-out and end-play I cleaned/repainted it (probably will not be dry until tomorrow since the humidity is high--as always.....and it's 28*F outside).....
I hope to install it tomorrow and clean up/repaint the passenger's trailing arm assembly.
Thread Starter
2026 Loser of the Year
Joined: Sep 2013
Posts: 36,607
Likes: 7,053
From: New Or-leens Loo-z-anna
I'll try to re-do the deleted pics (I should have a back-up CD)