


Installing new dash pads

Thread Starter
Melting Slicks


Joined: Aug 2012
Posts: 3,487
Likes: 83
From: Titusville Florida
What a pain in the butt! I read before they screw holes don't match up to the mounting brackets on the upper dash pad, well they don't! but that's not my problem, I'm getting that worked out... My problem is I have a couple of the screws pulling through the vinyl on the lower dash pads, is there a cure for that, maybe different screws with the bigger countersunk washers (if that's what they're called)...
I hope Ernie doesn't mind me using his website as a demo but here's the screws I'm talking about:
https://willcoxcorvette.com/corvette...screws-6-piece
I hope Ernie doesn't mind me using his website as a demo but here's the screws I'm talking about:
https://willcoxcorvette.com/corvette...screws-6-piece
Melting Slicks


Joined: Nov 2005
Posts: 2,297
Likes: 156
From: Clayton New Jersey
Team Owner


Joined: Sep 2006
Posts: 31,267
Likes: 4,362
From: Westminster Maryland
Hi AS,
You really DO need to use the screws with the collars for the 3 screws across the top of the lower dash pads to prevent the screw-heads from gripping the vinyl and making a hole rather than pulling the pad tight against the upper pads.
You also need to make sure the 'collars' are free to spin on the screws before you start each screw. Sometimes the collar is slightly deformed and won't spin. I gently re-shape it with a pliers.
Installing the dash pads and gauges/consoles is very tedious work!
Good luck!
Regards,
Alan
The 7 screws for each 71 lower dash pad. The3 collars painted pad color so you don't see them when installed.
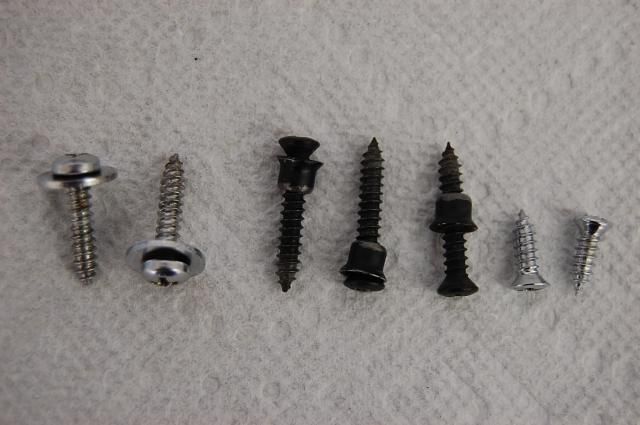
Last edited by Alan 71; Oct 27, 2015 at 08:14 AM.
Melting Slicks
Joined: Nov 2005
Posts: 2,297
Likes: 156
From: Clayton New Jersey
Hi AS,
You really DO need to use the screws with the collars for the 3 screws across the top of the lower dash pads to prevent the screw-heads from gripping the vinyl and making a hole rather than pulling the pad tight against the upper pads.
You also need to make sure the 'collars' are free to spin on the screws before you start each screw. Sometimes the collar is slightly deformed and won't spin. I gently re-shape it with a pliers.
Installing the dash pads and gauges/consoles is very tedious work!
Good luck!
Regards,
Alan
The 7 screws for each 71 lower dash pad.
Team Owner
Joined: Sep 2006
Posts: 31,267
Likes: 4,362
From: Westminster Maryland
Hi HT,
You posted while I was finding my picture!
I really think the new screws for that dash application come with the collars… at least some of them do.
Often when the original screws are removed from the old pads the collars remain embedded in the vinyl and need to be pulled out and put back on the screws.
The screws do generally tear through the vinyl without them.
Regards,
Alan
Last edited by Alan 71; Oct 27, 2015 at 08:26 AM.
Thread Starter
Melting Slicks
Joined: Aug 2012
Posts: 3,487
Likes: 83
From: Titusville Florida
thanks guys, I do have new screws that have the collars on the. My problem is that when I tighten them enough to pull the dash pad tight one on each side decided it wanted to sink itself into the vinyl around the edge of it and the screw hole (if that makes sense). I had hoped that perhaps there was a larger collar I could get or any suggestions on how to fix the vinyl with glue or something as I believe the big problem is that it's pulled itself away from the foam padding under it and allows the collar to get under it...
Team Owner
Joined: Sep 2006
Posts: 31,267
Likes: 4,362
From: Westminster Maryland
Hi AS,
It's difficult to say what's going on without seeing what you're facing.
I will say though that you need to have the pads fit tightly WITHOUT the screws in place�. the screws should just SECURE the pad in place, NOT be used to PULL the pad into place.
I'm NOT saying it's easy, but only that that's what I learned. The 3 pads and center cluster are a NASTY job to have turn out well!
???
Regards,
Alan
Corvette Stories
The Best of Corvette for Corvette Enthusiasts

Top 10 Most Expensive Corvettes Ever Sold on Bring A Trailer
Brett Foote
10 Things Every Corvette Owner Needs (2026 Edition)
Michael S. Palmer
8 Most "Only Corvette Owners Understand" Quirks and Problems
Pouria Savadkouei
10 Reasons the C6 Z06 is Still A Performance Benchmark After 20 Years
Joe Kucinski
How Much Horsepower Every Corvette Engine "LOST" in 1972
Joe Kucinski
Top 10 DOs and DON'Ts for Protecting Your Convertible Top!
Michael S. Palmer
Top 10 Most Explosive Corvettes Ever Made: Power-to-Weight Ratio Ranked!
Joe Kucinski
150 hp to 1,250 hp: Every Corvette Generation Compared by the Specs That Matter
Joe Kucinski
8 Coolest Corvette Pace Cars (and Replicas) of All Time
Verdad Gallardo
Le Mans Master

Joined: Oct 2006
Posts: 6,842
Likes: 285
From: Palmdale CA
thanks guys, I do have new screws that have the collars on the. My problem is that when I tighten them enough to pull the dash pad tight one on each side decided it wanted to sink itself into the vinyl around the edge of it and the screw hole (if that makes sense). I had hoped that perhaps there was a larger collar I could get or any suggestions on how to fix the vinyl with glue or something as I believe the big problem is that it's pulled itself away from the foam padding under it and allows the collar to get under it...
Thread Starter
Melting Slicks
Joined: Aug 2012
Posts: 3,487
Likes: 83
From: Titusville Florida
Hi AS,
It's difficult to say what's going on without seeing what you're facing.
I will say though that you need to have the pads fit tightly WITHOUT the screws in place�. the screws should just SECURE the pad in place, NOT be used to PULL the pad into place.
I'm NOT saying it's easy, but only that that's what I learned. The 3 pads and center cluster are a NASTY job to have turn out well!
???
Regards,
Alan
It's difficult to say what's going on without seeing what you're facing.
I will say though that you need to have the pads fit tightly WITHOUT the screws in place�. the screws should just SECURE the pad in place, NOT be used to PULL the pad into place.
I'm NOT saying it's easy, but only that that's what I learned. The 3 pads and center cluster are a NASTY job to have turn out well!
???
Regards,
Alan

My .02 from dealing with this, try using a plastic dry wall anchor cut down to size underneath the collar. You can even glue it in and let it set. The screw will tighten just fine and you will not see it at all. They come in various sizes and colors. The yellow ones, worked great on my completely ho'd out dash.
 I just want this job finished, hopefully I'll have her done by Sunday...