




Windshield header paint and window fit.

Thread Starter
Instructor

Joined: Sep 2015
Posts: 183
Likes: 17
 Windshield header paint and window fit.
Ok, Ive been working on this for a while and Ive got the frame repaired and sanded. Most of it is right down to bare metal. I had a couple of spots to fix, there were some small holes and the trim clip holes were way out of whack. On one side they were over and 1/8" lower that the other side. I welded it up and re drilled them. I welded new metal into the corners and fixed it all better than new. There is still a little bit of pitting but nothing serious and overall it was in really good shape. Behind the kick panels there was just some very minor surface rust but for the most part it still looked new.
Anyway, what should I paint this with. I got the POR15 starter kit but I notice that you have to use the metal prep before you use the POR15. The problem is the metal prep has to be rinsed off completely which is pretty much impossible considering the windshield is out and the interior would get soaking wet. I could sponge it off but I don't really trust that I could get into all the cracks. Im thinking I may just resort to using good old tremclad.
What have you guys used, any help is greatly appreciated.
Now the windshield install. Ive done the searches and there is some great info but Im still a bit confused. I know it has to be spaced away from the pinch weld so that the trim fits properly. I went to the local glass guy and he told me Id never get it right and he wanted to sell me some black weatherstripping that would fit under the trim to take up the space. He said it would look like a million bucks.....I walked out of there and decided that he was a hack. The other guys I called didn't even bother to show up.
So Im gonna do it myself but Im not sure how to get it right. One of the threads there was a link that didn't work but in the thread everyone said it was a great help...lol. Just my luck. I know one guy used a dam and it worked good, others said they used urethane with spacers. Yet another said they used 3M weld on tape set into in a bed of urethane to take up the space.
So what is the best way to do this? I only want to do it once and I want that trim to fit perfectly. I went through a lot of trouble to weld up the holes and re-drill them so the window doesn't have to be set in cockeyed. Where can I get the products I need? What exactly should I use? the 3M tape seems easy but does not look thick enough.
Please help, I really love this car and I don't want to do it half assed. I still have the original windshield but it looks like it was sandblasted and it was set in the frame so out of whack I can't believe it came from the factory that way. The stops for the glass are not even close to lining up the windshield so Ill have to make some spacers for that as well. Plus it is way thicker than the replacement glass I have(plinkerton).
As always, thanks in advance for any help. Hopefully one day I can return the favour.
Scott
Anyway, what should I paint this with. I got the POR15 starter kit but I notice that you have to use the metal prep before you use the POR15. The problem is the metal prep has to be rinsed off completely which is pretty much impossible considering the windshield is out and the interior would get soaking wet. I could sponge it off but I don't really trust that I could get into all the cracks. Im thinking I may just resort to using good old tremclad.
What have you guys used, any help is greatly appreciated.
Now the windshield install. Ive done the searches and there is some great info but Im still a bit confused. I know it has to be spaced away from the pinch weld so that the trim fits properly. I went to the local glass guy and he told me Id never get it right and he wanted to sell me some black weatherstripping that would fit under the trim to take up the space. He said it would look like a million bucks.....I walked out of there and decided that he was a hack. The other guys I called didn't even bother to show up.
So Im gonna do it myself but Im not sure how to get it right. One of the threads there was a link that didn't work but in the thread everyone said it was a great help...lol. Just my luck. I know one guy used a dam and it worked good, others said they used urethane with spacers. Yet another said they used 3M weld on tape set into in a bed of urethane to take up the space.
So what is the best way to do this? I only want to do it once and I want that trim to fit perfectly. I went through a lot of trouble to weld up the holes and re-drill them so the window doesn't have to be set in cockeyed. Where can I get the products I need? What exactly should I use? the 3M tape seems easy but does not look thick enough.
Please help, I really love this car and I don't want to do it half assed. I still have the original windshield but it looks like it was sandblasted and it was set in the frame so out of whack I can't believe it came from the factory that way. The stops for the glass are not even close to lining up the windshield so Ill have to make some spacers for that as well. Plus it is way thicker than the replacement glass I have(plinkerton).
As always, thanks in advance for any help. Hopefully one day I can return the favour.
Scott
Last edited by 73 Scott; Dec 10, 2015 at 03:18 PM.

Burning Brakes

Joined: Oct 2015
Posts: 781
Likes: 113
Ok, Ive been working on this for a while and Ive got the frame repaired and sanded. Most of it is right down to bare metal. I had a couple of spots to fix, there were some small holes and the trim clip holes were way out of whack. On one side they were over and 1/8" lower that the other side. I welded it up and re drilled them. I welded new metal into the corners and fixed it all better than new. There is still a little bit of pitting but nothing serious and overall it was in really good shape. Behind the kick panels there was just some very minor surface rust but for the most part it still looked new.
Anyway, what should I paint this with. I got the POR15 starter kit but I notice that you have to use the metal prep before you use the POR15. The problem is the metal prep has to be rinsed off completely which is pretty much impossible considering the windshield is out and the interior would get soaking wet. I could sponge it off but I don't really trust that I could get into all the cracks. Im thinking I may just resort to using good old tremclad.
What have you guys used, any help is greatly appreciated.
Now the windshield install. Ive done the searches and there is some great info but Im still a bit confused. I know it has to be spaced away from the pinch weld so that the trim fits properly. I went to the local glass guy and he told me Id never get it right and he wanted to sell me some black weatherstripping that would fit under the trim to take up the space. He said it would look like a million bucks.....I walked out of there and decided that he was a hack. The other guys I called didn't even bother to show up.
So Im gonna do it myself but Im not sure how to get it right. One of the threads there was a link that didn't work but in the thread everyone said it was a great help...lol. Just my luck. I know one guy used a dam and it worked good, others said they used urethane with spacers. Yet another said they used 3M weld on tape set into in a bed of urethane to take up the space.
So what is the best way to do this? I only want to do it once and I want that trim to fit perfectly. I went through a lot of trouble to weld up the holes and re-drill them so the window doesn't have to be set in cockeyed. Where can I get the products I need? What exactly should I use? the 3M tape seems easy but does not look thick enough.
Please help, I really love this car and I don't want to do it half assed. I still have the original windshield but it looks like it was sandblasted and it was set in the frame so out of whack I can't believe it came from the factory that way. The stops for the glass are not even close to lining up the windshield so Ill have to make some spacers for that as well. Plus it is way thicker than the replacement glass I have(plinkerton).
As always, thanks in advance for any help. Hopefully one day I can return the favour.
Scott
Anyway, what should I paint this with. I got the POR15 starter kit but I notice that you have to use the metal prep before you use the POR15. The problem is the metal prep has to be rinsed off completely which is pretty much impossible considering the windshield is out and the interior would get soaking wet. I could sponge it off but I don't really trust that I could get into all the cracks. Im thinking I may just resort to using good old tremclad.
What have you guys used, any help is greatly appreciated.
Now the windshield install. Ive done the searches and there is some great info but Im still a bit confused. I know it has to be spaced away from the pinch weld so that the trim fits properly. I went to the local glass guy and he told me Id never get it right and he wanted to sell me some black weatherstripping that would fit under the trim to take up the space. He said it would look like a million bucks.....I walked out of there and decided that he was a hack. The other guys I called didn't even bother to show up.
So Im gonna do it myself but Im not sure how to get it right. One of the threads there was a link that didn't work but in the thread everyone said it was a great help...lol. Just my luck. I know one guy used a dam and it worked good, others said they used urethane with spacers. Yet another said they used 3M weld on tape set into in a bed of urethane to take up the space.
So what is the best way to do this? I only want to do it once and I want that trim to fit perfectly. I went through a lot of trouble to weld up the holes and re-drill them so the window doesn't have to be set in cockeyed. Where can I get the products I need? What exactly should I use? the 3M tape seems easy but does not look thick enough.
Please help, I really love this car and I don't want to do it half assed. I still have the original windshield but it looks like it was sandblasted and it was set in the frame so out of whack I can't believe it came from the factory that way. The stops for the glass are not even close to lining up the windshield so Ill have to make some spacers for that as well. Plus it is way thicker than the replacement glass I have(plinkerton).
As always, thanks in advance for any help. Hopefully one day I can return the favour.
Scott
The best glass folks can also polish the old windshield glass and restore it to almost original clarity..but that takes the right tools and fine abrasives and skill to do right..
Be patient and continue searching for the right glass man..
This is not the usual safelite road hazard "chip fix venture done in the driveway project.."
Soiunds like you've spent the time to get the frame right....Jim
Thread Starter
Instructor
Joined: Sep 2015
Posts: 183
Likes: 17
Thanks Jim, but Ive called them all and none of them even know what Im talking about. They don't want the job and have no idea about spacing the windshield properly. You have no idea the trouble I had to go to just to get the replacement windshield. I do all my own work on my car so this isn't that big of a deal I just need some additional info on what guys used to get it spaced properly. I can do it, Im just being extra careful. I build guitars for a living so Im use to tedious precision work.
Also, What should I paint the frame with?
Also, What should I paint the frame with?
Burning Brakes
Joined: Oct 2015
Posts: 781
Likes: 113
Thanks Jim, but Ive called them all and none of them even know what Im talking about. They don't want the job and have no idea about spacing the windshield properly. You have no idea the trouble I had to go to just to get the replacement windshield. I do all my own work on my car so this isn't that big of a deal I just need some additional info on what guys used to get it spaced properly. I can do it, Im just being extra careful. I build guitars for a living so Im use to tedious precision work.
Also, What should I paint the frame with?
Also, What should I paint the frame with?
Be patient and persistent..
The original windshield was sealed with 3M adhesive..
It may not have been some sort of strip but rather something applied with a caulking gun..
Temperature of surface and glass were probably regulated..
Minimum 70F with nominal humidity..
Do you have the new windshield ?
How does it fit?
The 3M company makes a huge variety of adhesives and adhesive strips and pads..
IF you build guitars..this should be cake..

I am among othert things, an old lithuier maker myself..and I restore 100 year old smoking pipes..
I never give up on fixing and restoring old well made things..and never give up on helping folks recover what's lost.
Proper prep ( look at the KRYLON DUAL PRIMER-PAINT IN RATTLE CAN) PROPER temp, proper adhesive and proper PRESSURES should make clean durable well fitted job..
My Grandpa used to tell us boys:"
PLAN THE WORK, THEN WORK THE PLAN".
Like rebuilding a 37 year old Rochester Quadrajet carb, one man with the proper kit numbered to that carb can do it right..
One out of a thousand..Find the right people to help..Jim
Thread Starter
Instructor
Joined: Sep 2015
Posts: 183
Likes: 17
Thanks Jim, the new window actually fits really well. Even the corners hug the frame. Actually I think it fits better than the original.
Whatever was on there originally was like melted rubber or something. Butyl tape or calking. It's was hell to get it off the frame. There was also some gooey muck on the trim. Butyl calk I assume. Do I need to put all that crap back on the trim before I install it again?
I guess the first step is to get it all painted, get the trim clips in there and fit the trim with the window in the frame. Then I can measure the distance from the window to the trim. Then I'll know how thick the adhesive has to be. I did a quick dry fit and it appears to be about 3/8" from the trim. I want it to fit tight.
I'd like to hear from guys who have done it, what they used, where they got it, how they did it. Trying to avoid the pitfalls that come with doing something for the first time.
The original window is not cracked but it's pitted, I dont think it could be polished. I tried a little bit and it would take forever and never be as nice as the new windshield. Too many chips.
Whatever was on there originally was like melted rubber or something. Butyl tape or calking. It's was hell to get it off the frame. There was also some gooey muck on the trim. Butyl calk I assume. Do I need to put all that crap back on the trim before I install it again?
I guess the first step is to get it all painted, get the trim clips in there and fit the trim with the window in the frame. Then I can measure the distance from the window to the trim. Then I'll know how thick the adhesive has to be. I did a quick dry fit and it appears to be about 3/8" from the trim. I want it to fit tight.
I'd like to hear from guys who have done it, what they used, where they got it, how they did it. Trying to avoid the pitfalls that come with doing something for the first time.
The original window is not cracked but it's pitted, I dont think it could be polished. I tried a little bit and it would take forever and never be as nice as the new windshield. Too many chips.

Team Owner


Joined: Feb 2003
Posts: 54,059
Likes: 9,394
From: Sitting in his Nowhere land Hanover Pa
2024 C2 of the Year Finalist - Unmodified
2015 C2 of Year Finalist
I would not use POR15. I would spray the bare metal with a good epoxy primer then seam seal what you repaired. Then paint it.

Race Director


Joined: Apr 2009
Posts: 19,294
Likes: 2,753
From: Charlotte NC
SCOTT,
Touching base on what you wrote. I understand about the issue with the POR_15 where they want the MARINE CLEAN and ACID ETCH to be used to prep the steel for the POR_15.
ALSO....from what the tech line at POR-15 told me...IF I sandblast the steel clean...I DO NOT have to use the marine clean and acid etch.
I...myself would NOT use the acid etch on your windshield frame UNLESS you knwo you can do it correctly.
BE CAREFUL when you are painting your windshield frame.
https://www.corvetteforum.com/forums...or-primer.html
This thread has information on it that is important.
DUB
Touching base on what you wrote. I understand about the issue with the POR_15 where they want the MARINE CLEAN and ACID ETCH to be used to prep the steel for the POR_15.
ALSO....from what the tech line at POR-15 told me...IF I sandblast the steel clean...I DO NOT have to use the marine clean and acid etch.
I...myself would NOT use the acid etch on your windshield frame UNLESS you knwo you can do it correctly.
BE CAREFUL when you are painting your windshield frame.
https://www.corvetteforum.com/forums...or-primer.html
This thread has information on it that is important.
DUB
Last edited by DUB; Dec 10, 2015 at 07:31 PM.
Thread Starter
Instructor
Joined: Sep 2015
Posts: 183
Likes: 17
SCOTT,
Touching base on what you wrote. I understand about the issue with the POR_15 where they want the MARINE CLEAN and ACID ETCH to be used to prep the steel for the POR_15.
ALSO....from what the tech line at POR-15 told me...IF I sandblast the steel clean...I DO NOT have to use the marine clean and acid etch.
I...myself would NOT use the acid etch on your windshield frame UNLESS you knwo you can do it correctly.
BE CAREFUL when you are painting your windshield frame.
https://www.corvetteforum.com/forums...or-primer.html
This thread has information on it that is important.
DUB
Touching base on what you wrote. I understand about the issue with the POR_15 where they want the MARINE CLEAN and ACID ETCH to be used to prep the steel for the POR_15.
ALSO....from what the tech line at POR-15 told me...IF I sandblast the steel clean...I DO NOT have to use the marine clean and acid etch.
I...myself would NOT use the acid etch on your windshield frame UNLESS you knwo you can do it correctly.
BE CAREFUL when you are painting your windshield frame.
https://www.corvetteforum.com/forums...or-primer.html
This thread has information on it that is important.
DUB
So, if I understand correctly I should use the DP90 on everything except the pinch weld where the urathane will be. I should use an approved primer on the pinch weld that is compatible with the urathane that I'm using. There is a bit of pitting on the pinch weld but it's not real bad. Just a few spots. I've got the pinch weld all the way down to bare metal except for the part along the bottom on the window. I'll work that to metal before I install the glass.
Corvette Stories
The Best of Corvette for Corvette Enthusiasts

Top 10 Most Explosive Corvettes Ever Made: Power-to-Weight Ratio Ranked!
Joe Kucinski
150 hp to 1,250 hp: Every Corvette Generation Compared by the Specs That Matter
Joe Kucinski
8 Coolest Corvette Pace Cars (and Replicas) of All Time
Verdad Gallardo
Top 10 Corvette Engines RANKED by Peak Torque (70+ Years of Muscle!)
Joe Kucinski
Corvette ZR1X Will Be Pacing the Indy 500, And Could Probably Race, Too!
Verdad Gallardo
Top 10 Corvettes Coming to Mecum Indy 2026!
Brett Foote
Top 10 C9 Corvette MUST-HAVES to Fix These C8 Generation Flaws!
Michael S. Palmer
10 Revolutionary 'Corvette Firsts' Most People Don't Know
Joe Kucinski
5 Reasons to Upgrade to an LS6-Powered Corvette; 5 Reasons to Stay LT2
Michael S. Palmer
Thread Starter
Instructor
Joined: Sep 2015
Posts: 183
Likes: 17
Bumping this thread up to hopefully get some info on the sealer used on the t top corners and upper trim/moulding. I know the factory used some really nasty goop on there but I'm not sure what it was. Is there a more modern sealer? I can tell if there is nothing on there water will just run in the under the t top corners and under the trim. It'll filling up the header and I'll just be repairing the thing again in a few years. I'm trying to make this thing as water tight as I can cause we intend to do some traveling in it and I'm sure I'll get caught in the rain eventually.
Any help is appreciated as always. You guys really helped me get this job this far and I want to get it right so all the work wasn't for nothing.
Scott.
Any help is appreciated as always. You guys really helped me get this job this far and I want to get it right so all the work wasn't for nothing.
Scott.


 I'm patiently waiting as well....
Thread Starter
Instructor
Joined: Sep 2015
Posts: 183
Likes: 17
Damn, I thought Alan would have the answer with a part number and everything....lol
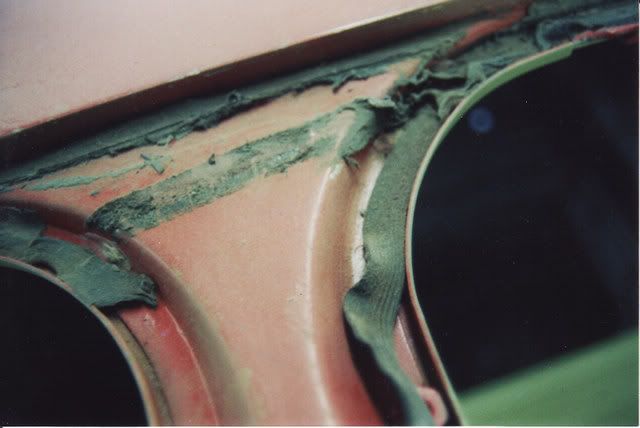
That's the stuff I found under my trim as well, in the exact same spots.
I'm not sure it's tape, it looks more like some sort of sealant from a tube. It's hell to get it off.
I'd like to use something more modern because obviously the stuff they used from the factory was crap. I can tell if it's not sealed properly water is gonna flow right in there and rust it up again. No point in doing all this work just to let it rust again. I'm hoping DUB will chime in here and help me out. There was some sticky goop all over the trim along the side of the window as well. I'm just about ready to put the windshield back in but I want to seal up the t-top corners first.
Also, what is this silver sealer I hear about? Where do I get this stuff from?
Thanks again to everyone, I really appreciate all the help.
That's the stuff I found under my trim as well, in the exact same spots.
I'm not sure it's tape, it looks more like some sort of sealant from a tube. It's hell to get it off.
I'd like to use something more modern because obviously the stuff they used from the factory was crap. I can tell if it's not sealed properly water is gonna flow right in there and rust it up again. No point in doing all this work just to let it rust again. I'm hoping DUB will chime in here and help me out. There was some sticky goop all over the trim along the side of the window as well. I'm just about ready to put the windshield back in but I want to seal up the t-top corners first.
Also, what is this silver sealer I hear about? Where do I get this stuff from?
Thanks again to everyone, I really appreciate all the help.
Last edited by 73 Scott; Dec 29, 2015 at 09:49 PM.


Melting Slicks


Joined: Apr 2010
Posts: 2,314
Likes: 164
From: Broadview hts Ohio
I am interested also. Next year I will be installing my WS into my 69" convertible. I do not need to paint anything, that is done. I am going to use the spacers to get the height correct. I also picked up a damming strip on ebay to assist in holding the sealant in so it does not run all over. What I really do not have an answer to is what to fill the header with. I have strip caulk, but that would be a lot of caulk. There must be something else to use to fill that cavity and keep the water out.
Joe
Joe

Team Owner


Joined: Sep 2006
Posts: 31,225
Likes: 4,312
From: Westminster Maryland
Hi,
From what I found on my car and what the AIM indicates it appears to me that there was no effort made to 'fill' the 'valley' in the windshield header with any material.
The sealing process seems to be aimed at creating a water tight seal between the the large piece of stainless steel trim, the corner castings, and the windshield header.
In the 71 AIM it's shown on UPC1, Sheet F9, View A. Its called out as symbol 184, Sealing Compound.
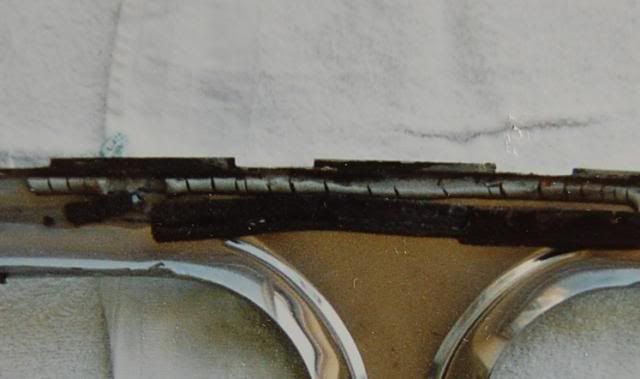
I found the black sealer at that joint, on the screws that mount the ss trim piece, the joint between the ss trim piece and the chrome corner pieces, and under the the corner pieces where the seat on the windshield header.
There is also a black foam strip shown and indicated as item 6, Sealing Strip 26.5" long.
In addition on my ss trim was a ribbon of gray material similar to window glazing. I don't see it called out in the AIM but people report it's presence.
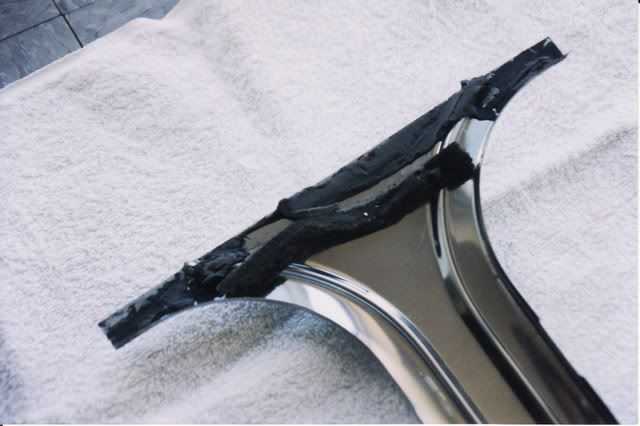
Here's what I found on the ss trim piece. You can see the 3 things I describe.
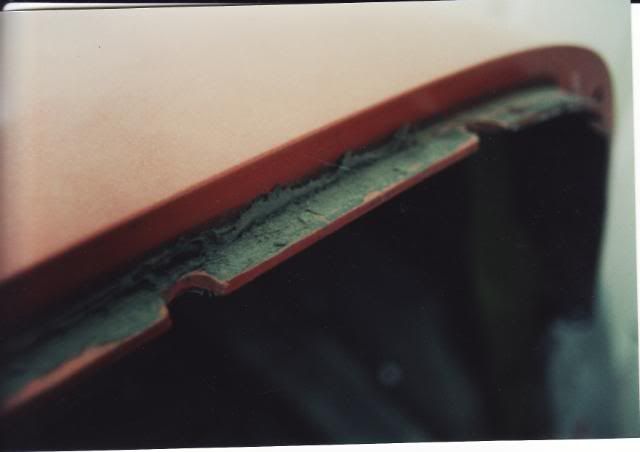
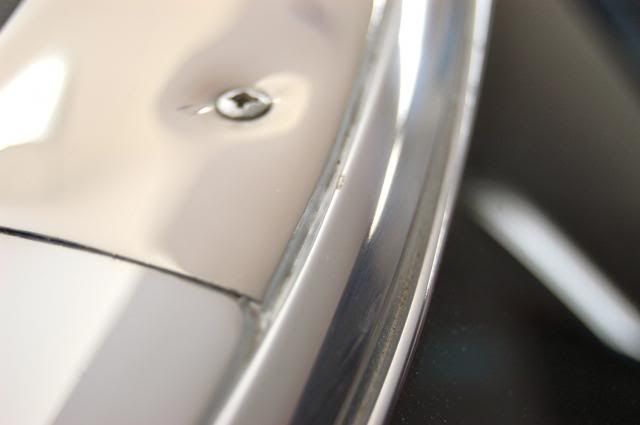
In addition a silver color sealer was placed in the joint between the ss header trim and the long thin piece of ss trim. I don't see this in the AIM but it is well documented on cars. Often when windshields were replaced this sealer wasn't relaced and that fact I believe leads to windshield leaks.
Regards,
Alan
The 3 materials.
Silver sealer.
From what I found on my car and what the AIM indicates it appears to me that there was no effort made to 'fill' the 'valley' in the windshield header with any material.
The sealing process seems to be aimed at creating a water tight seal between the the large piece of stainless steel trim, the corner castings, and the windshield header.
In the 71 AIM it's shown on UPC1, Sheet F9, View A. Its called out as symbol 184, Sealing Compound.
I found the black sealer at that joint, on the screws that mount the ss trim piece, the joint between the ss trim piece and the chrome corner pieces, and under the the corner pieces where the seat on the windshield header.
There is also a black foam strip shown and indicated as item 6, Sealing Strip 26.5" long.
In addition on my ss trim was a ribbon of gray material similar to window glazing. I don't see it called out in the AIM but people report it's presence.
Here's what I found on the ss trim piece. You can see the 3 things I describe.
In addition a silver color sealer was placed in the joint between the ss header trim and the long thin piece of ss trim. I don't see this in the AIM but it is well documented on cars. Often when windshields were replaced this sealer wasn't relaced and that fact I believe leads to windshield leaks.
Regards,
Alan
The 3 materials.
Silver sealer.
Safety Car

Joined: May 2008
Posts: 3,751
Likes: 719
From: Lafayette Louisiana
My 2 cents,...
My 2 cents:
I have got a copy of the windshield install for a 69 that ends with "aint she purty" that I can send you if you will PM me your email address. I used his method to install my 68 and 72 windshields with good results. The link to this writeup did not work the last time I tried to access it, but I had made a paper copy so I can send you scans. I am thinking this is the link that you reference.
I also suggest you do an extensive internet search and make your own decision as to what constitutes a safe install. I used the 3M window ribbon, but others have a different view.
Hope this helps.
I have got a copy of the windshield install for a 69 that ends with "aint she purty" that I can send you if you will PM me your email address. I used his method to install my 68 and 72 windshields with good results. The link to this writeup did not work the last time I tried to access it, but I had made a paper copy so I can send you scans. I am thinking this is the link that you reference.
I also suggest you do an extensive internet search and make your own decision as to what constitutes a safe install. I used the 3M window ribbon, but others have a different view.
Hope this helps.