When you click on links to various merchants on this site and make a purchase, this can result in this site earning a commission. Affiliate programs and affiliations include, but are not limited to, the eBay Partner Network.
Hello all. I have a 1970 stingray 454. I know these C3s have a common issue with the wipers bar vaccum not working and it's finally happened to my car. Headlights won't pop up either so I can't drive it at night. Is it the actuators, a leak or something simple? Any troubleshooting tips would be greatly appreciated. Thanks!
Hello all. I have a 1970 stingray 454. I know these C3s have a common issue with the wipers bar vaccum not working and it's finally happened to my car. Headlights won't pop up either so I can't drive it at night. Is it the actuators, a leak or something simple? Any troubleshooting tips would be greatly appreciated. Thanks!
If they were all working and now they suddenly are not, then you have a leak somewhere. Start by checking all the plastic Ts and connectors I find those tend to fail before the hoses. I used a cigar on my car to look where smoke was being drawn into ha-ha.
If they were all working and now they suddenly are not, then you have a leak somewhere. Start by checking all the plastic Ts and connectors I find those tend to fail before the hoses. I used a cigar on my car to look where smoke was being drawn into ha-ha.
That's awesome. I will try that, thank you
Last edited by Nater70vette; Mar 27, 2016 at 05:59 PM.
Hi n,
The smoke 'test' will be difficult to do at the headlight relays and actuators, at the wiper bay for the safety switch, and under the dash.
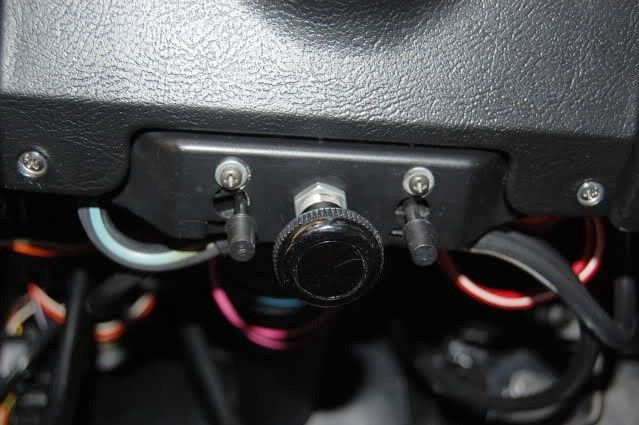
BEGIN by testing the 2 vacuum over-ride switches that are under the steering column.
Pull down on the left switch; the head light should open even with the headlight switch on the dash off.
Then do the same on the right side switch; the wiper door should open even with the wipers turned off.
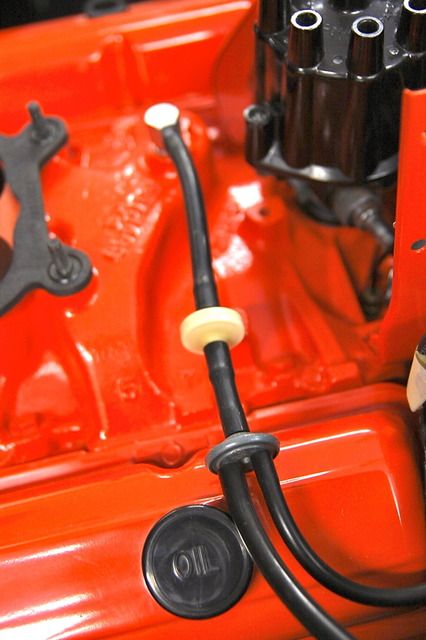
Have you checked to see if the vacuum line from the intake manifold is still hooked to the the intake fitting?
Sometimes when both systems don't operate it's because of a faulty vacuum source since one supply is used for both systems.
Regards,
Alan
Hi n,
The smoke 'test' will be difficult to do at the headlight relays and actuators, at the wiper bay for the safety switch, and under the dash.
BEGIN by testing the 2 vacuum over-ride switches that are under the steering column.
Pull down on the left switch; the head light should open even with the headlight switch on the dash off.
Then do the same on the right side switch; the wiper door should open even with the wipers turned off.
Have you checked to see if the vacuum line from the intake manifold is still hooked to the the intake fitting?
Sometimes when both systems don't operate it's because of a faulty vacuum source since one supply is used for both systems.
Regards,
Alan
Left headlight doors/Right wiper door
Vacuum supply from engine.
thanks so much Alan, currently putting a new clutch assembly in the car but once it's back together I will do what you told me to address the wipers and lights. Thanks again for the pics too.
2020 Corvette of the Year Finalist (performance mods)
2019 C3 of Year Winner (performance mods)
2016 C3 of Year Finalist
Its simple to start. Will one system work with the other off. If not, good it should be easy to find
Basic c3 vacuum<br/>
Assuming that both the headlight system and wiper system were both functioning properly and suddenly failed at the same time, we will be able to determine which side it is. Understand that there are 2 systems and each system has 2 sides, operating and switching. We just need to figure out if its both systems first or the switching side versus the op side
Using the basic chart first, but scroll down to the second chart to see the filter(white) and one way valve(silver)
On the basic chart
Check vacuum at E (filter) then D (teed valve) on the down hill side, furthest from the engine.
When you check D you will unplug both hoses and cover both nipples. This will tell you if the one way valve is leaking. Reassemble.
Now you will check the operating side versus the switching side.
With the systems both off check one side at a time at the same tee. Pull the hose going to the j,k,l side thats going to the dash and plug the tee. Still high vacuum present means the operating side is working. Low vacuum means a leak. Reassmble and disconnect C side and plug the tee. High vacumm means the switching side is good to the switches.
You should now know which side the leak is on.
From here you can look at the color coded system chart and determine
What to look for
Willcox
A leak on the switching side is the tee under the dash, the headlight switch or the solenoid on the tach. You will have to climb under the dash or remove the dash panels. Both hurt in some way or another.
A leak on the op side is in the engine compartment and easier to find than the previous switching side. Just eliminate one side at a time with the systems both turned turned on you can seperate the sytems at the tees by the vacuum tank
I had a slow leak at the wiper actuator switch that made both systems slow. Slow is harder to find than not leaking
Good luck
Last edited by Rescue Rogers; Mar 28, 2016 at 12:04 PM.
Hi RR,
"Its simple to start. Will one system work with the other off. If not, good it should be easy to find"
I believe in 70 the two systems were interconnected (and the diagrams show that) so a vacuum problem in one system can affect the operation of the other system too.
To test the systems independently the large hoses to the relays and actuators must be segregated, that's pretty easy; but it's harder to segregate the control functions of the system�. especially since some of it is behind the dash panel.
Regards,
Alan
2020 Corvette of the Year Finalist (performance mods)
2019 C3 of Year Winner (performance mods)
2016 C3 of Year Finalist
Yes you are correct. Its the same as my 68. If he can figure out if its on the operating side or the switching side he can then figure out if its the wiper side or the headlight side. Easier to do in big chunks then work down.
Its simple to start. Will one system work with the other off. If not, good it should be easy to find
Basic c3 vacuum<br/>
Assuming that both the headlight system and wiper system were both functioning properly and suddenly failed at the same time, we will be able to determine which side it is. Understand that there are 2 systems and each system has 2 sides, operating and switching. We just need to figure out if its both systems first or the switching side versus the op side
Using the basic chart first, but scroll down to the second chart to see the filter(white) and one way valve(silver)
On the basic chart
Check vacuum at E (filter) then D (teed valve) on the down hill side, furthest from the engine.
When you check D you will unplug both hoses and cover both nipples. This will tell you if the one way valve is leaking. Reassemble.
Now you will check the operating side versus the switching side.
With the systems both off check one side at a time at the same tee. Pull the hose going to the j,k,l side thats going to the dash and plug the tee. Still high vacuum present means the operating side is working. Low vacuum means a leak. Reassmble and disconnect C side and plug the tee. High vacumm means the switching side is good to the switches.
You should now know which side the leak is on.
From here you can look at the color coded system chart and determine
What to look for
Willcox
A leak on the switching side is the tee under the dash, the headlight switch or the solenoid on the tach. You will have to climb under the dash or remove the dash panels. Both hurt in some way or another.
A leak on the op side is in the engine compartment and easier to find than the previous switching side. Just eliminate one side at a time with the systems both turned turned on you can seperate the sytems at the tees by the vacuum tank
I had a slow leak at the wiper actuator switch that made both systems slow. Slow is harder to find than not leaking
Its simple to start. Will one system work with the other off. If not, good it should be easy to find
Basic c3 vacuum<br/>
Good luck
I just noticed that the control hoses to and from the headlight switch and the headlight override switch are reversed on this diagram. The source vacuum always goes to the port closest to the pull **** both on the h/l and the override switches. Easy to see if you compare it to the Willcox diagram. No one's fault here, many diagrams out there are wrong in this area.
Dave J is the doctor on the vac stuff. He helped me immensely when I became frustrated with my 68.
Since you had a catastrophic failure on both systems simultaneously I'd start and check the plastic filter and the check valve and work from there.
It is possible while pulling the trans or clutch something became dislodged?
I had 2 bad HL actuators and a bad after market head light actuator to complicate diagnosis further, had both relays rebuilt by Dave, replaced the head light switch as I had no dimmer any more, new hoses, new filter and check valve, new valve must be leaking. I placed a check valve in line between both control and supply after the check valve and now my system works while driving.
After 4 years its still not perfect but functional for cruise nights etc....
You'll get it its just a lot of trail and error.
Marshal
Last edited by marshal135; Mar 29, 2016 at 09:32 PM.
You might want to pull that yellow picture from your post. It might help avoid some confusion.
It's just my 2 cents.. but there are many different places you can start to diagnosis a vacuum issue but I always seem to start with simple. As mentioned above I would first go around to each connection and make sure a hose isn't loose, cracked or fallen off. If the hose is cracked you can usually cut back about 1/4 to 1/2 " and then re-install it.
If you don't find the issue this way then I would start looking at components...
For instance:
The small hoses that run to the top of the relays should always have vacuum on them when the wipers or the headlamps are off. It takes vacuum there to hold the plunger on the relay in the up position which is the "closed" position for vacuum. In this same sense to make the lamps open all you need to do is remove the hose from the top of the relay or block it. (Ie: over-ride switch under the dash).
Below I've posted everything I've got to help you understand the system. Hopefully it will help you diagnosis your issue. If you watch the first video it will explain to you in detail how to test each item in the system.
-Willcox
Headlamp Vacuum System Diagnostic Video 1968-1982
Headlamp/Windshield Wiper Actuator Relay testing. 68-72 for wipers.. 68-82 for headlamp.
69-72 Wiper Arm Vacuum Relay testing.
18243
Last edited by Willcox Corvette; Mar 29, 2016 at 11:11 PM.