When you click on links to various merchants on this site and make a purchase, this can result in this site earning a commission. Affiliate programs and affiliations include, but are not limited to, the eBay Partner Network.
Lots of leaking, transmission, (front and back), engine oil as well as antifreeze. I think of it as tears, she is crying because she wants to be young and pretty again, so we are trying to oblige.
Dropped the tranny off for a rebuild today, they quoted us $1200-$1250. Hopefully that is a good price. Guy seemed super nice!
Dropped the tranny off for a rebuild today, they quoted us $1200-$1250. Hopefully that is a good price. Guy seemed super nice!
Seven years ago I paid Machine Shop Bob $410 in parts and $428 in labor to rebuild my M21. However, those are reduced prices for me being part of "The Team" . Seems to me the bill of material included new bearings and seals, 2nd gear and synchros. I have the replaced parts in a box somewhere. This guy really knows what he is doing, the tranny is quiet and smooth as silk.
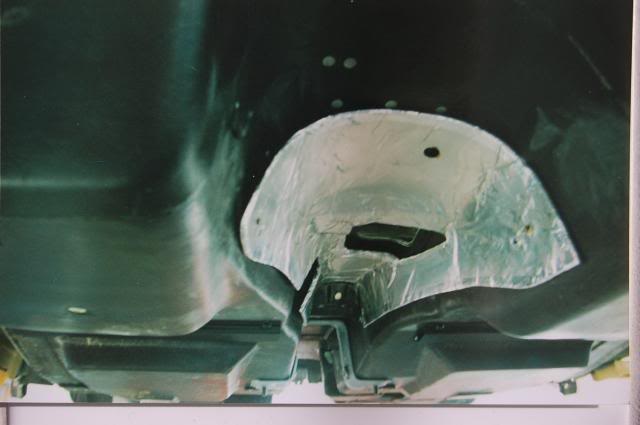
What is the nastly shredded insulation looking foil backed stuff that is just above where the tranny was? Have searched the part but cannot find it. Tried fire insulation, heat shield ect, but they are all under the carpet. This appears to be on the outside? ��
What is the nastly shredded insulation looking foil backed stuff that is just above where the tranny was? Have searched the part but cannot find it. Tried fire insulation, heat shield ect, but they are all under the carpet. This appears to be on the outside? ��
Hi c1n,
The tunnel insulation is held in place by 'pronged' clips that are riveted to the underbody.
The insulator should really be in place before the engine/transmission go back in place.
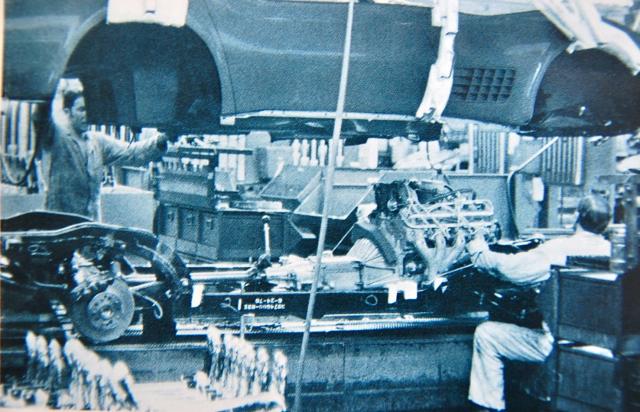
In addition, there originally was a thick foam collar that sat on the bell housing just to the rear of the engine block.
The purpose of both of these pieces was to help insulate the heat of the engine and drive train from the interior of the car.
Regards,
Alan
Here's the insulator in place looking from the rear of the transmission.
You can see the position of the dark colored collar on the bell housing in this St.Louis photo.
I can't wait till she is pretty again. Makes me sad but alas this is a means to an end. Working on cleaning out all the grease, grime and rust getting her ready for paint. These pictures are not for the faint of heart! Looks like open heart surgery.
Hi There, it doesn't seem too bad in that engine bay , there are certainly worse examples out there . A lot of work indeed , but as you know ,the better the prep. the better the finish will be . (I spent about 5 days in my stripped out engine bay just cleaning and paint prep. it had no chassis as well !)
Sorry to disturb the originality of her but I suggest that original tunnel insulation has to go
FWIW I think you are doing the right thing with a really nice car
OK, I need to power wash her while engine is out. The guy doing the suspension, steering and brake work said I needed to power wash and paint the underside above where the tranny, drive train etc will go.... So here is my dilemma, HOW do I get her high enough to power wash if I do not have a lift? I can get her on a trailer and get her to a car wash but will not have a good angle.
Hi c1n,
The fiberglass parts of the underbody weren't painted. Only metal brackets and mounting plates were painted semi-flat black.
So getting the fiberglass clean is all you need to do. (Unless you want to paint it.)
Access to those areas difficult and the actual cleaning process is a dirty, nasty, crummy, time consuming job.
You REALLY need to think about how you will approach that. It's a lot more than a trip to the car wash.
Money spent at the carwash and cans of degreaser will help the engine compartment. BUT, remember once the grease, oil, and dirt is gone anything metal that's not plated or painted will begin to rust over-night.
Tidying up the engine compartment is a very rewarding thing to do but to do it well is very labor intensive.
Good Luck!
Regards,
Alan
You will need to put the car up on jack stands and/or cribbing to be able to slide underneath it. Pull all the wheels for better access. FYI, power washing will not get the job done. You will need to clean it with a non-toxic degreaser like Spray Nine and a variety of brushes, one area at a time. My car had dealer-applied undercoating which also required scraping with a heat gun and putty knife. The bare fiberglass was not painted. The frame will need to be wire-wheeled, wire-brushed, sanded, self-etching primered and spray painted, after masking areas not to be painted. Your car is far too valuable to just pressure wash and rattle can it. I spent many hours lying on my back, picking pieces of wire out of my face. I went and bought a cheap rain suit at K-Mart to try and keep dry. Safety goggles are a must at all times.
PS- If you want to look at a bunch of photos of how I did it, send me a PM with your email address. My car is exactly the same as yours.
Last edited by Faster Rat; 10-25-2016 at 06:40 PM.
DUB,
I agree, fine line. My Dad and I even discussed pulling the original 427, shelving it, and putting in a crate engine. He had debated running it on the 1/4, I will however only be using it as a fair weather driver and put it in the occasional small town auto show. His other baby he left me, is a concourse level jaguar that I won't ever put on the road. She (vette) still runs nice now, but leaks like crazy. I want to keep her on the road for the most part during the restoration, but don't want to limit the quality of a body off restoration just to be able to enjoy her in the mean time. Decisions decisions! 😳
Since your car is a survivor your dad had good advice about shelving the original big block and putting in a crate engine if you at going to take it to the track. That's why many original cars never made it to be survivors . I would hate to hear that your original engine had thrown a rod out the side of the block coming down the track .
Since your car is a survivor your dad had good advice about shelving the original big block and putting in a crate engine if you at going to take it to the track. That's why many original cars never made it to be survivors . I would hate to hear that your original engine had thrown a rod out the side of the block coming down the track .
Me too DUB! I won't ever have her at the track. :o) I might take off fast every now and then, but she will be a driver.
I think you could buy this and use the dust shield as a template to drill holes in the fender for the pins. Would definitely be easier than the staples if you're not concerned about absolute originality. Another option that may look more original is using adhesive to hold the shield in place. They make some really good ones.
I also noticed on your last picture that the hose bracket isn't on the fender. If you didn't remove it for restoration and need one, here's the part:
Hi c1n,
I think JU is right!
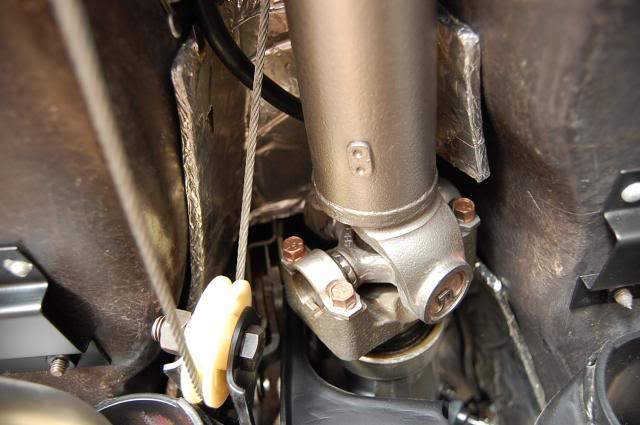
It appears the thick stack of alignment shims is being used to compensate for the damaged rubber bushing.
This is really something that should be tended to before you start driving the car on a regular basis.
Regards,
Alan
Yes! You are right JU and Alan. While the tranny and engine are getting their pampering, she will be getting all suspension issues addressed. I opted to stay with rubber bushings vs poly, after considering all pros and cons of each. Also going with stock leaf spring instead of fiberglass option. Did choose to add a roller cam when talking to the engine guys today. He said if it was his 427 he would do the rollers as opposed to flat head cam. Hope that is a good choice. $800 well spent? I also have started the slow tedious process of cleaning all the nuts and bolts. First soak in simple green, then soak overnight in Evaporust solution. So far happy with the way they are turning out. The input you guys have shared is so valuable. Neat trick with the yellow arrows Alan. Think you could point out were my bracket is lacking that JU was referring to? If I didn't have to work so many 12 hour shifts I could get this done more quickly ����
FYI, looks like the upper A arm bushing on the left is ....missing? Great work, are you having fun?
Fun, but intimidating and scary at the same time. I am such a novice I am terrified I will mess something up. It is very important that I do this right and make my Dad proud. If there was someone near me that could walk me through this I would probably be a little less apprehensive. This forum has been my go to source for reassurance and answers. 😊

 10-20-2016, 08:27 PM