When you click on links to various merchants on this site and make a purchase, this can result in this site earning a commission. Affiliate programs and affiliations include, but are not limited to, the eBay Partner Network.
I opted to stay with rubber bushings vs poly, after considering all pros and cons of each. Also going with stock leaf spring instead of fiberglass option. Think you could point out were my bracket is lacking that JU was referring to?
Good call on the bushings, Wilcox is a supplier with quality rubber.
The best thing I did for ride quality was put a fiberglass spring on 25 yrs ago!
Bracket?? I only see that the bushing has rotted off in the left arrow of Alan's photo.
If there was someone near me that could walk me through this I would probably be a little less apprehensive. This forum has been my go to source for reassurance and answers. 😊
Keep the photo's coming with questions! Remember....it's only a "Chevy", one of the easiest cars to get parts for and for you or your mechanic work on!
There is a NCRS club in Tulsa, http://www.ncrs-ok.org/. I'm sure there are members in the Oklahoma City area by you. What the local club here does is hold "tech day". You meet at a members garage who is in the process of rebuilding something and see how it's done. If anything you can gleam invaluable info on local sources for getting work done....right the first time by Corvette owning people.
Another C3 internet club is, http://www.c3vr.com/default.asp
Cindy, who lives in the middle of Canada, is half way thru a frame off restoration of a '75 in her barn. She's an inspiration for a lot of the guys in the club! We have a "Gathering" every summer to get together and put faces to the names of the people we chat with on the web. In 2017 it will be in Branson, MO, I'm guessing June 7-10.
Get your motor back in & suspension freshened up and make the 5 hour drive over!
"I also noticed on your last picture that the hose bracket isn't on the fender. If you didn't remove it for restoration and need one, here's the part:"
this was the above quote, but I am not sure where this "missing part goes"?
Love the picture John! That is great! Yes, many hours scrunched up into an Engine bay getting dirty. The girls at work and my friends are dying that I am always talking about my car projects. LOL
Hi c1n,
I believe this is the location of the clip that appears to be missing in the photo.
Not sure about the configuration of your car so aren't sure if it's missing or not. Generally if the plate shown in the photos that's riveted to the apron is there, the clip was used too.
Regards,
Alan
Hi c1n,
I think JU is right!
It appears the thick stack of alignment shims is being used to compensate for the damaged rubber bushing.
This is really something that should be tended to before you start driving the car on a regular basis.
Regards,
Alan
Hi PK,
Don't want to hi-jack this thread�.
A large difference in the number of shims on one a-arm or large difference from side to side is often an indication of something being amiss. Maybe even a tweaked frame.
Also, in your post #24 that heavy ground strap seems quite out of place too.
Regards,
Alan
Alan,
The suspension guy stated that something was "heated" and bent in the past to compensate???? Although the car drove pretty good going stright, turning created all kinds of intersting rubbing/noises. Cannot wait to get her on the road again and see what she is capable of!
I think you could buy this and use the dust shield as a template to drill holes in the fender for the pins. Would definitely be easier than the staples if you're not concerned about absolute originality. Another option that may look more original is using adhesive to hold the shield in place. They make some really good ones.
I also noticed on your last picture that the hose bracket isn't on the fender. If you didn't remove it for restoration and need one, here's the part:
I realize it's something you can do later, I just wanted to let you know it was missing. It will get those hoses out of the way.
Sorry about your Dad.
MajD
C1nicole,
I was the one that posted to you about the bracket. The original post is above. It is the bracket Alan identified in his response. If you look at your passenger fender skirt, there is a square bracket fastened with two rivets. The clamp goes in the square hole on that bracket and holds the heater hoses in place. You should also have one on the heater box. I gave you the wrong link for the clamp though. Here's the one you want:
I too am sorry for your loss. I lost my father back in 2010, and I still miss him every day.
As far as deciding on either upgrading your original engine or maybe a new one. I had to make that decision too. What help make the decision to go with a new "crate" engine was my Vette was going through a full frame off restoration and NOTHING in my Vette is number matching
Long story, I share it later.
My new engine is a small block, 400ci/414hp/490tq. It was built and dyno tested by an engine builder in SC. They have built over 60,000 engines! If you like I can PM their info since they are not a Forum supporter.
There are other engine builders near you that would do a great job too.
A photo of my Vette's going through her restoration.
Good Luck!!!
Corvette Jim,
I was noticing the bushings and control arm rods you put on. Can you send me some information on what they are and where I can get them? Thanks.
Have spent many hours cleaning with simple green and, scotch brite pads, power washed now ready to paint engine bay and frame. The engine and tranny are out and the car is going for suspension work on the 7th. Should I paint the frame before OR after they do the suspension? Also, can't decide between POR15 and chassis saver for frame. The additional prep and complications with adhesion make me nervous with POR. Trying to remind myself I want her back on the road come spring, that's my goal at least. We will see.
Hi c1n,
It's a little difficult to offer suggestions for which paint to use without seeing how far you've progressed with cleaning things and also how disassembled things are.
What is your definition of 'restoration' ?
Is your plan to paint everything black?
Are you going to protect some things that weren't typically black?
How much time/effort are you going to be able to spend on the painting process?
Are you going to go further under/back than the firewall now or in the near future?
What do you want it to look like when you're finished?
Regards,
Alan
Alan,
My main goal is to get her driveable again. While the engine is out I want to freshen her up. Nothing behind the dash at this time. She will be road worthy so dependability is a top priority. Unimaginably some people keep the engine in and freshen a bay (wow). I don't plan to pull every component off of the engine bay walls, hoping I could do some really good taping off. we are not addressing any body or interior issues at this time, that will have wo wait for more time and $$$ for the future.
Hi c1n,
The 2 products you mention are suitable for the frame and some suspension components.
They're not however suitable for the firewall, fender aprons, core support, and other small engine compartment components.
You might want to take a look at the paints made by SEM Products, a paint called John Deere Blitz Black, and Krylon #1613 Industrial Formula for those uses.
The black paint used originally is typically described as semi-flat.
Because I'm interested in parts having their original appearance I'm not a fan of POR15 or other similar coatings.
Good Luck!
Regards,
Alan
Yes, I should have been more clear. I didn't plan to use POR 15 or other chassis saver on the bay, intended to use the krylton you have recommended. Also plan to get her on a friends lift today and clean the under side with steel wool and spray a clear coat too. Have heard very mixed reviews about por15. Thanks Alan, you are a wealth of helpful info!
Nicole,
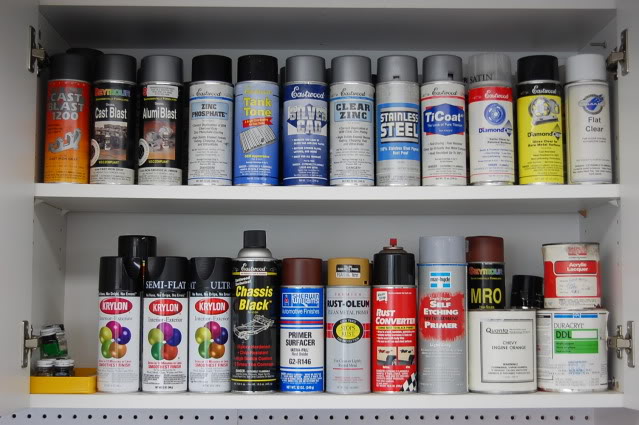
Hope you had a fun day painting. I took a shot of the left side of my frame. 25 years ago I removed the brake line fitting shown, taped it, repainted the frame with a mixture of Rustoleum Flat and Gloss paint (they did not have Satin yet). Since the motor was in the car I used a variety of china bristle brushes to get around in there. The upper A frame support is cast. I used a "cast paint" sprayed into the cap, then dipped a small brush in and applied to the support. The photo shows how it's held up for 25 years.....appears I need to touch up a few areas.....oops!
Hi John,
Your comment about mixing the 2 paints to get the gloss level you wanted reminded me that many, many, years ago I'd put talcum powder into Rustoleum gloss to flatten it a bit for use on some small parts.
Things have changed a bit!
Regards,
Alan
Alan,
You crack me up! I have 75% of those same paints in my collection. Eastwoods was the first on the market with the "proper tones" for us fussy types. That qt can on the lower right...I have two for my two tone paint job!
Hi John,
Yes, Eastwood gradually changed the appearance of a LOT of restored chassis as they brought out all those finishes.
Over the years I've gradually gotten away from them as I've increased my ability to do satisfactory plating at home and have also learned about protecting bare metal parts from rust/corrosion with things other than paint.
But, BOY did I depend on them in the beginning!!!
Regards,
Alan
Hi Alan, I am setting up a plating system also. Would you like to share your experience on this? Maybe not here but on a new thread so not to hijack this one. I'm sure it will help out a lot of people.

 10-28-2016, 11:29 AM