


C3 rear compartment light replacement?
Thread Starter
Pro


Joined: Sep 2016
Posts: 720
Likes: 205
From: Michigan
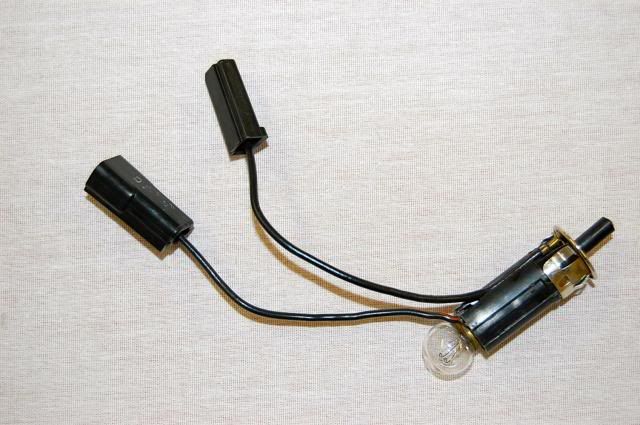
Purchased a replacement storage compartment light unit with connectors, socket, plunger and bulb. Can't for the life of me figure out how to install it.
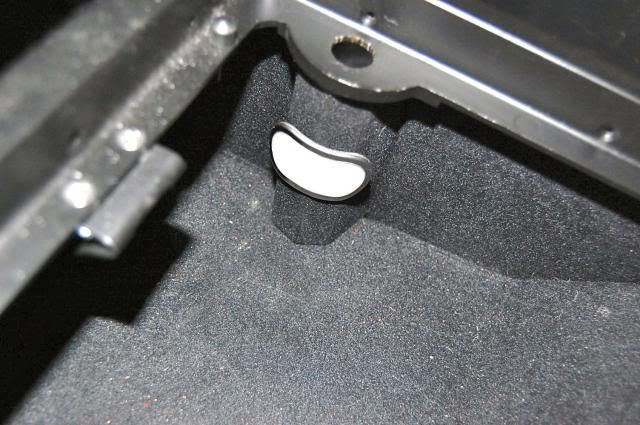
Looks like it should load from the top of the bin hole so the plunger pushes down when the door shuts and the ring l on the button should bear on the top of the bin edge.
But one of the connectors is too big to pass thru the hole, as is the socket body!
Please help solve the puzzle.
Looks like it should load from the top of the bin hole so the plunger pushes down when the door shuts and the ring l on the button should bear on the top of the bin edge.
But one of the connectors is too big to pass thru the hole, as is the socket body!
Please help solve the puzzle.
Last edited by Bergerboy; Oct 4, 2016 at 09:18 PM.
Is my vette stock?? HAHA


Joined: Oct 2015
Posts: 20,216
Likes: 9,354
From: Im not allowed to tell you
2020 C3 of the Year Finalist - Modified
2020 Corvette of the Year Finalist (performance mods)
2019 C3 of Year Winner (performance mods)
2016 C3 of Year Finalist
Pics please.
Thats how it should fit though, maybe wrong part?
Thats how it should fit though, maybe wrong part?
Drifting

Joined: May 2012
Posts: 1,353
Likes: 44
From: Calgary Alberta
What year is your car, 69?
The assembly should pass through from the top, without the bulb installed - that goes in from the bottom once the assembly is in place, if I remember correctly. If the wire connectors won't go through the hole, you must have the wrong part.
The assembly should pass through from the top, without the bulb installed - that goes in from the bottom once the assembly is in place, if I remember correctly. If the wire connectors won't go through the hole, you must have the wrong part.
Thread Starter
Pro
Joined: Sep 2016
Posts: 720
Likes: 205
From: Michigan
Thanks Alan - looks just like yours.
Only the hole in the bin frame is too small to fit the bigger connector, and then the body of the switch (even with the bulb out).
Don't want to enlarge the hole and permanently alter the existing part, until I know that the switch is correct.
I left a message at "Lectric Limited" (Corvette America's vendor for the part), to see if they have specs for the correct hole size for their part to fit into and then to engage.
C.A. didn't have design specifics.
I am assuming the silver collar sits on top side of the hole, with the spring ears engaging the underside of the hole.
I want to avoid overdoing it on the hole size, as I can envision ending up too loose, and having the bulb burn/melt the lens if knocked out of alignment.
Drifting
Joined: May 2012
Posts: 1,353
Likes: 44
From: Calgary Alberta
Can you post a picture of your compartment?
The body of the light assembly should go in with a fairly firm interference fit, if I remember correctly. The wire connector that won't fit through could likely be removed from the wire, if you had to.
I wouldn't start enlarging holes, especially if you've got an original rear compartment - shouldn't have to do that.
Last edited by Brcmpbl; Oct 5, 2016 at 11:08 AM.
Thread Starter
Pro
Joined: Sep 2016
Posts: 720
Likes: 205
From: Michigan
Mine is slightly different, in that the top ring clip is heat staked onto the plastic switch body.
I could remove it and re-glue them together after feeding the switch up from underneath, but - again - would like to understand from the company what the proper install procedure is.
(edit: Just heard back from Lectric Limited, maker of the part, and they indicate the hole size in the Rr Compartment Frame lip should be 0.625 (5/8") for proper clip engagement. And that it is designed be installed downwards from the top with the bulb removed. I will need to go home and measure mine, but wondering if anyone else has an undersized hole here?)
Thanks
Last edited by Bergerboy; Oct 5, 2016 at 11:27 AM.
Corvette Stories
The Best of Corvette for Corvette Enthusiasts

Top 10 Most Expensive Corvettes Ever Sold on Bring A Trailer
Brett Foote
10 Things Every Corvette Owner Needs (2026 Edition)
Michael S. Palmer
8 Most "Only Corvette Owners Understand" Quirks and Problems
Pouria Savadkouei
10 Reasons the C6 Z06 is Still A Performance Benchmark After 20 Years
Joe Kucinski
How Much Horsepower Every Corvette Engine "LOST" in 1972
Joe Kucinski
Top 10 DOs and DON'Ts for Protecting Your Convertible Top!
Michael S. Palmer
Top 10 Most Explosive Corvettes Ever Made: Power-to-Weight Ratio Ranked!
Joe Kucinski
150 hp to 1,250 hp: Every Corvette Generation Compared by the Specs That Matter
Joe Kucinski
8 Coolest Corvette Pace Cars (and Replicas) of All Time
Verdad GallardoMelting Slicks


Joined: Jul 2006
Posts: 3,103
Likes: 802
From: Massapequa Park NY
I literally just put mine in yesterday but I also replaced my compartment frame. The frames come without the light hole drilled. I had to drill my own hole along with the outer screw holes.
It sounds like you will need to enlarge your hole. If that's the case it will be no big deal. Just go slowly and keep test fitting the light fixture. When the connectors fit through that should be big enough to then fit the fixture.
I used my old frame hole as a template but made it a bit smaller on purpose.
Did the new light look like the old light that came out of The compartment? That's the only thing that makes no sense to me. If the old light was original than the new one should fit. Same with the connectors. How did you get the old one out? Did the connectors come out through the hole also?
Thread Starter
Pro
Joined: Sep 2016
Posts: 720
Likes: 205
From: Michigan

ED
The old switch was in pieces and I found it at the bottom of the jack compartment with just about anything else you could imagine EXCEPT a jack! Various nuts and bolts, cigarette butts, car wash tokens, a wheel bearing, ["and your angry eyes....."], lots of sticky stuff on the bottom of the compartment, etc. etc.
I'll have to retrieve it from the trash to see how it lines up to the new one, and to the existing hole.
Team Owner


Joined: Sep 2006
Posts: 31,278
Likes: 4,372
From: Westminster Maryland
Hi Bb,
On my 71 the light housing inserts from the top with the bulb removed.
The 2 connectors just fit through the hole one at a time.
Regards,
Alan
Bubba speaking…. "can the corners on the larger connector be 'trimmed' a bit so it'll fit through the existing hole?"
Here are the connectors in the jack compartment.
Last edited by Alan 71; Oct 5, 2016 at 02:45 PM.
Melting Slicks
Joined: Jul 2006
Posts: 3,103
Likes: 802
From: Massapequa Park NY
ED
The old switch was in pieces and I found it at the bottom of the jack compartment with just about anything else you could imagine EXCEPT a jack! Various nuts and bolts, cigarette butts, car wash tokens, a wheel bearing, ["and your angry eyes....."], lots of sticky stuff on the bottom of the compartment, etc. etc.
I'll have to retrieve it from the trash to see how it lines up to the new one, and to the existing hole.
Good luck with your resto. This forum is a true resource and full of great info from guys that have been were you are now. I've learned more here in the last two years then I have in the 20 before that.
Sincerely,
Ed
Also, put any nuts and bolts you find in a bag. They may go to something and having anything that might be original is good. If they do go to something, you'll know when you get to it. You can pretty much find what the "correct" bolt goes to by looking it up on the net or even asking here. Then you can match up what might be missing somewhere down the line. Some of us actually go out of the way for the proper headmarks when possible........just part of the sickness...or cure depending on how you look at it.
Last edited by ed427vette; Oct 5, 2016 at 06:48 PM.
Thread Starter
Pro
Joined: Sep 2016
Posts: 720
Likes: 205
From: Michigan
Thanks Ed and all.
I ended up opening up my 1/2 inch hole to the prescribed 5/8 inches and the unit fit snugly in. The collar ring snapped to engage in place.
Pretty happy with the final result even though I had to improvise a bit.
Wondering if anyone knows the definitive hole size of the original desgn.
Also should the holes in the bottoms of the battery and jack compartments be open or plugged? I can see the ground through both.
Also also, any science behind the need for a seal around the battery door? There is some corrosion powder around the lip in some areas.
Drifting
Joined: May 2012
Posts: 1,353
Likes: 44
From: Calgary Alberta
I'll measure the hole in my 70 this weekend out of curiosity, I believe it to be an original frame.
The circular drain holes in the bottom of the compartments should have a plug. You can see one in Alan's post #11, above, right hand side. The battery compartment seal was for vapour, etc., from the batteries of the period, which were more prone to leaking than modern designs (I believe). I'd put the seal on regardless. The battery compartment also had two rubber hoses that connected to the battery and vented to atmosphere under the car.
The circular drain holes in the bottom of the compartments should have a plug. You can see one in Alan's post #11, above, right hand side. The battery compartment seal was for vapour, etc., from the batteries of the period, which were more prone to leaking than modern designs (I believe). I'd put the seal on regardless. The battery compartment also had two rubber hoses that connected to the battery and vented to atmosphere under the car.
Last edited by Brcmpbl; Oct 6, 2016 at 04:51 AM.
Le Mans Master


Joined: May 2006
Posts: 5,814
Likes: 414
From: Pittsburgh suburbs Pa.
I'll measure the hole in my 70 this weekend out of curiosity, I believe it to be an original frame.
The circular drain holes in the bottom of the compartments should have a plug. You can see one in Alan's post #11, above, right hand side. The battery compartment seal was for vapour, etc., from the batteries of the period, which were more prone to leaking than modern designs (I believe). I'd put the seal on regardless. The battery compartment also had two rubber hoses that connected to the battery and vented to atmosphere under the car.
The circular drain holes in the bottom of the compartments should have a plug. You can see one in Alan's post #11, above, right hand side. The battery compartment seal was for vapour, etc., from the batteries of the period, which were more prone to leaking than modern designs (I believe). I'd put the seal on regardless. The battery compartment also had two rubber hoses that connected to the battery and vented to atmosphere under the car.
Team Owner
Joined: Sep 2006
Posts: 31,278
Likes: 4,372
From: Westminster Maryland
Hi,
Cap hose trivia�
The 2 hoses were a different length to compensate for the caps' positions on the battery.
One hose was smooth and the other ribbed so the line worker knew which was which.
The end of the had a very sharp cut on it. I've HEARD that this was to create some small amount of 'venturi effect' so the gases would be drawn out of the battery.
Regards,
Alan