


Seeking Input - Four Outstanding Issues Remaining
Thread Starter
Pro


Joined: Jul 2014
Posts: 523
Likes: 249
From: SC
2018 C3 of Year Finalist
First: The light in the center under body storage compartment is inoperative. I thought it would be just a simple matter of gently squeezing the shield (ref Service Manual, page 1B-23, part # 25) to release it from the sidewall of the compartment thus exposing the light assembly and switch. However, the shield won’t budge. So what's the access gouge?
Second: Head Lamp warning light. I didn’t realize this until I stumbled across it in the owner’s manual, the warning light should be extinguished when the headlamps are fully closed "OR" fully open. At headlamps fully open, the light remains illuminated.
It looks like a major PITA to make the headlamp travel adjustment (ref AIM, page 12-4, Para 3.c. and 3.d, fig 4). It looks like a lot of disassembly just to make a minor adjustment to the actuator rod length. Does this adjustment require disassembly of everything forward of the actuator assembly? I’m not sure I want to mess with this and inclined to leave well enough alone because the headlamps are working properly as is.
Third: Emergency flasher button is frozen in the “flasher lights off” position in steering column. I've pulled and pushed with considerable force but with no luck.
Fourth: Lamp monitoring system is inoperative. Front and rear optic lines are visible but disconnected at the center console (looks like some parts are missing). Discovered sensors at tail light location are painted over. Not sure if just scrapping off the paint would ruin them. Also not sure if the front optic lines are connected to the headlamps. I haven’t really researched the monitoring system yet. This will be last on my list.
Would appreciate your input.
Regards,
Tom
Last edited by Tom69; Nov 27, 2016 at 05:25 PM.
Melting Slicks


Joined: Nov 2000
Posts: 2,507
Likes: 114
From: St. Louis Mo
First: The light in the center under body storage compartment is inoperative. I thought it would be just a simple matter of gently squeezing the shield (ref Service Manual, page 1B-23, part # 25) to release it from the sidewall of the compartment thus exposing the light assembly and switch. However, the shield won�t budge. So what's the access gouge?
Second: Head Lamp warning light. I didn�t realize this until I stumbled across it in the owner�s manual, the warning light should be extinguished when the headlamps are fully closed "OR" fully open. At headlamps fully open, the light remains illuminated.
It looks like a major PITA to make the headlamp travel adjustment (ref AIM, page 12-4, Para 3.c. and 3.d, fig 4). It looks like a lot of disassembly just to make a minor adjustment to the actuator rod length. Does this adjustment require disassembly of everything forward of the actuator assembly? I�m not sure I want to mess with this and inclined to leave well enough alone because the headlamps are working properly as is.
Third: Emergency flasher button is frozen in the �flasher lights off� position in steering column. I've pulled and pushed with considerable force but with no luck.
Fourth: Lamp monitoring system is inoperative. Front and rear optic lines are visible but disconnected at the center console (looks like some parts are missing). Discovered sensors at tail light location are painted over. Not sure if just scrapping off the paint would ruin them. Also not sure if the front optic lines are connected to the headlamps. I haven�t really researched the monitoring system yet. This will be last on my list.
Would appreciate your input.
Regards,
Tom
Team Owner


Joined: Sep 2006
Posts: 31,198
Likes: 4,287
From: Westminster Maryland
Hi Tom,
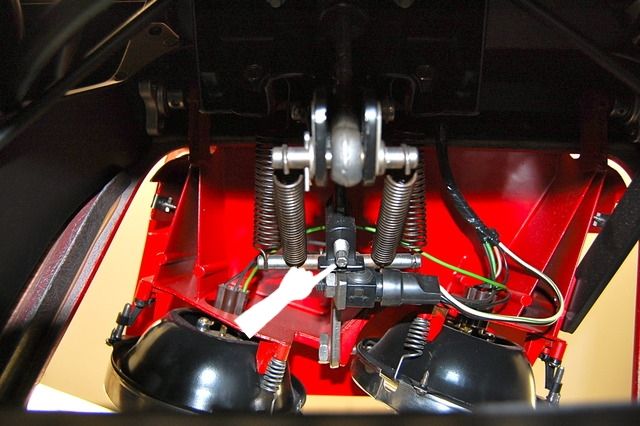
Second: The headlight warning switch…. the headlight warning on the center cluster should illuminate as soon as the headlight switch is pulled.
The light stays illuminated until the doors are fully open and the 'button' on the warning switches have been depressed by the headlight door linkages.
There's a warning switch for each headlight door.
First check to see if depressing the button on each switch turns off the warning in the dash. This will tell you if the switches are working or not. (They both need to work in order for the warning lamp to be extinguished on the dash.)
If the switches are working but the headlight mechanism isn't depressing the button fully you can adjust the linkage slightly.
Check the switches first,
Regards,
Alan
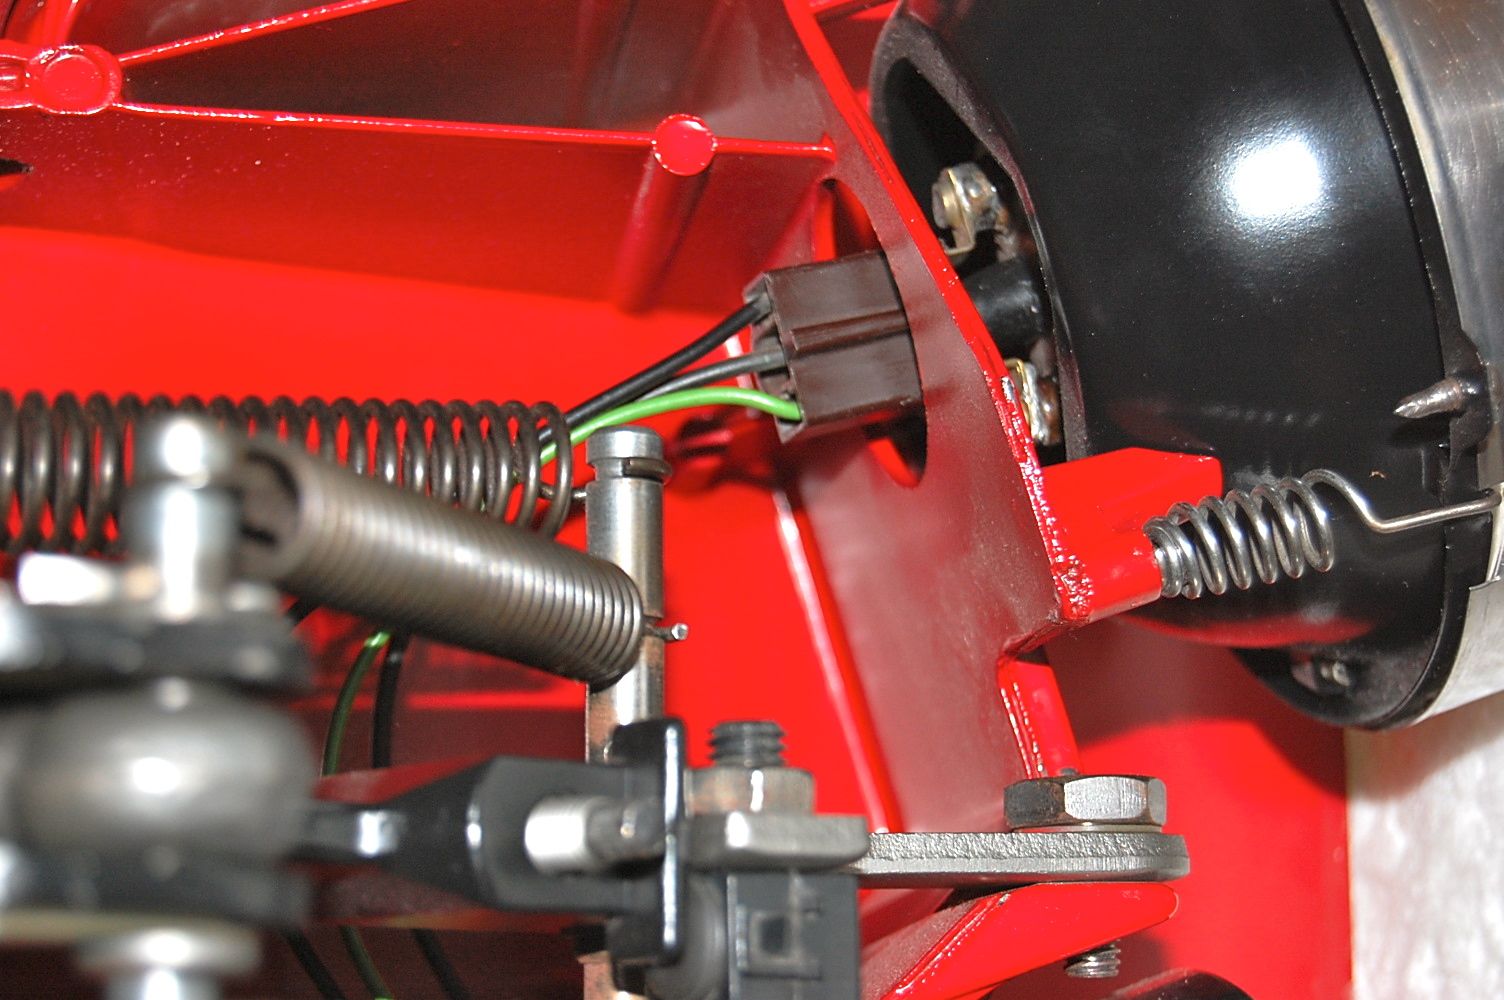
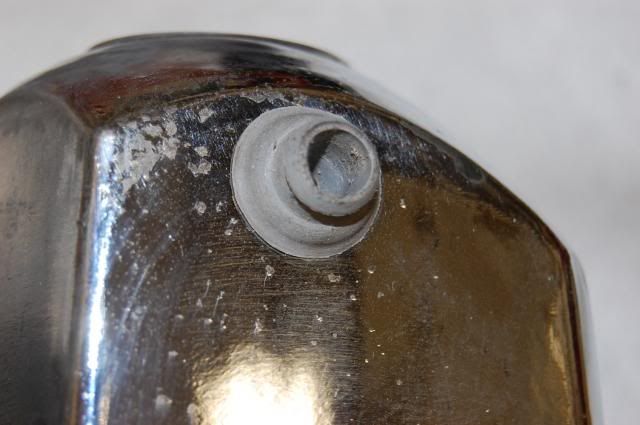
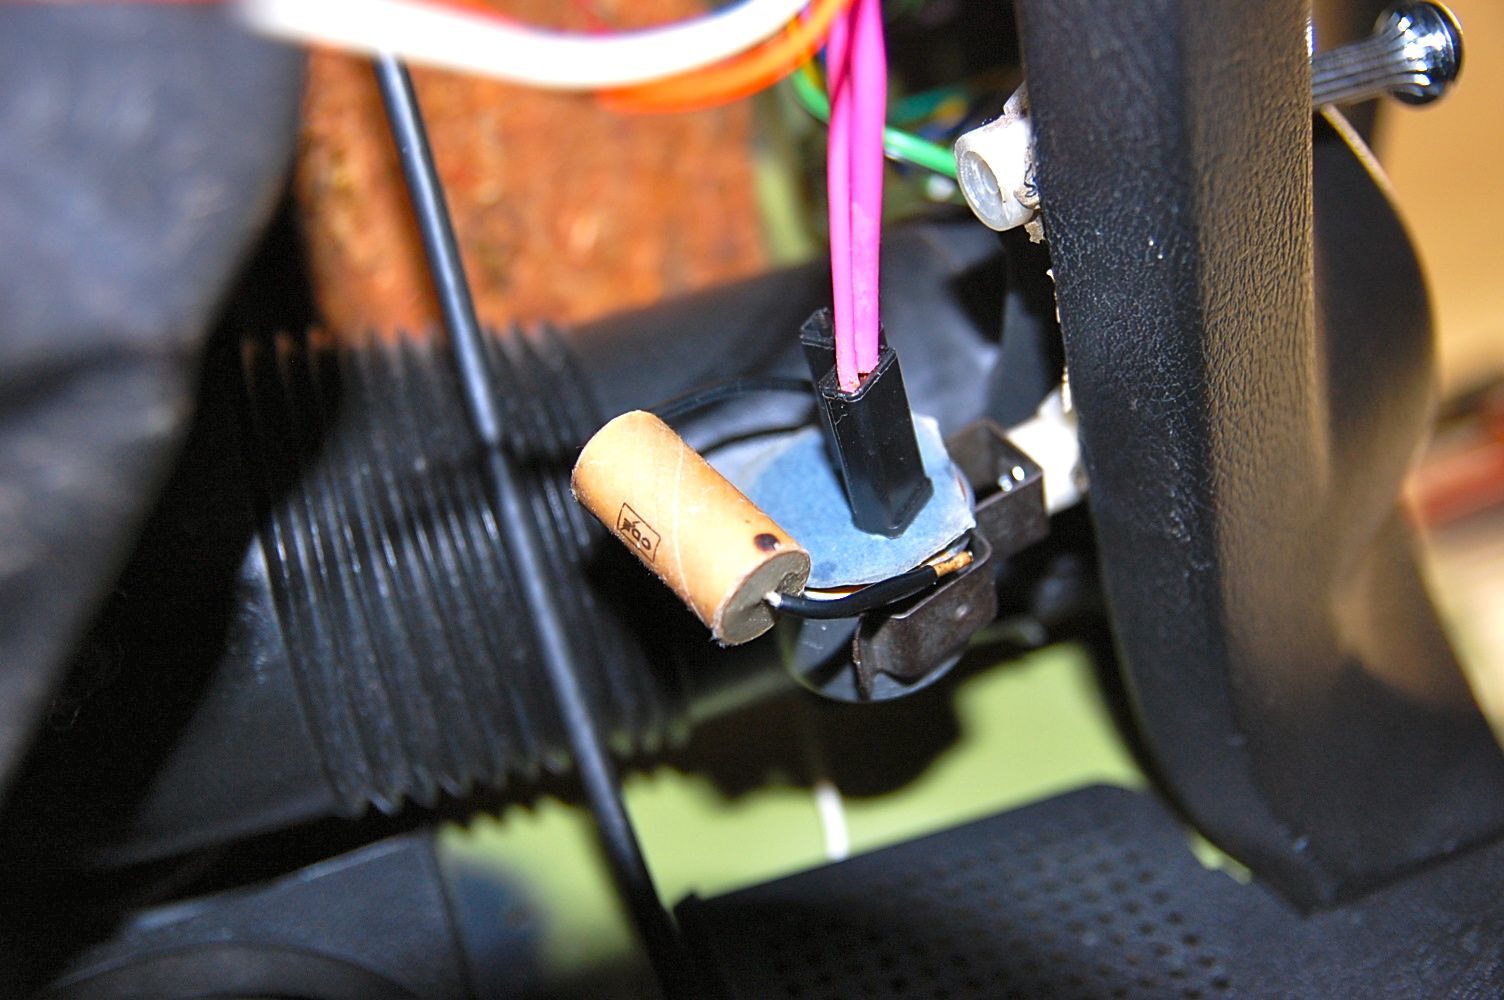
Here you see the switch, the button, the 'tab' on the linkage that depresses the 'button', and the location of the adjustment (the arrow).
Be VERY careful with the switches they're extremely fragile.
Second: The headlight warning switch…. the headlight warning on the center cluster should illuminate as soon as the headlight switch is pulled.
The light stays illuminated until the doors are fully open and the 'button' on the warning switches have been depressed by the headlight door linkages.
There's a warning switch for each headlight door.
First check to see if depressing the button on each switch turns off the warning in the dash. This will tell you if the switches are working or not. (They both need to work in order for the warning lamp to be extinguished on the dash.)
If the switches are working but the headlight mechanism isn't depressing the button fully you can adjust the linkage slightly.
Check the switches first,
Regards,
Alan
Here you see the switch, the button, the 'tab' on the linkage that depresses the 'button', and the location of the adjustment (the arrow).
Be VERY careful with the switches they're extremely fragile.
Last edited by Alan 71; Nov 27, 2016 at 06:25 PM.
Team Owner
Joined: Sep 2006
Posts: 31,198
Likes: 4,287
From: Westminster Maryland
Hi Tom,
Here's some info about the fiber optics.
The connections for the headlights are unique to themselves.
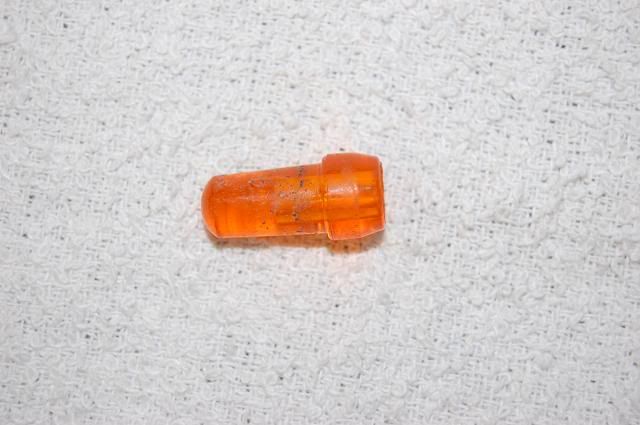
The connections for the front parking lights and the tail lights and license lamp are similar.
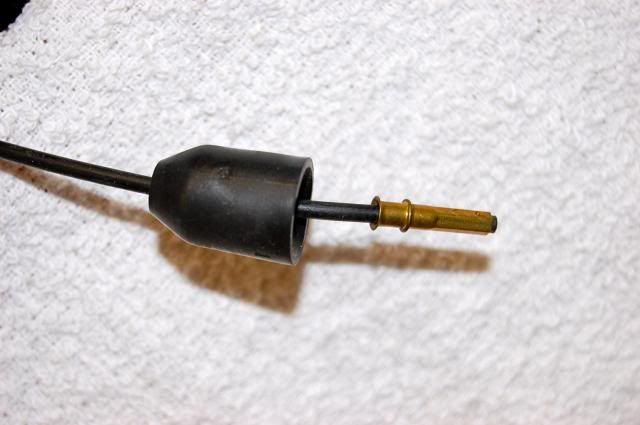
Here are the parts that make the connections.
Regards,
Alan
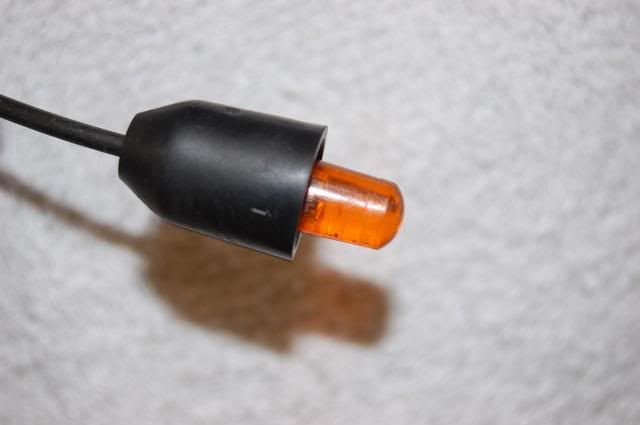
Headlights:
Black plastic tubes.
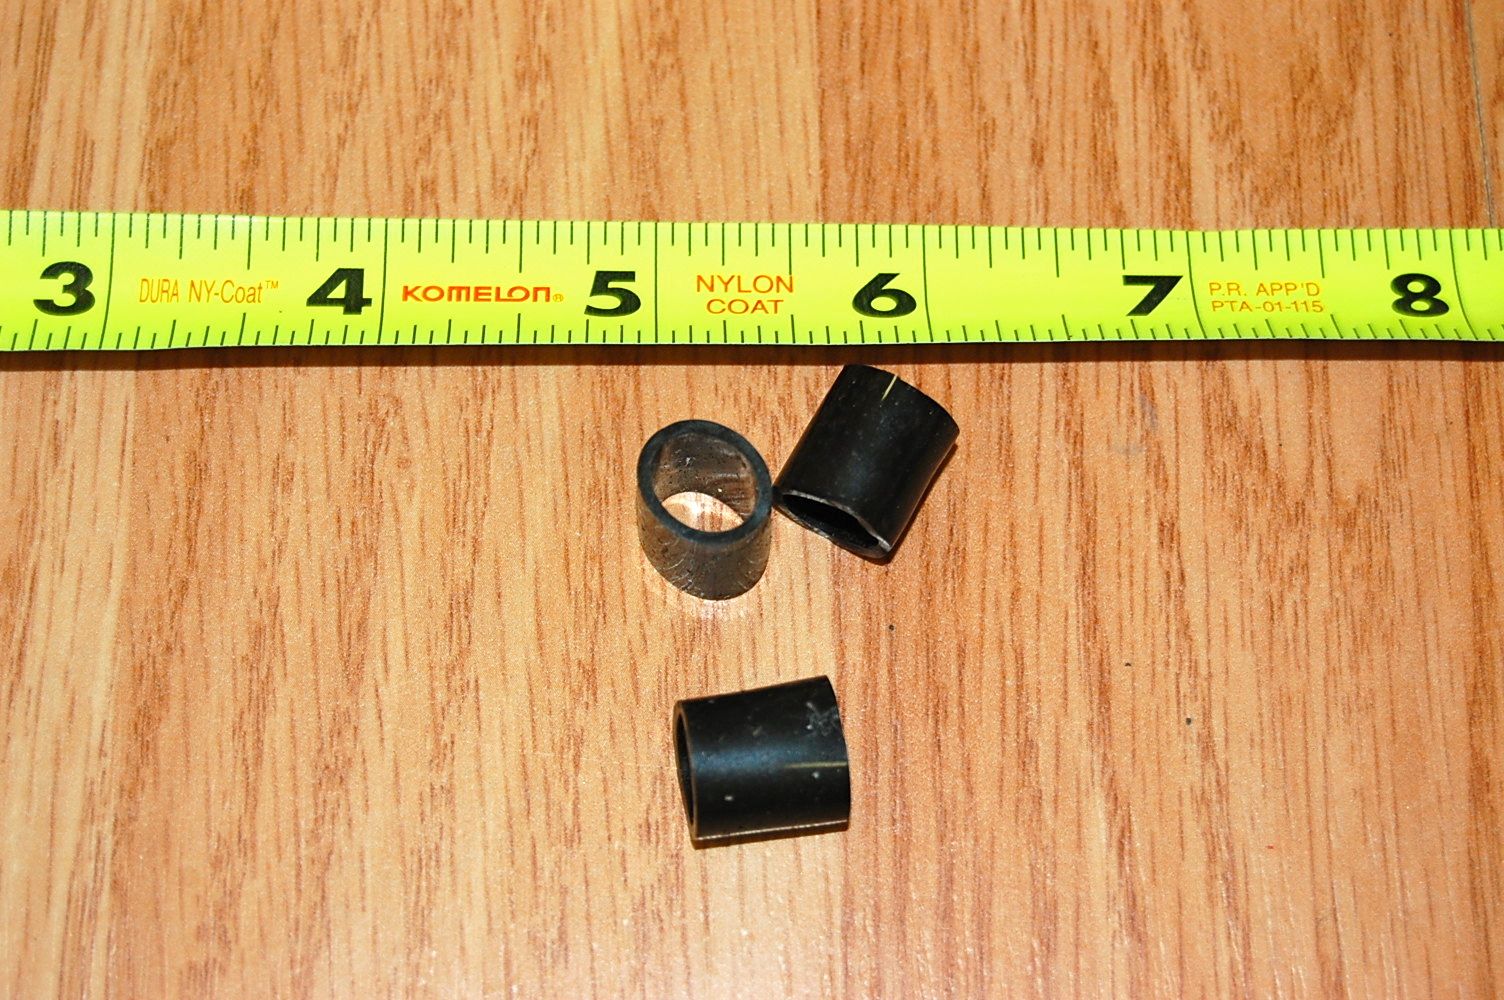
Connector… fiber optic cable is in the center.
The connector and tube in place.
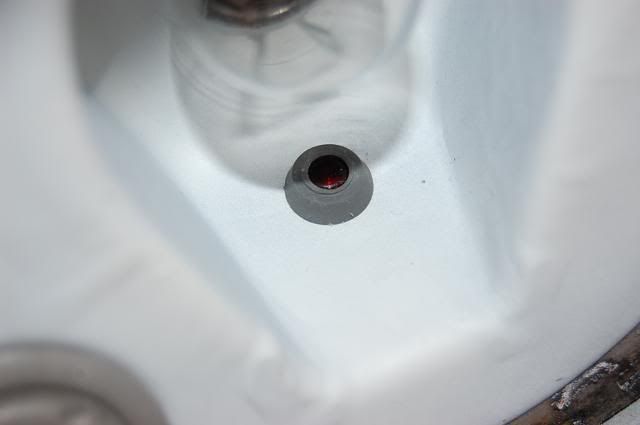
This happens to be the parking/turn signal connection.

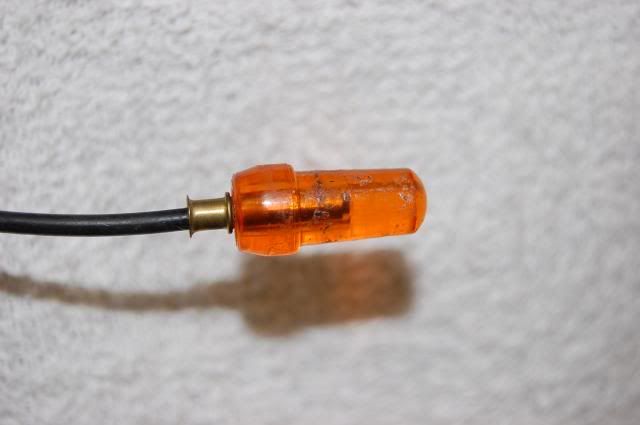
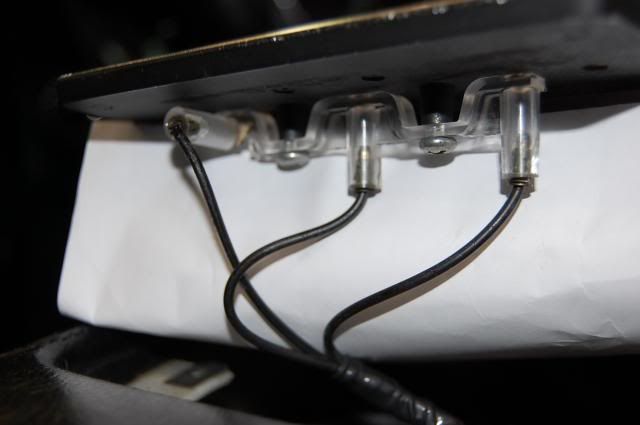
The typical tail/stop light connection.
Here are the connections for the tail/stop light and license lamp at the shifter plate.
Here's some info about the fiber optics.
The connections for the headlights are unique to themselves.
The connections for the front parking lights and the tail lights and license lamp are similar.
Here are the parts that make the connections.
Regards,
Alan
Headlights:
Black plastic tubes.
Connector… fiber optic cable is in the center.
The connector and tube in place.
This happens to be the parking/turn signal connection.
The typical tail/stop light connection.
Here are the connections for the tail/stop light and license lamp at the shifter plate.
Last edited by Alan 71; Nov 27, 2016 at 07:01 PM.
Thread Starter
Pro
Joined: Jul 2014
Posts: 523
Likes: 249
From: SC
2018 C3 of Year Finalist
Hi Tom,
Second: The headlight warning switch…. the headlight warning on the center cluster should illuminate as soon as the headlight switch is pulled.
The light stays illuminated until the doors are fully open and the 'button' on the warning switches have been depressed by the headlight door linkages.
There's a warning switch for each headlight door.
First check to see if depressing the button on each switch turns off the warning in the dash. This will tell you if the switches are working or not. (They both need to work in order for the warning lamp to be extinguished on the dash.)
If the switches are working but the headlight mechanism isn't depressing the button fully you can adjust the linkage slightly.
Check the switches first,
Regards,
Alan
Here you see the switch, the button, the 'tab' on the linkage that depresses the 'button', and the location of the adjustment (the arrow).
Be VERY careful with the switches they're extremely fragile.
Discovered the problem. Tested the buttons per your guidance. The right headlamp switch is way out of adjustment.

Regards,
Tom
Last edited by Tom69; Nov 27, 2016 at 10:05 PM.
Thread Starter
Pro
Joined: Jul 2014
Posts: 523
Likes: 249
From: SC
2018 C3 of Year Finalist
Team Owner
Joined: Sep 2006
Posts: 31,198
Likes: 4,287
From: Westminster Maryland
Hi Tom,
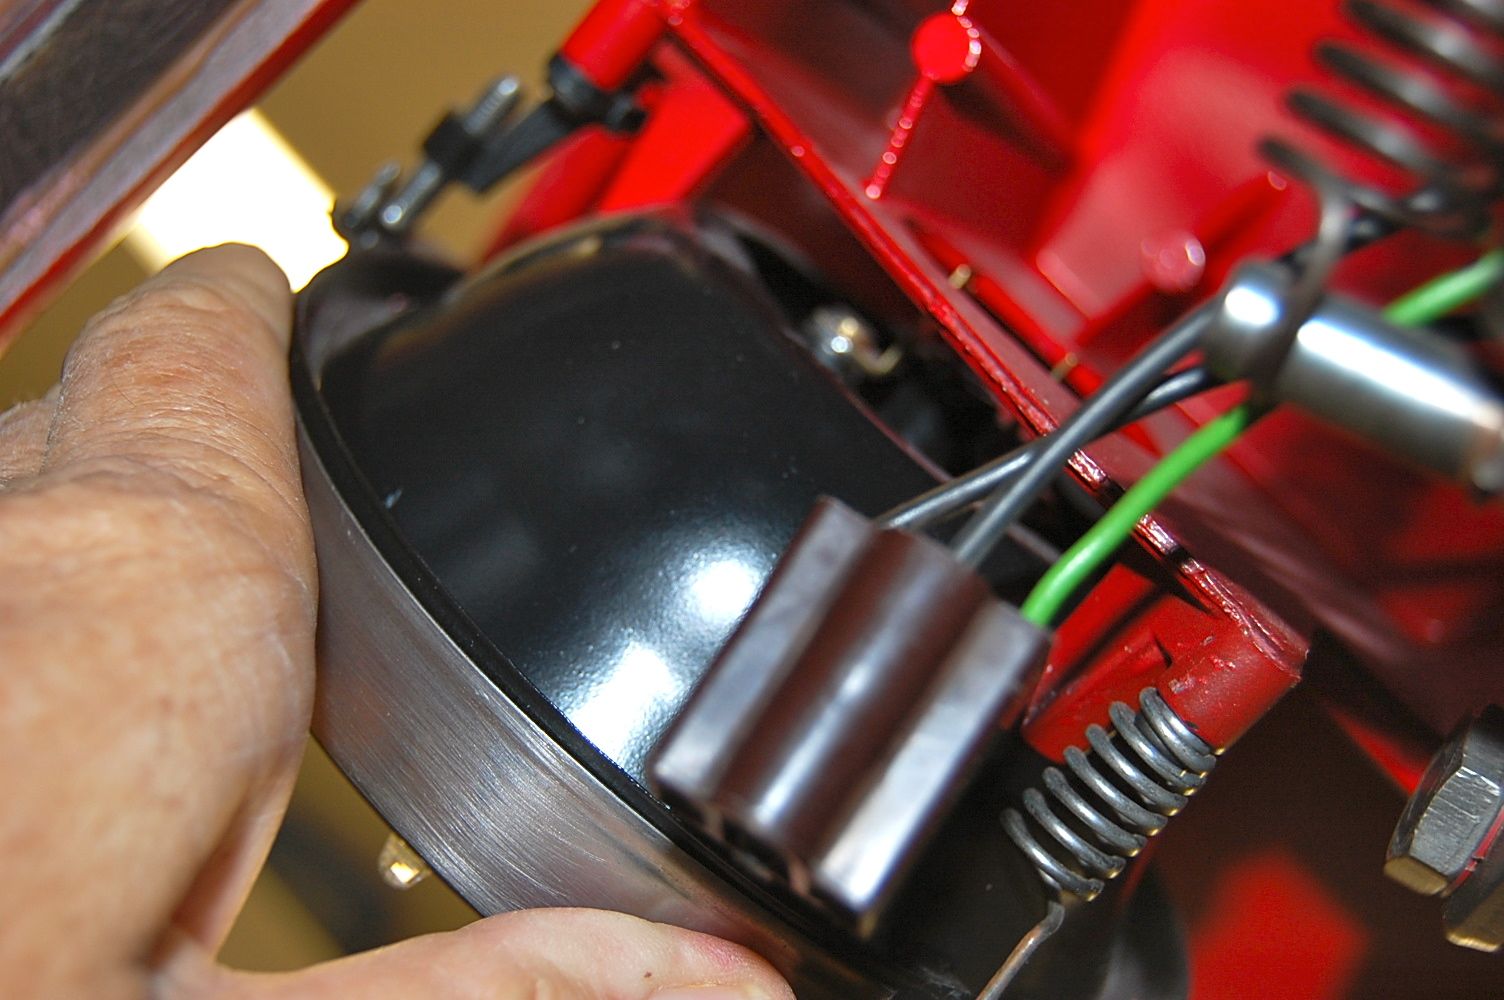
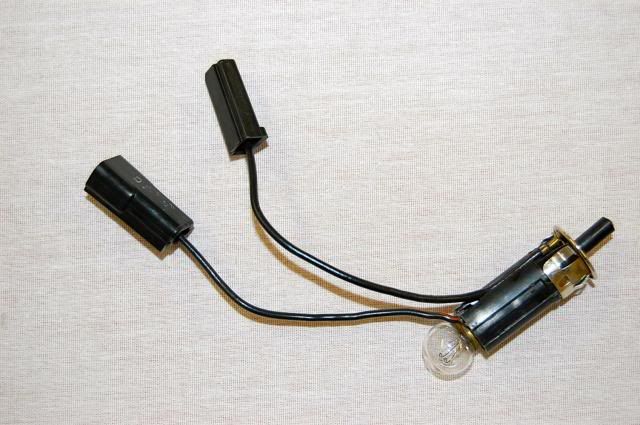
The flasher mounted in the clip that's located at the rear lower right side dash pad is for the turn signals.
The flasher for the 4-way emergency flashers is mounted to the upper left corner of the fuse block on the interior side.
I'm sorry but I can't help with the switch on the column� that's likely Jim Shea or Willcox territory.
Regards,
Alan
Turn signal flasher with radio condenser.
Last edited by Alan 71; Nov 28, 2016 at 07:08 AM.
Corvette Stories
The Best of Corvette for Corvette Enthusiasts

150 hp to 1,250 hp: Every Corvette Generation Compared by the Specs That Matter
Joe Kucinski
8 Coolest Corvette Pace Cars (and Replicas) of All Time
Verdad Gallardo
Top 10 Corvette Engines RANKED by Peak Torque (70+ Years of Muscle!)
Joe Kucinski
Corvette ZR1X Will Be Pacing the Indy 500, And Could Probably Race, Too!
Verdad Gallardo
Top 10 Corvettes Coming to Mecum Indy 2026!
Brett Foote
Top 10 C9 Corvette MUST-HAVES to Fix These C8 Generation Flaws!
Michael S. Palmer
10 Revolutionary 'Corvette Firsts' Most People Don't Know
Joe Kucinski
5 Reasons to Upgrade to an LS6-Powered Corvette; 5 Reasons to Stay LT2
Michael S. Palmer
2027 Corvette vs The World: Every C8 vs Its Closest Competitor
Joe KucinskiTeam Owner
Joined: Sep 2006
Posts: 31,198
Likes: 4,287
From: Westminster Maryland
Hi Tom,
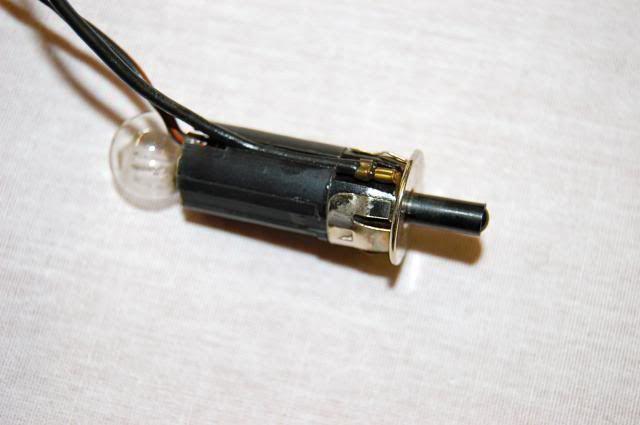
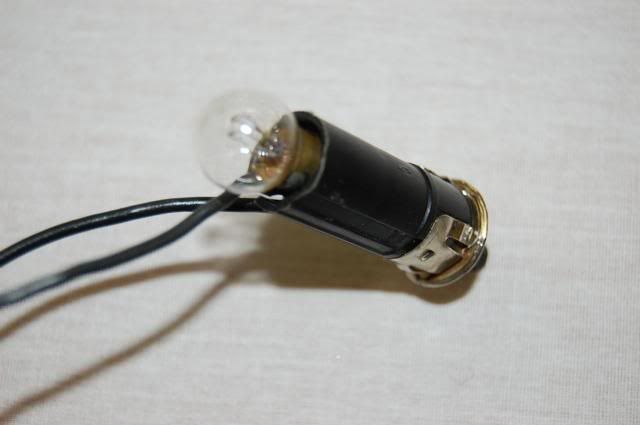
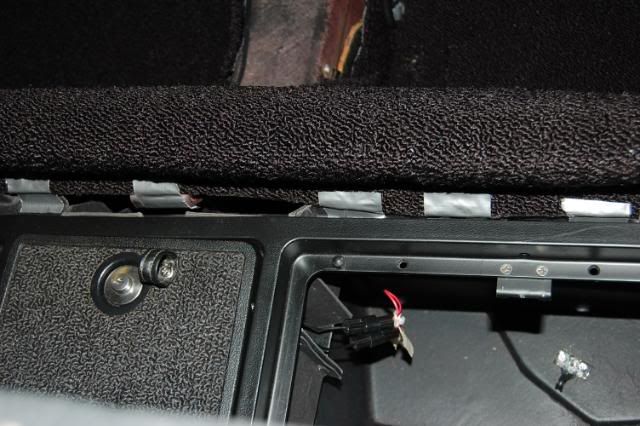
Here's the info on the glove box lamp.
The entire switch/socket/bulb is pulled up out of the hole in the compartment surround.
The connections are reached through the jack compartment.
Regards,
Alan
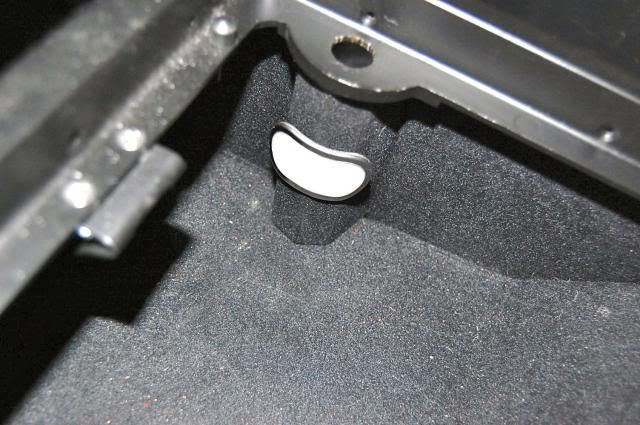
Note the prongs on the switch that hold it inlace in the plastic surround.
Here's the info on the glove box lamp.
The entire switch/socket/bulb is pulled up out of the hole in the compartment surround.
The connections are reached through the jack compartment.
Regards,
Alan
Note the prongs on the switch that hold it inlace in the plastic surround.
Last edited by Alan 71; Nov 28, 2016 at 08:24 AM.
Melting Slicks
Joined: May 2015
Posts: 2,365
Likes: 428
From: Cape Girardeau Missouri
I don't believe there is an adjustment for the switch itself. While your headlamp door may appear fully open it is not locked into the "up" position. When properly adjusted and operating, the actuator arm causes a bit of over-travel in the mechanism. That over-travel does not raise the door any more; instead it locks the door up. You will hear a metal-on-metal "snap" as this happens and that switch will be depressed. Observe the other side for what is supposed to occur.
Pro


Joined: Sep 2016
Posts: 720
Likes: 205
From: Michigan
Regarding the Fiber Optics:
I had some pretty good results cleaning off the rear lights "pickups".
I traced my fiber lines from the rears to the console, and all looked to be intact, but no lights were shining. I removed the tail light lenses and come to find out that they painted over the pickups!
I just took some fine sandpaper and sanded off the paint, getting the fiber bundle ends clean and smooth - and Viola! There was light at the console lenses!!
I also replaced the console F.O. lenses themselves (a cheap $20+ update) and things are working fine now.
The fronts needed a little cleaning and they work even better than the rears.
The rears seems to be a little less efficient, especially the one left side lens which (for some reason) was designed with a 90 degree angle where the fiber comes into the back of the lens.
But they work well enough that I had to do a "double take" when the car was parked in the garage with the rear end facing out in the sun. When I walked by the interior of the car during the day, the lenses in the console were shining so bright, I thought I left the lights on! But it was just the sunlight getting picked up by the F.O. in the tail lights!
I wish they shone that bright when the lights are on!
Thread Starter
Pro
Joined: Jul 2014
Posts: 523
Likes: 249
From: SC
2018 C3 of Year Finalist
Hi Tom,
Here's the info on the glove box lamp.
The entire switch/socket/bulb is pulled up out of the hole in the compartment surround.
The connections are reached through the jack compartment.
Regards,
Alan
Note the prongs on the switch that hold it inlace in the plastic surround.
Here's the info on the glove box lamp.
The entire switch/socket/bulb is pulled up out of the hole in the compartment surround.
The connections are reached through the jack compartment.
Regards,
Alan
Note the prongs on the switch that hold it inlace in the plastic surround.
Well I certainly have egg on my face on that one...I didn't realize the jack compartment bin simply lifts out of the compartment to allow access to the connections!
Regards,
Tom
Team Owner
Joined: Sep 2006
Posts: 31,198
Likes: 4,287
From: Westminster Maryland
Hi Tom,
A little egg on occasion is a good thing�. it keeps us in the "still figuring this out" stage, AND sounds an alarm in our brain if we type the word 'expert'.
Regards,
Alan
A little egg on occasion is a good thing�. it keeps us in the "still figuring this out" stage, AND sounds an alarm in our brain if we type the word 'expert'.
Regards,
Alan
Thread Starter
Pro
Joined: Jul 2014
Posts: 523
Likes: 249
From: SC
2018 C3 of Year Finalist
Regarding the Fiber Optics:
I had some pretty good results cleaning off the rear lights "pickups".
I traced my fiber lines from the rears to the console, and all looked to be intact, but no lights were shining. I removed the tail light lenses and come to find out that they painted over the pickups!
I just took some fine sandpaper and sanded off the paint, getting the fiber bundle ends clean and smooth - and Viola! There was light at the console lenses!!
I also replaced the console F.O. lenses themselves (a cheap $20+ update) and things are working fine now.
The fronts needed a little cleaning and they work even better than the rears.
The rears seems to be a little less efficient, especially the one left side lens which (for some reason) was designed with a 90 degree angle where the fiber comes into the back of the lens.
But they work well enough that I had to do a "double take" when the car was parked in the garage with the rear end facing out in the sun. When I walked by the interior of the car during the day, the lenses in the console were shining so bright, I thought I left the lights on! But it was just the sunlight getting picked up by the F.O. in the tail lights!
I wish they shone that bright when the lights are on!
I had some pretty good results cleaning off the rear lights "pickups".
I traced my fiber lines from the rears to the console, and all looked to be intact, but no lights were shining. I removed the tail light lenses and come to find out that they painted over the pickups!
I just took some fine sandpaper and sanded off the paint, getting the fiber bundle ends clean and smooth - and Viola! There was light at the console lenses!!
I also replaced the console F.O. lenses themselves (a cheap $20+ update) and things are working fine now.
The fronts needed a little cleaning and they work even better than the rears.
The rears seems to be a little less efficient, especially the one left side lens which (for some reason) was designed with a 90 degree angle where the fiber comes into the back of the lens.
But they work well enough that I had to do a "double take" when the car was parked in the garage with the rear end facing out in the sun. When I walked by the interior of the car during the day, the lenses in the console were shining so bright, I thought I left the lights on! But it was just the sunlight getting picked up by the F.O. in the tail lights!
I wish they shone that bright when the lights are on!
Regards,
Tom
Pro
Joined: Sep 2016
Posts: 720
Likes: 205
From: Michigan
Thanks Tom69.
I also found that how you insert/attach the FO cables into the back of the lenses, affects the brightness that reads through at the top.
I took the advice of others on this board, and I snipped the ends cleanly with a very sharp blade. Then take small lengths of shrink-wrap tubing to (layer by layer) build up the O.D. of the cable so that it fits snugly into the back tubular fitting of the lens. Don't go all the way to the end with the shrink wrapping - leave ~ 1/8" unwrapped.
After snugging each "thickened" cable into the receiver tube, I CAREFULLY applied some epoxy around the seam where the cable enters the tube - but do not get any epoxy inside the tube, or on the FO strand ends.
I'm not 100% happy with how bright mine turned out - as the depth of the insertion seems to have an effect on the optical transmission of light to the lens (closer is not necessarily better). I may go in again in the spring to re-do my rear lens's 3 cable interfaces.
Also - be really careful with that goofy left side rear lens, as the 90 degree offset seems to get hung-up on the console opening edge during install/removal of the shifter plate (which includes the rear FO lens assembly).
Mine was broken off when I first opened it up after buying the car, and I'm convinced now that it broke off somewhere during install/removal of the shifter plate by someone not aware that this was an "edge catcher" that was easily breakable.
Good luck!
Last edited by Bergerboy; Nov 28, 2016 at 02:54 PM.
Team Owner
Joined: Sep 2006
Posts: 31,198
Likes: 4,287
From: Westminster Maryland
Hi Tom,
I would caution you from using sandpaper on the lenses.
People report using something like 2000 on the ends of the cables to 'refresh' the end of the cable but the other parts of the system should be cleaned in an un-abrasive manner.
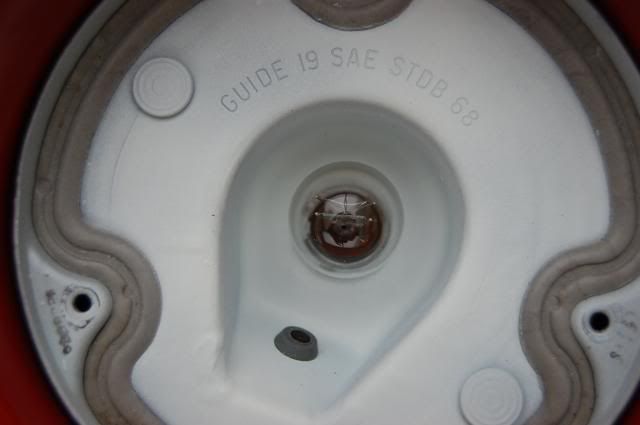
I found the condition of the interior of the taillight housings has an impact on how bright the 'light' in the console monitors is.
The original paint was a very bright white and had just a little bit of sparkle to it.
Have you checked the condition of the inside of the housings yet?
Regards,
Alan
I would caution you from using sandpaper on the lenses.
People report using something like 2000 on the ends of the cables to 'refresh' the end of the cable but the other parts of the system should be cleaned in an un-abrasive manner.
I found the condition of the interior of the taillight housings has an impact on how bright the 'light' in the console monitors is.
The original paint was a very bright white and had just a little bit of sparkle to it.
Have you checked the condition of the inside of the housings yet?
Regards,
Alan
Thread Starter
Pro
Joined: Jul 2014
Posts: 523
Likes: 249
From: SC
2018 C3 of Year Finalist
Hi Tom,
I would caution you from using sandpaper on the lenses.
People report using something like 2000 on the ends of the cables to 'refresh' the end of the cable but the other parts of the system should be cleaned in an un-abrasive manner.
I found the condition of the interior of the taillight housings has an impact on how bright the 'light' in the console monitors is.
The original paint was a very bright white and had just a little bit of sparkle to it.
Have you checked the condition of the inside of the housings yet?
Regards,
Alan
No, I haven't really started on the FO project yet. I also haven't inspected all the tail light housings so I haven't confirmed if I have FO's connected to all the appropriate rear lights. While working on the headlamp issue I did note that a center FO wire was installed in each headlamp connector.
Pulled the compartment light and switch assembly out. I have a burned-out non-standard #1816 bulb installed. Order a new light/switch assembly.
Today planning to study how to adjust that right headlamp warning light switch. The push button function of both left and right switches work. It looks like a very bad rigging problem. Not sure about access to the assembly so I might take it to a shop to make the adjustment.
Regards,
Tom
Pro
Joined: Sep 2016
Posts: 720
Likes: 205
From: Michigan
Alan makes a good point about the inside of the tail light housing.
I only cleaned off the actual ends of the FO cables to remove the paint and "refresh" them.
But since the car was repainted in Bridgehampton Blue (I am guessing - as this is a 1970 color on a 1969 car), the housings are also in this blue and may be reducing the light transmission from the bulb up to the console FO lenses.
I may try to mask and paint the body area under the tail light lenses in some bright reflective color to see if that makes a difference in light transmission.
Team Owner
Joined: Sep 2006
Posts: 31,198
Likes: 4,287
From: Westminster Maryland
Hi bb,
The interior of all four housings were originally painted with a thick white coating.
I think the coating's purpose was to increase the amount of light given off through the tail/brake and back-up lights, but might also of helped the fiber-optics a bit too.
Regards,
Alan
The interior of all four housings were originally painted with a thick white coating.
I think the coating's purpose was to increase the amount of light given off through the tail/brake and back-up lights, but might also of helped the fiber-optics a bit too.
Regards,
Alan
Thread Starter
Pro
Joined: Jul 2014
Posts: 523
Likes: 249
From: SC
2018 C3 of Year Finalist
I don't believe there is an adjustment for the switch itself. While your headlamp door may appear fully open it is not locked into the "up" position. When properly adjusted and operating, the actuator arm causes a bit of over-travel in the mechanism. That over-travel does not raise the door any more; instead it locks the door up. You will hear a metal-on-metal "snap" as this happens and that switch will be depressed. Observe the other side for what is supposed to occur.
Thanks again for confirming what I was finally beginning to figure out.
Regards,
Tom
Last edited by Tom69; Nov 28, 2016 at 05:36 PM.