



Dial indicator for checking rotor runout
Thread Starter
Racer

Joined: Mar 2016
Posts: 470
Likes: 31
From: Melbourne Victoria

A couple of things I'd like to mention, before you get to the work.
Definitely put a block of wood or similar in between the pads as you lift the calliper away. You don't want them to close, its a pain to get them back, plus you'll get air in the system etc etc. (I keep a correct sized block in the tool chest just for the job) Much easier just to block them and then drop them back on. As said, hang them by wire, you can hook them on the chassis.
Your rotors are replacements, so no rivets. The wheel holds them on when all is bolted back together. (They were only riveted for production ease and machined true with the spindle during production.) I'm guessing the fact that they are replacements is the reason they need some shimming.
The fronts are different again, the rotors are riveted to the bearing carrier and don't need to come off that unless being replaced. There should be no run-out if it's all original unless the spindle is bent! If they have been changed, that's a different matter!
There are plenty of people who'll say it's a "snap" to change parking-brake shoes with the spindle in place - it isn't! I'd say, don.t get into that unless you really need to!
Definitely put a block of wood or similar in between the pads as you lift the calliper away. You don't want them to close, its a pain to get them back, plus you'll get air in the system etc etc. (I keep a correct sized block in the tool chest just for the job) Much easier just to block them and then drop them back on. As said, hang them by wire, you can hook them on the chassis.
Your rotors are replacements, so no rivets. The wheel holds them on when all is bolted back together. (They were only riveted for production ease and machined true with the spindle during production.) I'm guessing the fact that they are replacements is the reason they need some shimming.
The fronts are different again, the rotors are riveted to the bearing carrier and don't need to come off that unless being replaced. There should be no run-out if it's all original unless the spindle is bent! If they have been changed, that's a different matter!
There are plenty of people who'll say it's a "snap" to change parking-brake shoes with the spindle in place - it isn't!
I'd say, don.t get into that unless you really need to!Not sure what you mean by changing the parking brake shoes. You must be talking about the rear shoes that I'm taking off today I presume? Once the caliper is removed can't you just take the shoes out?
Last edited by Corvetteoz; Jan 13, 2017 at 08:01 PM.

Le Mans Master


Joined: Dec 2006
Posts: 8,837
Likes: 1,028
No problem. I am going out today to take the calipers off. I'll hunt around for something that's as wide as the rotors and jam that in between the shoes.. Better to be safe than sorry.
Not sure what you mean by changing the parking brake shoes. You must be talking about the rear shoes that I'm taking off today I presume? Once the caliper is removed can't you just take the shoes out?
Not sure what you mean by changing the parking brake shoes. You must be talking about the rear shoes that I'm taking off today I presume? Once the caliper is removed can't you just take the shoes out?
Don't mix front and rear rotors. Although the same casting, the rears are machined differently, and have the hole to adjust the star wheel on the parking brake shoes.
Thread Starter
Racer
Joined: Mar 2016
Posts: 470
Likes: 31
From: Melbourne Victoria
The rear rotor is also a drum for the parking brake. Take off the rotor, and look behind the axle flange.
Don't mix front and rear rotors. Although the same casting, the rears are machined differently, and have the hole to adjust the star wheel on the parking brake shoes.
Don't mix front and rear rotors. Although the same casting, the rears are machined differently, and have the hole to adjust the star wheel on the parking brake shoes.
Thread Starter
Racer
Joined: Mar 2016
Posts: 470
Likes: 31
From: Melbourne Victoria
Ok well got down to business this afternoon. What a weird set up, having the park brake shoes inside the hub of the rotor, never seen anything like it.
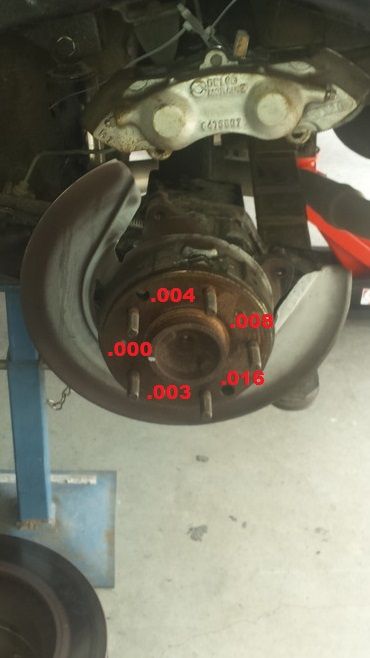
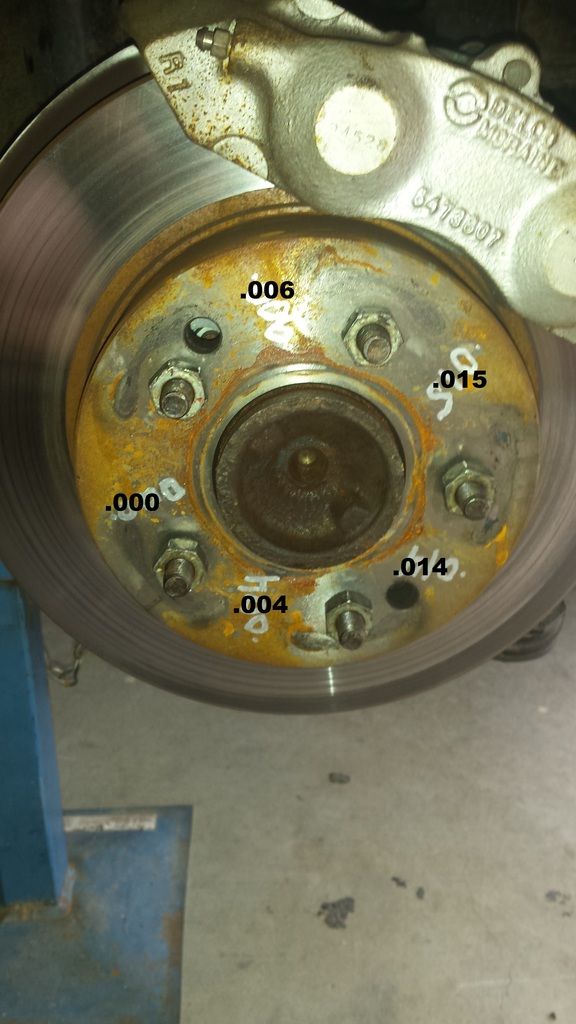
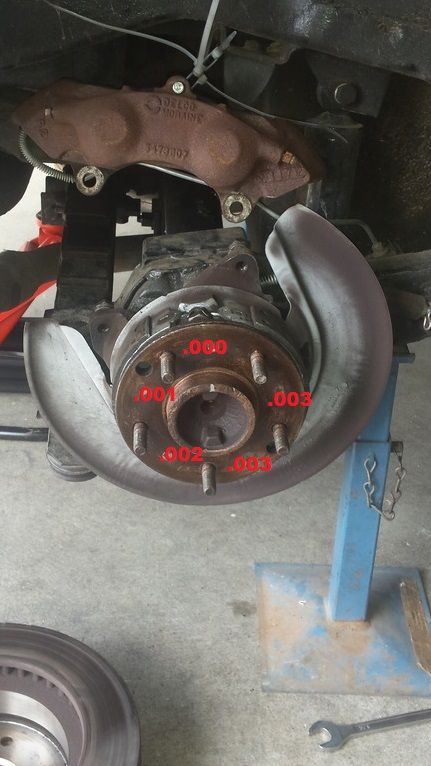
I checked both flanges and they almost match whats going on on the rotors. I tried reversing the rotors in 3 or 4 different positions however the results were worse than were originally. RHS isn't too bad. LHS rear is just as bad as the rotor though. I put up the original rotor runout readings too so we can compare more easily.
Readings can be a bit hard to see. I should've done them in a different colour. I'll put them down here from .000 going clockwise.
LHS first .000- .004- .008- .016- .003
RHS .000- .003- .003- .002- .001
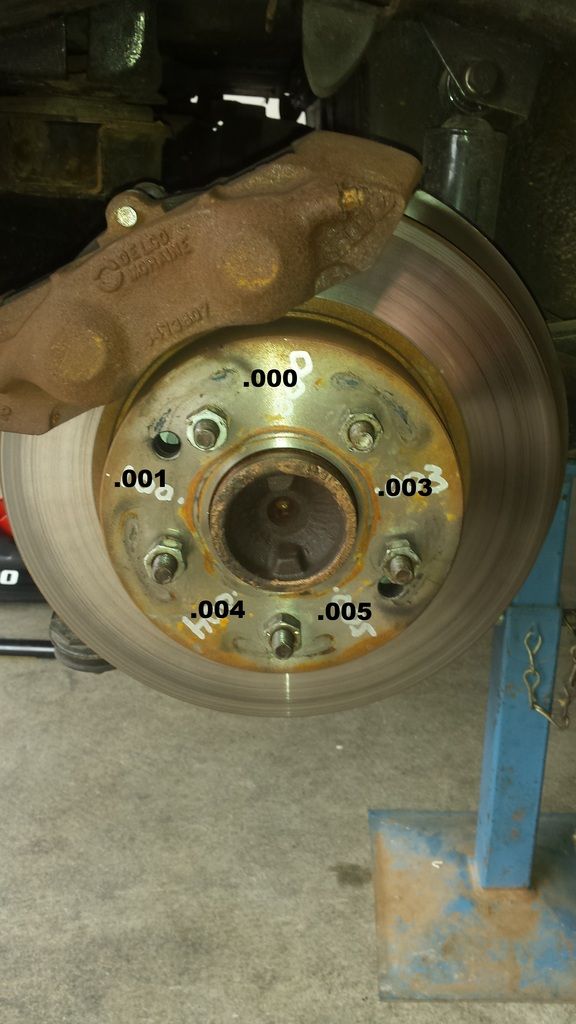
Not sure what the next step will be seeing the flange or axle is obviously out of shape. Apart from changing the axle looks like the best thing to do is shim both rotors.
Right rotor will only need 2 shims while the left side will need about 12.
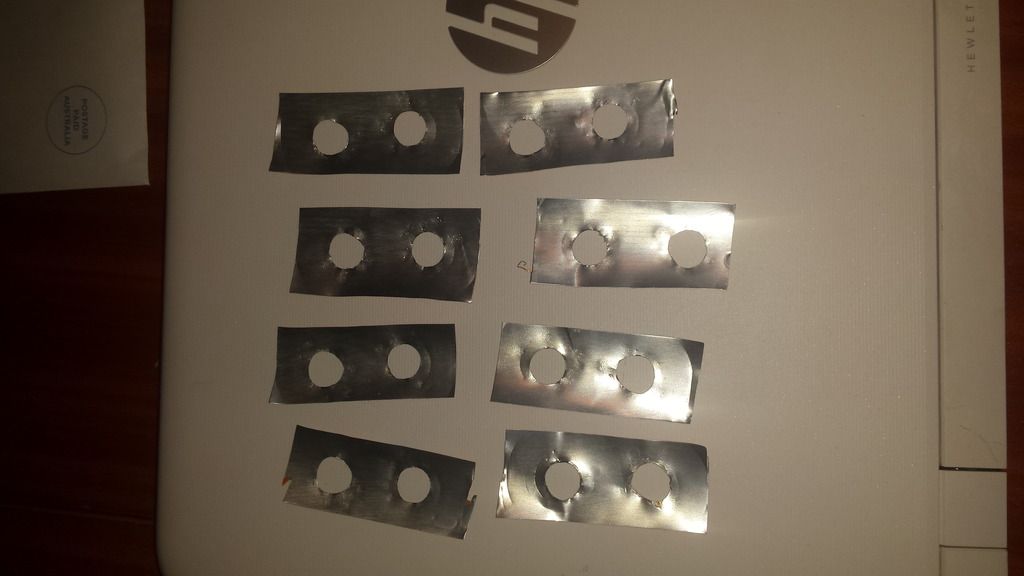
Pretty hard to get shims on the weekend so I made my own out of a tin can. The thickness ranges from .0025-.004. I will measure each one so I can get it as close as possible. I plan on just building on the studs to the highest point. Hopefully that is the right way to do it, if not please let me know? E.G- the highest point won't get a shim.
I checked both flanges and they almost match whats going on on the rotors. I tried reversing the rotors in 3 or 4 different positions however the results were worse than were originally. RHS isn't too bad. LHS rear is just as bad as the rotor though. I put up the original rotor runout readings too so we can compare more easily.
Readings can be a bit hard to see. I should've done them in a different colour. I'll put them down here from .000 going clockwise.
LHS first .000- .004- .008- .016- .003


RHS .000- .003- .003- .002- .001


Not sure what the next step will be seeing the flange or axle is obviously out of shape. Apart from changing the axle looks like the best thing to do is shim both rotors.
Right rotor will only need 2 shims while the left side will need about 12.
Pretty hard to get shims on the weekend so I made my own out of a tin can. The thickness ranges from .0025-.004. I will measure each one so I can get it as close as possible. I plan on just building on the studs to the highest point. Hopefully that is the right way to do it, if not please let me know? E.G- the highest point won't get a shim.

Last edited by Corvetteoz; Jan 14, 2017 at 04:56 AM.
Corvette Stories
The Best of Corvette for Corvette Enthusiasts

Corvette & Porsche 911: How Two Icons Conquered the Last 25 Years
Joe Kucinski
2027 Chevrolet Silverado 1500 First Look: Everything You NEED to Know!
Michael S. Palmer
5 Best & 5 Worst Corvette Daily Drivers
Joe Kucinski
The Headlights of Every Corvette Generation Explained
Joe Kucinski
5 Best & 5 Most Overrated Corvette Track Packages of All Time!
Joe Kucinski
Every 2027 Corvette Engine Explained
Joe Kucinski
Designer Imagines A Corvette That Looks More Like a Corvette Than the Corvette
Verdad Gallardo
10 Ugly Corvettes That We Still Kinda Love
Joe Kucinski
Top 10 Most Expensive Corvettes Ever Sold on Bring A Trailer
Brett Foote
Thread Starter
Racer
Joined: Mar 2016
Posts: 470
Likes: 31
From: Melbourne Victoria
yes it will affect the run-out, it may get better ,or worse . try and see if your lucky !
Someone has put a replacement rotor on which doesn't have the rivet holes so apart from the caliper, which should be taken off and wired up out the way while doing the shimming ,it relies on your your wheel nuts/road wheel to hold the rotor on .
have you disconnected the half shafts ?
Someone has put a replacement rotor on which doesn't have the rivet holes so apart from the caliper, which should be taken off and wired up out the way while doing the shimming ,it relies on your your wheel nuts/road wheel to hold the rotor on .
have you disconnected the half shafts ?
A couple of things I'd like to mention, before you get to the work.
Definitely put a block of wood or similar in between the pads as you lift the calliper away. You don't want them to close, its a pain to get them back, plus you'll get air in the system etc etc. (I keep a correct sized block in the tool chest just for the job) Much easier just to block them and then drop them back on. As said, hang them by wire, you can hook them on the chassis.
Your rotors are replacements, so no rivets. The wheel holds them on when all is bolted back together. (They were only riveted for production ease and machined true with the spindle during production.) I'm guessing the fact that they are replacements is the reason they need some shimming.
The fronts are different again, the rotors are riveted to the bearing carrier and don't need to come off that unless being replaced. There should be no run-out if it's all original unless the spindle is bent! If they have been changed, that's a different matter!
There are plenty of people who'll say it's a "snap" to change parking-brake shoes with the spindle in place - it isn't! I'd say, don.t get into that unless you really need to!
Definitely put a block of wood or similar in between the pads as you lift the calliper away. You don't want them to close, its a pain to get them back, plus you'll get air in the system etc etc. (I keep a correct sized block in the tool chest just for the job) Much easier just to block them and then drop them back on. As said, hang them by wire, you can hook them on the chassis.
Your rotors are replacements, so no rivets. The wheel holds them on when all is bolted back together. (They were only riveted for production ease and machined true with the spindle during production.) I'm guessing the fact that they are replacements is the reason they need some shimming.
The fronts are different again, the rotors are riveted to the bearing carrier and don't need to come off that unless being replaced. There should be no run-out if it's all original unless the spindle is bent! If they have been changed, that's a different matter!
There are plenty of people who'll say it's a "snap" to change parking-brake shoes with the spindle in place - it isn't!
I'd say, don.t get into that unless you really need to!
Burning Brakes


Joined: Jan 2001
Posts: 1,222
Likes: 450
From: Loir Valley Sarthe, France
2025 c3 ('74-'82) of the Year Finalist - Unmodified
2024 C3 of the Year Finalist - Unmodified
2023 C3 of the Year Finalist - Unmodified
I didn't need quite as much "shim" as you do, but I went the same route - a beer can clipped to "shim shape" and popped over the stud, rotor on top of that. Got pretty close to acceptable! I'd say not unusual to find the flange is also "out" - spindle/flange and rotor were machined as one at the factory, so the spindle would have been "true" with the original rotor face, but not necessarily the flange face.
Surprised you haven't come across the parking brake set-up, didn't you guys have the Astra in the Holden range? Our '95 had exactly the same system.
It's why we talked about pulling up the lever to see if the squeak stopped - the shoes can drag inside the rotor if adjustment is not perfect, or a return spring is broken or weak. If they do so badly, they'll heat up and destroy the bearings.
You definitely need a "Workshop Manual" - Haynes or the factory item - before you go much further! I have a Haynes which is excellent. AIM is great, but doesn't explain repairs and maintenance.
I'd say not unusual to find the flange is also "out" - spindle/flange and rotor were machined as one at the factory, so the spindle would have been "true" with the original rotor face, but not necessarily the flange face. Surprised you haven't come across the parking brake set-up, didn't you guys have the Astra in the Holden range? Our '95 had exactly the same system.
It's why we talked about pulling up the lever to see if the squeak stopped - the shoes can drag inside the rotor if adjustment is not perfect, or a return spring is broken or weak. If they do so badly, they'll heat up and destroy the bearings.
You definitely need a "Workshop Manual" - Haynes or the factory item - before you go much further! I have a Haynes which is excellent. AIM is great, but doesn't explain repairs and maintenance.
Last edited by Stephen Irons; Jan 14, 2017 at 05:55 AM.
Thread Starter
Racer
Joined: Mar 2016
Posts: 470
Likes: 31
From: Melbourne Victoria
Cheers Stephen, looks like what I am doing tomorrow is the right way to go about things then. I was surprised the LHS rear was out by that much to be honest. I'd be happy to leave the RHS but while I've got it apart I might as well throw 2 shims in there to make it better.
I actually turned the rotors today by hand just to make sure the park brake wasn't dragging, I'm confident it is not.
I'll report back tomorrow after the shim both sides.
I actually turned the rotors today by hand just to make sure the park brake wasn't dragging, I'm confident it is not.
I'll report back tomorrow after the shim both sides.
Le Mans Master
Joined: Dec 2006
Posts: 8,837
Likes: 1,028
Le Mans Master
Joined: Dec 2006
Posts: 8,837
Likes: 1,028
Good job. Try to get to .001" with the fewest/thinnest shims you can use.
Remember, the caliper is fixed. and you want it centered on the rotor or close as possible.
This is the ideal way, but not necessary:
http://www.raybestosbrakes.com/magno...Number=BA80306
Remember, the caliper is fixed. and you want it centered on the rotor or close as possible.
This is the ideal way, but not necessary:
http://www.raybestosbrakes.com/magno...Number=BA80306


Melting Slicks

Joined: Jul 2010
Posts: 3,176
Likes: 633
From: perth western australia
the old can comes to the rescue
was it a beer can ? , almost mandatory to have some while working on cars
just make sure both faces are perfectly clean and your wheel nuts are all the same tightness
as said do the test at the outer edge and you should end up fine .
then grab a six pack of shim material and move to the front
I have the 69 chassis manual , very informative and covers a wide range of repairs ,including the fibreglass repair
Oh and BTW the commodore still has the 2 brake system , a lot better nowdays of course.
was it a beer can ? , almost mandatory to have some while working on cars
just make sure both faces are perfectly clean and your wheel nuts are all the same tightness
as said do the test at the outer edge and you should end up fine .
then grab a six pack of shim material and move to the front
I have the 69 chassis manual , very informative and covers a wide range of repairs ,including the fibreglass repair
Oh and BTW the commodore still has the 2 brake system , a lot better nowdays of course.
Last edited by bazza77; Jan 14, 2017 at 04:50 PM.
Thread Starter
Racer
Joined: Mar 2016
Posts: 470
Likes: 31
From: Melbourne Victoria
Yes 10mm from the edge.
No unfortunately was a Sunkist can lol only got stubbies here 
I cleaned both faces just with a rag as both faces were pretty good anyway. I tightened the wheel nuts by hand but certainly didn't go the length of using a torque wrench, should I?
the old can comes to the rescue
was it a beer can ? , almost mandatory to have some while working on cars
just make sure both faces are perfectly clean and your wheel nuts are all the same tightness
as said do the test at the outer edge and you should end up fine .
then grab a six pack of shim material and move to the front
I have the 69 chassis manual , very informative and covers a wide range of repairs ,including the fibreglass repair
Oh and BTW the commodore still has the 2 brake system , a lot better nowdays of course.
was it a beer can ? , almost mandatory to have some while working on cars
just make sure both faces are perfectly clean and your wheel nuts are all the same tightness
as said do the test at the outer edge and you should end up fine .
then grab a six pack of shim material and move to the front
I have the 69 chassis manual , very informative and covers a wide range of repairs ,including the fibreglass repair
Oh and BTW the commodore still has the 2 brake system , a lot better nowdays of course.
I cleaned both faces just with a rag as both faces were pretty good anyway. I tightened the wheel nuts by hand but certainly didn't go the length of using a torque wrench, should I?
Thread Starter
Racer
Joined: Mar 2016
Posts: 470
Likes: 31
From: Melbourne Victoria
Ok here goes.
After putting in a few shims which I thought would be the right spots, what happened was a few other spots would go out of whack. I must have pulled the rotors off and on about 15 times today but it was a good learning experience. After a while I found the best thing to do was just add one shim per stud at a time. Putting on multiple shims on one stud caused the readings to be a bit all over the place.
I think the RHS took about 4 shims in about 3 places and the LHS took about 7 or 8 shims in 3 places also. In the end it actually turned out better than I thought. RHS turned out the best with only .001" of variation. LHS was a bit more tricky, but .002 of variation I'm happy with. I'm told the spec from the manufacturer is .003". As I only had .0035" shims from the can, .002" is probably as close as I'll get. It's a mile better than what it was before. Will take it for a test drive tomorrow. I triple checked it after I had finished to make sure it was giving the true readings. One thing you have to look out for when taking your measurements.
When you put the magnet base on the shock. You have to make sure your caliper isn't touching the magnet otherwise your readings might be out. That was one thing I noticed yesterday. You can't really tie the caliper up anywhere else so both a very close together. I just made sure there was a couple mil of gap between the caliper and magnet base.
Here are the final results. Thanks to all for their advice. You guys have been a huge help.
RHS after shims

RHS before shims

LHS after shims

LHS before shims

Last edited by Corvetteoz; Jan 15, 2017 at 04:50 AM.
Burning Brakes
Joined: Jan 2001
Posts: 1,222
Likes: 450
From: Loir Valley Sarthe, France
2025 c3 ('74-'82) of the Year Finalist - Unmodified
2024 C3 of the Year Finalist - Unmodified
2023 C3 of the Year Finalist - Unmodified
Nice job!
Good luck with the test drive. Remember to check that the brakes are OK after having the callipers off etc.
This thread had reminded me of a photos sent to me some years ago by Paul Golledge, well known by some on this forum and a great friend who sadly passed away last year. I managed to find it last night. Note the shiny parts, the English beer can and the tobacco tin - it sums up Paul!
Good luck with the test drive. Remember to check that the brakes are OK after having the callipers off etc.
This thread had reminded me of a photos sent to me some years ago by Paul Golledge, well known by some on this forum and a great friend who sadly passed away last year. I managed to find it last night. Note the shiny parts, the English beer can and the tobacco tin - it sums up Paul!
Thread Starter
Racer
Joined: Mar 2016
Posts: 470
Likes: 31
From: Melbourne Victoria
Nice job!
Good luck with the test drive. Remember to check that the brakes are OK after having the callipers off etc.
This thread had reminded me of a photos sent to me some years ago by Paul Golledge, well known by some on this forum and a great friend who sadly passed away last year. I managed to find it last night. Note the shiny parts, the English beer can and the tobacco tin - it sums up Paul!
Good luck with the test drive. Remember to check that the brakes are OK after having the callipers off etc.
This thread had reminded me of a photos sent to me some years ago by Paul Golledge, well known by some on this forum and a great friend who sadly passed away last year. I managed to find it last night. Note the shiny parts, the English beer can and the tobacco tin - it sums up Paul!