
PSlow's '72 Restomod Project
 04-21-2019, 08:30 PM
#581
Race Director


 04-21-2019, 09:22 PM
#582
Drifting

 04-22-2019, 08:57 AM
#583
Burning Brakes

Thread Starter
I am glad that I am not the only one. It really does make it so easy to pull out a baggie of parts, refinish, and store until needed. I buy them in bulk at my local Costco 
HAHAHAHA....awesome. I totally missed it!! Those stitches I did not do although at this point I have had so many in me, I feel like I could probably do it myself.
Ugh, I can only imagine how uncomfortable that must have been. These were bad enough but not being able to put your arm down? To hell with that!
Again, that sucks and yeah, mine still isn't right either. About 4-5 years ago I had a crash and tore the tendon in the palm of my right hand. Took about 1.5 years until it felt normal again. Tendons suck :-(. How long was it until you could walk on that foot?
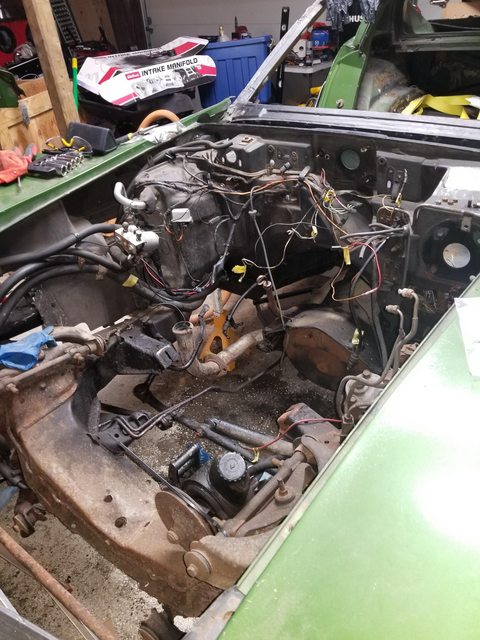
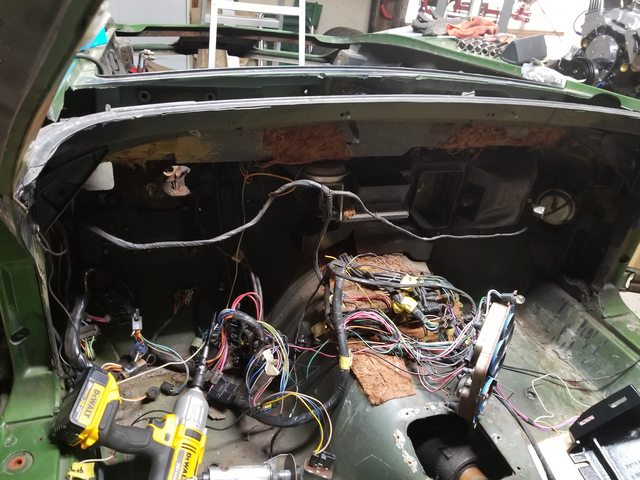
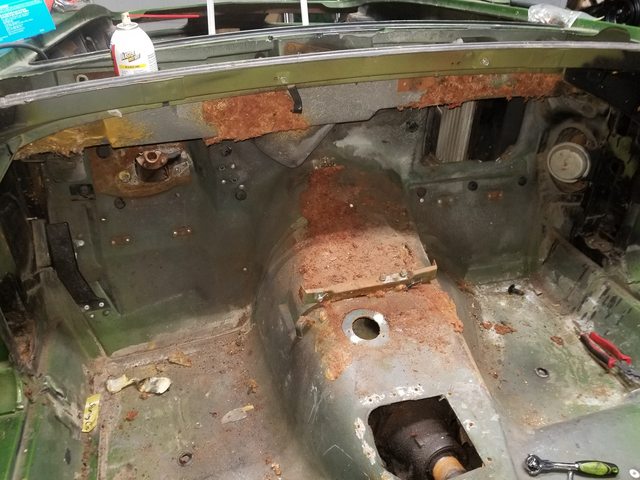
Aaaaand...for C3 stuff: Today I am trying to get a lot done. I intend to finish clearing out the engine compartment of the heater stuff, remaining wiring, and A/C components. After that, I need to finish removing the heater ducting inside the cabin, and what little remains of the wiring harness work. After that I should be ready to lift the body off the frame.
What is left in the engine bay
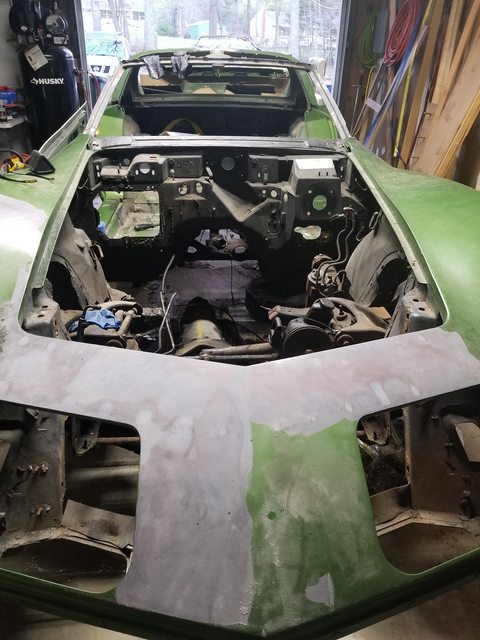
What is left in the passenger cabin
HAHAHAHA....awesome. I totally missed it!! Those stitches I did not do although at this point I have had so many in me, I feel like I could probably do it myself.
Aaaaand...for C3 stuff: Today I am trying to get a lot done. I intend to finish clearing out the engine compartment of the heater stuff, remaining wiring, and A/C components. After that, I need to finish removing the heater ducting inside the cabin, and what little remains of the wiring harness work. After that I should be ready to lift the body off the frame.
What is left in the engine bay
What is left in the passenger cabin
Last edited by PainfullySlow; 04-22-2019 at 09:24 AM.
04-22-2019, 09:21 AM
#584
Nam Labrat


Member Since: Sep 2013
Location: New Orleans Loo-z-anna
Posts: 33,899
Received 4,179 Likes
on
2,739 Posts

It sounds like a busy week for you  (Fizzle Therapy sucks but it's worth it later on)
(Fizzle Therapy sucks but it's worth it later on)
04-22-2019, 12:10 PM
#585
Le Mans Master


I am glad that I am not the only one. It really does make it so easy to pull out a baggie of parts, refinish, and store until needed. I buy them in bulk at my local Costco
HAHAHAHA....awesome. I totally missed it!! Those stitches I did not do although at this point I have had so many in me, I feel like I could probably do it myself.
Ugh, I can only imagine how uncomfortable that must have been. These were bad enough but not being able to put your arm down? To hell with that!
Again, that sucks and yeah, mine still isn't right either. About 4-5 years ago I had a crash and tore the tendon in the palm of my right hand. Took about 1.5 years until it felt normal again. Tendons suck :-(. How long was it until you could walk on that foot?
Aaaaand...for C3 stuff: Today I am trying to get a lot done. I intend to finish clearing out the engine compartment of the heater stuff, remaining wiring, and A/C components. After that, I need to finish removing the heater ducting inside the cabin, and what little remains of the wiring harness work. After that I should be ready to lift the body off the frame.
What is left in the engine bay

What is left in the passenger cabin

HAHAHAHA....awesome. I totally missed it!! Those stitches I did not do although at this point I have had so many in me, I feel like I could probably do it myself.
Ugh, I can only imagine how uncomfortable that must have been. These were bad enough but not being able to put your arm down? To hell with that!
Again, that sucks and yeah, mine still isn't right either. About 4-5 years ago I had a crash and tore the tendon in the palm of my right hand. Took about 1.5 years until it felt normal again. Tendons suck :-(. How long was it until you could walk on that foot?
Aaaaand...for C3 stuff: Today I am trying to get a lot done. I intend to finish clearing out the engine compartment of the heater stuff, remaining wiring, and A/C components. After that, I need to finish removing the heater ducting inside the cabin, and what little remains of the wiring harness work. After that I should be ready to lift the body off the frame.
What is left in the engine bay
What is left in the passenger cabin
 04-22-2019, 02:33 PM
#586
Burning Brakes
Thread Starter
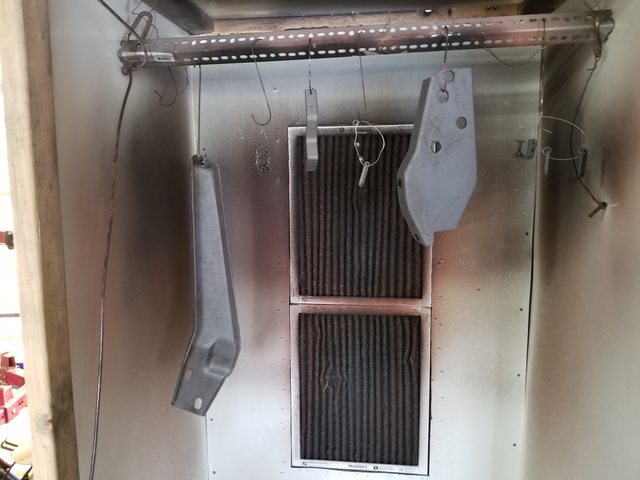
It really is gratifying to take something 47 years old and make it like new again.
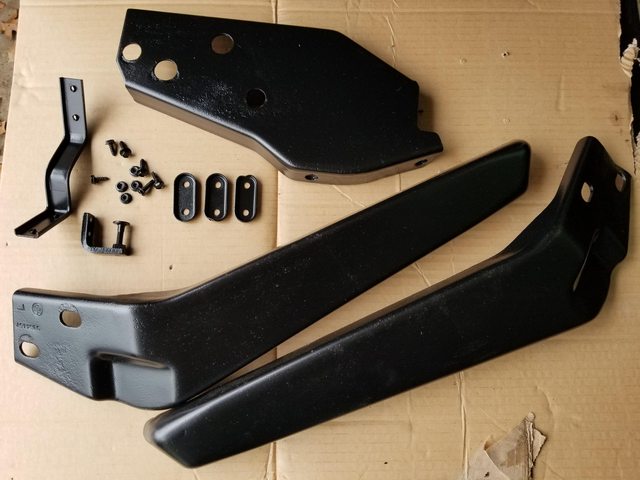
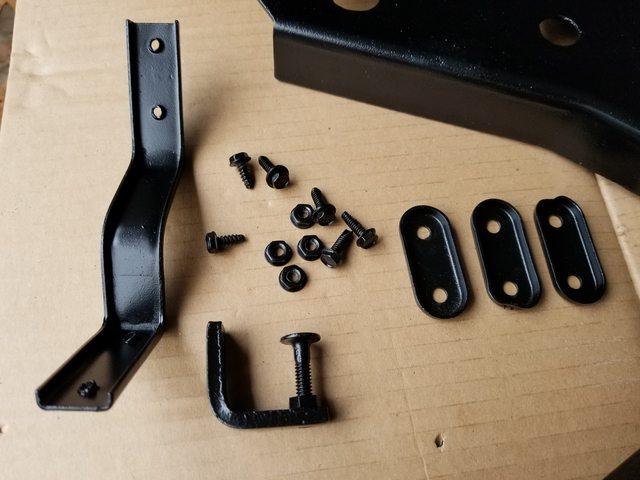
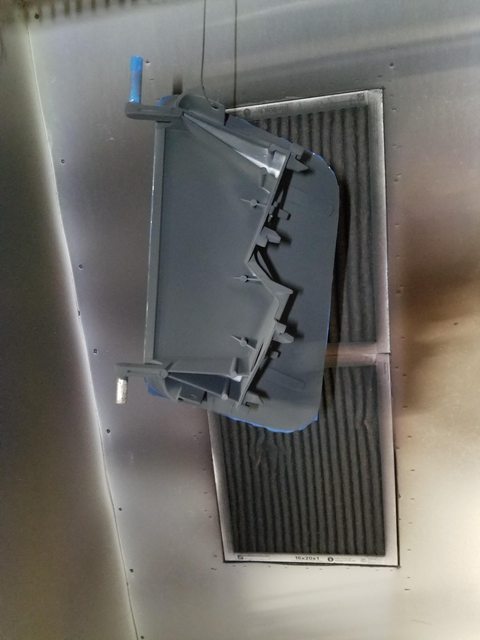
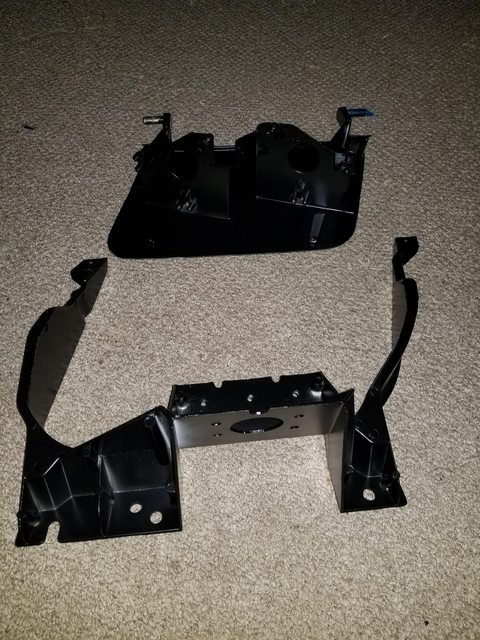
Random engine compartment parts plus some bumper brackets since I did not want to heat the oven up for just a few screws. This was after blasting in the cabinet followed by the afterblast cleaning/phosphate coating process...
and 20 minutes later...
Back to getting the heater core out...
Last edited by PainfullySlow; 04-22-2019 at 02:35 PM.
04-23-2019, 06:11 AM
#587
Burning Brakes
Thread Starter
Well yesterday was productive even if I did not get quite as far as I would have liked. I did manage to get all the remaining bits out of the interior of the car before my wrist gave out entirely but nonetheless, it feels like a huge milestone to me.
The insulation was almost like powder and came out in handfuls so there is still some cleaning up to do to remove what remains but overall, it is in good shape. No signs of significant rust on the floorpans.
Today's plan, if the wrists will cooperate, is to remove the remaining bits from the engine compartment such as the A/C lines and the few remaining connections on the wiring harness. If I am still ok to work, I will begin removing the remaining insulation out of the cabin.
04-23-2019, 07:24 PM
#588
Burning Brakes
Thread Starter
Home stretch now...

 04-23-2019, 10:31 PM
#590
Le Mans Master
Member Since: May 2003
Location: Fernandina Beach FL
Posts: 8,481
Received 3,220 Likes
on
1,732 Posts
2023 Restomod of the Year finalist
2020 C3 of the Year Winner - Modified

Are you talking about the left over insulation???
Are you going to shoot the interior with Lizard Skin? If you are - I have a loaner program for their gun- just let me know I'll ship it to you..
Richard
Are you going to shoot the interior with Lizard Skin? If you are - I have a loaner program for their gun- just let me know I'll ship it to you..
Richard
Last edited by Richard454; 04-23-2019 at 10:31 PM.
The following users liked this post:
caskiguy (04-23-2019)
04-24-2019, 08:21 AM
#592
Burning Brakes
Thread Starter
Nope, no rust. That is all left over insulation that has just turned to almost powder with age.
I wasn't planning on it. I have dynamat and the heat reflective insulation that I was planning on using unless you can convince me otherwise =)
Yep, insulation that I haven't had the time to clean yet.
Yep, insulation that I haven't had the time to clean yet.
04-27-2019, 09:36 PM
#593
Burning Brakes
Thread Starter
Well, there has been a change in plans and the body lift has been put off for a little bit, mostly due to the fact that I decided that I want to put tubular control arms on it and I cannot get them until next month. Since the plan was to basically remove the old frame and then strip parts, refinish, and then install them on the new frame as I went along it does not make sense to start that now without the control arms.
SO....I continued my A.D.D. method of refinish which had me doing the one remaining headlight assembly. The usual disassembly, clean, media blast, afterblast, and powder coat thing...
and now like new...
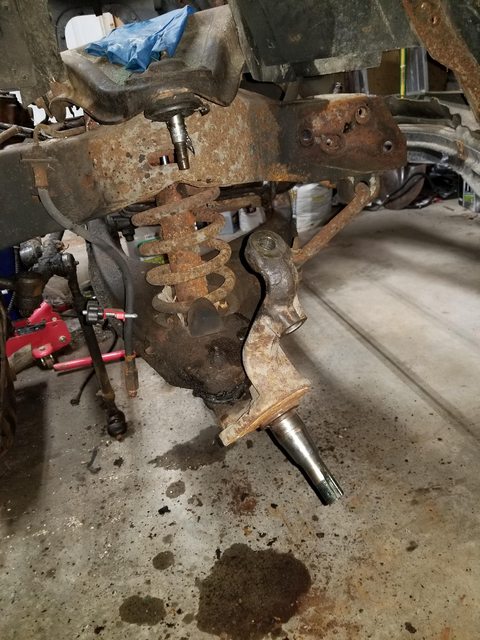
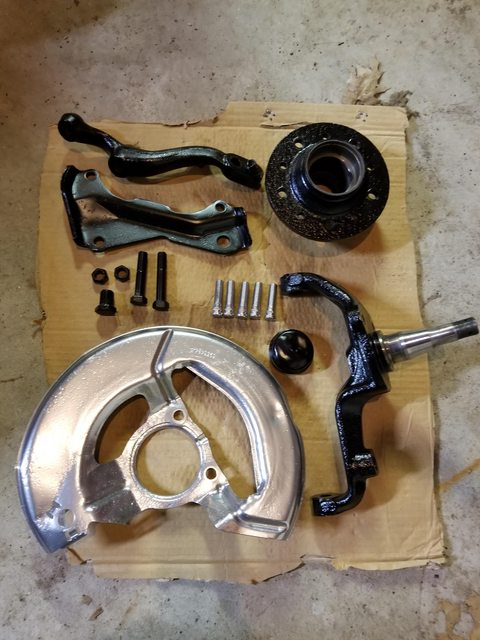
And since it has been raining non-stop here for the past few days and will continue for the next 4...I was sitting in my garage waiting for the powder to cure on the headlight and decided that I may as well do something besides sit around so I started in on disassembling the spindles...and now three days later here I am (this is the nightmare of how my brain works).
It was a rusty, greasy mess and the lower ball joint was a real beeeyotch to get off, especially with my hands the way they are. I tried an air hammer and a puller but nothing made it budge. What finally got the job done was a pickling fork and a 5lb sledge with my 240lb lineman teenager behind it but it finally came out.
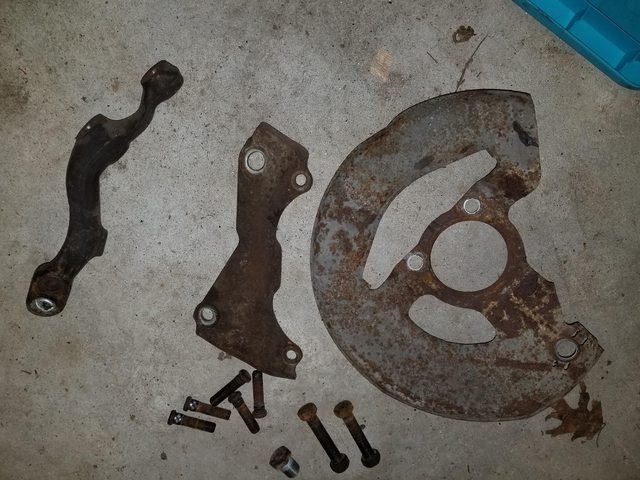
I then spent some time cleaning the old parts in a solution of simple green to remove the grease followed by a visit to the blast cabinet. The usual phosphate treatment next and finally, powder coat. Not too shabby if I do say so myself.
Some nice new Timken bearings while I was in there. Getting the races in and out really wasn't too bad. A drift and a hammer got the job done without too much fuss. For installation I used a section of cast iron pipe that fit perfectly.
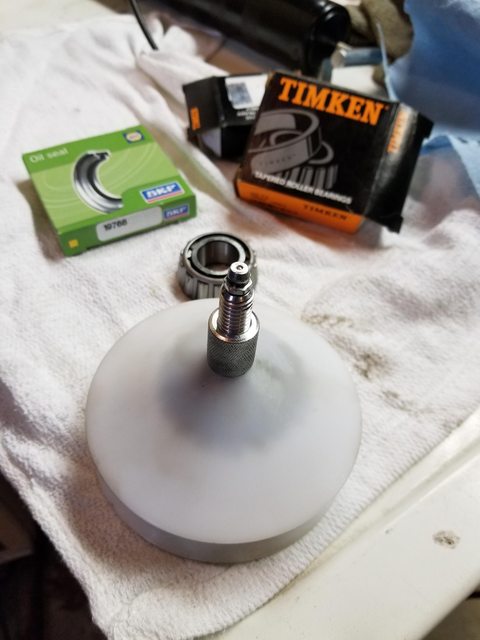
This bearing packing tool is such a simple thing but it really helps to make sure that the entire bearing is filled with grease and also cuts down on the mess in the process. Something that should be in every toolbox!

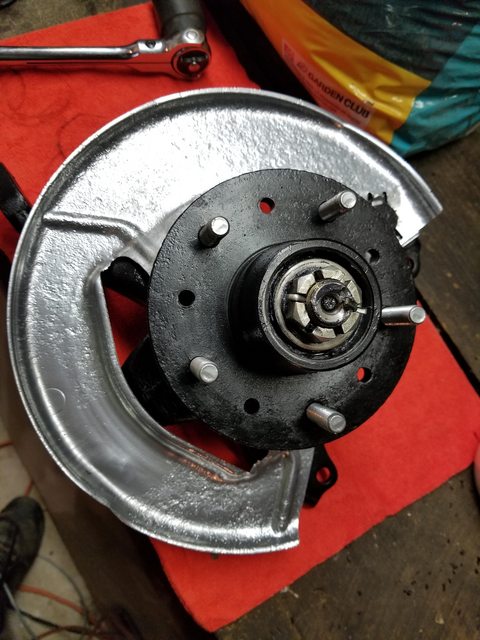
Studs and bearings back in the hub, and all lubed up with a quality synthetic, non-hygroscopic grease.
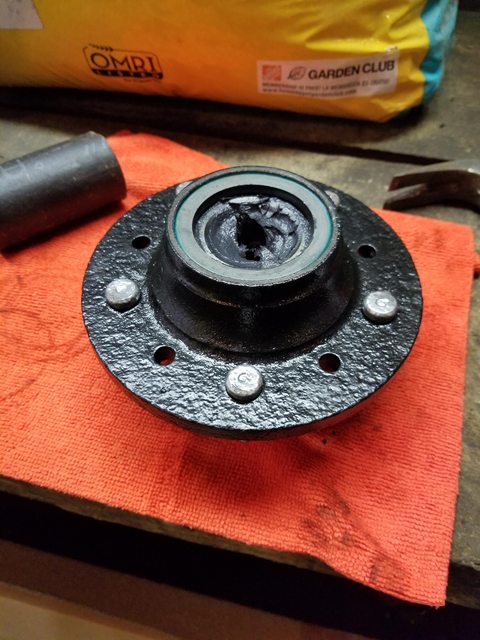
Reassembled and new cotter pin in place. I went digging through the shop manual to find the torque spec for the spindle nut and was shocked to read that it is basically "finger tight then put the cotter pin through". In any case, the new bearings are beautiful and the hub spins freely and smoothly.
My wrists are shot so I am not sure if I will be able to do more work tomorrow or not but if so, I will continue with the other side.
SO....I continued my A.D.D. method of refinish which had me doing the one remaining headlight assembly. The usual disassembly, clean, media blast, afterblast, and powder coat thing...
and now like new...
And since it has been raining non-stop here for the past few days and will continue for the next 4...I was sitting in my garage waiting for the powder to cure on the headlight and decided that I may as well do something besides sit around so I started in on disassembling the spindles...and now three days later here I am (this is the nightmare of how my brain works).
It was a rusty, greasy mess and the lower ball joint was a real beeeyotch to get off, especially with my hands the way they are. I tried an air hammer and a puller but nothing made it budge. What finally got the job done was a pickling fork and a 5lb sledge with my 240lb lineman teenager behind it but it finally came out.
I then spent some time cleaning the old parts in a solution of simple green to remove the grease followed by a visit to the blast cabinet. The usual phosphate treatment next and finally, powder coat. Not too shabby if I do say so myself.
Some nice new Timken bearings while I was in there. Getting the races in and out really wasn't too bad. A drift and a hammer got the job done without too much fuss. For installation I used a section of cast iron pipe that fit perfectly.
This bearing packing tool is such a simple thing but it really helps to make sure that the entire bearing is filled with grease and also cuts down on the mess in the process. Something that should be in every toolbox!
Studs and bearings back in the hub, and all lubed up with a quality synthetic, non-hygroscopic grease.
Reassembled and new cotter pin in place. I went digging through the shop manual to find the torque spec for the spindle nut and was shocked to read that it is basically "finger tight then put the cotter pin through". In any case, the new bearings are beautiful and the hub spins freely and smoothly.
My wrists are shot so I am not sure if I will be able to do more work tomorrow or not but if so, I will continue with the other side.
Last edited by PainfullySlow; 04-27-2019 at 09:43 PM.
04-28-2019, 12:16 PM
#594
Race Director
If you don’t mind sharing, what was the cost of your media blasting equipment, powder coat equipment and can you provide a list of everything involved in doing your own powder coating.
Either here or in a new thread.
Like you, I plan to powder coat most everything over painting and I’m trying to figure out if it would be worth it to buy the equipment to do it myself?
I would sell it when I’m done with my resto mod because I am limited to a small garage and space is a premium.
Ive seen many forum members who talk about doing it themselves but haven’t seen any threads about the equipment they use, the cost and any savings.
Thanks,
Greg
Last edited by OldCarBum; 04-28-2019 at 12:29 PM.
04-28-2019, 08:29 PM
#595
Le Mans Master
Member Since: May 2003
Location: Fernandina Beach FL
Posts: 8,481
Received 3,220 Likes
on
1,732 Posts
2023 Restomod of the Year finalist
2020 C3 of the Year Winner - Modified
If you don�t mind sharing, what was the cost of your media blasting equipment, powder coat equipment and can you provide a list of everything involved in doing your own powder coating.
Either here or in a new thread.
Like you, I plan to powder coat most everything over painting and I�m trying to figure out if it would be worth it to buy the equipment to do it myself?
I would sell it when I�m done with my resto mod because I am limited to a small garage and space is a premium.
Ive seen many forum members who talk about doing it themselves but haven�t seen any threads about the equipment they use, the cost and any savings.
Thanks,
Greg
Micheal put together a GREAT thread on powdercoating.
I too am running the Harbor Freight special under $60- and an VERY happy with it.
https://www.corvetteforum.com/forums...t-at-home.html
04-29-2019, 06:44 AM
#596
Burning Brakes
Thread Starter
Hey Greg-
Micheal put together a GREAT thread on powdercoating.
I too am running the Harbor Freight special under $60- and an VERY happy with it.
https://www.corvetteforum.com/forums...t-at-home.html
Micheal put together a GREAT thread on powdercoating.
I too am running the Harbor Freight special under $60- and an VERY happy with it.
https://www.corvetteforum.com/forums...t-at-home.html
If you don’t mind sharing, what was the cost of your media blasting equipment, powder coat equipment and can you provide a list of everything involved in doing your own powder coating.
Either here or in a new thread.
Like you, I plan to powder coat most everything over painting and I’m trying to figure out if it would be worth it to buy the equipment to do it myself?
I would sell it when I’m done with my resto mod because I am limited to a small garage and space is a premium.
Ive seen many forum members who talk about doing it themselves but haven’t seen any threads about the equipment they use, the cost and any savings.
Thanks,
Greg
Either here or in a new thread.
Like you, I plan to powder coat most everything over painting and I’m trying to figure out if it would be worth it to buy the equipment to do it myself?
I would sell it when I’m done with my resto mod because I am limited to a small garage and space is a premium.
Ive seen many forum members who talk about doing it themselves but haven’t seen any threads about the equipment they use, the cost and any savings.
Thanks,
Greg
To start (acceptable results, slower work time): HF compressor 21 gal or bigger $200, HF blast cabinet $180, HF Powder coat gun $70, HF powder $5/lb, craigslist oven to cure $50 = ~$505
Current rig (professional results, fast work time): 60 gal compressor $600+, HF blast cabinet with mods, upgraded blast gun $350, Spectracoat ES-02 powder coat unit $1000, quality powder $15/lb, custom spray booth w/exhaust fan $300, in process of building custom oven big enough to do motorcycle frames and multiple parts at once $500 = ~$2800
Keep in mind that if you are going to do it yourself that you will need at least one 220v outlet for your oven, or more if you get a bigger compressor. I was able to do the wiring myself so the cost was only the physical wire however if you had to pay an electrician to add those outlets into your work space you would need to factor that cost in as well.
PRO's of doing it yourself:
1) satisfaction. This is big for me, even more so now with my nearly useless hands. This is one of the few things that I can still do and be proud of. I fully intend to have my finished C3 and be able to stand in front of someone and tell them that the only work on the entire car that I did not do myself was the machine work on the engine block, and only because I did not have the correct equipment.
2) cost per part. The more you do, the less all that equipment costs per piece. I PC everything that is metal and fits in the oven. Tons of parts around the house, on my motorcycles, and on the C3. I can honestly say that even with the amount that I have invested into my rig, with all that I have done for coating the cost per part is already much lower than I would have paid to have a jobber do it, and that ROI will only continue to improve as I coat more parts.
3) instant turnaround. If you have ever waited for a PC jobber then you know it can be 6-8 weeks for your parts. Heaven forbid that you forgot something or ended up needing more work, add 6-8 more weeks. Here I pull something off the car, clean it, blast it, coat it, and could put it back into service in less than an hour total. I am NOT a patient man :-p
4) color choice. If all you want is satin black then they will have it easily available. If you want to go with something funky or unique then you would pay a premium and then have to wait even longer for the parts. This is the 2 stage metallic orange pearl that I powder coated my brake calipers with so that it would match the paint color on the car. Getting this done at a jobber would be $$$$$.

CON's of doing it yourself
1) Initial investment in equipment. $500 to get your foot in the door but it can quickly scale upwards. If all you need are 1-2 pieces done, send it to a jobber. If you are going to do 10+ pieces, it is already cheaper to do it yourself with a base rig.
2) Space. Yep, it takes up some room. Blast cabinet, oven, spray booth, and compressor probably take up 30+ square feet. FYI I have both my oven and spray booth on castors and simply move them to the wall when not in use. It doesn't negate the problem, but it helps.
3) Fumes. Not noxious or poison and not really overbearing, but there is an odor to curing powder. *I* never notice it but my wife will if she comes out to the garage and I have been coating with the doors closed. Doors open, no smell at all.
4) The 'can you coat this for me' guy. Depending on your personal outlook this can be a pro or a con. Personally, I prefer to do my own work. Anyway, be prepared that once you tell someone that you did the powder coating yourself, the immediate next words out of their mouth will be 'hey, I have a few pieces that need to be powder coated...'
I hope this helps you to make your decision. Oh, when you are figuring out the return on your investment, do not forget to include the savings on all of the spray paint you will not be buying. 1lb of powder can easily coat the same as ~15 cans of spray paint.
**EDIT** If cost is a major factor in your purchasing decision, especially when it comes to purchasing better equipment, you can consider doing side work via forums or craigslist. I purchased all of my equipment at a stage in my life when time was worth more than money to me so I didn't do a lot of it but I have done several sets of wheels for people I know and various motorcycle parts. I would guess that I made back about $1000 in my investment just through word of mouth and without any effort from me other than coating the parts themselves. I imagine that if I were to advertise, even a little, I could have an endless stream of work waiting and it would very quickly turn profitable.
Last edited by PainfullySlow; 04-29-2019 at 06:59 AM.
04-29-2019, 06:53 AM
#597
Tech Contributor
Mike
You might want to touch a 2" grinder to those holes in the hub. The metal usually raises around the rivet holes and could throw off your rotor runout. I tap those holes and bolt on the rotors to dial them in.
FYI- my seminar is June 15th and I will be covering trailing arms, if you want to bring yours down we can take a look at them for you.
The following 2 users liked this post by GTR1999:
bmans vette (05-12-2019),
PainfullySlow (04-29-2019)
04-29-2019, 10:47 AM
#598
Le Mans Master
Member Since: May 2003
Location: Fernandina Beach FL
Posts: 8,481
Received 3,220 Likes
on
1,732 Posts
2023 Restomod of the Year finalist
2020 C3 of the Year Winner - Modified
I'm gonna order some SuperChrome from Prismatic Powders!!!
Mike
You might want to touch a 2" grinder to those holes in the hub. The metal usually raises around the rivet holes and could throw off your rotor runout. I tap those holes and bolt on the rotors to dial them in.
FYI- my seminar is June 15th and I will be covering trailing arms, if you want to bring yours down we can take a look at them for you.
You might want to touch a 2" grinder to those holes in the hub. The metal usually raises around the rivet holes and could throw off your rotor runout. I tap those holes and bolt on the rotors to dial them in.
FYI- my seminar is June 15th and I will be covering trailing arms, if you want to bring yours down we can take a look at them for you.
I'd love to come up to your seminar- but too much going on and too far away. We really appreciate the sharing of your knowledge!!

The following users liked this post:
bmans vette (05-12-2019)
04-29-2019, 08:51 PM
#599
Burning Brakes
Thread Starter
Mike
You might want to touch a 2" grinder to those holes in the hub. The metal usually raises around the rivet holes and could throw off your rotor runout. I tap those holes and bolt on the rotors to dial them in.
FYI- my seminar is June 15th and I will be covering trailing arms, if you want to bring yours down we can take a look at them for you.
You might want to touch a 2" grinder to those holes in the hub. The metal usually raises around the rivet holes and could throw off your rotor runout. I tap those holes and bolt on the rotors to dial them in.
FYI- my seminar is June 15th and I will be covering trailing arms, if you want to bring yours down we can take a look at them for you.
**edit** now that I have more than 2 seconds to reply; I really appreciate the info you constantly provide and I will absolutely take you up on the offer to take a look at my trailing arms. This brings up a couple of questions:
First, is there some reason why you tap the holes and bolt the rotors in place instead of simply using the lug nuts?
Secondly, my original trailing arms are rusted to hell so I have used replacement arms which are bare. I was planning on refinishing them shortly. Would this be ok for your seminar? Do they need to be partially assembled, etc for the seminar?
Thanks!
Last edited by PainfullySlow; 04-30-2019 at 10:41 AM.
04-30-2019, 11:15 AM
#600
Race Director
Thanks for the tips on the powder coating equipment.
Once I get started I'll have a better Idea of which will work best for me.
Greg
Once I get started I'll have a better Idea of which will work best for me.
Greg