


Door ajar switch replacement
Race Director


Joined: Sep 2001
Posts: 10,560
Likes: 439
From: Wellington, FL
St. Jude Donor '11 thru '25
I believe they just screw in. Try a little Blaster on it. Here's a pic:
http://www.ecklers.com/product.asp?p...5&dept_id=1168
http://www.ecklers.com/product.asp?p...5&dept_id=1168
Melting Slicks


Joined: Feb 2006
Posts: 2,092
Likes: 5
From: Fayetteville Arkansas
they are just screwed in. I replaced mine in my 72 a few weeks ago. You can also remove the rear wheel and open the small panel to get to the wires also. Spray on the PB blaster and then brake it free. I had to run a tap through mine to clean up the threads before I put the new ones in.
hth,
Sully
hth,
Sully

Racer

Joined: Jul 2004
Posts: 286
Likes: 1
From: Mesa az
Just a warning, hold the center post, the one that presses in and springs out, an stop it from rotating while you unscrew the outer threaded portion. The center post has the wires plugged into it and if it's allowed to rotate it may damage the wires. Just an FYI.
Andy
Andy

Team Owner


Joined: Jul 2004
Posts: 40,352
Likes: 787
From: Redondo Beach, California
When you unscrew the door ajar switch, hold the plunger with your fingers to keep it from turning as you unscrew the switch. If you don't, the plunger will turn with the switch body and damage the little connectors going into the switch.
You probably should think about ordering some new connector pins. They're available from Lectric Limited or Paragon. To install them it'd be good to have a 22 gauge wire crimper.
You'll need to remove the body little black access panel - it's inside the rear wheel wells in front of the rear tires on the body.
FYI. The door ajar wires are part of the rear body harness that includes the brake lights, backup lights, rear cabin interior lights, side marker lights.
Team Owner


Joined: Jan 2006
Posts: 37,637
Likes: 3,116
From: Crossville TN
Make sure you order the exact switch for your car. There are a million of these kinds of switches and the wrong one will not work properly. NAPA...no; Lectric Limited...yes. www.lectriclimited.com
Corvette Stories
The Best of Corvette for Corvette Enthusiasts

150 hp to 1,250 hp: Every Corvette Generation Compared by the Specs That Matter
Joe Kucinski
8 Coolest Corvette Pace Cars (and Replicas) of All Time
Verdad Gallardo
Top 10 Corvette Engines RANKED by Peak Torque (70+ Years of Muscle!)
Joe Kucinski
Corvette ZR1X Will Be Pacing the Indy 500, And Could Probably Race, Too!
Verdad Gallardo
Top 10 Corvettes Coming to Mecum Indy 2026!
Brett Foote
Top 10 C9 Corvette MUST-HAVES to Fix These C8 Generation Flaws!
Michael S. Palmer
10 Revolutionary 'Corvette Firsts' Most People Don't Know
Joe Kucinski
5 Reasons to Upgrade to an LS6-Powered Corvette; 5 Reasons to Stay LT2
Michael S. Palmer
2027 Corvette vs The World: Every C8 vs Its Closest Competitor
Joe Kucinski
Thread Starter
Advanced
Joined: Jan 2008
Posts: 53
Likes: 0
From: Woodstock Ct
Thanks, I ordered the swich from Wilcoxs. Now If I understand This right the switch installs from the back. To acess it I have to go thru the wheel well. The nut in the door jamb doesn't loosen.
Racer
Joined: Jul 2004
Posts: 286
Likes: 1
From: Mesa az
There isn't a "nut" associated with these switches. The threaded hole in the body is a plate riveted to the body. The switch is the "bolt" with a hex head that should unscrew from the body part. I'm not even sure you can get to the back thru the wheel well. It's inside the birdcage frame behind both doors. You may want to take a second look if you're seeing a "nut". It'd have to be the whole plate that should be riveted to the body.
Andy
Andy
Team Owner

Joined: Sep 2006
Posts: 31,197
Likes: 4,287
From: Westminster Maryland
The nut you're seeing is part of the body of the switch. You loosen and install it from the door side of the jam. When you connect and disconnect the wires you must have new tiny connectors that the suppliers also sell. You cut the old connectors off because they can only be used once, and crimp new connectors onto the wires which clip into your new switch. You pull the wires through the same hole the switch just came out of to work on the connection.
Regards
Alan
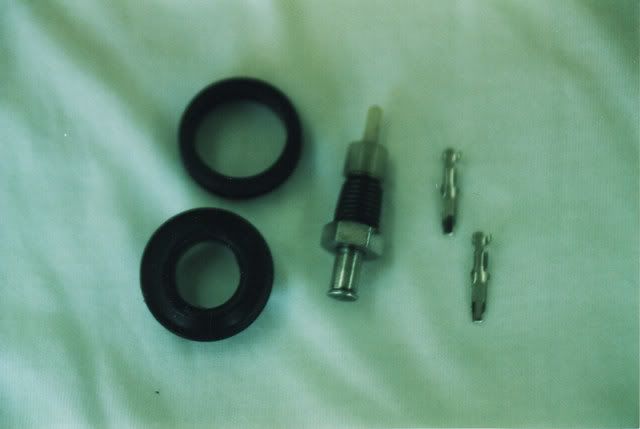
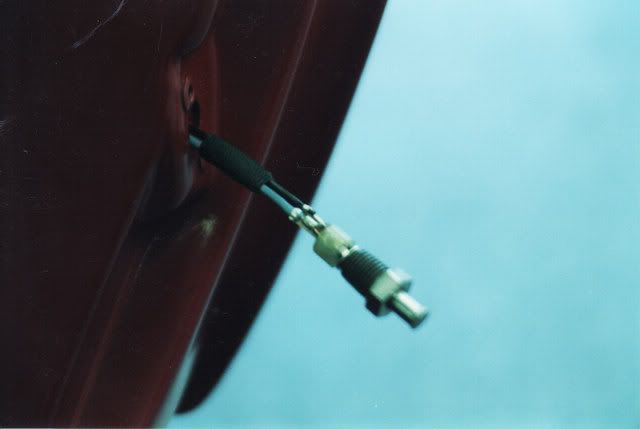
Here is a picture of the switch and connectors and a picture of the switch ready to go back in the jam. The grommet is in the birdcage and protects the wires where they come through into the hinge pillar.
Regards
Alan
Here is a picture of the switch and connectors and a picture of the switch ready to go back in the jam. The grommet is in the birdcage and protects the wires where they come through into the hinge pillar.
Last edited by Alan 71; Jun 2, 2008 at 04:05 PM.
Thread Starter
Advanced
Joined: Jan 2008
Posts: 53
Likes: 0
From: Woodstock Ct
ok thats a little clearer. I started to soak the switch / nut that I can see at the rear of the door jam. Neither side would move and was afraid of putting to much force to them. It felt like there was something behind that would move and stop. Didn't want to break anything.
Team Owner
Joined: Jan 2006
Posts: 37,637
Likes: 3,116
From: Crossville TN
Try tightening the hex body just a bit...in order to break the corrosion loose...then try removing it. If it is the one at the front of the door (either side), you can get better access by removing the kick panel (remove sill plate first).
Team Owner
Joined: Jul 2004
Posts: 40,352
Likes: 787
From: Redondo Beach, California
Some additional things I experienced.
Paragon lists the door ajar switches for the later C3's as having a metric thread. There was no such metric indication for the switch I bought (applicable for a 70).
When it came time to screw in the new switch, it wouldn't screw in. It was then on close examination, I looked at the old switch that I removed and it's threads were crushed. I took a bright light and looked into what was supposed to be the threaded bracket on the inside of the door well. It looked like it had never been tapped for theads! Apparantly, at the factory, an air powered tool had been used to screw in the original switch, and with no theads, the air tool just forced the switch in jam tight. So I had to tap new threads.....guess what kind of threads my new switch had...yep, metric! So I tapped it with a metric tap, and my new swithc went in effortlessly.
Also, look at the little connector pin shafts when you get them installed. In the switch, they are side by side. If one ever touches the other, you'll be getting a constant "door ajar" light. Wrap a little strip of tap around the connector shafts so they never touch (i.e. ground)..
Racer
Joined: Jul 2004
Posts: 286
Likes: 1
From: Mesa az
As I've worked with the door switches I'd noticed they seem to only tighten, once "loose" always loose. The switch threads are somewhat funnel-shaped/flared out so once it screwed in place it remains tight. If the internal plate had been threaded, the switch couldn't be screwed in just to the right position and hold that position. I'm planning on using a soft, thin, mteal shim to give an interference fit as I screw in the new switch. The body has to remain in contact with the frame.
Just an after-thought.
Andy
Just an after-thought.
Andy
Thread Starter
Advanced
Joined: Jan 2008
Posts: 53
Likes: 0
From: Woodstock Ct
Thanks for the continuing help guy's. all this info will help. Just trying to get everything working as it should. This forum has been the best help to us new guy,s. This weekend I had the chance to finally get to my radio and tried your input from a few months ago and checked all the grounds and repluged everything. Put in new speakers and the radio works great!! just let it play for 5hrs this weekend. I assuming it is a stereo because it has the 2 amps 1 large 1 small. Just have to see why the stero light isn't working the cutout is in the dial. It can be fustrating at times but when it starts coming together is rewarding. Hope to have the interior done and driving agian by July 4th. 