Vacuum line to wire.
Thread Starter
Instructor

Joined: Mar 2008
Posts: 235
Likes: 1
From: Waynesburg PA
I have 2 vacuum lines that change to wires. One looks like it goes from a shut off of the hotwater line to heater core. The other goes off a tee off the drivers side of the 3 pronged valve on the intake manafold. The wire then goes back behind the distributor somewhere.
How do these work, what is their purpose?
Also in that vacuum line off the drivers side of the 3 pronged valve on the intake manafold is a little round disk that looks like an in-line fuel filter on a lawnmower. What is this, what is it for?
How do these work, what is their purpose?
Also in that vacuum line off the drivers side of the 3 pronged valve on the intake manafold is a little round disk that looks like an in-line fuel filter on a lawnmower. What is this, what is it for?
Team Owner

Joined: Aug 2006
Posts: 24,125
Likes: 15
From: Columbia Missouri
I have 2 vacuum lines that change to wires. One looks like it goes from a shut off of the hotwater line to heater core. The other goes off a tee off the drivers side of the 3 pronged valve on the intake manafold. The wire then goes back behind the distributor somewhere.
How do these work, what is their purpose?
Also in that vacuum line off the drivers side of the 3 pronged valve on the intake manafold is a little round disk that looks like an in-line fuel filter on a lawnmower. What is this, what is it for?
How do these work, what is their purpose?
Also in that vacuum line off the drivers side of the 3 pronged valve on the intake manafold is a little round disk that looks like an in-line fuel filter on a lawnmower. What is this, what is it for?
They are not changing to wires, just smaller more hardened vacuum lines. They provide the vacuum for the shut off valve. That three prong tree is where that part of the system gets it's vacuum.
That disk is a check valve to keep the vacuum going only one way.
Thread Starter
Instructor
Joined: Mar 2008
Posts: 235
Likes: 1
From: Waynesburg PA
OK Thanks
Can someone explain how to splice a new section of hose onto one of these little vacuum wire/hoses. This may be my vacuum leak the rubber hose (very short piece) is old, hard and brittle and will not stay on barbs of the fitting. I bubba-ed it with electical tape and car seemed to idle better but it was raining so really couldn't test.
Can someone explain how to splice a new section of hose onto one of these little vacuum wire/hoses. This may be my vacuum leak the rubber hose (very short piece) is old, hard and brittle and will not stay on barbs of the fitting. I bubba-ed it with electical tape and car seemed to idle better but it was raining so really couldn't test.
Team Owner
Joined: Aug 2006
Posts: 24,125
Likes: 15
From: Columbia Missouri
OK Thanks
Can someone explain how to splice a new section of hose onto one of these little vacuum wire/hoses. This may be my vacuum leak the rubber hose (very short piece) is old, hard and brittle and will not stay on barbs of the fitting. I bubba-ed it with electical tape and car seemed to idle better but it was raining so really couldn't test.
Can someone explain how to splice a new section of hose onto one of these little vacuum wire/hoses. This may be my vacuum leak the rubber hose (very short piece) is old, hard and brittle and will not stay on barbs of the fitting. I bubba-ed it with electical tape and car seemed to idle better but it was raining so really couldn't test.
I have never had to replace any before, but I think some of our vendors sell stock diameter vacuum tubing, and might be able to help you. Chances are if you have one leak you'll have more than one, and it's best to replace the entire length, but patching might work using vacuum tube with an inside diameter the same as the outside diameter of the bad tubing. Just use a small amount of silicon on the outside of the old tube when you slide the new on, and let it cure.
Drifting


Joined: May 2008
Posts: 1,462
Likes: 43
From: Choctaw Country
a temp fix for stiff or brittle lines is to get a swab or small towel or such and soak it in armor all or equiv and then wipe down the rubber line with it. The line will soak up the juice and get malable. Take your time and have patience.
Petroleum jelly works too but remember most of these products will eventually break down rubber, especially the p/j.
word of caution this is only a temp fix... some lines are old and done for and need to be replaced, but maybe this will help you get back up for now.
Petroleum jelly works too but remember most of these products will eventually break down rubber, especially the p/j.
word of caution this is only a temp fix... some lines are old and done for and need to be replaced, but maybe this will help you get back up for now.
Safety Car


Joined: Oct 2007
Posts: 4,380
Likes: 1,745
From: Seattle Area Washington
From the barb fitting on the tee facing the drivers side there actually should be 2 disk like fittings. The first one after the barb should be white in color, this is a filter only. The second one inline is made of metal with a single port in and a duel port out. This is the check valve.
You can cut a short piece of the hard line out and take it to your local auto parts house. Have them cut you a length of vacuum line that fits the OD of the hard line. Use a shot of silicone spray on the hard line to make the new rubber line slide on a bit easier.
You can cut a short piece of the hard line out and take it to your local auto parts house. Have them cut you a length of vacuum line that fits the OD of the hard line. Use a shot of silicone spray on the hard line to make the new rubber line slide on a bit easier.
Thread Starter
Instructor
Joined: Mar 2008
Posts: 235
Likes: 1
From: Waynesburg PA
I have both those disks, one line goes off that 1 to 2 disk and goes throught the firewall somewhere (I think its a smaller dia. rubber hose line). The 2nd goes about 10 inch to a plastic tee (the tee was bad, I replaced it). The one off the tee goes to the headlights. The other is the little piece of rubber hose that is hard/brittle (their is maybe an inch of rubber) with thes little wire hose line glued in to the little piece of rubber hose. What does this go to?
Corvette Stories
The Best of Corvette for Corvette Enthusiasts

Top 10 Most Expensive Corvettes Ever Sold on Bring A Trailer
Brett Foote
10 Things Every Corvette Owner Needs (2026 Edition)
Michael S. Palmer
8 Most "Only Corvette Owners Understand" Quirks and Problems
Pouria Savadkouei
10 Reasons the C6 Z06 is Still A Performance Benchmark After 20 Years
Joe Kucinski
How Much Horsepower Every Corvette Engine "LOST" in 1972
Joe Kucinski
Top 10 DOs and DON'Ts for Protecting Your Convertible Top!
Michael S. Palmer
Top 10 Most Explosive Corvettes Ever Made: Power-to-Weight Ratio Ranked!
Joe Kucinski
150 hp to 1,250 hp: Every Corvette Generation Compared by the Specs That Matter
Joe Kucinski
8 Coolest Corvette Pace Cars (and Replicas) of All Time
Verdad Gallardo
Le Mans Master

Joined: Jul 2006
Posts: 8,117
Likes: 104
From: charlotte north carolina
the small vaccum line outer diameter is the same as the inner diameter of regular(1/4") vaccum line. carefully cut the small line with a razor knife to prevent cracks, clean thoroughly it's outer surface and the inner surface of the regular line, coat the small line with weatherstrip adhesive(keep it away from the end to prevent blockage) and slide it into the line about an inch.
Thread Starter
Instructor
Joined: Mar 2008
Posts: 235
Likes: 1
From: Waynesburg PA
I will get some pic's tonight. Their are 3 sizes of line, 2 rubber (it looks like one will fit the other but thats not what I need to splice) and one looks like a piece of wire (its green I think). Its the piece of wire looking one onto the smaller sized rubber. Current one looks like some type of hard black cement holding it in. The wire one is way smaller than the inside of the smallest rubber tube.
Safety Car
Joined: Oct 2007
Posts: 4,380
Likes: 1,745
From: Seattle Area Washington
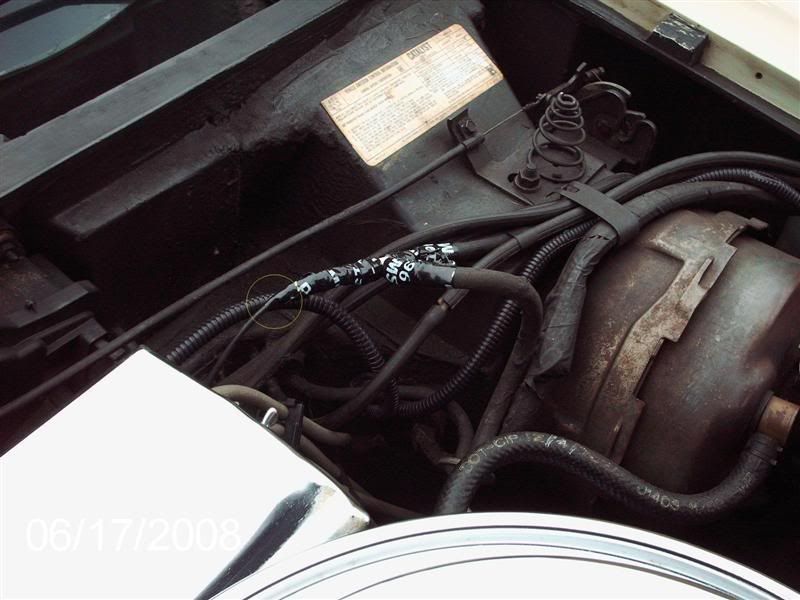
The second picture is one I have used for many years from Dr. Rebuilds web site I dolled up a little with the correct color codes for the 77 model. The red circle on the second picture is what that broken line is.