




View Poll Results: top or bottom
cutting spring form top


5
25.00%
cutting spring form bottom


15
75.00%
Voters: 20. You may not vote on this poll
Cutting spring top or bottom?

Pro


Joined: Sep 2002
Posts: 624
Likes: 1
From: Melbourne, Fla. 6 months- New Middletown, Ohio 6 months

Any reason why you would not recommend changing upper ball joints and upper bushings at this time if needed or were they just not in your train of thought while discussing spring changes.

Thread Starter
7th Gear

Joined: Mar 2009
Posts: 7
Likes: 0
Hey guys, so we got around to doing the front spring. Removed the shock, swaybar and seperated the top ball joint and used the jack to lower the A arm. All in all was very easy to do. There is a big rubber insulator that goes between the top of the spring and the Frame that is about 1" inch thick. Does anyone have this? The spring was in fact mis alligned on the insulator/bushing.

Race Director


Joined: May 2003
Posts: 10,956
Likes: 409
From: California
Hey NOONIE.... please give more clarification on pockets. When i did my 550# springs I placed the spring in the proper BOTTOM a-arm slot. The Bottom is at least as prominent as the top is, that is to say there is as much if not more of a inclining seat for the bottom a-arm as the top. Does it really matter? Just as long as it is done the same on both sides? Because once you cut, either the bottom or the top will not sit in 100%...
I cut my #550 springs 1/4, and will go into it again next week and cut another 1/4 turn to lower some more. (these are VBP #550 springs)

I cut my #550 springs 1/4, and will go into it again next week and cut another 1/4 turn to lower some more. (these are VBP #550 springs)
Race Director
Joined: May 2003
Posts: 10,956
Likes: 409
From: California
Hey guys, so we got around to doing the front spring. Removed the shock, swaybar and seperated the top ball joint and used the jack to lower the A arm. All in all was very easy to do. There is a big rubber insulator that goes between the top of the spring and the Frame that is about 1" inch thick. Does anyone have this? The spring was in fact mis alligned on the insulator/bushing.
I think that may be aftermarket... I had no such thing..

Race Director

Joined: Mar 2006
Posts: 14,112
Likes: 28
From: Florida
Hey NOONIE.... please give more clarification on pockets. When i did my 550# springs I placed the spring in the proper BOTTOM a-arm slot. The Bottom is at least as prominent as the top is, that is to say there is as much if not more of a inclining seat for the bottom a-arm as the top. Does it really matter? Just as long as it is done the same on both sides? Because once you cut, either the bottom or the top will not sit in 100%...
I cut my #550 springs 1/4, and will go into it again next week and cut another 1/4 turn to lower some more. (these are VBP #550 springs)
I cut my #550 springs 1/4, and will go into it again next week and cut another 1/4 turn to lower some more. (these are VBP #550 springs)
I like to cut a full coil off because it will sit in top and bottom pockets just like oem, but it really doesn't matter much. Have done it all different ways. When all assembled the spring isn't moving anywhere.
As far as I know the taper for the spring to seat in is the same top and bottom (a arm). You can see the shiny part of the upper pocket as to where the spring really made contact.
The tighter wound end of the coil should go to the top.
If I want to lower it more I cut a full coil from the bottom, if lowering less, from the top of spring where it is wound tighter.
The easiest way to install them is to put a 5/16" x 1" bolt in the top alignment hole and a 3/8" x 1" bolt in the bottom alignment hole and jamb the end of the spring against the bolt. If bound after assembly just use a wrench to remove. It also assures both sides will be exactly even in the pockets.


 [/QUOTE]
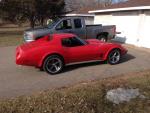
Here is the car with full top coil cut off and 245 60 on front and 255 60 on rear. There is about 1" clearance from the top of the tire to the fender lip front and back.
 [/QUOTE]
Racer
Joined: Nov 2007
Posts: 350
Likes: 0
From: coon rapids mn
the only thing i took off or apart was the shocks,sway bar end links and lower ball joint left brakes alone and cut one coil from bottom of spring put back in no spring compresser to diassemble or put together just a floor jack and stands took about three hours from start to finish.
Race Director
Joined: May 2003
Posts: 10,956
Likes: 409
From: California
This is the way I do it with the temp bolts to line the spring up.
I like to cut a full coil off because it will sit in top and bottom pockets just like oem, but it really doesn't matter much. Have done it all different ways. When all assembled the spring isn't moving anywhere.
As far as I know the taper for the spring to seat in is the same top and bottom (a arm). You can see the shiny part of the upper pocket as to where the spring really made contact.
The tighter wound end of the coil should go to the top.
If I want to lower it more I cut a full coil from the bottom, if lowering less, from the top of spring where it is wound tighter.
The easiest way to install them is to put a 5/16" x 1" bolt in the top alignment hole and a 3/8" x 1" bolt in the bottom alignment hole and jamb the end of the spring against the bolt. If bound after assembly just use a wrench to remove. It also assures both sides will be exactly even in the pockets.
I like to cut a full coil off because it will sit in top and bottom pockets just like oem, but it really doesn't matter much. Have done it all different ways. When all assembled the spring isn't moving anywhere.
As far as I know the taper for the spring to seat in is the same top and bottom (a arm). You can see the shiny part of the upper pocket as to where the spring really made contact.
The tighter wound end of the coil should go to the top.
If I want to lower it more I cut a full coil from the bottom, if lowering less, from the top of spring where it is wound tighter.
The easiest way to install them is to put a 5/16" x 1" bolt in the top alignment hole and a 3/8" x 1" bolt in the bottom alignment hole and jamb the end of the spring against the bolt. If bound after assembly just use a wrench to remove. It also assures both sides will be exactly even in the pockets.
Last edited by pauldana; Jun 25, 2009 at 11:49 PM.
Corvette Stories
The Best of Corvette for Corvette Enthusiasts

Top 10 Most Explosive Corvettes Ever Made: Power-to-Weight Ratio Ranked!
Joe Kucinski
150 hp to 1,250 hp: Every Corvette Generation Compared by the Specs That Matter
Joe Kucinski
8 Coolest Corvette Pace Cars (and Replicas) of All Time
Verdad Gallardo
Top 10 Corvette Engines RANKED by Peak Torque (70+ Years of Muscle!)
Joe Kucinski
Corvette ZR1X Will Be Pacing the Indy 500, And Could Probably Race, Too!
Verdad Gallardo
Top 10 Corvettes Coming to Mecum Indy 2026!
Brett Foote
Top 10 C9 Corvette MUST-HAVES to Fix These C8 Generation Flaws!
Michael S. Palmer
10 Revolutionary 'Corvette Firsts' Most People Don't Know
Joe Kucinski
5 Reasons to Upgrade to an LS6-Powered Corvette; 5 Reasons to Stay LT2
Michael S. Palmer
Race Director
Joined: Mar 2006
Posts: 14,112
Likes: 28
From: Florida
I think I do it the same way... but just to make sure we are on the same page.... The only way the spring can fit both upper and lower pockets is to NOT be cut. Once cut, both springs need to be seated the same, rather both seated to upper pocket and not worry about bottom and visa versa, set both springs in lower pocked and let upper sit where ever it goes.... just pick one or the other? correct?.... in my personal case I cut 1/4 turn then set both in the lower A-arm pocket and let the upper sit wherever it sits...
I almost always cut either a full coil off the top or bottom, depending on the drop desired. With a full coil cut, it will sit the same as oem.
I even go so far as using the original end if the spring as a guide for the abrasive metal cutoff wheel.

Le Mans Master


Joined: Apr 2007
Posts: 7,353
Likes: 72
From: Graceland in a Not Correctly Restored Stingray
At great risk of 
...not my word, but per Dick Guldstrand's advice/instruction one should properly seat the spring in the upper pocket; it not being necessary that the bottom be cut to exactly fit all the way around the lower A-arm pocket or that it be re-closed after cutting. In my experience, I haven't seen any evidence to suggest he is incorrect. Cut the bottom and seat the top, 'nough said...

TSW
...not my word, but per Dick Guldstrand's advice/instruction one should properly seat the spring in the upper pocket; it not being necessary that the bottom be cut to exactly fit all the way around the lower A-arm pocket or that it be re-closed after cutting. In my experience, I haven't seen any evidence to suggest he is incorrect. Cut the bottom and seat the top, 'nough said...
TSW
Thread Starter
7th Gear
Joined: Mar 2009
Posts: 7
Likes: 0
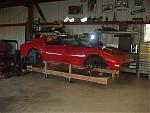
Here is the look guys, cut from the bottom and longer bolts in the rear all the way threaded out.

