


Trailing Arm Bushing?

Thread Starter
Instructor


Joined: Jan 2007
Posts: 233
Likes: 41
From: Simpsonville SC
I need to replace my training arm bushings and I have a few questions.
First question, I have seen the poly TA bushing kits that some vendors sell advertise �can be installed without removing the trailing arm� and come with the flaring tool. I like the idea of not having to remove the TA completely but I seems if you have gone this far, you might as well remove it for cleaning and paint. I was curious if other forum members have replaced the TA bushings without removing the TA completely.
Second question, How come the rubber bushing kits don�t come with a simple nut and bolt flaring tool like the poly kits do?

Instructor
Joined: Dec 2007
Posts: 184
Likes: 0
From: Crystal Lake IL
This is just my opinion, if you're going to go through the trouble of removing the bushing, you might as well rebuild the whole thing. If it's never been done, there's a good chance it needs a rebuilld anyway.
As far as the tool goes, the poly bushing just need to be flared. The rubber bushing needs to be compressed before you can flare the insert...so the tool is a little more complex.
As far as the tool goes, the poly bushing just need to be flared. The rubber bushing needs to be compressed before you can flare the insert...so the tool is a little more complex.

Former Vendor
Joined: Apr 2009
Posts: 766
Likes: 3
From: Charlotte North Carolina 704-394-5150
This is just my opinion, if you're going to go through the trouble of removing the bushing, you might as well rebuild the whole thing. If it's never been done, there's a good chance it needs a rebuilld anyway.
As far as the tool goes, the poly bushing just need to be flared. The rubber bushing needs to be compressed before you can flare the insert...so the tool is a little more complex.
As far as the tool goes, the poly bushing just need to be flared. The rubber bushing needs to be compressed before you can flare the insert...so the tool is a little more complex.


The staking tool for the rubber bushing is much more heavy duty. Using the poly-bushings that supply the nut/bolt staking tool work well but you may need to look at how your shims are located in the frame.
If you BASICALLY have an even amount of shims on both sides of the TA bushing...then the poly TA bushing will usually work.
IF your TA is up against the frame and all of the shims are on one side or very close to being against the frame...very few shims....then the poly bushing may cause for a problem when it goes to be re-aligned.
The poly bushings that are made for the DIY'er at home...are wider and can cause for a problem in re-aligning the trainling arms "toe" setting due to possible previous damage to the trailing arm...thus not allowing the ability to set the toe due to this "tweaking" in the TA.
I have been "bit" by this in the past and I do not use the type that uses a bolt to stake the inner sleeve....I use the poly bushings that are made JUST LIKE the original desiogn that requires the special staking tool.
"DUB"
Thread Starter
Instructor
Joined: Jan 2007
Posts: 233
Likes: 41
From: Simpsonville SC
The staking tool for the rubber bushing is much more heavy duty. Using the poly-bushings that supply the nut/bolt staking tool work well but you may need to look at how your shims are located in the frame.
If you BASICALLY have an even amount of shims on both sides of the TA bushing...then the poly TA bushing will usually work.
IF your TA is up against the frame and all of the shims are on one side or very close to being against the frame...very few shims....then the poly bushing may cause for a problem when it goes to be re-aligned.
The poly bushings that are made for the DIY'er at home...are wider and can cause for a problem in re-aligning the trainling arms "toe" setting due to possible previous damage to the trailing arm...thus not allowing the ability to set the toe due to this "tweaking" in the TA.
I have been "bit" by this in the past and I do not use the type that uses a bolt to stake the inner sleeve....I use the poly bushings that are made JUST LIKE the original desiogn that requires the special staking tool.
"DUB"
 He spent almost 2 hours and only got 2 shims removed on the driver side. Rust and more rust.. He recommended I pull the trailing arms remove all the rust and replace the bushings. Then bring it back an he would dial it in. I'm lucky, this old alignment has had a lot of experience with aligning vets. It's always something with these cars but I love it!!!
Former Vendor
Joined: Apr 2009
Posts: 766
Likes: 3
From: Charlotte North Carolina 704-394-5150
One thing leads to another and to another and to another....
Take into consideration that the strut rod bushings need to be in good condition also.
If you are removing them from the bearing support housing that is part of the trailing arm...make sure that the splines in them that allow these shock bolts to lock onto the cast housing of the beaing support are in very good condition and not rounded off. The splines need to be effective to aid in keeping this shock bolt from being able to rotate up and down....because it IS attached to your SHOCK. More parts ...more parts. This part is often overlooked or not replaced...it is good insurance to keep other parts from being damaged and needing replacement in the future.
If in your area, you have a shop that can re-arch your leaf spring. You may want to look into this also. If you do..measure the thickness of the spring at the center attachment bolt that holds the leaf springs together. When it is re-arched or replaced. Compare this measurement to the original and if it is off considerably...you will need to spend time in making sure that the four bolts that secure the spring to the differential are correct in length so you have enough threads to go into the differential housing but yet not so many that the threads bottom out and cause for damage to your rear differential cover...which can occur if the two bolts that are closest to the front of the car can actually crack the inside of the rear differential cover and cause gear oil to leak out.
Run the bolts in carefully and mark the bolt where it stops and then remove it to see how many threads ACTUALLY go up into the housing. The two rear bolts do not matter because they have the ability to go all the way through the "ears" of the rear cover.
If you do this and are re-installing the spring...install the four center bolts and plate and get them SNUG but not TIGHT....YET....then install the outer bolts and cushions. Then set the car down on the ground so the weight of the car can COMPRESS the spring and allow you to properly torque these four bolts WITHOUT breaking the "ears" off of your rear diff cover....which CAN occur if you try to use these four bolts to COMPRESS the spring tightly to the rear cover....which is a NO-NO!!! Let the weight of the car work FOR YOU.
And last but not least is the amount of side yoke run-out from the differential. If your side yokes have excessive run-out. you may still have a handling problem when you drive it at high speeds and hits ruts or groves in the road. If you have equal to or more than the thickness of a paper matchstick...the beginning of the end has occured and you are now on borrowed time...depending on how much you actually drive the car in a year.
"DUB"

Intermediate

Joined: Jan 2001
Posts: 34
Likes: 10
From: Cave Creek Arizona
i have a '71 LT-1 4-speed coupe. About seven years and 2,000 miles ago I rebuilt the suspension using Vette Brakes components, including their fabricated offset trailing arms with poly bushings.
Recently during a pre-alignment inspection, I discovered what I believe to be an excessive amount of rocking movement to the rear wheels and thought at first I had a wheel bearing issue. But upon closer inspection the movement is coming from the control arm bushing. On the right side (which is worse) there is only one outboard shim. On the left side there are two outboard shims.
How much rocking movement in the bushing is allowable? Why would the number of shims on one side effect bushing flex?
I ordered a replacement set of bushings from VetteBrakes but have not taken everything apart yet. The bushing set came with a bolt and wheel nut to flare the bushing sleeve.
Should I replace the bushings, or do I have another problem?
Former Vendor
Joined: Apr 2009
Posts: 766
Likes: 3
From: Charlotte North Carolina 704-394-5150
i have a '71 LT-1 4-speed coupe. About seven years and 2,000 miles ago I rebuilt the suspension using Vette Brakes components, including their fabricated offset trailing arms with poly bushings.
Recently during a pre-alignment inspection, I discovered what I believe to be an excessive amount of rocking movement to the rear wheels and thought at first I had a wheel bearing issue. But upon closer inspection the movement is coming from the control arm bushing. On the right side (which is worse) there is only one outboard shim. On the left side there are two outboard shims.
How much rocking movement in the bushing is allowable? Why would the number of shims on one side effect bushing flex?
I ordered a replacement set of bushings from VetteBrakes but have not taken everything apart yet. The bushing set came with a bolt and wheel nut to flare the bushing sleeve.
Should I replace the bushings, or do I have another problem?
Recently during a pre-alignment inspection, I discovered what I believe to be an excessive amount of rocking movement to the rear wheels and thought at first I had a wheel bearing issue. But upon closer inspection the movement is coming from the control arm bushing. On the right side (which is worse) there is only one outboard shim. On the left side there are two outboard shims.
How much rocking movement in the bushing is allowable? Why would the number of shims on one side effect bushing flex?
I ordered a replacement set of bushings from VetteBrakes but have not taken everything apart yet. The bushing set came with a bolt and wheel nut to flare the bushing sleeve.
Should I replace the bushings, or do I have another problem?
If you are talking about the shims/washers used by Vette Brakes to correctly set up the bushing in the trailing arm...that is another issue. Either open the bushing kit you have or go online and review the installation instructions of these bushings and you will see that they have to be set up with a feeler guage as described in their instructions. If you choose, you can remove your trailing arms and check this area of meausrement.
If your trailing arm is twisting and you can see where the play is at, then either call VB&P or remove them and check them out. If my memory serves me correctly, there should be .010" space between the bushing and the outer washer where it is staked together....but check this out because I no longer use their poly trailing arm bushings,,,I use another companies poly bushings which are more like the originals in design measurements...and those do require the staking tool to install and not the bolt and nut tool like those of VB&P.
"DUB"
Intermediate
Joined: Jan 2001
Posts: 34
Likes: 10
From: Cave Creek Arizona
Thank you for your response. The shims I'm talking about are the alignment shims. We could not detect any trailing arm twisting. The bushing or something is flexing. The trailing arms I purchased from Vette Brakes already had the bushings installed. What I want to end up with trailing arms where the bushings don't deflect or flex so I can get the car aligned properly. What do you recommend?
Corvette Stories
The Best of Corvette for Corvette Enthusiasts

Top 10 Most Expensive Corvettes Ever Sold on Bring A Trailer
Brett Foote
10 Things Every Corvette Owner Needs (2026 Edition)
Michael S. Palmer
8 Most "Only Corvette Owners Understand" Quirks and Problems
Pouria Savadkouei
10 Reasons the C6 Z06 is Still A Performance Benchmark After 20 Years
Joe Kucinski
How Much Horsepower Every Corvette Engine "LOST" in 1972
Joe Kucinski
Top 10 DOs and DON'Ts for Protecting Your Convertible Top!
Michael S. Palmer
Top 10 Most Explosive Corvettes Ever Made: Power-to-Weight Ratio Ranked!
Joe Kucinski
150 hp to 1,250 hp: Every Corvette Generation Compared by the Specs That Matter
Joe Kucinski
8 Coolest Corvette Pace Cars (and Replicas) of All Time
Verdad Gallardo
Former Vendor
Joined: Apr 2009
Posts: 766
Likes: 3
From: Charlotte North Carolina 704-394-5150
Hopefully your shims for the alignment are tight and can not be moved up or down...eventhough I know the large cotter pin keeps them from falling out.
If the shims are tight...as they should be... Then depending on how much flex you have may be due to the amount of spacing that the bushing is designed to have....or....the pivot bolt that holds your trailing arm in place may be worn where the bolt and inner sleeve of the bushing have "slop". There is supposed to be a bit of play and not be totally tight due to teh bushing set-up and VB&P design.
You may need to take a close look at it and call them and discuss your options. This is also one of the reasons I do not use those bushings. They are great for the guy in his home garage...but for me I do not have time playing around with setting up washer shims to get specific gaps when I can install a poly bushing that goes in just like the factory design.
If you have flexing...you should be able to tell where it is coming from by cafefully watching the bushing area while moving the trailing arm.
"DUB"
Intermediate
Joined: Jan 2001
Posts: 34
Likes: 10
From: Cave Creek Arizona
Thanks again for your input. I don't have time for fooling around with DIY bushing shimming either. I want to fix the issue and go on with life. So would you recommend a source for a factory-type poly bushing that needs to be staked?
By the way, I have a lot of Corvette related posts on Dean's Garage (http://www.deansgarage.com)--Gary
By the way, I have a lot of Corvette related posts on Dean's Garage (http://www.deansgarage.com)--Gary
Former Vendor
Joined: Apr 2009
Posts: 766
Likes: 3
From: Charlotte North Carolina 704-394-5150
I do not think the factory designed bushings will work due to you having off-set trailing arms. I believe the area where the bushing is installed is wider than stock and the inner sleeve will not be long enough. I need the width of the area where the bushing is in your off-set arm and get back to me by calling me or post it. I may be wrong so that it why I need the width.
"DUB"
"DUB"
Safety Car

Joined: Oct 2006
Posts: 3,930
Likes: 15
From: Calgary Alberta
I do not think the factory designed bushings will work due to you having off-set trailing arms. I believe the area where the bushing is installed is wider than stock and the inner sleeve will not be long enough. I need the width of the area where the bushing is in your off-set arm and get back to me by calling me or post it. I may be wrong so that it why I need the width.
"DUB"
"DUB"
Safety Car
Joined: Oct 2006
Posts: 3,930
Likes: 15
From: Calgary Alberta
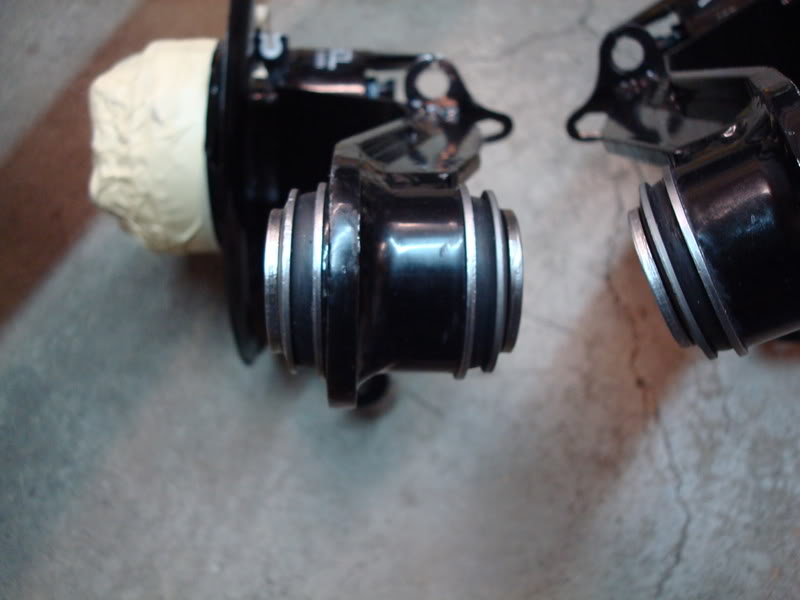
The bushing cups were also popping in and out of the hole.
Last edited by stinger12; Aug 31, 2009 at 02:12 AM.
Intermediate
Joined: Jan 2001
Posts: 34
Likes: 10
From: Cave Creek Arizona
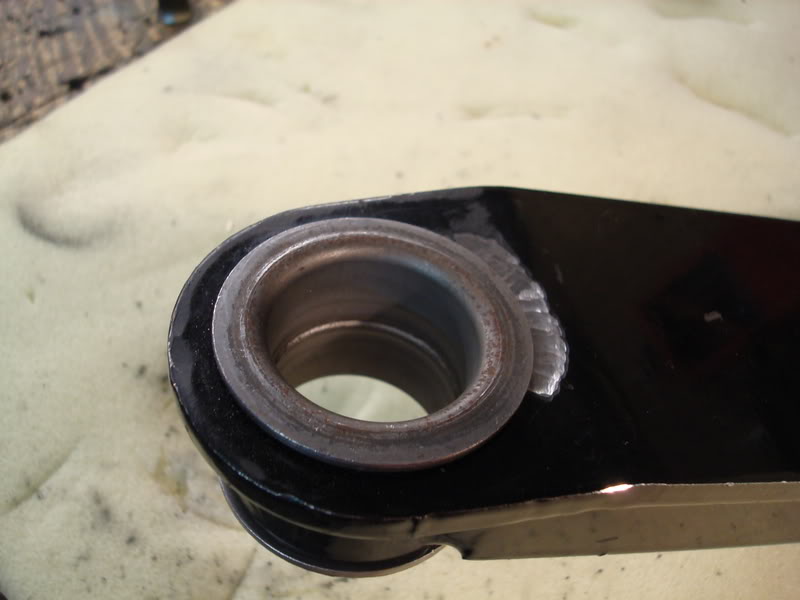
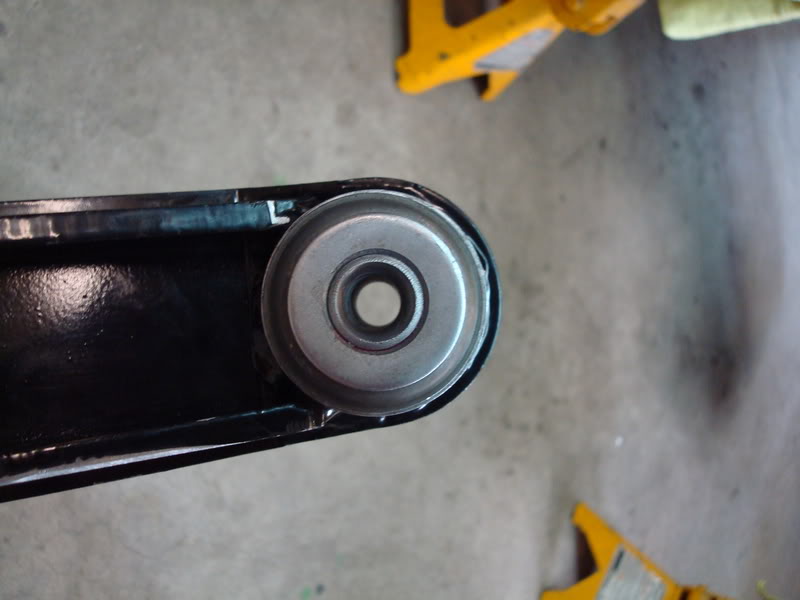
I removed the right trailing arm (the worse one). I don't see anything wrong. No broken bolts. Bushing seems tight. There were only two thin shims on the outboard side. What do you think is causing the flex? The design of the bushing? Do the shims not support the side of the bushing adequately?
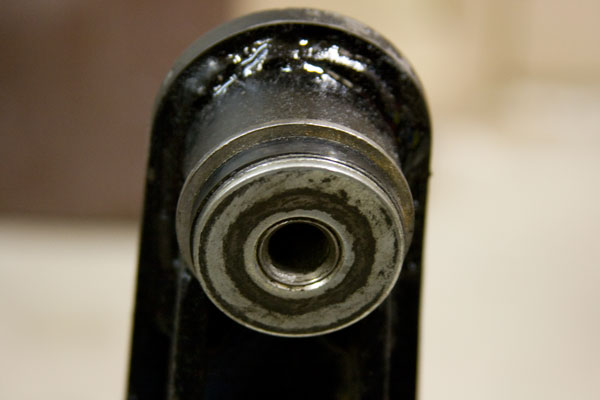
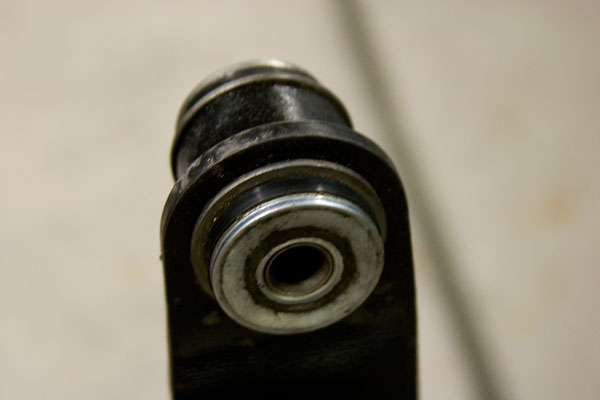

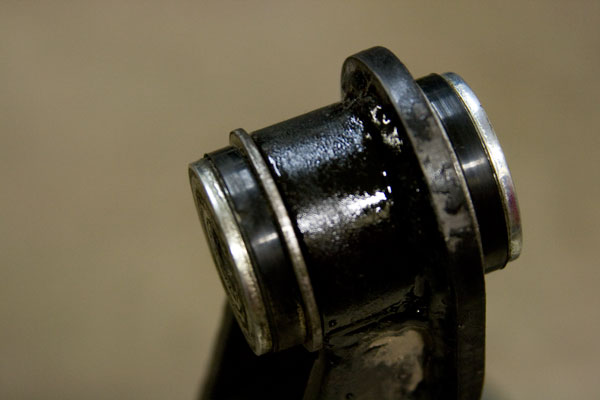
The tube that the bushing fits into is 1.25" wide.
Recommendations?
Thanks.
The tube that the bushing fits into is 1.25" wide.
Recommendations?
Thanks.
Former Vendor
Joined: Apr 2009
Posts: 766
Likes: 3
From: Charlotte North Carolina 704-394-5150
gdsmith,
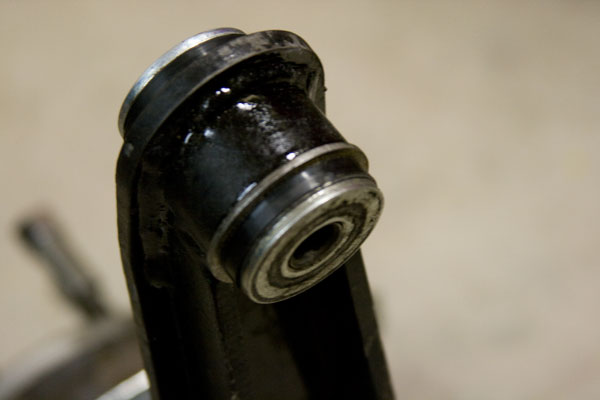
Yes at first glance from your photo's...everything looks normal...and that is where it stops. From the instructions from VB&P...if you have looked at them...using a feeler guage...you need to check your gap in the trailing arm bushing...(the worst one) and see if the gap is correct to VB&P's tolerances. By looking at them will not tell you squat. You need to check it with a feeler gauge. You may have an issue of excessive clearance and this is causing the arm to twist...regardless of the tightness of the bushing in the frame with the alignment shims. If the assembly was TIGHT in the frame...then the flexing is due to the amount of gap provided when the bushing was installed. If you carefully look at the inner sleeve of your new t/a bushings...you will see the step in the end of the sleeve where you will evenbtually stake it together with the tool. The shims provided allow you to customize the set-up due to VB&P's tolerances being what they are...and these washer shims take out the slack...so to speak ...and make it so when the bolt tool is used... it will allow the final staking to maintain the set-up you used to get to the correct gap by using the feeler gauge. chances are the gap is greater than the designed tolerances from VB&P nad will need to be replaced. You haven't replied back if you talked to them or not. Have you?
"DUB"
Intermediate
Joined: Jan 2001
Posts: 34
Likes: 10
From: Cave Creek Arizona
Dub,
I did speak to VB&P today. The only thing that seemed to be a possibility was that there were too few alignment shims that was allowing the movement. None of what you discussed was mentioned. I'm not sure I understand where the tolerance problem is. I can't get any feeler gage in between the shims/washer/bushing, so you must be talking about another tolerance. The instructions for installing the bushings are here: http://www.vbandp.com/instructions/41042.pdf. I tried calling you today and got a recording. I'll try again tomorrow morning. Thanks for your help. I really appreciate it.
I did speak to VB&P today. The only thing that seemed to be a possibility was that there were too few alignment shims that was allowing the movement. None of what you discussed was mentioned. I'm not sure I understand where the tolerance problem is. I can't get any feeler gage in between the shims/washer/bushing, so you must be talking about another tolerance. The instructions for installing the bushings are here: http://www.vbandp.com/instructions/41042.pdf. I tried calling you today and got a recording. I'll try again tomorrow morning. Thanks for your help. I really appreciate it.
Former Vendor
Joined: Apr 2009
Posts: 766
Likes: 3
From: Charlotte North Carolina 704-394-5150
The answering machine will automatically pick up when ever I can not get to the phone by the fourth ring...or...if I am on the other line. So ALWAYS leave a message and return number and I will call you back...like I did earlier today. I hope that your discussion helped. Let me know what you have found with the feeler gauge.
"DUB"
Intermediate
Joined: Jan 2001
Posts: 34
Likes: 10
From: Cave Creek Arizona
Dub,
Thanks for taking the time to discuss several alignment related rear suspension issues with me this morning. I didn't have time to check everything today, but I did create a fixture to take what clearance there might be out of the VB&P bushing and check the gap. It easily measures .028". If this is an OK method to check the clearance, then there is way to much and that would account for the flex.
Gary
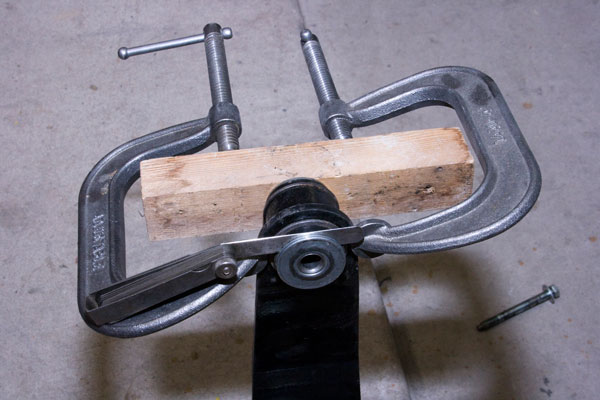