


Looking for interior pictures.

Thread Starter
Intermediate

Joined: Aug 2007
Posts: 28
Likes: 0
From: Everett Wa
I bought a 77 a while back. The previous owner had got through the disassembly portion of the restore and stopped there. I am now trying to piece it all back together. For everything else I have worked on on the car, I took a lot of pictures while taking it apart to help with reassembly. Unfortunately I have no clue how its all supposed to look or how the sequence went when taking it apart.
Does anyone have links to pictures taken while disassembling or reassembling the interior? I am looking for as much info as I can find. Right now all that's remaining in the interior are the wire harnesses.
On a slightly related topic.
I have been ordering a fair number of replacement parts for interior trim. I am changing the color from red to black. I tried re-dying a few parts and am finding the dyed parts are a more mat looking finish than the new replacement parts I bought. The new parts look more plastic-like/glossy. Has anyone else had this problem? Any suggestions? Do i need to be dying the black parts with black dye to make them match, or should I do something to the dyed parts to make them more glossy? I am trying to dye parts since the cost of replacing ALL the interior parts is insane....
Thanks
Former Vendor
Joined: Aug 2006
Posts: 76,656
Likes: 1,852
From: Jeffersonville Indiana 812-288-7103
St. Jude Donor '08-'09-'10-'11-'12-'13-'14-'15
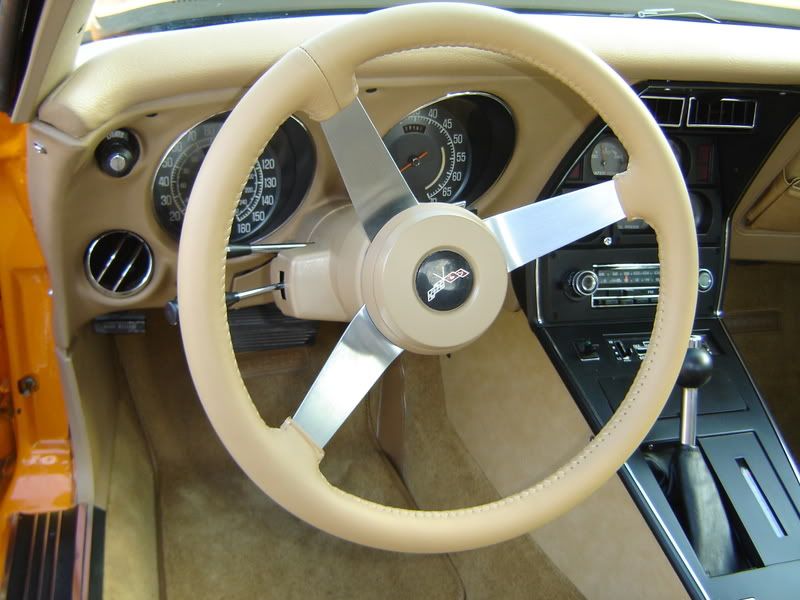
WnMech: Very nice!
Bmanops;
We have an instruction sheet on our web site that will show you how the pads come out, you can just reverse this to install the pads. If I were you I would extend the LH side speaker wires, it makes it easier to get the wires on the speaker.
You'll find it here: http://willcoxcorvette.com/repairand...lp.php?hID=105
Also,
You might want to purchase the assembly manual. This is probably the best book you'll find for putting the car back together. It won't tell you how the parts go in, but it will show you how they were done at the factory.
You can find them at this link: http://willcoxcorvette.com/product_i...ducts_id=25580
Willcox
Pro


Joined: Apr 2008
Posts: 596
Likes: 6
From: Irving Texas
not to highjack the thread but I noticed you did a great job with the interior but didnt put the trim at the top of the seats. Any particular reason? I assumed all the seats had this trim but my 76 didnt have them and yours doesnt either-whats the history of the horizontal trim located by the shoulder blades in the seat?thanks!
Drifting


Joined: Jun 2005
Posts: 1,523
Likes: 1
From: grand prairie texas
not to highjack the thread but I noticed you did a great job with the interior but didnt put the trim at the top of the seats. Any particular reason? I assumed all the seats had this trim but my 76 didnt have them and yours doesnt either-whats the history of the horizontal trim located by the shoulder blades in the seat?thanks!
Former Vendor
Joined: Aug 2006
Posts: 76,656
Likes: 1,852
From: Jeffersonville Indiana 812-288-7103
St. Jude Donor '08-'09-'10-'11-'12-'13-'14-'15
not to highjack the thread but I noticed you did a great job with the interior but didnt put the trim at the top of the seats. Any particular reason? I assumed all the seats had this trim but my 76 didnt have them and yours doesnt either-whats the history of the horizontal trim located by the shoulder blades in the seat?thanks!

Corvette Stories
The Best of Corvette for Corvette Enthusiasts

Top 10 Most Expensive Corvettes Ever Sold on Bring A Trailer
Brett Foote
10 Things Every Corvette Owner Needs (2026 Edition)
Michael S. Palmer
8 Most "Only Corvette Owners Understand" Quirks and Problems
Pouria Savadkouei
10 Reasons the C6 Z06 is Still A Performance Benchmark After 20 Years
Joe Kucinski
How Much Horsepower Every Corvette Engine "LOST" in 1972
Joe Kucinski
Top 10 DOs and DON'Ts for Protecting Your Convertible Top!
Michael S. Palmer
Top 10 Most Explosive Corvettes Ever Made: Power-to-Weight Ratio Ranked!
Joe Kucinski
150 hp to 1,250 hp: Every Corvette Generation Compared by the Specs That Matter
Joe Kucinski
8 Coolest Corvette Pace Cars (and Replicas) of All Time
Verdad GallardoTeam Owner


Joined: Jan 2006
Posts: 37,637
Likes: 3,118
From: Crossville TN
If the 'new' interior parts have been stored for any length of time in airtight wrapping, the plastic parts will 'age' and form a film on the surface. That may be what you are seeing. Also, the dye used to color them may be more [or less] glossy than the dye you bought. By the way, did you buy your interior dye at a professional auto body paint supply store...or did you get a spray can from an aftermarket source? If it is the latter, that stuff may really be 'paint'. I only use SEM 'Color Coat' interior dye. It covers easily, flows well and doesn't run (if sprayed in a reasonable manner), and the dry finish is exactly how a new car will look. If you chose a good quality dye and you've thoroughly washed any new components with detergent and still have differences in surface sheen, I would recommend that you re-shoot the new stuff so that it will match. But you will have to clean them all very well before shooting dye.
Thread Starter
Intermediate
Joined: Aug 2007
Posts: 28
Likes: 0
From: Everett Wa
7T1vette,
The dye was the 58-82 interior dye from zip. I don't know what that means for it being paint vs dye. Sounds like maybe it would be a good idea to remove all the parts from their plastic wrappings. It will be a while before I am able to install them.
wnmech,
Thanks for the pictures. I must agree, that looks great.
Does anyone have any suggestions for removing the old red dye from the parts. So far, my suspicions were confirmed and I can tell you paint stripper does NOT work too well.
Last edited by bmanops; Oct 7, 2009 at 09:26 AM.