



dizzy (literally) install, did I do this right?

Thread Starter
Team Owner


Joined: Mar 2002
Posts: 24,160
Likes: 78
 dizzy (literally) install, did I do this right?
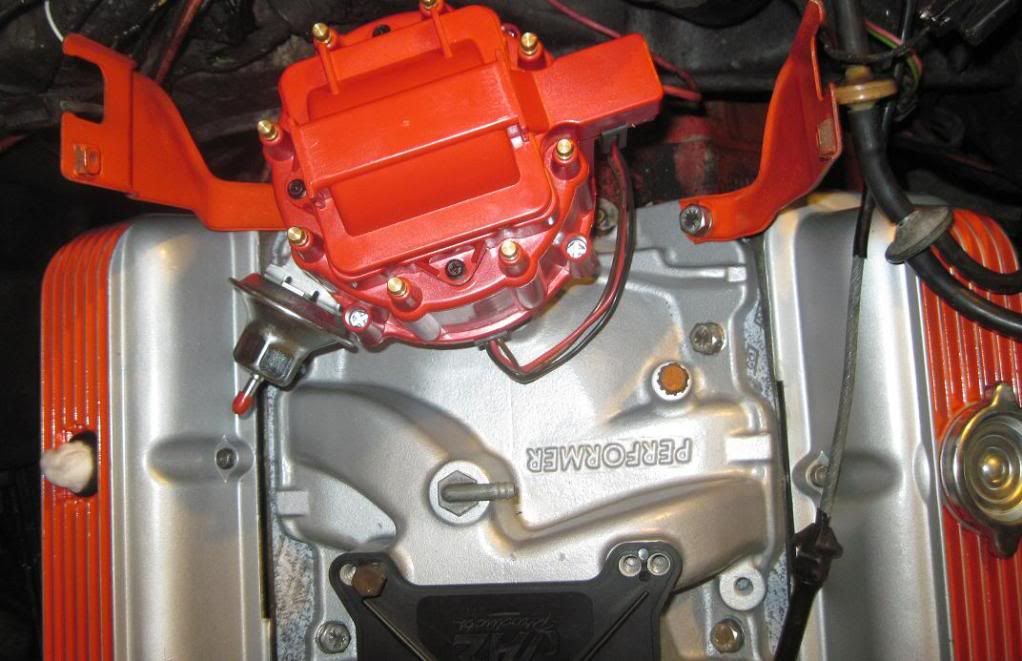
Ok, I'm pulling my hair out here. The old, original distributor that I pulled out was sitting more or less perpendicular to the engine (that is to say the 1,8 posts were). I have verified the new balancer is reading TDC correctly. I set the engine at 12* btdc, dropped in the distributor with it pointed at #1, and now it looks like this. 
And here's the balancer...
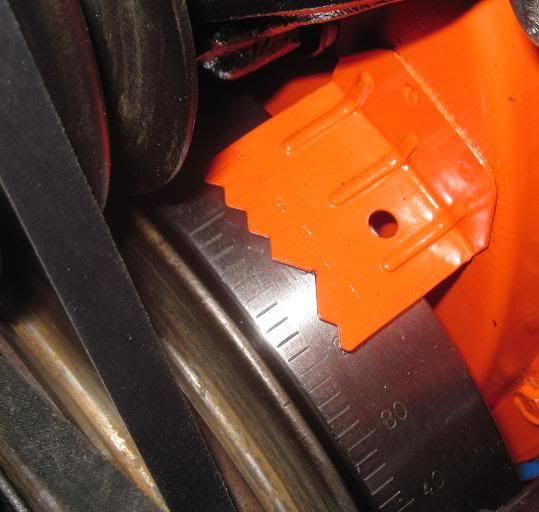
Did I screw something up, or is that normal? I've tried stabbing it one tooth more clockwise, but that skews the angle clockwise just about as much.
I have no idea if the original was timed correctly or not. The engine was running ... not great but it was running. But I do know the vacuum advance was non-functional.
And here's the balancer...
Did I screw something up, or is that normal? I've tried stabbing it one tooth more clockwise, but that skews the angle clockwise just about as much.
I have no idea if the original was timed correctly or not. The engine was running ... not great but it was running. But I do know the vacuum advance was non-functional.

Race Director

Joined: May 2006
Posts: 16,528
Likes: 53
From: Dayton, Ohio
I think your going 2 teeth if its going that much clockwise.Did you swap out the lower gear ? On some of the older engines while trying to get the vac nipple behind the bracket to minimize the cable angle I've had to flip the gear 180 degrees.
Thread Starter
Team Owner
Joined: Mar 2002
Posts: 24,160
Likes: 78
I dunno, Roger. I probably installed it a dozen times. I'm 93% sure I only rotated it one tooth. I count 13 teeth on the gear, so that equates to about 28* per tooth. And the difference between the first pic and this one ..
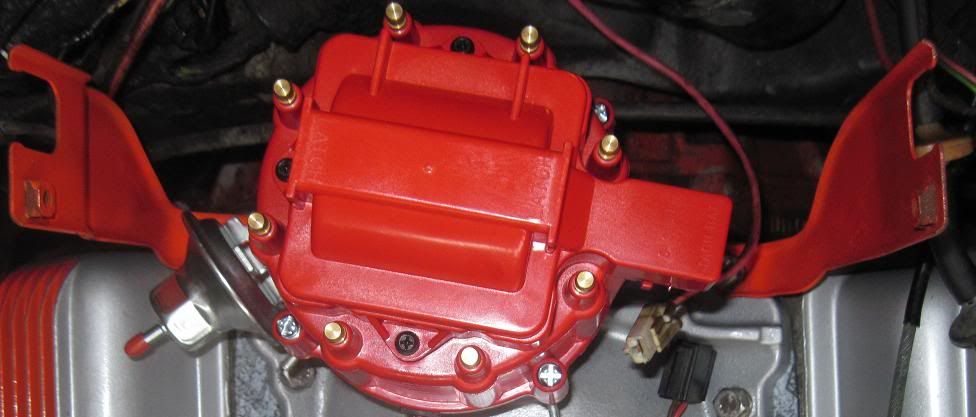
I would eyeball right around that much.
I think I follow what you're saying about the lower gear. Because there's an odd number of teeth on the gear, if I reinstall it 180* out that will change my rotor position by half a tooth. And judging by my pics that would probably put it spot on. Hmmmmmmm
Burning Brakes


Joined: May 2007
Posts: 1,042
Likes: 1
From: Greensboro NC
Went through the same thing when I first installed the HEI dizzy in my 69.
It looked exactly like your in picture #1.
I gave up, twisted the dizzy so the orientation was "straight" across, connected everything and hit the key.
Car immediately started up and ran perfectly.....
It looked exactly like your in picture #1.
I gave up, twisted the dizzy so the orientation was "straight" across, connected everything and hit the key.
Car immediately started up and ran perfectly.....

Instructor

Joined: Sep 2010
Posts: 229
Likes: 2
From: Grants Pass Oregon
Engine looks great. So, i take it the engine was running good before you changed dist. ? I have to ask, way do some set their timming before installing the dist. ? I have always set my timming at TDC, then take a long screw driver, turn oil pump shift to line up with dist. gear with rotor pointing to #1 cyl. Drop in, fine tune.
Thread Starter
Team Owner
Joined: Mar 2002
Posts: 24,160
Likes: 78
Went through the same thing when I first installed the HEI dizzy in my 69.
It looked exactly like your in picture #1.
I gave up, twisted the dizzy so the orientation was "straight" across, connected everything and hit the key.
Car immediately started up and ran perfectly.....
It looked exactly like your in picture #1.
I gave up, twisted the dizzy so the orientation was "straight" across, connected everything and hit the key.
Car immediately started up and ran perfectly.....
Thread Starter
Team Owner
Joined: Mar 2002
Posts: 24,160
Likes: 78

I'm not trying to set timing per se. I just want the damn thing to start and run halfway decent. I'll fine tune with a light once everything is buttoned up.
Corvette Stories
The Best of Corvette for Corvette Enthusiasts

Corvette & Porsche 911: How Two Icons Conquered the Last 25 Years
Joe Kucinski
2027 Chevrolet Silverado 1500 First Look: Everything You NEED to Know!
Michael S. Palmer
5 Best & 5 Worst Corvette Daily Drivers
Joe Kucinski
The Headlights of Every Corvette Generation Explained
Joe Kucinski
5 Best & 5 Most Overrated Corvette Track Packages of All Time!
Joe Kucinski
Every 2027 Corvette Engine Explained
Joe Kucinski
Designer Imagines A Corvette That Looks More Like a Corvette Than the Corvette
Verdad Gallardo
10 Ugly Corvettes That We Still Kinda Love
Joe Kucinski
Top 10 Most Expensive Corvettes Ever Sold on Bring A Trailer
Brett Foote
Race Director


Joined: Jan 2000
Posts: 12,399
Likes: 247
From: San Jose CA
It's a VERY good idea to set the timing correctly before you start it.
Your oil pump pickup has most likely shifted and isn't letting the distributor line up properly. Conveniently, the direction the rotor should end up pointing for #1 at 0* is going to be in the same line as the little bar on the bottom of the distributor gear. Eyeball it, and turn the oil pump pickup so that it matches that line.
That should get you where you want to be.
Your oil pump pickup has most likely shifted and isn't letting the distributor line up properly. Conveniently, the direction the rotor should end up pointing for #1 at 0* is going to be in the same line as the little bar on the bottom of the distributor gear. Eyeball it, and turn the oil pump pickup so that it matches that line.
That should get you where you want to be.
Thread Starter
Team Owner
Joined: Mar 2002
Posts: 24,160
Likes: 78
It's a VERY good idea to set the timing correctly before you start it.
Your oil pump pickup has most likely shifted and isn't letting the distributor line up properly. Conveniently, the direction the rotor should end up pointing for #1 at 0* is going to be in the same line as the little bar on the bottom of the distributor gear. Eyeball it, and turn the oil pump pickup so that it matches that line.
That should get you where you want to be.
Your oil pump pickup has most likely shifted and isn't letting the distributor line up properly. Conveniently, the direction the rotor should end up pointing for #1 at 0* is going to be in the same line as the little bar on the bottom of the distributor gear. Eyeball it, and turn the oil pump pickup so that it matches that line.
That should get you where you want to be.
Race Director
Joined: Jan 2000
Posts: 12,399
Likes: 247
From: San Jose CA
Pretty much every time I've pulled a distributor, that $#!@-ing thing shifts on me. (oil pump pickup)

Race Director

Joined: Mar 2006
Posts: 14,112
Likes: 28
From: Florida
Try setting your timing where you finally want it, 34 or 36 or whatever at rpm without removing the dist. then if not aligned correctly remove the cap, one hand turning the rotor and the other lifting slowly on the housing until you can feel the gear move a tooth or however many teeth you need. You will be able to feel and count each tooth. If the pump shaft prevents the dist from fully seating, then just have someone bump the engine over while putting pressure down on the housing. Fastest way I've found.
If you still can't get it aligned, then install the gear on the shaft 180° and repeat, that should align it.
Here is one set to 35°

If you still can't get it aligned, then install the gear on the shaft 180° and repeat, that should align it.
Here is one set to 35°
Instructor
Joined: Sep 2010
Posts: 229
Likes: 2
From: Grants Pass Oregon
It's a VERY good idea to set the timing correctly before you start it.
Your oil pump pickup has most likely shifted and isn't letting the distributor line up properly. Conveniently, the direction the rotor should end up pointing for #1 at 0* is going to be in the same line as the little bar on the bottom of the distributor gear. Eyeball it, and turn the oil pump pickup so that it matches that line.
That should get you where you want to be.
Your oil pump pickup has most likely shifted and isn't letting the distributor line up properly. Conveniently, the direction the rotor should end up pointing for #1 at 0* is going to be in the same line as the little bar on the bottom of the distributor gear. Eyeball it, and turn the oil pump pickup so that it matches that line.
That should get you where you want to be.
I guess i should have asked about what cam you have. ie= my car says 8 degrees BTDC. My cam says to start @ 2-4 degrees so i find with 0 degrees, i have a little more to play with.
Last edited by 78 silver 78; Jan 2, 2011 at 03:14 PM. Reason: add on
Burning Brakes
Joined: May 2008
Posts: 1,116
Likes: 5
From: Middleburg Florida
Might be stating the obvious here, but you only show the distributor with the cap on in your pics. That's not really what's important at this point. Bring the engine up to TDC (if you don't know how ask) and then drop the dizzy in so the rotor is pointing at where you want the number one spark plug wire to be. You can use a long screw driver to turn the oil pump drive where ever you need it to be.
Thread Starter
Team Owner
Joined: Mar 2002
Posts: 24,160
Likes: 78
Might be stating the obvious here, but you only show the distributor with the cap on in your pics. That's not really what's important at this point. Bring the engine up to TDC (if you don't know how ask) and then drop the dizzy in so the rotor is pointing at where you want the number one spark plug wire to be. You can use a long screw driver to turn the oil pump drive where ever you need it to be.
Le Mans Master

Joined: Jan 2003
Posts: 6,575
Likes: 1
From: Tuttle OK
Cruise-In VIII Veteran
Thread Starter
Team Owner
Joined: Mar 2002
Posts: 24,160
Likes: 78
Originally Posted by Shark Racer
Your oil pump pickup has most likely shifted and isn't letting the distributor line up properly.
I don't want to seem ungrateful for any advice given, but the thing about the oil pump is it's incredibly obvious when you haven't engaged it correctly. As I mentioned, the dizzy flange will stand off the surface of the manifold by about 3/8" if it's not engaged correctly. There's really no way for the oil pump to skew the rotor position because you either engage it or not. There's no middle ground with that one. The easiest way I found was to just turn the rotor CCW about 2" back from the #1 post position, lower it in, then manually turn the crank over until the dizzy drops down the rest of the way. The reason this works is because you've already engaged the cam gear. The oil pump shaft won't hold you up high enough to keep from engaging the cam gear. Hence the rotor-cam relationship won't change at this point. So you just crank crank crank and at some point *thunk* the dizzy drops down the rest of the way ... easy as pie.


Melting Slicks


Joined: Oct 2002
Posts: 2,317
Likes: 111
From: St Louis MO
Without the distributor cap off, one can't see where the rotor is pointing. Further, if you can't start it, you don't know where the distributor body (cap assy) will end up pointing.
Here's the things you've done right:
Setting the crank to 12 degrees BTDC, however, did you ensure that it's at TDC-firing for #1, or is it at TDC-firing for #6?
If you did not check this, look at the #3 intake valve - is it open? (pull the left hand valve cover and look.) If it is, you're at TDC-firing for #1; if it's not, you're at firing for #6. Whichever you find, no need to turn the crank another turn, just drop in the distributor so that the rotor points to the post for whichever cylinder is at TDC-firing (NOT TDC-overlap). Ensure that the #1 and #8 dist. posts are perpendicular to the engine's center-line.
For the advanced tuner, the body of the dist will need to be rotated a bit more to get the initial timing right... the best way is to position the body of the distributor to align the 8 inward-facing points of the stator pickup with the 8 outward-facing points of the rotor. This is exactly when the HEI triggers (technically, just when the points pass exact alignment.)
For even better accuracy, pull up on the distributor shaft as you do the above alignment - this takes out the running clearance as the shaft is normally forced upwards by the camshaft drive gear against the distributor gear. As the shaft moves upwards to the running position, the rotor will turn counter-clockwise a degree or two compared to the static position.
Using the above procedure will get you running quite well, at least enough to put a timing light on the engine at do a final timing set.
Finally, you should hook up the vacuum advance to the canister.
__________________
1965 Convertible
NCCC 2B National Drag Record Holder
11.34 second 1/4 Mile
Here's the things you've done right:
Setting the crank to 12 degrees BTDC, however, did you ensure that it's at TDC-firing for #1, or is it at TDC-firing for #6?
If you did not check this, look at the #3 intake valve - is it open? (pull the left hand valve cover and look.) If it is, you're at TDC-firing for #1; if it's not, you're at firing for #6. Whichever you find, no need to turn the crank another turn, just drop in the distributor so that the rotor points to the post for whichever cylinder is at TDC-firing (NOT TDC-overlap). Ensure that the #1 and #8 dist. posts are perpendicular to the engine's center-line.
For the advanced tuner, the body of the dist will need to be rotated a bit more to get the initial timing right... the best way is to position the body of the distributor to align the 8 inward-facing points of the stator pickup with the 8 outward-facing points of the rotor. This is exactly when the HEI triggers (technically, just when the points pass exact alignment.)
For even better accuracy, pull up on the distributor shaft as you do the above alignment - this takes out the running clearance as the shaft is normally forced upwards by the camshaft drive gear against the distributor gear. As the shaft moves upwards to the running position, the rotor will turn counter-clockwise a degree or two compared to the static position.
Using the above procedure will get you running quite well, at least enough to put a timing light on the engine at do a final timing set.
Finally, you should hook up the vacuum advance to the canister.
__________________
1965 Convertible
NCCC 2B National Drag Record Holder
11.34 second 1/4 Mile
Thread Starter
Team Owner
Joined: Mar 2002
Posts: 24,160
Likes: 78
Here's the things you've done right:
Setting the crank to 12 degrees BTDC, however, did you ensure that it's at TDC-firing for #1, or is it at TDC-firing for #6?
Setting the crank to 12 degrees BTDC, however, did you ensure that it's at TDC-firing for #1, or is it at TDC-firing for #6?
For the advanced tuner, the body of the dist will need to be rotated a bit more to get the initial timing right... the best way is to position the body of the distributor to align the 8 inward-facing points of the stator pickup with the 8 outward-facing points of the rotor. This is exactly when the HEI triggers (technically, just when the points pass exact alignment.)
Ensure that the #1 and #8 dist. posts are perpendicular to the engine's center-line.
 Am I thinking right?
Damnit I feel stupid now.
 I'll try to remedy this (again) tonight.
edit: On second thought, I think my problem is my #1 plug is actually at the 7 o'clock position and not the 5 o'clock. I've read that some SBCs have it here? So if I go 2 cogs CW on the rotor for 55.4* and then back the stator (dist. body) 10.4* CCW to line it up with the post at 7 o'clock ... what do you bet that would line up the dist.?
Last edited by wcsinx; Jan 3, 2011 at 06:05 PM.