WHAT IS THE BEST WAY TO PUT NEW COIL SPRINGS BACK IN


Front springs

Burning Brakes

Joined: Apr 2009
Posts: 807
Likes: 2
From: VIRGINIA BEACH VIRGINIA
I placed the springs in the upper and lower control arm. Make sure you get them in the grooves. Then I used a floor jack under the lower control arm and jacked it up high enough to put the spindle on. Do it carefully because you do not want the spring to jump out.
My upper and lower control arm had a spot for each end of the coil. If you don't seat it in there correctly, your car will sit off balance (one side higher than the other) and you will have to pull it out again and spin it a little then put the spindle back on.
Dan
My upper and lower control arm had a spot for each end of the coil. If you don't seat it in there correctly, your car will sit off balance (one side higher than the other) and you will have to pull it out again and spin it a little then put the spindle back on.
Dan
Le Mans Master


Joined: Oct 2007
Posts: 7,471
Likes: 988
From: RI, Now Franklin/Nashville TN
I placed the springs in the upper and lower control arm. Make sure you get them in the grooves. Then I used a floor jack under the lower control arm and jacked it up high enough to put the spindle on. Do it carefully because you do not want the spring to jump out.
My upper and lower control arm had a spot for each end of the coil. If you don't seat it in there correctly, your car will sit off balance (one side higher than the other) and you will have to pull it out again and spin it a little then put the spindle back on.
Dan
My upper and lower control arm had a spot for each end of the coil. If you don't seat it in there correctly, your car will sit off balance (one side higher than the other) and you will have to pull it out again and spin it a little then put the spindle back on.
Dan
Burning Brakes
Joined: Dec 2005
Posts: 992
Likes: 56
From: Baldwinsville, NY
I just completed a front end job and used a Moog spring which was shorter than the original one.
The first side I had the upper and lower arms on and the spindle connected to the lower arm, it was next to impossible to get the top of the spring in place. I ended up taking the spindle and upper arm off and using a floor jack under the lower arm. After several up and down and shifting the spring aroung, beer, timeout the spring found the upper pocket. The other side when in with little effort.
I should have done the front end first five years ago. My car drives straight, smooth, and no vibration.
Good luck, Mike
Le Mans Master


Joined: Nov 2003
Posts: 5,773
Likes: 694
From: Maryland
St. Jude Donor '05, '09, '15

And set the top of the new spring in the upper spring pocket at the stop and let the bottom seat wherever it may.
Corvette Stories
The Best of Corvette for Corvette Enthusiasts

Corvette & Porsche 911: How Two Icons Conquered the Last 25 Years
Joe Kucinski
2027 Chevrolet Silverado 1500 First Look: Everything You NEED to Know!
Michael S. Palmer
5 Best & 5 Worst Corvette Daily Drivers
Joe Kucinski
The Headlights of Every Corvette Generation Explained
Joe Kucinski
5 Best & 5 Most Overrated Corvette Track Packages of All Time!
Joe Kucinski
Every 2027 Corvette Engine Explained
Joe Kucinski
Designer Imagines A Corvette That Looks More Like a Corvette Than the Corvette
Verdad Gallardo
10 Ugly Corvettes That We Still Kinda Love
Joe Kucinski
Top 10 Most Expensive Corvettes Ever Sold on Bring A Trailer
Brett FooteBurning Brakes


Joined: Mar 2010
Posts: 944
Likes: 15
From: Valdosta Georgia
Racer


Joined: Apr 2008
Posts: 406
Likes: 46
From: Lebanon OH
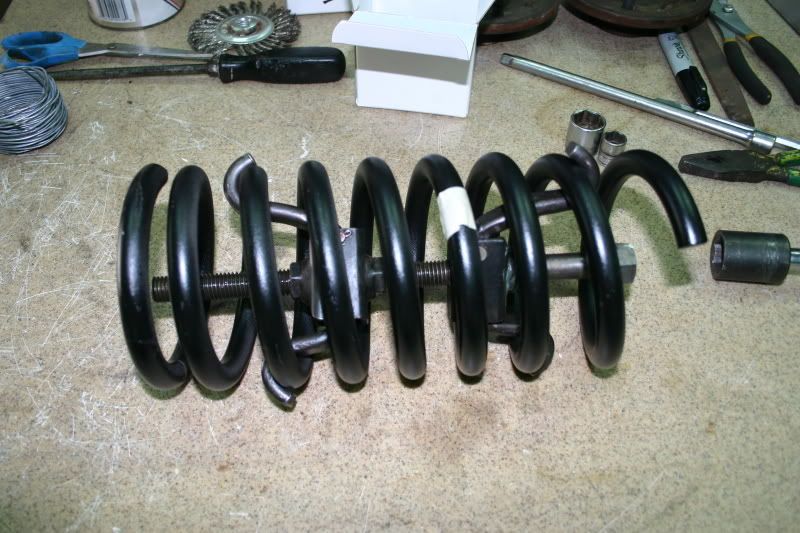
I rebuilt the front end in my 79, and I used a spring compression tool. After compressing the spring, you will have to disconnect the lower control arm to get the old spring out and the new one in. The idea is to compress the spring so it's length is less than the distance between the lower control arm and frame mount. This allows you to place the spring in the lower control arm grove so it doesn't squeak. Put the compressed spring between the control arm and frame, and bolt the lower control arm in place. Once that's done, slowly decompress the spring so it rests in the grove, and everything should come together. I hope that helps.
Team Owner


Joined: Sep 2006
Posts: 31,338
Likes: 4,458
From: Westminster Maryland
Hi,
There's a small diameter hole in the bottom of the spring pocket in the lower arm. I believe that the spring should be placed so you can just see the cut end of the coil when you look through the hole. This detail helps get the same ride height on each side.
Good Luck!
Regards,
Alan
There's a small diameter hole in the bottom of the spring pocket in the lower arm. I believe that the spring should be placed so you can just see the cut end of the coil when you look through the hole. This detail helps get the same ride height on each side.
Good Luck!
Regards,
Alan
Race Director

Joined: Mar 2006
Posts: 14,112
Likes: 28
From: Florida
Hi,
There's a small diameter hole in the bottom of the spring pocket in the lower arm. I believe that the spring should be placed so you can just see the cut end of the coil when you look through the hole. This detail helps get the same ride height on each side.
Good Luck!
Regards,
Alan
There's a small diameter hole in the bottom of the spring pocket in the lower arm. I believe that the spring should be placed so you can just see the cut end of the coil when you look through the hole. This detail helps get the same ride height on each side.
Good Luck!
Regards,
Alan
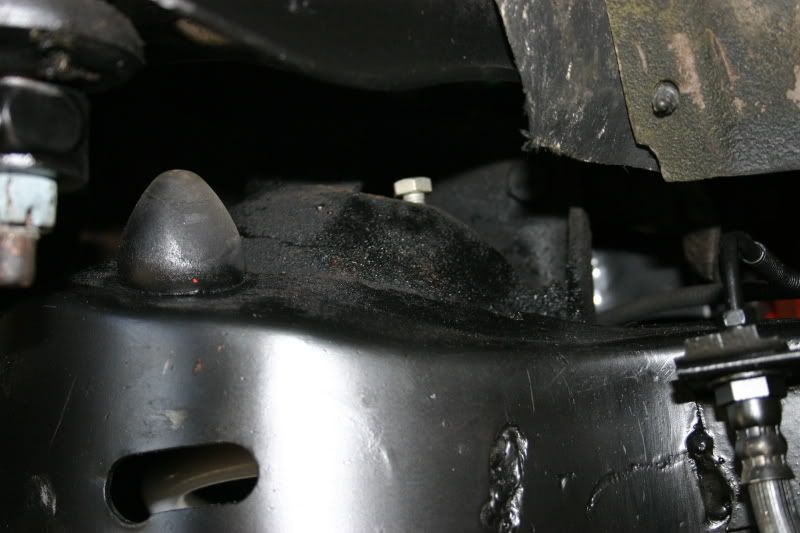
The general consensus it to align the springs from the top, supposedly as the factory did. there is also a guide hole up there.
Small bolts will screw in by themselves with no fuss, temporarily. to butt against, for spring installation.
Here are temp bolts top and bottom.