


intake manifold restoration
Thread Starter
Burning Brakes


Joined: Feb 2011
Posts: 850
Likes: 12
From: Shakopee MN
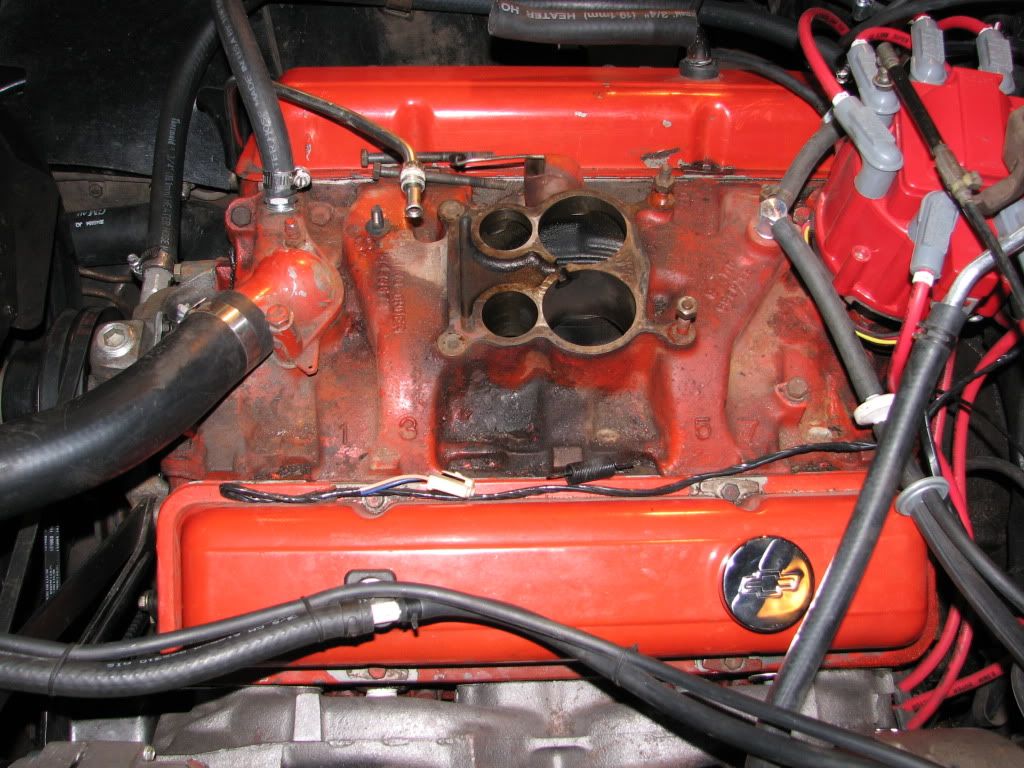
Ok, since I finally got around to sending in my carb for a rebuild to SMI, I'm stuck here looking at my old intake manifold and noticing just how ugly it looks. So the question is, just how hard of a job is it to remove the manifold, have it blasted clean, repaint, and the reinstall? What is the best paint to use or do people have them powder coated?
It's just the stock manifold for my Rochester qjet. Is there a better intake I should be using instead with my qjet? My coupe is a base model.
Here are some pictures of the ugliness:


It's just the stock manifold for my Rochester qjet. Is there a better intake I should be using instead with my qjet? My coupe is a base model.
Here are some pictures of the ugliness:
Race Director


Joined: May 2006
Posts: 18,737
Likes: 2,582

Le Mans Master


Joined: Jun 2004
Posts: 6,231
Likes: 65
From: Seattle WA
St. Jude Donor '14
You could upgrade, but I'd double-check on what's going to fit under your stock hood.
It's not a big job to R&R the manifold - 2-4 hours on-and-off.
Otherwise, the manifold restoration is pretty easy. You will want to remove the heat shield on the bottom by removing the rivets. Then get it blasted and either powdercoated or painted - you'll have to make a judgement call on how close to the factory paint you want to get. Reinstall the heat shield by tapping the holes for screws.
Thread Starter
Burning Brakes
Joined: Feb 2011
Posts: 850
Likes: 12
From: Shakopee MN
Do I need to drain some coolant before pulling it off? I've never done this before so it's all new to me. What does this heat shield look like and why would I need to take it off?
Le Mans Master
Joined: Jun 2004
Posts: 6,231
Likes: 65
From: Seattle WA
St. Jude Donor '14
A sevice manual is a very, very smart investment 
Yes, you'll need to drain the coolant as there's water in the manifold.
The heat shield is just a bit of tin on the bottom of the manifold. It's intended to keep hot oil off the bottom of the plenum to avoid heating the intake charge. It fills with a very hard goo that kind of defeats the purpose. You can just take it off and leave it off if you choose...but you really need to clean all that garbage out.
It's also a chance to address a lot of other service issues like vacuum hoses, etc.
Last edited by billla; Sep 28, 2011 at 05:36 PM.
Team Owner


Joined: Jan 2006
Posts: 37,637
Likes: 3,118
From: Crossville TN
If I were you, I would just mask off the throttle openings (duct tape for better strength), cut an opening in an inexpensive [paper] drop cloth to use for masking off the intake from other 'stuff', vacuum/clean off the top of the intake and spray paint it with Dupli-Color engine enamel (good to 500*F). You can remove the distributor or leave it there and mask around it.
Allow fresh paint to cure at least 2 days to be sturdy enough for reassembly. Full cure takes about 7 days.
Allow fresh paint to cure at least 2 days to be sturdy enough for reassembly. Full cure takes about 7 days.
Safety Car

Joined: Oct 2007
Posts: 3,729
Likes: 267
From: Austin Texas
Corvette of the Year Winner 2017
2016 C3 of Year Finalist
not worth removing just to clean and paint.
only remove if your replacing it.
get some degreaser and clean and paint in place.
Tin foil works great to mask off / protect parts you do not want to paint.
only remove if your replacing it.
get some degreaser and clean and paint in place.
Tin foil works great to mask off / protect parts you do not want to paint.
Corvette Stories
The Best of Corvette for Corvette Enthusiasts

Top 10 Most Expensive Corvettes Ever Sold on Bring A Trailer
Brett Foote
10 Things Every Corvette Owner Needs (2026 Edition)
Michael S. Palmer
8 Most "Only Corvette Owners Understand" Quirks and Problems
Pouria Savadkouei
10 Reasons the C6 Z06 is Still A Performance Benchmark After 20 Years
Joe Kucinski
How Much Horsepower Every Corvette Engine "LOST" in 1972
Joe Kucinski
Top 10 DOs and DON'Ts for Protecting Your Convertible Top!
Michael S. Palmer
Top 10 Most Explosive Corvettes Ever Made: Power-to-Weight Ratio Ranked!
Joe Kucinski
150 hp to 1,250 hp: Every Corvette Generation Compared by the Specs That Matter
Joe Kucinski
8 Coolest Corvette Pace Cars (and Replicas) of All Time
Verdad Gallardo
Le Mans Master
Joined: Jun 2004
Posts: 6,231
Likes: 65
From: Seattle WA
St. Jude Donor '14
If it's iron - not aluminum - blasting isn't an issue  And if it's getting painted, a light media or glass-bead isn't going to mar the surface from a restoration perspective.
I've never seen so much to-do over removing an intake - I must do it too often to think it's a big deal
And if it's getting painted, a light media or glass-bead isn't going to mar the surface from a restoration perspective. I've never seen so much to-do over removing an intake - I must do it too often to think it's a big deal
Drifting

Joined: Mar 2011
Posts: 1,271
Likes: 1
From: PA
Yea. Paint stripper and some elbow grease. You'll be happy with the results. I know lots of guys are reluctant to pull the distributor, drain some coolant and unhook hoses but it really is easy. The hardest part for a " newbie " is the distributor pull. And that's not too bad if you are careful....
Racer

Joined: Sep 2009
Posts: 437
Likes: 3
From: Alvin Texas
I agree with 69Vett, use degreaser and scrub it down, mask with aluminum foil.
You should drain coolant to do a better job on the front end. Remove the choke stove on the right side and clean it up, paint with high temp silver would be a good touch. Who knows, you may be able to do something with the front of the motor while you are at it. You could spray some engine paint into a container and use a brush, I've done that several times and it works fine without a mess. (Paint remover may make a mess.)
You should drain coolant to do a better job on the front end. Remove the choke stove on the right side and clean it up, paint with high temp silver would be a good touch. Who knows, you may be able to do something with the front of the motor while you are at it. You could spray some engine paint into a container and use a brush, I've done that several times and it works fine without a mess. (Paint remover may make a mess.)
Le Mans Master
Joined: Jun 2004
Posts: 6,231
Likes: 65
From: Seattle WA
St. Jude Donor '14

And the results won't be as good...and the gunk will still be under the plenum.
...but the last time I made a comment like that I really torqued someone off

Thread Starter
Burning Brakes
Joined: Feb 2011
Posts: 850
Likes: 12
From: Shakopee MN
Yea. Paint stripper and some elbow grease. You'll be happy with the results. I know lots of guys are reluctant to pull the distributor, drain some coolant and unhook hoses but it really is easy. The hardest part for a " newbie " is the distributor pull. And that's not too bad if you are careful....
Does anyone have pictures of their intake where they left it on the car and just used paint remover and cleaned it before painting?
It's not an aluminum intake, it's the stock steel intake that I presume came with the car. Taking it out and having it glass beaded then painted sounded like the best option as far as looks go.
Safety Car


Joined: Jun 2005
Posts: 3,775
Likes: 4
ive got some pictures from a few years ago when i did that. looked great for about 6 months, then it all started cracking and peeling off.
i cleaned and spray painted the motor in the car once, and i will never do it again. it takes more work and effort to do it in the car, and its a poor finish. compared to doing it out of the car and stripping it down fully.
i cleaned and spray painted the motor in the car once, and i will never do it again. it takes more work and effort to do it in the car, and its a poor finish. compared to doing it out of the car and stripping it down fully.
Last edited by another-user; Sep 29, 2011 at 02:06 AM.
Thread Starter
Burning Brakes
Joined: Feb 2011
Posts: 850
Likes: 12
From: Shakopee MN
However for someone who's never done something like this before, I want to know what the water's like before jumping in. So yes I'm baring my newbness to the world. I'm not sure if it's just breaking a bolt that's holding me back or just the "I've never done this before" fear.
I had roughly the same fear before I tore apart my front suspension. But in that case, I new a place I could easily get cheap parts, and the main bolts holding to the car were huge and were of little risk of snapping. If I were to break a bolt in my intake, I'd have no idea of how tough it may be to get it out and just pulling the engine out isn't something I can do in my current setup.
BTW, the front suspension turned out great and that fear is gone if I had to do it again.
PS - do I have to drain all of the coolant or just enough to drop it down so it doesn't leak all over the place when I remove it?
Last edited by StingrayLust; Sep 29, 2011 at 02:13 AM.
Thread Starter
Burning Brakes
Joined: Feb 2011
Posts: 850
Likes: 12
From: Shakopee MN
ive got some pictures from a few years ago when i did that. looked great for about 6 months, then it all started cracking and peeling off.
i cleaned and spray painted the motor in the car once, and i will never do it again. it takes more work and effort to do it in the car, and its a poor finish. compared to doing it out of the car and stripping it down fully.
i cleaned and spray painted the motor in the car once, and i will never do it again. it takes more work and effort to do it in the car, and its a poor finish. compared to doing it out of the car and stripping it down fully.
But this also brings up a good point, maybe this is a lot of work for nothing as it will just look somewhat this bad in a year from now?
Safety Car
Joined: Jun 2005
Posts: 3,775
Likes: 4
should just be enough so it doesnt leak out when you pull the it off. personally, id just open the petcock and let it all drain out into some clean buckets and put lids on it. as long as it still looks clean and useable, id strain it and just dump it all back in the car.
if your intake bolts are like mine, theyll be loose as hell already. just put a wrench on them and give it a go. youll get a pretty quick idea if theyre going to come out or not.
if your intake bolts are like mine, theyll be loose as hell already. just put a wrench on them and give it a go. youll get a pretty quick idea if theyre going to come out or not.
Safety Car
Joined: Jun 2005
Posts: 3,775
Likes: 4
this is where i just started cleaning all the crap off for the first time

after spray bombing, and way too many hours of work. picture taken 7/7/09

april of 11, maybe 1500 miles later. its hard to see, but the front of the block and heads has alot of paint lifting already.

and finally, 1st of sept. after the block and heads were wire wheeled down to shiny metal, heavily degreased about 100x over, metal etched, primed, and painted. i couldnt tell you what this will look like a year or two from now, but i sure hope it still looks this good.

with all this said, my front and rear suspension still look great over all. the rear suspension is about 3 years old, front is 2. every piece on there was blasted, primed, and painted with rustoleum. id be willing to guess that those components are going to take a hell of alot more beating from the elements and the road then the motor will ever see, and just with the blasting, painting and priming, theyve held up 10x better than the spray bombed motor did.
after spray bombing, and way too many hours of work. picture taken 7/7/09
april of 11, maybe 1500 miles later. its hard to see, but the front of the block and heads has alot of paint lifting already.
and finally, 1st of sept. after the block and heads were wire wheeled down to shiny metal, heavily degreased about 100x over, metal etched, primed, and painted. i couldnt tell you what this will look like a year or two from now, but i sure hope it still looks this good.
with all this said, my front and rear suspension still look great over all. the rear suspension is about 3 years old, front is 2. every piece on there was blasted, primed, and painted with rustoleum. id be willing to guess that those components are going to take a hell of alot more beating from the elements and the road then the motor will ever see, and just with the blasting, painting and priming, theyve held up 10x better than the spray bombed motor did.