


Power Steering Control Valve Removal
Melting Slicks


Joined: Aug 2012
Posts: 2,548
Likes: 379
From: Woodinville WA
Hi ,
Not sure why everyone says remove the pitman arm , unless i am misunderstanding what everyone is saying .
Get yourself a quality ball joint splitter, not a pickle fork ,put it on the ball joint where the valve is joined to the pitman arm , tighten the long bolt and it should break the joint . If it gets really hard to turn the bolt and you feel its going to break or damage something leave it under tension and just give the side of the pitman arm a good blow with a hammer , the shock should break the joint .
Dont forget the way your hoses came off , its important . Unscrew the valve from the steering shaft , fit a new kit , grease the joint and re-fit . Dont forget to centre the valve once you have the engine running and have bled the power steering .
See Jim Shea's thread on power steering , follow his way of doing the job correctly and you wont have any problems at all .
John
Racer

Joined: Jun 2011
Posts: 300
Likes: 3
From: kempton park Gauteng
hi ,
Not with you on that one !! i removed my steering valve without removing the pitman arm . Maybe i am misunderstanding people when they say they remove the pitman arm . The arm is removed from the steering box , the valve is broken and removed from the pitman arm .
This is how i took off mine , i took off the pitman arm from the steering box when i unbolted the steering box from the car and put the steering box in a vice to hold it and get a proper puller on the pitman arm .
john
the valve threads onto the steering linkage, so you have to remove the pitman arm to unthread the valve. Could you rebuilt it on the car? yes, could you also lose all those cool little pieces that would simply sit in the valve if you took it off and rebuilt it on your bench? that depends - on how familiar you are with a b**tard-child named Murphy.

Burning Brakes

Joined: Mar 2011
Posts: 969
Likes: 1
From: NJ
Don't mean to steal the thread but I'm doing the same job right now. I just unbolted everything today, disconnected the hoses and will be taking the valve off the next few days.
There is a load of grime and dirt all over the valve, damper and hoses. What is the best way, best product to clean all the components. Can I dip everything in something to make sure the grime and dirt that made its way into the hoses while unscrewing them gets flushed out?
I just want to be careful as to not put cleaning products where they're not supposed to go.
Thanks
Instructor
Joined: May 2012
Posts: 105
Likes: 12
From: Rockford, IL
Don't mean to steal the thread but I'm doing the same job right now. I just unbolted everything today, disconnected the hoses and will be taking the valve off the next few days.
There is a load of grime and dirt all over the valve, damper and hoses. What is the best way, best product to clean all the components. Can I dip everything in something to make sure the grime and dirt that made its way into the hoses while unscrewing them gets flushed out?
I just want to be careful as to not put cleaning products where they're not supposed to go.
Thanks
There is a load of grime and dirt all over the valve, damper and hoses. What is the best way, best product to clean all the components. Can I dip everything in something to make sure the grime and dirt that made its way into the hoses while unscrewing them gets flushed out?
I just want to be careful as to not put cleaning products where they're not supposed to go.
Thanks

Le Mans Master


Joined: Apr 1999
Posts: 6,134
Likes: 46
From: Raleigh North Carolina
Instructor
Joined: May 2012
Posts: 105
Likes: 12
From: Rockford, IL

Heel & Toe
Joined: May 2014
Posts: 24
Likes: 17
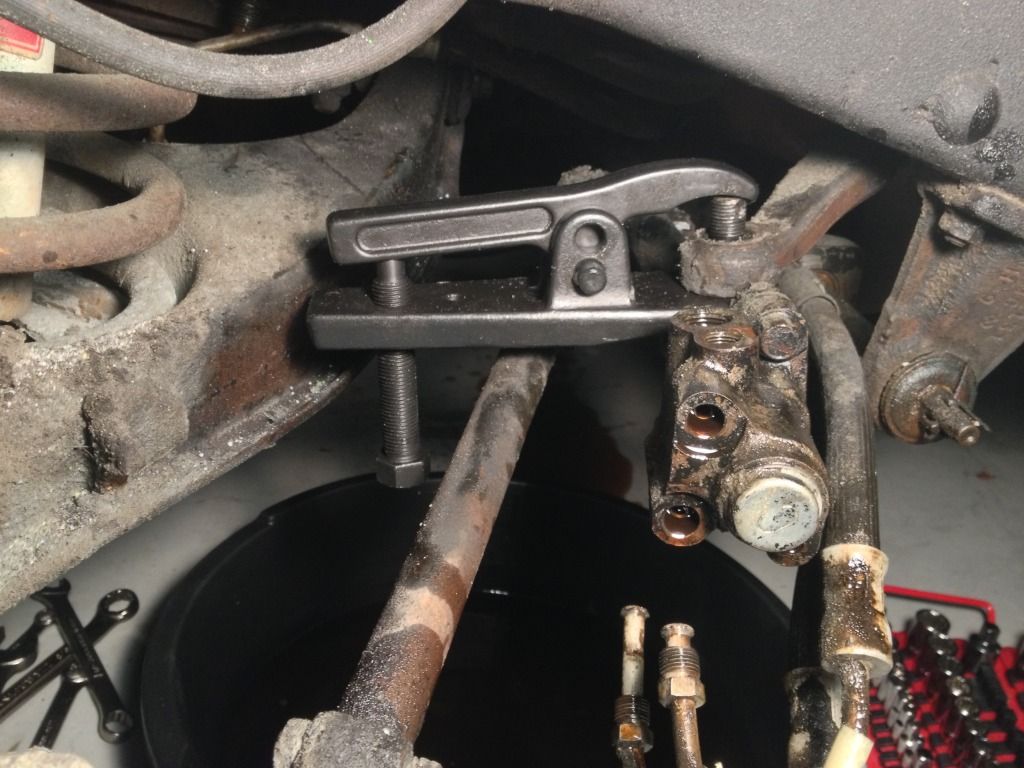
I found the perfect solution. I went to Harbor Freight and found a puller labelled for ball joints. Rather than the usual 2 or 3 hook style puller, it consists of a plate with a slot that slides in between the idler arm and valve, and a lever that goes extends over the contol valve stud. A bolt threads in from the bottom. Tighten the bolt and it pops apart with a bang. $20! Awesome! Here's a link:
http://www.harborfreight.com/3-4-qua...tor-99849.html
http://www.harborfreight.com/3-4-qua...tor-99849.html
Instructor
Joined: May 2012
Posts: 105
Likes: 12
From: Rockford, IL
That tool has come in handy several times. I used it when I changing out my wheel bearing hub on my DD. Works great.
Corvette Stories
The Best of Corvette for Corvette Enthusiasts

Top 10 Most Expensive Corvettes Ever Sold on Bring A Trailer
Brett Foote
10 Things Every Corvette Owner Needs (2026 Edition)
Michael S. Palmer
8 Most "Only Corvette Owners Understand" Quirks and Problems
Pouria Savadkouei
10 Reasons the C6 Z06 is Still A Performance Benchmark After 20 Years
Joe Kucinski
How Much Horsepower Every Corvette Engine "LOST" in 1972
Joe Kucinski
Top 10 DOs and DON'Ts for Protecting Your Convertible Top!
Michael S. Palmer
Top 10 Most Explosive Corvettes Ever Made: Power-to-Weight Ratio Ranked!
Joe Kucinski
150 hp to 1,250 hp: Every Corvette Generation Compared by the Specs That Matter
Joe Kucinski
8 Coolest Corvette Pace Cars (and Replicas) of All Time
Verdad Gallardo
Heel & Toe
Joined: Jan 2017
Posts: 22
Likes: 1
I found the perfect solution. I went to Harbor Freight and found a puller labelled for ball joints. Rather than the usual 2 or 3 hook style puller, it consists of a plate with a slot that slides in between the idler arm and valve, and a lever that goes extends over the contol valve stud. A bolt threads in from the bottom. Tighten the bolt and it pops apart with a bang. $20! Awesome! Here's a link:
http://www.harborfreight.com/3-4-qua...tor-99849.html
http://www.harborfreight.com/3-4-qua...tor-99849.html
Drifting


Joined: Mar 2011
Posts: 1,347
Likes: 121
From: Kernersville NC
Ted and Black C3,
The secret to using a hammer is to use TWO hammers or even a hammer and an axe! You need to rest the second hammer or axe head against one side of the Pitman arm adjacent to the control valve stud and whack the side 180 degrees away with the first hammer.
This action "shocks" the Pitman arm and causes it to let go of the stud and it should just fall out, providing you've removed the nut on the end.
Try it, and come back to me if it doesn't work.
Regards from Down Under.
aussiejohn
The secret to using a hammer is to use TWO hammers or even a hammer and an axe!
You need to rest the second hammer or axe head against one side of the Pitman arm adjacent to the control valve stud and whack the side 180 degrees away with the first hammer.This action "shocks" the Pitman arm and causes it to let go of the stud and it should just fall out, providing you've removed the nut on the end.
Try it, and come back to me if it doesn't work.
Regards from Down Under.
aussiejohn
Works the same on the rear shock / control arm mounts.