




1972 Front Bumper bracket issue?

Thread Starter
Racer


Joined: May 2012
Posts: 272
Likes: 46
From: Tulsa OK
 1972 Front Bumper bracket issue?
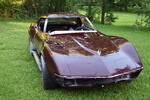
I recently bought a 72 coupe that ran into a dumpster. From the damage to the front bumper it wasn't to bad. The person I bought it from was not the person that wrecked it but he had done a lot of the fiberglass repair but he didn't get most of the brackets and braces from the guy that started the disassembly. I now have most of the parts to start putting it back together. The problem I'm having is the main support brace, the one that looks like a giant horseshoe, is about 2" from being able to meet the bumper mounting plate. Is there supposed to be something between those two pieces? Or could it be something else? I live in the Edmond Oklahoma if there is someone with experience with this close I wouldn't mind the extra set of eyes. If not I hope someone on here has the solution. Looking forward to your responses.
Thanks,
Adam
Thanks,
Adam

Melting Slicks


Joined: Jul 2001
Posts: 2,609
Likes: 12
From: Massapequa Park NY
That bracket should bolt up directly to the bumper. There is some adjustment, but not 2 inches worth. Check frame extensions on each side to see if the moved as well.
The front cross member is attached to the frame extensions and has about an inch or so of adjustment. How bad was the damage initially? Any pictures?
Jim
The front cross member is attached to the frame extensions and has about an inch or so of adjustment. How bad was the damage initially? Any pictures?
Jim
Safety Car


Joined: May 2008
Posts: 3,751
Likes: 720
From: Lafayette Louisiana
Suggestion
I bought a 72 with front bumper damage, same kind of thing. I have the damage photos, did not look too bad, the fiberglass was cracked, replacing the hood surround now.
I had a similar problem as you.
Figured out the horseshoe was slightly bent at the bottom, I bent that back, it was pretty obvious how that was supposed to look.
But it took me a while to figure out the first front vee crossmember was bent up too at the ends where it bolts to the frame horns.
I played with it awhile and bent it back pretty good, but not having a pattern of what to shoot for, I finally bought a new one. The new one got the horseshoe in the right place for the chrome bumper to line up properly.
Hope this helps. Also check your AIM and you can see what pieces go where, come to think of it, I think I was about 2" off too.
I had a similar problem as you.
Figured out the horseshoe was slightly bent at the bottom, I bent that back, it was pretty obvious how that was supposed to look.
But it took me a while to figure out the first front vee crossmember was bent up too at the ends where it bolts to the frame horns.
I played with it awhile and bent it back pretty good, but not having a pattern of what to shoot for, I finally bought a new one. The new one got the horseshoe in the right place for the chrome bumper to line up properly.
Hope this helps. Also check your AIM and you can see what pieces go where, come to think of it, I think I was about 2" off too.
Last edited by 20mercury; May 1, 2013 at 04:56 PM.

Le Mans Master

Joined: Jul 2006
Posts: 8,117
Likes: 104
From: charlotte north carolina
as 70bb posted, the bumper braces bolt to the frame extensions, which in turn bolt to the frame nose. the horsecollar bolts to the radiator support. all these pieces have a little play in their position.
loosen everything slightly and fasten the bumper in place using the fiberglass as a guide(tape the edges to prevent damage) and see if the braces can be made to line up. don't forget that the nose bar will lift the center slightly. it's best to have help when doing this-when i set my front bumper i was flat on my back using both hands and one leg to hold the bumper in place.
loosen everything slightly and fasten the bumper in place using the fiberglass as a guide(tape the edges to prevent damage) and see if the braces can be made to line up. don't forget that the nose bar will lift the center slightly. it's best to have help when doing this-when i set my front bumper i was flat on my back using both hands and one leg to hold the bumper in place.

Team Owner


Joined: Sep 2006
Posts: 31,226
Likes: 4,313
From: Westminster Maryland
Hi Adam,
The position of the center bumper bracket IS determined by the 4 bolts that mount it to the front crossmember. But there's only about a 1/2" of forward/backward adjustment at that point.
The front cross members position is critical too, and THAT is determined by the front frame extensions that bolt to the frame rails. (You see those extensions in the wheel wells.)
Since you're looking for 2 inches I think you need to verify that ALL those parts are where they're supposed to be and aren't bent/kinked. There's some adjustment in the bolts, but not 2".
Good Luck!
Regards,
Alan
The position of the center bumper bracket IS determined by the 4 bolts that mount it to the front crossmember. But there's only about a 1/2" of forward/backward adjustment at that point.
The front cross members position is critical too, and THAT is determined by the front frame extensions that bolt to the frame rails. (You see those extensions in the wheel wells.)
Since you're looking for 2 inches I think you need to verify that ALL those parts are where they're supposed to be and aren't bent/kinked. There's some adjustment in the bolts, but not 2".
Good Luck!
Regards,
Alan
Thread Starter
Racer
Joined: May 2012
Posts: 272
Likes: 46
From: Tulsa OK
Here are a few pics of that I got from the person I bought it from.


And here are a few I just took of the problem and of the frame extensions. Maybe someone can tell if something else is wrong.


Here's the damage done to the bumper

I should mention that all the brackets, except the frame extensions, are new or replacements bought from different corvette parts places.
Looking at the pics of the frame extensions it looks like they are pushed down in the front. But if I raise the up I think it will make my problem worse.


And here are a few I just took of the problem and of the frame extensions. Maybe someone can tell if something else is wrong.


Here's the damage done to the bumper

I should mention that all the brackets, except the frame extensions, are new or replacements bought from different corvette parts places.
Looking at the pics of the frame extensions it looks like they are pushed down in the front. But if I raise the up I think it will make my problem worse.
Le Mans Master
Joined: Jul 2006
Posts: 8,117
Likes: 104
From: charlotte north carolina
it may be the angle of the first picture, but it looks like the tip of the nose is too high. take some measurements as to the height of the front bumper with other reference points, such as the wheel wells or the crests over the wheels, or the height of the radiator support. other members could then check their own cars for comparison.
Team Owner
Joined: Sep 2006
Posts: 31,226
Likes: 4,313
From: Westminster Maryland
Hi Adam,
I agree with jnb that in the picture it looks like the front of the clip is tipped up.
Have you tried the fit of the hood, wiper grill and wiper door? That will tell you if the added part of front of the clip is pulled forward any.
If you try to temporarily fit the some more of the parts you may see a clue as to why the bumper brace is showing such a large gap.
Regards,
Alan
PS: That butt seam over the wheel arch is going to be a BEAR to finish. It's right where the clip wants to flex.
I agree with jnb that in the picture it looks like the front of the clip is tipped up.
Have you tried the fit of the hood, wiper grill and wiper door? That will tell you if the added part of front of the clip is pulled forward any.
If you try to temporarily fit the some more of the parts you may see a clue as to why the bumper brace is showing such a large gap.
Regards,
Alan
PS: That butt seam over the wheel arch is going to be a BEAR to finish. It's right where the clip wants to flex.
Corvette Stories
The Best of Corvette for Corvette Enthusiasts

Top 10 Most Explosive Corvettes Ever Made: Power-to-Weight Ratio Ranked!
Joe Kucinski
150 hp to 1,250 hp: Every Corvette Generation Compared by the Specs That Matter
Joe Kucinski
8 Coolest Corvette Pace Cars (and Replicas) of All Time
Verdad Gallardo
Top 10 Corvette Engines RANKED by Peak Torque (70+ Years of Muscle!)
Joe Kucinski
Corvette ZR1X Will Be Pacing the Indy 500, And Could Probably Race, Too!
Verdad Gallardo
Top 10 Corvettes Coming to Mecum Indy 2026!
Brett Foote
Top 10 C9 Corvette MUST-HAVES to Fix These C8 Generation Flaws!
Michael S. Palmer
10 Revolutionary 'Corvette Firsts' Most People Don't Know
Joe Kucinski
5 Reasons to Upgrade to an LS6-Powered Corvette; 5 Reasons to Stay LT2
Michael S. Palmer
Thread Starter
Racer
Joined: May 2012
Posts: 272
Likes: 46
From: Tulsa OK
JNB,
You are right, the front end is sitting about 3-4 inches high I think. I was thinking this might be a suspension issue. Here are some pics and measurements I just took.


The picture with the measurement is next to the passenger side of the horse collar brace. I also measured from the lip of the fender well to the center of the hub and that measurement is about 16.25".
You are right, the front end is sitting about 3-4 inches high I think. I was thinking this might be a suspension issue. Here are some pics and measurements I just took.


The picture with the measurement is next to the passenger side of the horse collar brace. I also measured from the lip of the fender well to the center of the hub and that measurement is about 16.25".


Safety Car
Joined: May 2008
Posts: 3,751
Likes: 720
From: Lafayette Louisiana
question and suggestion
Not sure but is the horseshoe pushing the front end up in this photo?
If yes, then I think your front vee crossmember is bent up where it connects to the two front frame horn extensions like mine was. Since the horseshoe bolts to the front vee crossmember, it will be tilted up too.
Did you replace the front vee crossmember also?, if so, then I am incorrect and forget this.
But, if you still have your original front vee crossmembers, try unbolting it and shim it with washers to tilt the front of it down. If this starts to solve your problem, then you need a new front crossmember (or heat and beat this one back to the correct position).
Hope this helps
If yes, then I think your front vee crossmember is bent up where it connects to the two front frame horn extensions like mine was. Since the horseshoe bolts to the front vee crossmember, it will be tilted up too.
Did you replace the front vee crossmember also?, if so, then I am incorrect and forget this.
But, if you still have your original front vee crossmembers, try unbolting it and shim it with washers to tilt the front of it down. If this starts to solve your problem, then you need a new front crossmember (or heat and beat this one back to the correct position).
Hope this helps
JNB,
You are right, the front end is sitting about 3-4 inches high I think. I was thinking this might be a suspension issue. Here are some pics and measurements I just took.
The picture with the measurement is next to the passenger side of the horse collar brace. I also measured from the lip of the fender well to the center of the hub and that measurement is about 16.25".
You are right, the front end is sitting about 3-4 inches high I think. I was thinking this might be a suspension issue. Here are some pics and measurements I just took.
The picture with the measurement is next to the passenger side of the horse collar brace. I also measured from the lip of the fender well to the center of the hub and that measurement is about 16.25".
Team Owner
Joined: Sep 2006
Posts: 31,226
Likes: 4,313
From: Westminster Maryland
Hi Adam,
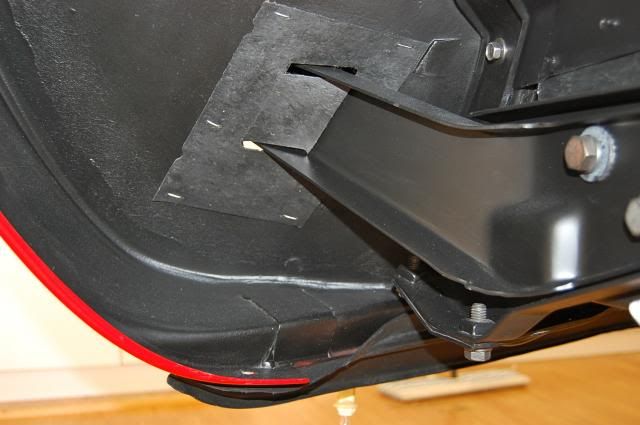
Here are a few pictures from my71.
Perhaps they'll give you some ideas as to the relationship of the extensions, crossmember, center brace, and bumper.
Notice especially the angle of the front crossmember, and the relationship of the center brace, front crossmember, and core support in the pictures taken from above.
Regards,
Alan


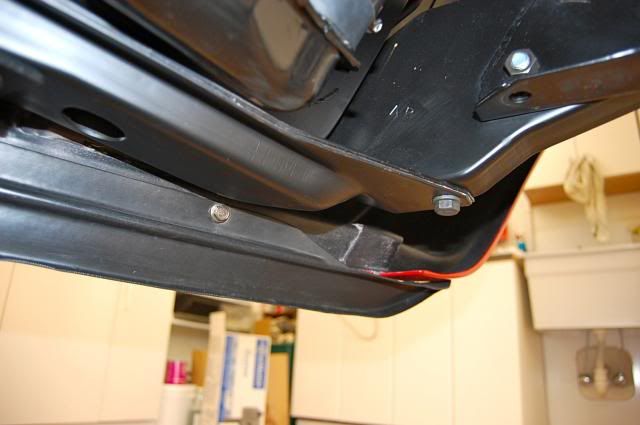


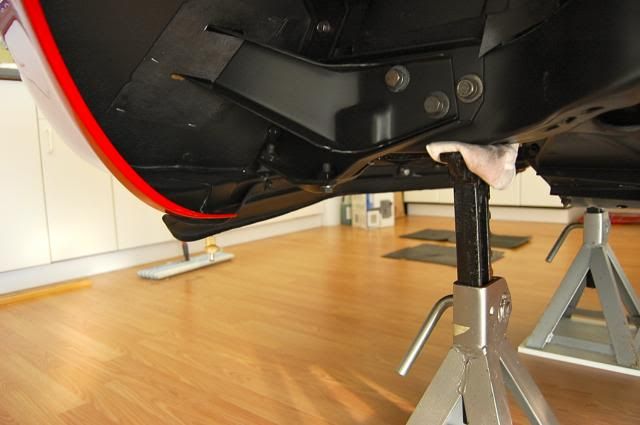
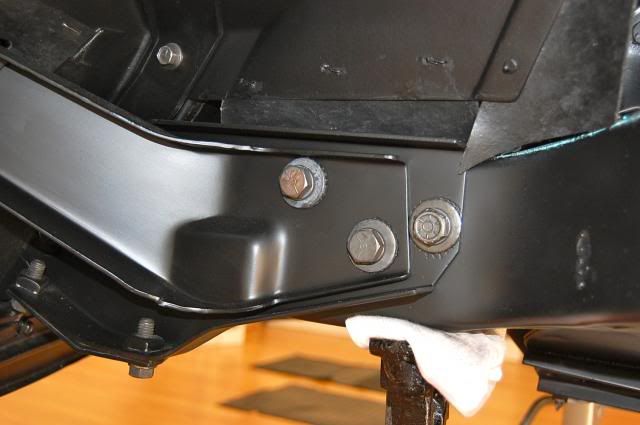


Here are a few pictures from my71.
Perhaps they'll give you some ideas as to the relationship of the extensions, crossmember, center brace, and bumper.
Notice especially the angle of the front crossmember, and the relationship of the center brace, front crossmember, and core support in the pictures taken from above.
Regards,
Alan


Melting Slicks
Joined: Jul 2001
Posts: 2,609
Likes: 12
From: Massapequa Park NY
Really Alan, not even a speck of dust under the car?  And on a hardwood floor???
  Fantastic as always
Oklahoma Adam
There is a metal brace that gets riveted to the front lip, hard to tell in the pictures if that is in place. Also the front cross member appears to be pointing way up in the air. does the horseshoe bracket fall in the right location vertically?
Jim
And on a hardwood floor??? Fantastic as alwaysOklahoma Adam
There is a metal brace that gets riveted to the front lip, hard to tell in the pictures if that is in place. Also the front cross member appears to be pointing way up in the air. does the horseshoe bracket fall in the right location vertically?
Jim
Thread Starter
Racer
Joined: May 2012
Posts: 272
Likes: 46
From: Tulsa OK
It looks like my cross member is pointing up a little to much. I'll take a closer look at it tonight. Thanks for the advice everyone.
Jim,
The bracket does line up on center its just a little high and too far back. I think it is probably a cross member issue.
Alan,
Nice car! Thanks for the pics.
Jim,
The bracket does line up on center its just a little high and too far back. I think it is probably a cross member issue.
Alan,
Nice car! Thanks for the pics.
Last edited by Oklahoma Adam; May 2, 2013 at 09:45 AM.


Safety Car


Joined: Dec 1999
Posts: 3,599
Likes: 837
From: PA
Alan,
Can you measure the gap between the forward crossmember and the radiator support as shown in your photo?
Have looked at four cars recently and it looks to vary a bit... One appears to be close to yours, the other three are relatively tight with almost no gap.
More for my knowledge than anything else.
Oh, by the way, you better think about bringing that car out to a regional... It's too darn nice not to have it judged at some point!
Jim,
I understand the car being clean, but I'm with you on the floor...
What's up with the hardwood garage floor Alan? Even I'm not that bad!
In all seriousness, it looks great my friend!
In response to the OP, I'm with Mike... That crossmember looks more than a little bent. You may want to compare it to an undamaged piece to see if it can be saved or if the problem might be somewhere else.
Regards,
Stan Falenski
Can you measure the gap between the forward crossmember and the radiator support as shown in your photo?
Have looked at four cars recently and it looks to vary a bit... One appears to be close to yours, the other three are relatively tight with almost no gap.
More for my knowledge than anything else.
Oh, by the way, you better think about bringing that car out to a regional... It's too darn nice not to have it judged at some point!
I understand the car being clean, but I'm with you on the floor...
What's up with the hardwood garage floor Alan? Even I'm not that bad!
In all seriousness, it looks great my friend!
In response to the OP, I'm with Mike... That crossmember looks more than a little bent. You may want to compare it to an undamaged piece to see if it can be saved or if the problem might be somewhere else.
Regards,
Stan Falenski
Last edited by Rowdy Rat; May 2, 2013 at 10:52 AM. Reason: Additional Information
Team Owner
Joined: Sep 2006
Posts: 31,226
Likes: 4,313
From: Westminster Maryland
Hi Stan,
Here's a picture... pretty close to 1/4"
I'd think the dimension could vary depending on the core-support used, (aluminum or copper radiator), how the core-support is bolted into the apron brackets, and the position of the frame extensions for the cross member where they're bolted to the frame rails.
I actually 'backed' into that dimension... I set the bumper first. and then placed all the brackets so I could tighten the bolts gradually, and in sequence, without moving the bumper or brackets, and without putting any pressure on the fiberglass.
If you need something else please let me know!
Regards,
Alan
I think my 'restoration days' are behind me so I put down a laminate floor. The garage is in my basement so moisture and variation in temp shouldn't be an issue. It's easy for me to keep clean, and shows off the car. I just need to be careful when I use a floor jack and jack stands.
It's not at all suitable for a 'REAL' garage, but is fine for someone just playing around.

Here's a picture... pretty close to 1/4"
I'd think the dimension could vary depending on the core-support used, (aluminum or copper radiator), how the core-support is bolted into the apron brackets, and the position of the frame extensions for the cross member where they're bolted to the frame rails.
I actually 'backed' into that dimension... I set the bumper first. and then placed all the brackets so I could tighten the bolts gradually, and in sequence, without moving the bumper or brackets, and without putting any pressure on the fiberglass.
If you need something else please let me know!
Regards,
Alan
I think my 'restoration days' are behind me so I put down a laminate floor. The garage is in my basement so moisture and variation in temp shouldn't be an issue. It's easy for me to keep clean, and shows off the car. I just need to be careful when I use a floor jack and jack stands.
It's not at all suitable for a 'REAL' garage, but is fine for someone just playing around.

Last edited by Alan 71; May 2, 2013 at 12:02 PM.

Team Owner
Joined: Jul 1999
Posts: 65,492
Likes: 230
From: Orange Park Florida
Hi Stan,
Here's a picture... pretty close to 1/4"
I'd think the dimension could vary depending on the core-support used, (aluminum or copper radiator), how the core-support is bolted into the apron brackets, and the position of the frame extensions for the cross member where they're bolted to the frame rails.
I actually 'backed' into that dimension... I set the bumper first. and then placed all the brackets so I could tighten the bolts gradually, and in sequence, without moving the bumper or brackets, and without putting any pressure on the fiberglass.
If you need something else please let me know!
Regards,
Alan
I think my 'restoration days' are behind me so I put down a laminate floor. The garage is in my basement so moisture and variation in temp shouldn't be an issue. It's easy for me to keep clean, and shows off the car. I just need to be careful when I use a floor jack and jack stands.
It's not at all suitable for a 'REAL' garage, but is fine for someone just playing around.
Here's a picture... pretty close to 1/4"
I'd think the dimension could vary depending on the core-support used, (aluminum or copper radiator), how the core-support is bolted into the apron brackets, and the position of the frame extensions for the cross member where they're bolted to the frame rails.
I actually 'backed' into that dimension... I set the bumper first. and then placed all the brackets so I could tighten the bolts gradually, and in sequence, without moving the bumper or brackets, and without putting any pressure on the fiberglass.
If you need something else please let me know!
Regards,
Alan
I think my 'restoration days' are behind me so I put down a laminate floor. The garage is in my basement so moisture and variation in temp shouldn't be an issue. It's easy for me to keep clean, and shows off the car. I just need to be careful when I use a floor jack and jack stands.
It's not at all suitable for a 'REAL' garage, but is fine for someone just playing around.


Melting Slicks


Joined: Jan 2012
Posts: 3,038
Likes: 504
From: myrtle beach sc
Army
That bar supports the weight of the nose. Early and mid 68 vettes did not have it and our cars cracked by the round corners in front , by the hood hinge. That is why GM added them. Lou.