


Can you read these plugs???
Thread Starter
Melting Slicks


Joined: Apr 2010
Posts: 2,790
Likes: 108
From: On the coast North of SF bay
Here's a set of R44TS plugs with two of the old R45TS plugs at the bottom. There is reason to believe that this 350 has a bit of preignition - a few black specs (no aluminum) on the porcelain. The bottom two plugs are representative of the old set and the only things that changed are 1) the plugs to the colder 44's and 2) the slightly high engine temp (running at 180-190 now).
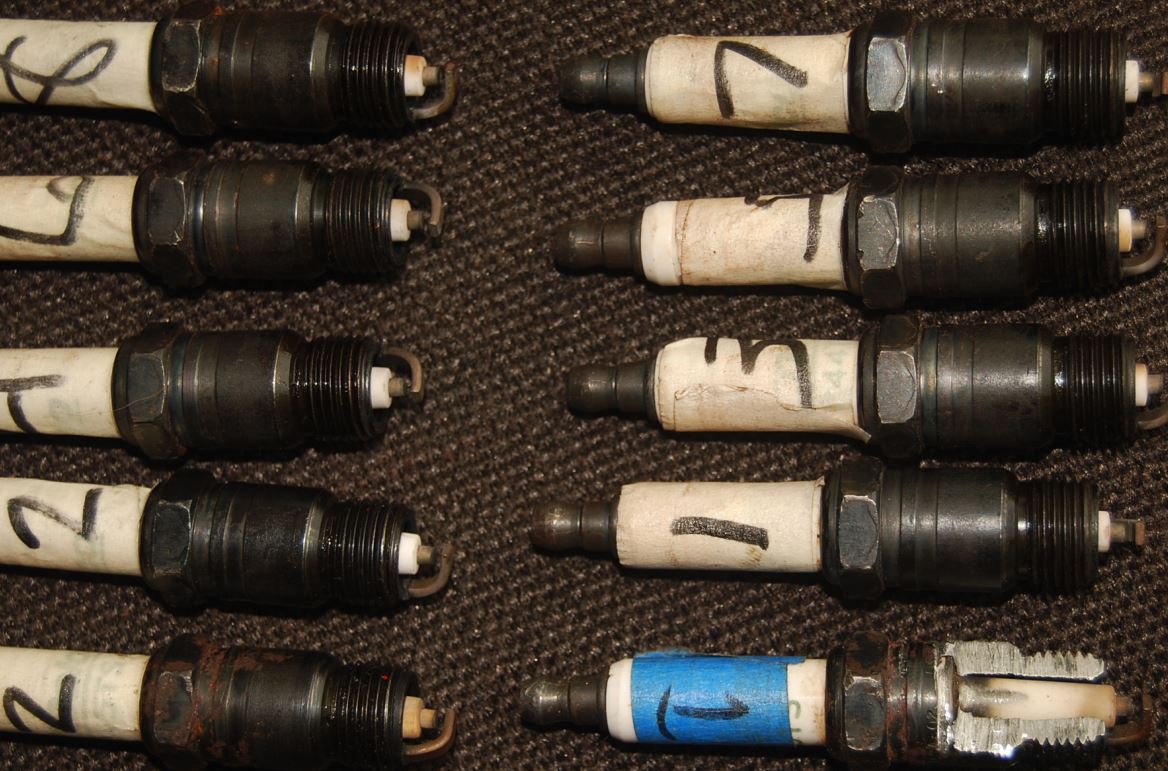
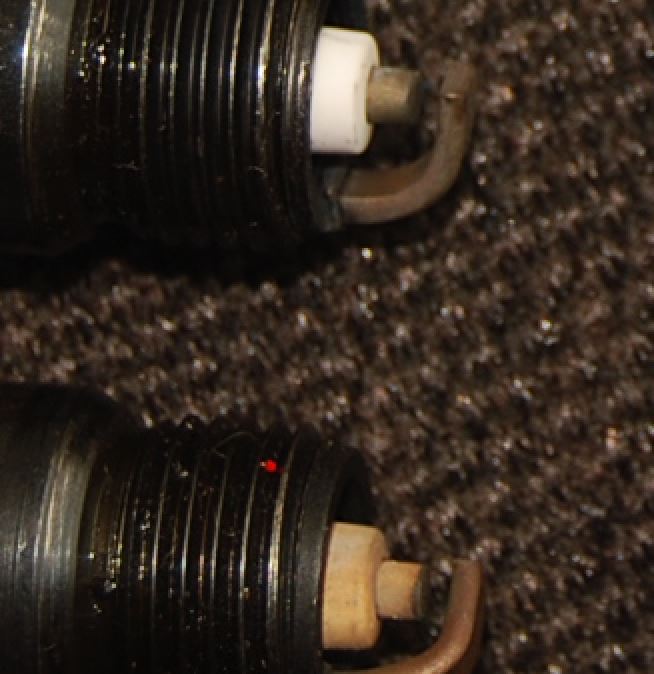
And here's a closeup of the new 44 and old 45 from #2 cylinder:
I have set the initial and mechanical set to under 29 until I get this figured out. While I'm writing this, it occurred to me that the vacuum advance was connected and at one time I had it on my list to verify the actual advance since I didn't check recently it and it's not so easy to replicate accurately in the garage.
It's really hard to hear the engine with the Flowmasters and the loud timing gearset. However, while cruising I hear was appears to be a constants rattle and it appears to stop when pressing on the throttle.
At the moment, it kind of looks like I may have solved the issue??
Anyone have a recommendation for a proper vacuum canister on a GM HEI distributor?
Thoughts?
Race Director


Joined: May 2006
Posts: 18,740
Likes: 2,583
have you looked at Lar's paper on setting up distributors including the correct vacuum unit to use? Use the search function to get his email. Check your initial timing at idle with vacuum disconnected then plug in vacuum, difference is what the vauum can is giving you.
What carburetor are you using and what jetting, may be lean.
What carburetor are you using and what jetting, may be lean.
Thread Starter
Melting Slicks
Joined: Apr 2010
Posts: 2,790
Likes: 108
From: On the coast North of SF bay
have you looked at Lar's paper on setting up distributors including the correct vacuum unit to use? Use the search function to get his email. Check your initial timing at idle with vacuum disconnected then plug in vacuum, difference is what the vauum can is giving you.
What carburetor are you using and what jetting, may be lean.
What carburetor are you using and what jetting, may be lean.
Have Lars paper and his list of canisters (not terribly clear to this cluttered mind). As for vacuum advance testing, this 350 has a fairly aggressive cam and idles at 950+- with about 8-9hg, but at 2500 is getting 22hg.
Not sure, but I think the difference between vacuum and no vacuum at idle is not indicative of what is happening at 2500 while cruising.
The carb is a 650 Holly single pumper with vacuum secondaries. I believe the secondaries are opening properly, but that has been an issue previously. Don't think they are open while cruising though and if they were, wouldn't that just lessen the issue of a lean mixture.
The jets are stock and I believe the are 65's. Another thing about this setup is that it burns a lot of fuel as SBC's go. Like maybe less than 9 mpg.
My next thought is to to disconnect the vacuum advance an see what happens to the rattle/noise. I did do that last time out to see if it made any difference in the plug color - it didn't, but I neglected to associate the issue with that noise so I will do that as soon as I get another set of plugs.
Anyone want to venture a guess as to which plugs I should use next?
Race Director
Joined: May 2006
Posts: 18,740
Likes: 2,583
how about sticking with 44ts, raise primary and secondary jetting by two and correctly set your total mechanical advance to 36. Then get a new plug reading. So if you get a better vacuum reading at 2,500 rpm can you do that in neutral and check what affect the vacuum has on the advance using a dial back timing light.
Race Director
Joined: Mar 2006
Posts: 14,112
Likes: 28
From: Florida
If you are running Exx gasoline which it looks like you are, this may interest you. Can be tough to get accurate plug readings with Exx. Lean codes aren't all that uncommon. Plugs burn extremely clean.
http://www.ngkplugpro.ca/content/con...ol_fuel_en.pdf
Solution
If your vehicle was not calibrated for a fuel blended with ethanol the following adjustments can be done to restore the expected mileage and performance prior to the change in the fuel type. NGK Spark Plugs Canada Limited recommends to install a spark plug one heat rating cooler than OE to dissipate the increase in cylinder temperature as well as adjusting the spark plug gap setting to 0.010� smaller then the vehicle�s factory setting (Note: do not reduce gap to less than 0.035�.
If your vehicle was not calibrated for a fuel blended with ethanol the following adjustments can be done to restore the expected mileage and performance prior to the change in the fuel type. NGK Spark Plugs Canada Limited recommends to install a spark plug one heat rating cooler than OE to dissipate the increase in cylinder temperature as well as adjusting the spark plug gap setting to 0.010� smaller then the vehicle�s factory setting (Note: do not reduce gap to less than 0.035�.
Corvette Stories
The Best of Corvette for Corvette Enthusiasts

Top 10 Most Expensive Corvettes Ever Sold on Bring A Trailer
Brett Foote
10 Things Every Corvette Owner Needs (2026 Edition)
Michael S. Palmer
8 Most "Only Corvette Owners Understand" Quirks and Problems
Pouria Savadkouei
10 Reasons the C6 Z06 is Still A Performance Benchmark After 20 Years
Joe Kucinski
How Much Horsepower Every Corvette Engine "LOST" in 1972
Joe Kucinski
Top 10 DOs and DON'Ts for Protecting Your Convertible Top!
Michael S. Palmer
Top 10 Most Explosive Corvettes Ever Made: Power-to-Weight Ratio Ranked!
Joe Kucinski
150 hp to 1,250 hp: Every Corvette Generation Compared by the Specs That Matter
Joe Kucinski
8 Coolest Corvette Pace Cars (and Replicas) of All Time
Verdad GallardoBurning Brakes


Joined: Feb 2012
Posts: 925
Likes: 7
OP,
Did you just pull the plugs one day after cruising around? To get a more accurate read, you are supposed to warm-up the car to normal temps and go though the gears hard and then immediately shut-off the engine and coast over to the side of the road and pull the plugs to take a reading. You don't read the porcelain to tell the mixture. You're supposed to look at the color of the ground strap and the end of the plug that the strap is welded to (base ring).
I'm sure there's a million plug reading posts, here's one at http://members.uia.net/pkelley2/sparkplugreading.html.
Not sure I understand your post completely. You are running initial, mechanical advance and vacuum equaling 29 degrees? Even if only initial and mechanical advance, that is way low (retarded) and would cause increased engine temps and who knows what that is doing to affect reading the plugs. You need to get your timing up first, before fine tuning anything with the plugs.


Burning Brakes
Joined: Feb 2012
Posts: 925
Likes: 7
BTW, if you do the run it through the gears thing, shut it off and then coast to the side of the road, you may be going 80mph or more and that wouldn't be a good time to lock-up the steering wheel. So when you shut the engine off, don't bring the key all the way toward you. Make sure that you are able to steer. In the heat of the moment, it's easy to end up with no steering. Ask me how I know.
Thread Starter
Melting Slicks
Joined: Apr 2010
Posts: 2,790
Likes: 108
From: On the coast North of SF bay
Please correct me if I have made any inaccurate statements below.
See below....
Will do that.
This could be part of the confusion - could it be that my source of fuel has gone to E85 and it wasn't before?
Did pull the plugs upon returning from a 50+ mile round trip inland to warmer climes, primarily to see if I had made any progress on the high operating temps while running at highway speeds in ambient temps of 80+ degrees. There was quite an improvement.
Lots of thoughts on timing - originally retarded the timing a bit just to make sure there would be no detonation while I was trying to reduce the operating temperature. Had/have every intention of resetting it to 36+-. I just need to get my head around the proper steps/changes. I'm having some difficulty with slightly retarding the timing will causing all of the symptoms I'm seeing. In particular, the detonation.
In looking at the page/above link (been to that page before), there is every indication that the color of the porcelain is not absolute and really only determines if there is any detonation going on. I believe there is as there are some fused black spots on the nearly white porcelain.
The base ring helps determines how well the jetting is set - these plugs tell me the jetting is a little on the rich side - contrary to what looks it looks like from the photos. All of that seems to coincide with the tail pipes - dark with soot.
This is part of my confusion, but the other part is that the R45 plugs all looked like the lower two (45's) and the 44's went white.
Then we get into reading the ground strap, which is the reason I changed to the 44's in the first place. The 45's showed the color change at the bend and the 44's now show the color change near or at the base ring - just the opposite of what I had hoped to accopmlish.
Everything I have read is that a properly set up 650 will produce 800HP??? But your point has been in the back of my mind for some time now.
Good thoughts - no power steering though. Will attempt to make that happen.
how about sticking with 44ts, raise primary and secondary jetting by two and correctly set your total mechanical advance to 36. Then get a new plug reading. So if you get a better vacuum reading at 2,500 rpm can you do that in neutral and check what affect the vacuum has on the advance using a dial back timing light.
If you are running Exx gasoline which it looks like you are, this may interest you. Can be tough to get accurate plug readings with Exx. Lean codes aren't all that uncommon. Plugs burn extremely clean.
http://www.ngkplugpro.ca/content/con...ol_fuel_en.pdf
http://www.ngkplugpro.ca/content/con...ol_fuel_en.pdf
OP, Did you just pull the plugs one day after cruising around? To get a more accurate read, you are supposed to warm-up the car to normal temps and go though the gears hard and then immediately shut-off the engine and coast over to the side of the road and pull the plugs to take a reading. You don't read the porcelain to tell the mixture. You're supposed to look at the color of the ground strap and the end of the plug that the strap is welded to (base ring).
I'm sure there's a million plug reading posts, here's one at http://members.uia.net/pkelley2/sparkplugreading.html.
Not sure I understand your post completely. You are running initial, mechanical advance and vacuum equaling 29 degrees? Even if only initial and mechanical advance, that is way low (retarded) and would cause increased engine temps and who knows what that is doing to affect reading the plugs. You need to get your timing up first, before fine tuning anything with the plugs.
Lots of thoughts on timing - originally retarded the timing a bit just to make sure there would be no detonation while I was trying to reduce the operating temperature. Had/have every intention of resetting it to 36+-. I just need to get my head around the proper steps/changes. I'm having some difficulty with slightly retarding the timing will causing all of the symptoms I'm seeing. In particular, the detonation.
In looking at the page/above link (been to that page before), there is every indication that the color of the porcelain is not absolute and really only determines if there is any detonation going on. I believe there is as there are some fused black spots on the nearly white porcelain.
The base ring helps determines how well the jetting is set - these plugs tell me the jetting is a little on the rich side - contrary to what looks it looks like from the photos. All of that seems to coincide with the tail pipes - dark with soot.
This is part of my confusion, but the other part is that the R45 plugs all looked like the lower two (45's) and the 44's went white.
Then we get into reading the ground strap, which is the reason I changed to the 44's in the first place. The 45's showed the color change at the bend and the 44's now show the color change near or at the base ring - just the opposite of what I had hoped to accopmlish.
Everything I have read is that a properly set up 650 will produce 800HP??? But your point has been in the back of my mind for some time now.
BTW, if you do the run it through the gears thing, shut it off and then coast to the side of the road, you may be going 80mph or more and that wouldn't be a good time to lock-up the steering wheel. So when you shut the engine off, don't bring the key all the way toward you. Make sure that you are able to steer. In the heat of the moment, it's easy to end up with no steering. Ask me how I know.
Thread Starter
Melting Slicks
Joined: Apr 2010
Posts: 2,790
Likes: 108
From: On the coast North of SF bay
Let me see if I can make a plan for what I need to do???
I think the first thing is to get a clean set of plugs (44's are colder than 45's - yes?) so probably another set of 44's.
Need to verify the effects of the current vacuum advance canister at cruising RPM's and obtain a new one that more closely creates the proper advance at 2500+- RPM.
Need to set the initial timing about 13+ degrees and verify that the mechanical advance brings it all in at 33+/2700 RPM
Then I need to verify that the ground strap on the new plugs has a color change at the proper location near the bend but still on the flat part. Also verify that there is no indication of preignitiion and that the seemingly corresponding rattle at highway speeds has been eliminated.
I'm not sure that I need to change the jets since all the colors (base ring and tail pipe) indicate that it's a bit on the rich side already?? Ran across this chart when looking through this part of the project.
http://walkerproducts.com/_pdf/holleymeteringjets.pdf
My guess is that most of the problem lies in the vacuum canister - I will zero in on that.
Thoughts?
Burning Brakes
Joined: Feb 2012
Posts: 925
Likes: 7
Please correct me if I have made any inaccurate statements below.
Did pull the plugs upon returning from a 50+ mile round trip inland to warmer climes, primarily to see if I had made any progress on the high operating temps while running at highway speeds in ambient temps of 80+ degrees. There was quite an improvement.
Lots of thoughts on timing - originally retarded the timing a bit just to make sure there would be no detonation while I was trying to reduce the operating temperature. Had/have every intention of resetting it to 36+-. I just need to get my head around the proper steps/changes. I'm having some difficulty with slightly retarding the timing will causing all of the symptoms I'm seeing. In particular, the detonation.
In looking at the page/above link (been to that page before), there is every indication that the color of the porcelain is not absolute and really only determines if there is any detonation going on. I believe there is as there are some fused black spots on the nearly white porcelain.
The base ring helps determines how well the jetting is set - these plugs tell me the jetting is a little on the rich side - contrary to what looks it looks like from the photos. All of that seems to coincide with the tail pipes - dark with soot.
This is part of my confusion, but the other part is that the R45 plugs all looked like the lower two (45's) and the 44's went white.
Then we get into reading the ground strap, which is the reason I changed to the 44's in the first place. The 45's showed the color change at the bend and the 44's now show the color change near or at the base ring - just the opposite of what I had hoped to accopmlish.
Everything I have read is that a properly set up 650 will produce 800HP??? But your point has been in the back of my mind for some time now.
Good thoughts - no power steering though. Will attempt to make that happen.
What I wrote about not turning the key all the way counter-clockwise has nothing to do with power steering. I'm trying to warn you about locking the steering wheel when you are going 80-100 mph. You don't want to bring the key all the way back toward you as if you were going to remove them, The wheel will be mechanically locked in place if you do. You need to think about a place to do this where there isn't any traffic and you have a safe place to coast the car over to pull the plugs.
The rule of thumb is get the timing right first, then the mixture. The plugs come in third. The timing is the most critical setting on the engine when it comes to making power and having it run right. Some of these engines run at 36-38, some even lower. The figure you see most often is 36. When you say you are running under 29 degrees and you don't know if the vacuum advance was hooked up or not, you're leaving quite a bit of room for retarded timing. My vacuum advance contributes 5 degrees at idle. If yours is similar, you could actually have as little as "under 24" when it's all in. You should read up and get the timing procedure down in your mind and go after it first and find out where you are. You definitely want the vacuum advance disconnected when you time the engine.
A formula for generally sizing the carb is displacement x max rpm x volumetric efficiency/3456 = cfm. I know nothing about your engine but being optimistic and saying VE = .92, the carb size is 606 cfm. 650cfm will not make 800HP. I'm sure there are people running 750s on an engine similar to yours. No hard and fast rule.
Thread Starter
Melting Slicks
Joined: Apr 2010
Posts: 2,790
Likes: 108
From: On the coast North of SF bay
To get a good picture of the plugs you are supposed to run through the gears and go to WOT, then get off the gas and immediately kill the ignition. Then pull the plugs, right then. If you drive around for any distance, instead of shutting the engine off immediately, you are not getting the true picture of the plugs condition. You're wasting your time trying to analyze these plugs now.
What I wrote about not turning the key all the way counter-clockwise has nothing to do with power steering. I'm trying to warn you about locking the steering wheel when you are going 80-100 mph. You don't want to bring the key all the way back toward you as if you were going to remove them, The wheel will be mechanically locked in place if you do. You need to think about a place to do this where there isn't any traffic and you have a safe place to coast the car over to pull the plugs.
The rule of thumb is get the timing right first, then the mixture. The plugs come in third. The timing is the most critical setting on the engine when it comes to making power and having it run right. Some of these engines run at 36-38, some even lower. The figure you see most often is 36. When you say you are running under 29 degrees and you don't know if the vacuum advance was hooked up or not, you're leaving quite a bit of room for retarded timing. My vacuum advance contributes 5 degrees at idle. If yours is similar, you could actually have as little as "under 24" when it's all in. You should read up and get the timing procedure down in your mind and go after it first and find out where you are. You definitely want the vacuum advance disconnected when you time the engine.
A formula for generally sizing the carb is displacement x max rpm x volumetric efficiency/3456 = cfm. I know nothing about your engine but being optimistic and saying VE = .92, the carb size is 606 cfm. 650cfm will not make 800HP. I'm sure there are people running 750s on an engine similar to yours. No hard and fast rule.
Hope to put it on a dyno after this all gets sorted out. Found out that many companies that have a dyno will run your car, but will not tune it.
Last edited by pcguy2u; Jul 28, 2013 at 11:18 AM.
Thread Starter
Melting Slicks
Joined: Apr 2010
Posts: 2,790
Likes: 108
From: On the coast North of SF bay
Heading to town on Tuesday for new plugs and in the meantime I thought I would figure out what to do with the vacuum advance canister. Had hoped to pick up a canister at the same time, but out here in the country, the selection is not great.
Putting the plugs back in only to take them out again was not something I wanted to do - headers and all. So I pulled the canister and thought you guys might want to know what I stumbled on.
The existing canister had no identifying references stamped on so I devised a bench test that told me what should be happening at cruising/idle.
First I determined that the point of the connection to the advance arm on the dist. is on a 1.5" radius (3" diam.) Then I measured the amount of movement which turned out to be 1/4" at full vacuum of 12-13hg. 1/4" calcs to be dist. 9.55* or 19.1* crank. So cruising I should have been getting 19.1 on top of mechanical. Can't say what part this may have played in the point at hand, but this is just for the record.
The start of movement was at 7hg so at idle (with 8.5hg) it was not fully engaged and this causes (according to Lars and others) the vacuum to change the RPM and to then change the vacuum and all over again - something that this engine has done from the beginning.
I happened to have another relatively new HEI dist with a vacuum advance so I pulled that and tested it to see if it might be useful. It turned out to have a good starting point at 5hg, but the travel produced almost 27 crank degrees of advance.
Since the starting poiint was better for this engine, I modified it by restrict the travel with a small plate and some epoxy. The result was fully advanced by 7hg and produced 15.1* advance at the crank.
I'll let you know how this works out after I set the timing once again.
BTW, I did not find this little tip on the internet - it's just something I happened to dream up. I'm sure it's been done before, but I never encountered it.
Thread Starter
Melting Slicks
Joined: Apr 2010
Posts: 2,790
Likes: 108
From: On the coast North of SF bay
Well, the saga for the replacement plugs got complicated. Went to NapaAuto to get a set of R43TS plugs and the only set they had in stock was not an 8 pack, but was a combo of different sized boxes. Looked at a few of the plugs and they looked like they had been at least screwed into a set of heads, but not run??? There were black marks on the porcelain on and around the tips of the electrodes.
The black marks were much the same as those on my R44TS's except that on the 44's, the marks were now baked on and couldn't be cleaned. That could have lead me to think that I had detonation going on???
Decided not to get them and went to O'reilly's and their R43TS's weren't much better but was at least a matched set of boxes. Bought them and went out to the car and decided to open the boxes only to find that two of them had chips in the porcelain around the electrodes - not small chips either.
Went back inside and the sales guy told me AC Delco QC was not very good any more. Sold me a set of Accel 0567 (was supposed to be the same heat range but turns out I should have gotten 0574's), and off I went - 33 miles home.
Get home and open the plugs only to find the end of the ground strap was flared to a point on the 3 outer sides. Don't need that in my engine. Also, the electrode on half of them was not in the center and didn't line up with the strap.
So, heading back to town to find another set, but looking for a recommendation from you guys??? How about Autolite 24's - anyone use those?
This shouldn't be that difficult???
Team Owner


Joined: Jan 2006
Posts: 37,637
Likes: 3,118
From: Crossville TN
No. It shouldn't be that tough. But, aftermarket auto part quality is pretty well in the pits, these days. If I purchase a part, I carefully look it over before I purchase it. If the parts store doesn't like that, I just don't buy from them.
I'm also of the opinion that NGK makes darn good plugs. The next set I install will be some NGK Irridium plugs, in hopes that their extended lifespan (over 100K miles in electronic ignition cars) will eliminate the need for me EVER to have to change plugs again. And, if I find that I need to go to an electronic ignition for them to perform correctly, I'll stick a Pertronix module and a compatible coil in the ignition system.
I'm also of the opinion that NGK makes darn good plugs. The next set I install will be some NGK Irridium plugs, in hopes that their extended lifespan (over 100K miles in electronic ignition cars) will eliminate the need for me EVER to have to change plugs again. And, if I find that I need to go to an electronic ignition for them to perform correctly, I'll stick a Pertronix module and a compatible coil in the ignition system.
Pro

Joined: Jun 2009
Posts: 613
Likes: 3
From: Fleetwood PA
You said your fuel is now E85?? From what I've read, you'll need to bump up the jets. Personally I would try to find something other than E85. With ethanol that high, I have know idea what that may do as far as reading plugs in the conventional manner.