


Body Dollie Constuction Question.
Thread Starter
Safety Car


Joined: Mar 2005
Posts: 4,255
Likes: 82
From: Brampton Ont.
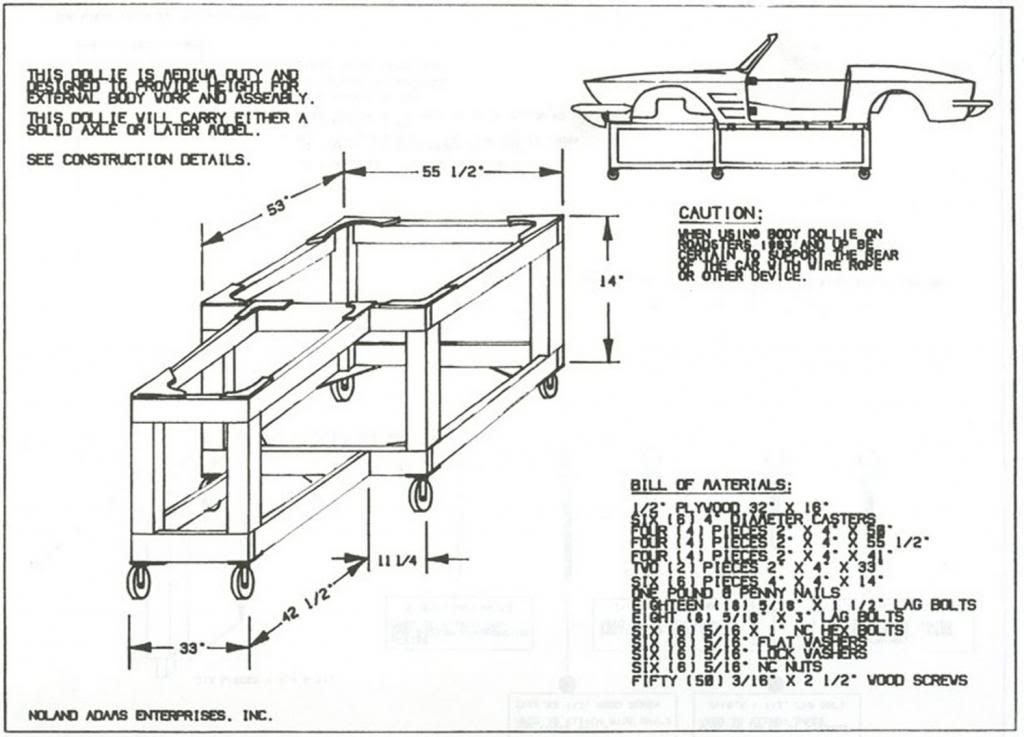
The photo below is the body dollie for the C2 are the dimensions exactly the same for the C3? Are there any changes you would make as I'm going to starting building it Thursday.
 [/QUOTE]
[/QUOTE]
Burning Brakes


Joined: Aug 2007
Posts: 892
Likes: 243
From: Green Valley Ca
http://www.lbfun.com/warehouse/tech_...dy%20Dolly.pdf I used this dolly for a 1970, it worked out great.
Bob
Bob

Pro

Joined: Nov 2012
Posts: 672
Likes: 0
From: Chesapeake Virginia
I build that same dolly for my '81, it worked OK but you will have to make some mods for it to fit right, the dimensions are correct, but I had to add a couple of 2x6 standing on their sides down the 53" "sides" of the main body portion of it. also, you will need some kind of support for the nose of the body when it's on the dolly, I used a couple 2x4's mounted diagonally from the dolly towards the nose and was able to get them wedged up between the opening for the hood and where the headlight mechanisms mount to the body. it works but you will have to do some "jury rigging" to make it fit your specific application. I would also build it taller if you plan on working on the bottom of the body while it's on the dolly.
Team Owner


Joined: Sep 2006
Posts: 31,164
Likes: 4,242
From: Westminster Maryland
Hi mmvlfe,
I think that's a very good dolly.
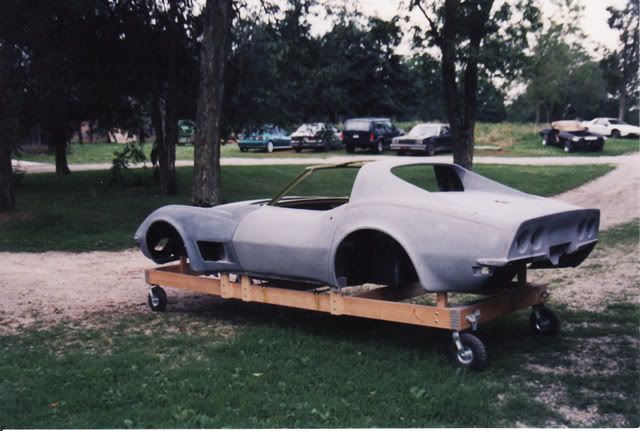
One of the things I learned when I investigating building a dolly is that it's useful to have the body supported at just the 8 body mount points. This allows you to have access to the large percentage of the underbody for whatever work you'll be doing.
I took the body mount locations and heights off the frame drawing in the front of the Chassis service manual.
The dolly I built isn't as strong as the one you picture but is fine for 1 or 2 restorations. The large wheels make it easier to move the body around, especially if it's outside.
The materials can be bought and the dolly built in 1 morning.
Good Luck!
Regards,
Alan

I think that's a very good dolly.
One of the things I learned when I investigating building a dolly is that it's useful to have the body supported at just the 8 body mount points. This allows you to have access to the large percentage of the underbody for whatever work you'll be doing.
I took the body mount locations and heights off the frame drawing in the front of the Chassis service manual.
The dolly I built isn't as strong as the one you picture but is fine for 1 or 2 restorations. The large wheels make it easier to move the body around, especially if it's outside.
The materials can be bought and the dolly built in 1 morning.
Good Luck!
Regards,
Alan


Thread Starter
Safety Car
Joined: Mar 2005
Posts: 4,255
Likes: 82
From: Brampton Ont.
http://www.lbfun.com/warehouse/tech_...dy%20Dolly.pdf I used this dolly for a 1970, it worked out great.
Bob
Bob
Thanks for the reply Alan, I like that design although I'm going to need to replace the two rear mounts and clean up the other 6, therefore if the dollie rest on the mounts that limits my access.
Instructor

Joined: Apr 2013
Posts: 152
Likes: 0
If I'm missing something, sorry for the confusion. Still trying to get the nerve to do this to my 80!
Tech Contributor


Joined: Aug 1999
Posts: 14,366
Likes: 6,348
From: At my Bar drinking and wrenching in Lafayette Colorado
The wooden structure dolly you have a drawing of seemed too cluttered and low to do bottom-side work, so I built a simple tube frame structure that�s a bit taller. This allowed me to easily work on the bottom of the body while still having the sides and top fender surfaces at a good working height for block sanding. I used the wooden dolly drawing for some basic dimensions, and verified those dimensions against the body mount locations on the car before welding up the structure. This structure is very open on the bottom, allowing me to sit on a roll-around stool and comfortably work on the bottom of the car.
Here�s the body being lowered onto the tube dolly. The entire dolly was built in an afternoon with a cutoff saw and a MIG welder:
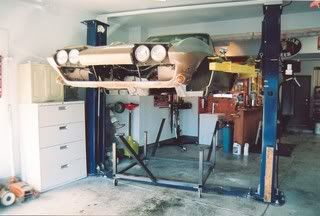
Dolly held the body rigid enough that the doors could be opened and aligned:
The dolly was the perfect height for sanding and body work: I didn�t want to have to be bent over too far while sanding the lower sides of the body:

The body was even transported while on the dolly � I was able to roll the entire thing up on my trailer and chain it down for transport:
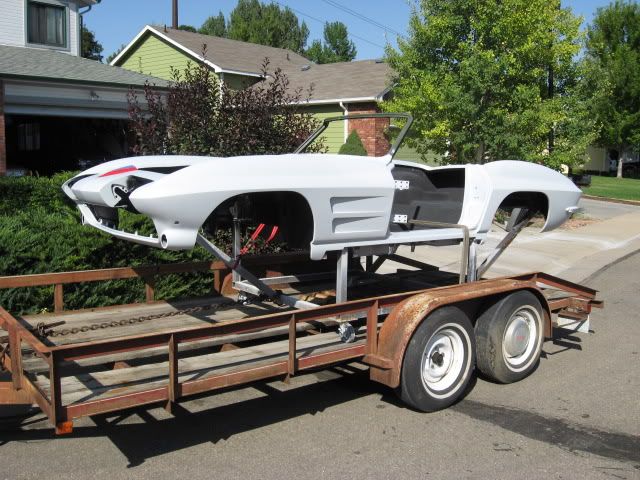
Lars
Here�s the body being lowered onto the tube dolly. The entire dolly was built in an afternoon with a cutoff saw and a MIG welder:

Dolly held the body rigid enough that the doors could be opened and aligned:

The dolly was the perfect height for sanding and body work: I didn�t want to have to be bent over too far while sanding the lower sides of the body:

The body was even transported while on the dolly � I was able to roll the entire thing up on my trailer and chain it down for transport:

Lars
Team Owner
Joined: Sep 2006
Posts: 31,164
Likes: 4,242
From: Westminster Maryland
Hi mmmvlfe,
The uprights on the dolly I show are held in place with 2 bolts so they can be removed 1 or 2 at a time thus you have access to the mounts.
Regards,
Alan
A steel dolly is the way to go... but a few people aren't welders.
The uprights on the dolly I show are held in place with 2 bolts so they can be removed 1 or 2 at a time thus you have access to the mounts.
Regards,
Alan
A steel dolly is the way to go... but a few people aren't welders.
Corvette Stories
The Best of Corvette for Corvette Enthusiasts

Top 10 Corvette Engines RANKED by Peak Torque (70+ Years of Muscle!)
Joe Kucinski
Corvette ZR1X Will Be Pacing the Indy 500, And Could Probably Race, Too!
Verdad Gallardo
Top 10 Corvettes Coming to Mecum Indy 2026!
Brett Foote
Top 10 C9 Corvette MUST-HAVES to Fix These C8 Generation Flaws!
Michael S. Palmer
10 Revolutionary 'Corvette Firsts' Most People Don't Know
Joe Kucinski
5 Reasons to Upgrade to an LS6-Powered Corvette; 5 Reasons to Stay LT2
Michael S. Palmer
2027 Corvette vs The World: Every C8 vs Its Closest Competitor
Joe Kucinski
10 Most Common Corvette Problems of the Last 20 Years!
Joe Kucinski
5 MOST and 5 LEAST Popular Corvette Model Years in History!
Joe Kucinski


Racer
Joined: Sep 2013
Posts: 284
Likes: 16
From: St Louis MO http://1972corvetterestomod.blogspot.com/
Hi mmvlfe,
I think that's a very good dolly.
One of the things I learned when I investigating building a dolly is that it's useful to have the body supported at just the 8 body mount points. This allows you to have access to the large percentage of the underbody for whatever work you'll be doing.
I took the body mount locations and heights off the frame drawing in the front of the Chassis service manual.
The dolly I built isn't as strong as the one you picture but is fine for 1 or 2 restorations. The large wheels make it easier to move the body around, especially if it's outside.
The materials can be bought and the dolly built in 1 morning.
Good Luck!
Regards,
Alan
I really like this idea... supporting the body at the mount locations, also plan to support the nose. Worried about the body possibly wanting to sliding off those vertical uprights. How did you guard against that? Based on your experience, what do you think about running a 2x3 across the top of each vertical upright pair that it is a little longer than necessary to give the body room to slide horizontally? Would that work... ie. no protrusions on the body underside that would now rest on these horizontals and thus not be on the uprights at the mount locations?
Thanks!

Greg
(also sent you a PM a bit ago when I found your plans in a different thread, but the forum system wouldn't let me quote it with your pics as it was forwarded from someone else)
Team Owner
Joined: Sep 2006
Posts: 31,164
Likes: 4,242
From: Westminster Maryland
Hi Greg,
If you look carefully at the photo you can see one of the two uprights supporting the nose of the body.
They're not on the plan because I didn't add them until I actually transported the body on the dolly.
I didn't feel as though the body wanted to move around on the dolly. But it would be VERY easy to put a lag screw down through the #1 mount on each side. Since you'd be screwing into the end of the upright I'd drill a suitable size hole first so you don't split the upright.
Regards,
Alan
It's difficult for me to believe that this picture is 10 years old!

Team Owner
Joined: Sep 2006
Posts: 31,164
Likes: 4,242
From: Westminster Maryland
Hi MS,
The smaller size seemed to work fine. I really don't see any reason to not use a 2x4 though.
Regards,
Alan
In my case the most important thing was the large wheels. This made it really easy to move around. Which was important since the fellow who painted the body works by himself and he would push it out in the sun everyday during the late spring, summer, and fall.
Racer
Joined: Sep 2013
Posts: 284
Likes: 16
From: St Louis MO http://1972corvetterestomod.blogspot.com/
Thanks Alan. Think I'm going to go the 4x4 route for the uprights with lag screws out the top for peace of mind. Hopefully in a few weeks I can post pics of the body resting on the dolly.
Team Owner
Joined: Sep 2006
Posts: 31,164
Likes: 4,242
From: Westminster Maryland
Hi,
If you do use the 4x4 you'll need to change the dimension on the width of the dolly frame so that the center + of the 4x4 is the center+ of the hole for the body mount bolt.
Regards,
Alan
If you do use the 4x4 you'll need to change the dimension on the width of the dolly frame so that the center + of the 4x4 is the center+ of the hole for the body mount bolt.
Regards,
Alan
Racer
Joined: Sep 2013
Posts: 284
Likes: 16
From: St Louis MO http://1972corvetterestomod.blogspot.com/
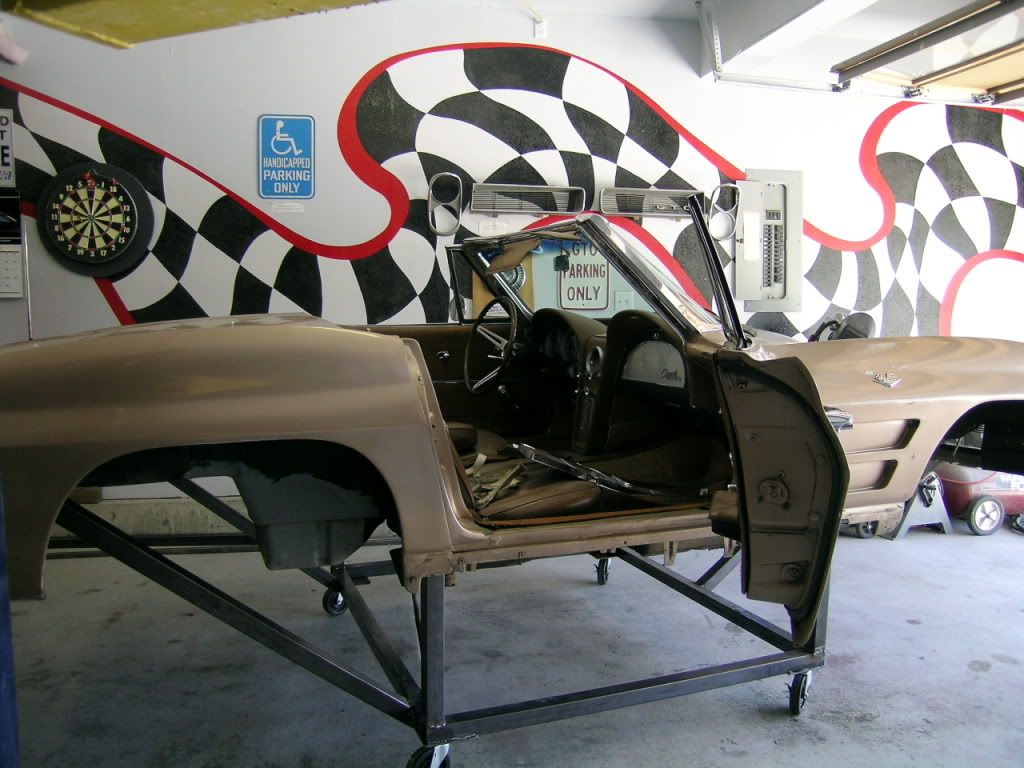
This dolly worked great for me. See below for a couple pics. I decided to stick with 2 x 3's for the uprights, but did make a few minor adjustments...
Overall, Alan71's plans are great... Thanks Alan! If you don't mind, I'm going to link to this post in a restoration blog I'm starting and give credit where credit is due! Here's a link to the blog.... http://1972corvetterestomod.blogspot.com/

Overall, Alan71's plans are great... Thanks Alan!
If you don't mind, I'm going to link to this post in a restoration blog I'm starting and give credit where credit is due! Here's a link to the blog.... http://1972corvetterestomod.blogspot.com/
Team Owner
Joined: Sep 2006
Posts: 31,164
Likes: 4,242
From: Westminster Maryland
Hi MS,
The improvements sound good.
Having the larger wheels does make moving the body around easier.
Once my body was pretty much ready to paint the fellow who painted it pushed it out into the sun each day from about May to October. The bigger wheels made it easier for him to maneuver it by himself
Good Luck!
Regards,
Alan