


Engine Compartment Restoration Help.
Team Owner


Joined: Sep 2006
Posts: 31,280
Likes: 4,372
From: Westminster Maryland
Hi,
I'm pretty sure there was typically paint, (semi-flat black, done during what was called 'blackout'), on the fender aprons, the upper portions of the firewall, and in the wiper bay.
The blackout paint stopped on the face of the firewall about even with bottom of the heater box (which wasn't painted since it went on after the blackout was done).
The black out on the aprons extended forward to the core support, thus the hood hinges often had some black on them in addition to some body color overspray. The hood hinges started out plated, then received some body colored overspray, and then various amounts of black depending on just how well the 'mask' was placed for the 'blackout' operation.
The black out on the aprons began to 'peter-out' as the aprons turned toward the fenders. Generally there was very little if any 'blackout' in the areas of the aprons where the vacuum tank and vapor canister mounted on the driver's side on some cars, and where the washer bottle and wiper-door relay mounted on the passenger's side.
The 'blackout' was done quickly and easily (since the compartment was empty except for clips and brackets that were riveted to the firewall and aprons) since it was empty. The amount of 'blackout' varied from car to car just as the 'blackout' in the wheel wells varied from car to car. It was at best skimpy.... but was there.
Remember!!! the engine compartment in my pictures is a good example of what 'over restored' looks like! Use the pictures with caution!
Regards,
Alan
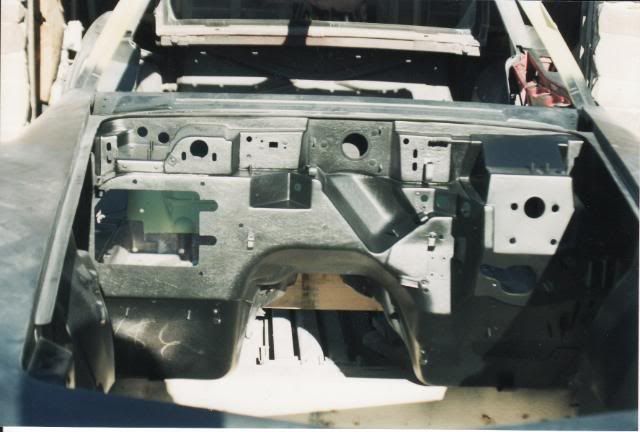
I believe this is how bare the compartment was when the 'blackout' was done. The paint in this picture extends too far down the firewall, it should stop around the bottom of the heater box opening and the beginning of the toe boards. But I did it the way I wanted to do it.
Note the texture visible on the surface of the fiberglass.... no gel coat.
I'm pretty sure there was typically paint, (semi-flat black, done during what was called 'blackout'), on the fender aprons, the upper portions of the firewall, and in the wiper bay.
The blackout paint stopped on the face of the firewall about even with bottom of the heater box (which wasn't painted since it went on after the blackout was done).
The black out on the aprons extended forward to the core support, thus the hood hinges often had some black on them in addition to some body color overspray. The hood hinges started out plated, then received some body colored overspray, and then various amounts of black depending on just how well the 'mask' was placed for the 'blackout' operation.
The black out on the aprons began to 'peter-out' as the aprons turned toward the fenders. Generally there was very little if any 'blackout' in the areas of the aprons where the vacuum tank and vapor canister mounted on the driver's side on some cars, and where the washer bottle and wiper-door relay mounted on the passenger's side.
The 'blackout' was done quickly and easily (since the compartment was empty except for clips and brackets that were riveted to the firewall and aprons) since it was empty. The amount of 'blackout' varied from car to car just as the 'blackout' in the wheel wells varied from car to car. It was at best skimpy.... but was there.
Remember!!! the engine compartment in my pictures is a good example of what 'over restored' looks like! Use the pictures with caution!
Regards,
Alan
I believe this is how bare the compartment was when the 'blackout' was done. The paint in this picture extends too far down the firewall, it should stop around the bottom of the heater box opening and the beginning of the toe boards. But I did it the way I wanted to do it.
Note the texture visible on the surface of the fiberglass.... no gel coat.


Drifting

Joined: Aug 2012
Posts: 1,650
Likes: 2
From: Tulsa Oklahoma
Hi,
I'm pretty sure there was typically paint, (semi-flat black, done during what was called 'blackout'), on the fender aprons, the upper portions of the firewall, and in the wiper bay.
The blackout paint stopped on the face of the firewall about even with bottom of the heater box (which wasn't painted since it went on after the blackout was done).
The black out on the aprons extended forward to the core support, thus the hood hinges often had some black on them in addition to some body color overspray. The hood hinges started out plated, then received some body colored overspray, and then various amounts of black depending on just how well the 'mask' was placed for the 'blackout' operation.
The black out on the aprons began to 'peter-out' as the aprons turned toward the fenders. Generally there was very little if any 'blackout' in the areas of the aprons where the vacuum tank and vapor canister mounted on the driver's side on some cars, and where the washer bottle and wiper-door relay mounted on the passenger's side.
The 'blackout' was done quickly and easily (since the compartment was empty except for clips and brackets that were riveted to the firewall and aprons) since it was empty. The amount of 'blackout' varied from car to car just as the 'blackout' in the wheel wells varied from car to car. It was at best skimpy.... but was there.
Remember!!! the engine compartment in my pictures is a good example of what 'over restored' looks like! Use the pictures with caution!
Regards,
Alan
I believe this is how bare the compartment was when the 'blackout' was done. The paint in this picture extends too far down the firewall, it should stop around the bottom of the heater box opening and the beginning of the toe boards. But I did it the way I wanted to do it.
Note the texture visible on the surface of the fiberglass.... no gel coat.
Scott
Team Owner
Joined: Sep 2006
Posts: 31,280
Likes: 4,372
From: Westminster Maryland
Hi Fat Cat,
Yes, the Judging Guide indicates that points should be deducted for over restored areas/components.
I guess the most often used phrase is that cars/parts should restored to a condition/finish that would have been typical of factory production.
Regards,
Alan
Yes, the Judging Guide indicates that points should be deducted for over restored areas/components.
I guess the most often used phrase is that cars/parts should restored to a condition/finish that would have been typical of factory production.
Regards,
Alan
Thread Starter
Safety Car


Joined: Mar 2005
Posts: 4,255
Likes: 82
From: Brampton Ont.
Thanks agqin for all the replies;
Thanks Alan, I'll try to get the Krylon #1613 but I heard it was discontinued. I think I may go the way of 320 grit and paint. Hopefully one coat will do it.
I haven't gotten to that point yet but would be interested in any coments.
Thanks Bruce, I picked up the Spray Nine but couldn't find either of the Duplicolor, maybe I'll try again tomorrow.
Thanks for the reply Mooser, any idea where to pick up the Zinc-Chromate, or a brand or number would help.
I don't plan on having the car judged, I only want to make it clean as well as somewhat details, but I appreciate the suggestion.
I'll keep that in mind, thanks.
Thanks for the info Alan.
Today I worked on the engine, although I only got half done. It would have taken way to long to polish up the M/T valve covers I had on before so I replaced them with some new ones I had for about 25 years.


Semi-flat black has about the right amount of sheen to be similar to what was used in St.Louis.
People use and like various paints, SEM, John Deere Blitz Black, Krylon #1613, Eastwood to name a few.
The fiberglass may be primed, but if it's nice and clean and sanded with about 320 paper, you can paint without primer. A couple of light coats should be enough.
Many of the brackets used to mount things in the compartment were painted semi-flat black too. But, since often those parts were originally painted by being 'dipped' they may have a little more gloss than the aprons or firewall. Depending on their condition you may want to use some primer.
Spray Nine is an excellent cleaner and degreaser. Spray it on, scrub with a scotch brite, rinse with water, repeat on next section. The scotch brite will help remove any loose material, and scuff the surface for the paint. I wouldn't use brake cleaner, the grease & wax remover will probably suffice for any stubborn residue.As for primer, I only used it on the metal parts, not the fiberglass.
It has been a long time since I did my engine compartment, I can't remember what brand paint I used, but I used low gloss black in a spray can. These days, for other parts, I like to use Duplicolor DE1634 low gloss black engine enamel.
As for the trans, the only "aluminum" paint I have used that looks somewhat real is Duplicolor DE1650 cast coat aluminum engine enamel.
keep the etching primer on the shelf, it's addictive and can go wrong quickly. Get a can or two of zinc-chromate for bare aluminum (sticky but will work better)
I've never been too happy with krylon primer (top coats are fairly decent), just doesn't seem to stick as good as others.
I've never been too happy with krylon primer (top coats are fairly decent), just doesn't seem to stick as good as others.
Hi,
I'm pretty sure there was typically paint, (semi-flat black, done during what was called 'blackout'), on the fender aprons, the upper portions of the firewall, and in the wiper bay.
The blackout paint stopped on the face of the firewall about even with bottom of the heater box (which wasn't painted since it went on after the blackout was done).
The black out on the aprons extended forward to the core support, thus the hood hinges often had some black on them in addition to some body color overspray. The hood hinges started out plated, then received some body colored overspray, and then various amounts of black depending on just how well the 'mask' was placed for the 'blackout' operation.
The black out on the aprons began to 'peter-out' as the aprons turned toward the fenders. Generally there was very little if any 'blackout' in the areas of the aprons where the vacuum tank and vapor canister mounted on the driver's side on some cars, and where the washer bottle and wiper-door relay mounted on the passenger's side.
The 'blackout' was done quickly and easily (since the compartment was empty except for clips and brackets that were riveted to the firewall and aprons) since it was empty.
Today I worked on the engine, although I only got half done. It would have taken way to long to polish up the M/T valve covers I had on before so I replaced them with some new ones I had for about 25 years.


Race Director


Joined: Apr 2011
Posts: 11,183
Likes: 3,335
From: North of Toronto - Ontario
Team Owner
Joined: Sep 2006
Posts: 31,280
Likes: 4,372
From: Westminster Maryland
Hi mmvlfe
Looks like you're making good progress.
The Krylon #1613 is still being produced but it's no longer available at the consumer retail level.
I order mine from a company named Film Tools. Even with shipping it's still a reasonable cost.
You might try some of the other suggestions.... people report good results with them.
Just stay away from the cheap 'no name paint' spray paint at the home store.
As I said in my first post I like the #1613 because I believe it's lacquer based so it re-coats and touches up well.
Regards,
Alan
Corvette Stories
The Best of Corvette for Corvette Enthusiasts

Top 10 Most Expensive Corvettes Ever Sold on Bring A Trailer
Brett Foote
10 Things Every Corvette Owner Needs (2026 Edition)
Michael S. Palmer
8 Most "Only Corvette Owners Understand" Quirks and Problems
Pouria Savadkouei
10 Reasons the C6 Z06 is Still A Performance Benchmark After 20 Years
Joe Kucinski
How Much Horsepower Every Corvette Engine "LOST" in 1972
Joe Kucinski
Top 10 DOs and DON'Ts for Protecting Your Convertible Top!
Michael S. Palmer
Top 10 Most Explosive Corvettes Ever Made: Power-to-Weight Ratio Ranked!
Joe Kucinski
150 hp to 1,250 hp: Every Corvette Generation Compared by the Specs That Matter
Joe Kucinski
8 Coolest Corvette Pace Cars (and Replicas) of All Time
Verdad Gallardo
Thread Starter
Safety Car
Joined: Mar 2005
Posts: 4,255
Likes: 82
From: Brampton Ont.
You can say that again, but I'm getting tired.
Thanks Bruce, I'll stop by there when I get the chance. Thanks for the reply Mooser, maybe the CTC store I went to was out of stock, I'll check another store.
I'll try the stores that were mentioned and are local to me first and will post back.
Today I took more of the firewall apart and used a container of Spray Nine and scotch brite. Tomorrow I have a doctors and dentists appointment as well I have to run several errands so I don't know how much I can complete.
Progress Pictures.


Thanks Bruce, I'll stop by there when I get the chance. Thanks for the reply Mooser, maybe the CTC store I went to was out of stock, I'll check another store.
Today I took more of the firewall apart and used a container of Spray Nine and scotch brite. Tomorrow I have a doctors and dentists appointment as well I have to run several errands so I don't know how much I can complete.
Progress Pictures.


Race Director
Joined: Apr 2011
Posts: 11,183
Likes: 3,335
From: North of Toronto - Ontario
Grab a roll of aluminum foil while your out, works great for masking all the lines, hoses, wires, etc. etc. etc. sticking out of the firewall that you can't / don't want to remove.
The rubber grommets (such as the three or four hole one coming out near the throttle cable), if you can reach them from the inside, pop them all the way in and mask the cable/hoses etc off and stuff them inside an inch or two, much cleaner job.
Alternatively, if you run a trip or two of masking tape around the outside of the grommet and them pop them inwards just enough so the masking tape is in the hole it will make for a nicer job when you pop them back out. It's otherwise hard to get a nice clean line around them and it looks exactly like it was, a masked grommet.
M

Last edited by Mooser; Oct 2, 2013 at 08:32 PM.
The ORIGINAL and bestest

Joined: Oct 2000
Posts: 10,009
Likes: 240
From: Toronto Ontario
Toronto Events Coordinator
It looks really clean now Frank! How did you like the Spray Nine? It is my cleaning secret weapon, I put that **** on everything!! 
Seriously, I buy it by the gallon when it goes on sale, I have found nothing better!
Great tip from Mooser about the aluminum foil, it is a real time saver compared to taping and masking irregular shapes.

Seriously, I buy it by the gallon when it goes on sale, I have found nothing better!
Great tip from Mooser about the aluminum foil, it is a real time saver compared to taping and masking irregular shapes.
Thread Starter
Safety Car
Joined: Mar 2005
Posts: 4,255
Likes: 82
From: Brampton Ont.
Sorry for the late update, I had gotten behind on my other chores.
Mooser, I agree, tin foil will work out great and I can get some for $2.00 at the dollar store, hey one time use.....why not. Thanks for the photo....what colour is that and is that the primer coat. Which year was that done?
Bruce, thanks for the tip, Spray Nine works like a charm and as you, I'm buying a gallon or two when it goes on sale at CTC.
I've order several cans of SEM Paint Trim Fast Dry Flat Black Aerosol 15.5 oz. 39143 as I've read it's one of the better choices. In the meantime I've decided to clean parts and work on body mount repairs which I've started new threads seeking more advice.

I was thinking of wire wheeling, degreasing then applying self etch primer below. I'm not sure what the top coat colour should be. By the way, the tank has already been cleaned.

These are the conditions of some of the parts although I'm not sure exactly how to refurbish them. I was thinking of replacing the seals in the booster but was told they're a bitch to seperate and replace so I'm on the fence.


Mooser, I agree, tin foil will work out great and I can get some for $2.00 at the dollar store, hey one time use.....why not. Thanks for the photo....what colour is that and is that the primer coat. Which year was that done?
Bruce, thanks for the tip, Spray Nine works like a charm and as you, I'm buying a gallon or two when it goes on sale at CTC.
I've order several cans of SEM Paint Trim Fast Dry Flat Black Aerosol 15.5 oz. 39143 as I've read it's one of the better choices. In the meantime I've decided to clean parts and work on body mount repairs which I've started new threads seeking more advice.
I was thinking of wire wheeling, degreasing then applying self etch primer below. I'm not sure what the top coat colour should be. By the way, the tank has already been cleaned.
These are the conditions of some of the parts although I'm not sure exactly how to refurbish them. I was thinking of replacing the seals in the booster but was told they're a bitch to seperate and replace so I'm on the fence.


Last edited by Maymyvetteliveforevr; Oct 10, 2013 at 09:13 AM.


