


Engine Compartment Restoration Help.
Thread Starter
Safety Car


Joined: Mar 2005
Posts: 4,255
Likes: 82
From: Brampton Ont.
I'm in the middle of a body resto and would like to spend some time on the engine compartment. The car will not be NCRS but I would like to have it as original as possible or......clean and details as I can.
Any advise will be appreciated.
These are the before pictures, and since then engine has been removed. Tomorrow I will powerwash the engine and compartment and remove as much as I can.


Any advise will be appreciated.
These are the before pictures, and since then engine has been removed. Tomorrow I will powerwash the engine and compartment and remove as much as I can.


Melting Slicks

Joined: May 2011
Posts: 2,753
Likes: 119
From: Springfield Missouri
start by taking pictures, LOTS of them!!!!!! then start taking parts off and label them, put bolts in plastic baggies, label them, tape bolts to the parts that come off to help when putting back on. Clean parts, paint parts. clean motor area, paint motor area. put engine and all parts back on. GET LOAN TO BUY ALL NEW PARTS, or hit the Lottery.
or pay someone to do all this work. There a web site called the corvette restoration page, he shows how to everything. I keep checking it to see how he is doing. He even had time to get married.
or pay someone to do all this work. There a web site called the corvette restoration page, he shows how to everything. I keep checking it to see how he is doing. He even had time to get married.
Team Owner


Joined: Sep 2006
Posts: 31,270
Likes: 4,362
From: Westminster Maryland
Hi mm,
I agree that the more you disassemble the more detailed the job can be.
You should look at each part for clues as to what color paint, what type of plating, or whether the part was 'natural', and then try to duplicate that finish.
Having the engine out makes it much easier because your access to everything is so much better.
There are many, many different 'detail' paints available that can make a very nice looking engine compartment for not much $$ but lot's of work.
Since the compartment is what many people look at first I think it's worth the effort.
Good Luck!
Regards,
Alan


Team Owner

Joined: Jan 2006
Posts: 37,637
Likes: 3,118
From: Crossville TN
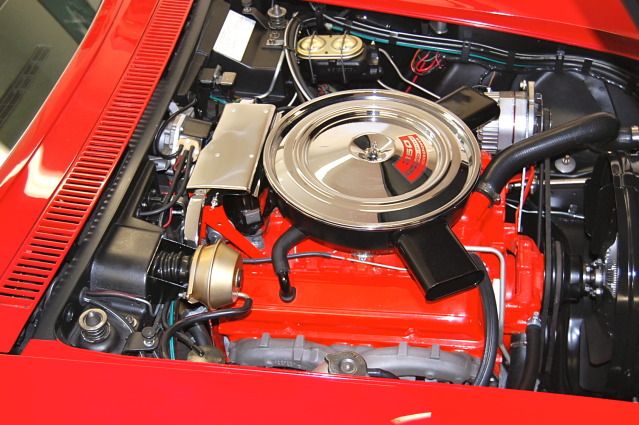
For exhaust manifolds, use Seymour High-Temp "Cast Blast" cast iron colored spray paint. It is a ceramic paint and is good for 1200 F. Remove the manifolds and have them cleaned WELL (bead blast is good, but brush/solvent cleaning and a good wipe-down with lacquer thinner will do). Spray the manifolds with two good coats of "Cast Blast" and allow to dry. Whenever you are ready for them, install on the engine. Take care with damage to the paint, as they will not be fully cured until the engine has run for about 4-6 hours.
The paint will bake onto the manifolds as you drive the car. It will stink something awful, so keep your windows down. You will see some "smoke" (fumes) come out of the engine compartment, but this is normal.
When they finally cure, you will have manifolds that look like fresh, new cast iron that will stay that way for many years. You can just see some of the left exhaust manifold in the photo below. Mine has looked that way for over 4 years (when they were coated), and I've put over 10K miles on the car since then.

The ORIGINAL and bestest

Joined: Oct 2000
Posts: 10,009
Likes: 240
From: Toronto Ontario
Toronto Events Coordinator
Remove any runs of sealer with a solvent, and any blobs of bonding adhesive with a chisel. Then remove everything that can be possibly be removed, and then clean, clean, clean! After power washing, use Spray Nine cleaner and a Scotch-Brite pad, power washing alone will not really clean it. After it is squeaky clean, wipe it all down with Duplicolor Grease & Wax remover; which you can buy at Canadian Tire. Then you will be ready for paint!
Looks like things are coming along Frank!!!!

Looks like things are coming along Frank!!!!
Corvette Stories
The Best of Corvette for Corvette Enthusiasts

Top 10 Most Expensive Corvettes Ever Sold on Bring A Trailer
Brett Foote
10 Things Every Corvette Owner Needs (2026 Edition)
Michael S. Palmer
8 Most "Only Corvette Owners Understand" Quirks and Problems
Pouria Savadkouei
10 Reasons the C6 Z06 is Still A Performance Benchmark After 20 Years
Joe Kucinski
How Much Horsepower Every Corvette Engine "LOST" in 1972
Joe Kucinski
Top 10 DOs and DON'Ts for Protecting Your Convertible Top!
Michael S. Palmer
Top 10 Most Explosive Corvettes Ever Made: Power-to-Weight Ratio Ranked!
Joe Kucinski
150 hp to 1,250 hp: Every Corvette Generation Compared by the Specs That Matter
Joe Kucinski
8 Coolest Corvette Pace Cars (and Replicas) of All Time
Verdad Gallardo
Thread Starter
Safety Car
Joined: Mar 2005
Posts: 4,255
Likes: 82
From: Brampton Ont.
First off thanks for all the replies lvmyvt76, Alan 71, suj, MrJlr,7T1vette and 7t2vette, AGVI.
I powerwashed the motor, tranny and engine compartment today and started to use a razor blade to remove all overspray in the engine compartment. Tomorrow I'll work on the motor but in the meantime, I have several questions.
I agree.............Wooow Alan, if mine could look half as good I'd be happy, thanks for posting.
That's what I'm hoping I can get help with, what parts get what colour. Also do you prime everything with let's say self etch primer first?
I have headers and they're coated so I was going to use VHT high heat paint for those. According to the instructions they say it needs to be at around 300 degrees for 30 minutes and so on and so on. Therefore I have the headers covered, now onto the rest.
I removed most of the runs as you can see in the photos but still need to go over them with a solvent, would brake cleaner be too harsh? Looks like I'm going to need to remove more parts. It's been powerwashed twice now so after the solvent, (brake cleaner?) I'll go over it with Spray Nine and scotch brite? I'll drop by CTC and pick up a can of Duplicolor Grease & Was Remover, I'll assume one can will do it?
What brand and colour of paint should I use for each section. The engine I have covered but not the tranny.


That's what I'm hoping I can get help with, what parts get what colour. Also do you prime everything with let's say self etch primer first?
Remove any runs of sealer with a solvent, and any blobs of bonding adhesive with a chisel. Then remove everything that can be possibly be removed, and then clean, clean, clean! After power washing, use Spray Nine cleaner and a Scotch-Brite pad, power washing alone will not really clean it. After it is squeaky clean, wipe it all down with Duplicolor Grease & Wax remover; which you can buy at Canadian Tire. Then you will be ready for paint!
What brand and colour of paint should I use for each section. The engine I have covered but not the tranny.


Last edited by Maymyvetteliveforevr; Sep 30, 2013 at 07:20 PM.
Team Owner
Joined: Sep 2006
Posts: 31,270
Likes: 4,362
From: Westminster Maryland
Hi,
I'll reply for the aprons and fire wall.
The fiberglass was painted during a process known as "blackout" when the engine bay was completely empty except for the various clips that were riveted to the fiberglass to carry hoses and wires.
Semi-flat black has about the right amount of sheen to be similar to what was used in St.Louis.
People use and like various paints, SEM, John Deere Blitz Black, Krylon #1613, Eastwood to name a few.
The fiberglass may be primed, but if it's nice and clean and sanded with about 320 paper, you can paint without primer. A couple of light coats should be enough.
Many of the brackets used to mount things in the compartment were painted semi-flat black too. But, since often those parts were originally painted by being 'dipped' they may have a little more gloss than the aprons or firewall. Depending on their condition you may want to use some primer.
But generally the less paint you use to achieve the look you want the better it is.
Good luck as you get started.
Regards,
Alan
Pro


Joined: Aug 2000
Posts: 610
Likes: 168
From: Vancouver B.C.
Thinking of freshening up my engine this winter. Did it many years ago, but need a redo. Would like to do a more indepth detail this time.
What are your thoughts on things like the vacuum actuators and hinges, etc. Getting harder to find guys around here that anodize metal anymore. As well, I like to avoid disassembling things like the actuators that are working fine. How are some of these paint options that make things look anodized. Waste of time or? Only looks good if disassembled anyway? For me, the engine bay itself rather than the motor is what really makes a nice looking engine bay. Engine seems an easier process. Tips on the bay if you guys have them. Thanks.
What are your thoughts on things like the vacuum actuators and hinges, etc. Getting harder to find guys around here that anodize metal anymore. As well, I like to avoid disassembling things like the actuators that are working fine. How are some of these paint options that make things look anodized. Waste of time or? Only looks good if disassembled anyway? For me, the engine bay itself rather than the motor is what really makes a nice looking engine bay. Engine seems an easier process. Tips on the bay if you guys have them. Thanks.
The ORIGINAL and bestest
Joined: Oct 2000
Posts: 10,009
Likes: 240
From: Toronto Ontario
Toronto Events Coordinator
I removed most of the runs as you can see in the photos but still need to go over them with a solvent, would brake cleaner be too harsh? Looks like I'm going to need to remove more parts. It's been powerwashed twice now so after the solvent, (brake cleaner?) I'll go over it with Spray Nine and scotch brite? I'll drop by CTC and pick up a can of Duplicolor Grease & Was Remover, I'll assume one can will do it?
What brand and colour of paint should I use for each section. The engine I have covered but not the tranny.
What brand and colour of paint should I use for each section. The engine I have covered but not the tranny.
It has been a long time since I did my engine compartment, I can't remember what brand paint I used, but I used low gloss black in a spray can. These days, for other parts, I like to use Duplicolor DE1634 low gloss black engine enamel.
As for the trans, the only "aluminum" paint I have used that looks somewhat real is Duplicolor DE1650 cast coat aluminum engine enamel.
Race Director


Joined: Apr 2011
Posts: 11,183
Likes: 3,335
From: North of Toronto - Ontario
Three top notch sources of info right there to get you going.
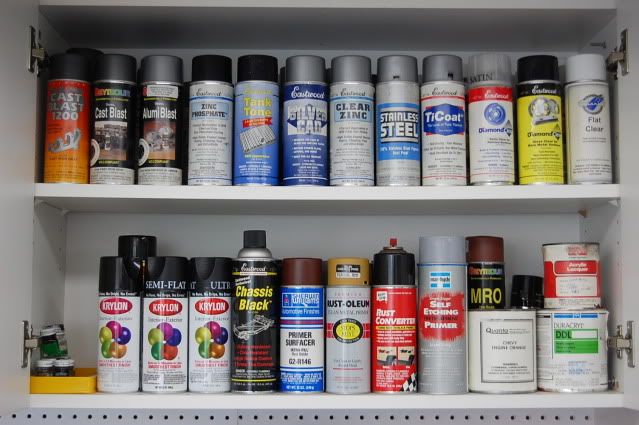
keep the etching primer on the shelf, it's addictive and can go wrong quickly. Get a can or two of zinc-chromate for bare aluminum (stinky but will work better)
I've never been too happy with krylon primer (top coats are fairly decent), just doesn't seem to stick as good as others.
Shoot test panels with different paints/colors and then write down what you like (especially for a year from now when you can't remember which of the 8 cans of "alumiblast" you've gone through was the one that looked good.
BTW, Alan, your paint cabinet looks better than my car, thanks for keeping me grounded
Mooser
Last edited by Mooser; Oct 1, 2013 at 06:11 PM.
Le Mans Master

Joined: Oct 2002
Posts: 7,098
Likes: 378
From: Las Vegas - Just stop perpetuating myths please.
I think this is too late and sorry i bust anyones bubble but the firewall should only be cleaned and polished - no sanding or paint. The FW is just fiberglass with a get coat and sanding will only expose the fiberglass fibers. If already sanded i really dont know what the fix is other than maybe a new gel coat.
Paint over the fiberglass FW would really have to be some tough stuff and i dont know of any hi-temp epoxy paints.
Had to say something as i see this all the time and sanding/painting is not original. There was a forum member once that was a great enthusiast here but got carried away and POR15'd the FW. Just a few months later he was back at it trying to sand the POR15 away - yuck.
My cheap 2 cents is just clean and polish the FW unless it needs repairs - then just glass it.
cardo
Le Mans Master
Joined: Oct 2002
Posts: 7,098
Likes: 378
From: Las Vegas - Just stop perpetuating myths please.
Then what covers the glass fibers? U wont see and fibers hanging off the FW. Just resin then as the FW was poped outa the mold.
Still had no paint on it.
cardo0
Still had no paint on it.
cardo0

Melting Slicks

Joined: Feb 2004
Posts: 2,111
Likes: 32
From: Damascus MD
I am pretty sure the heater box was originally natural.
The blackout was done after the paint so on areas like the radiator support and hood hinges you would have both body color and black.
Bill

Le Mans Master
Joined: Oct 2002
Posts: 7,098
Likes: 378
From: Las Vegas - Just stop perpetuating myths please.
What "blackout"? I will look again but i recall my FW is same top to bottom.
Yes i can see fibers but they are not hanging loose. The fibers are covered by something - whatever - but not exposed.
So to be original then someone would have to "blackout" and undermined amount of the FW? Im not buying that.
cardo0
Yes i can see fibers but they are not hanging loose. The fibers are covered by something - whatever - but not exposed.
So to be original then someone would have to "blackout" and undermined amount of the FW? Im not buying that.
cardo0
Team Owner
Joined: Jan 2006
Posts: 37,637
Likes: 3,118
From: Crossville TN
VHT paint is pretty good....but for exhaust manifolds, it can't even come close to what Seymour Cast Blast does.
I used VHT to coat the alternator housing in photo of my prior post. It has looked great for 4 years, also. But, it doesn't see nearly 1000*F. I know what Seymour does for manifolds; I can't imagine anything else being so good.
But, to each his/her own....
Wish you the best on your "trek"!
I used VHT to coat the alternator housing in photo of my prior post. It has looked great for 4 years, also. But, it doesn't see nearly 1000*F. I know what Seymour does for manifolds; I can't imagine anything else being so good.
But, to each his/her own....
Wish you the best on your "trek"!

Drifting

Joined: Aug 2012
Posts: 1,650
Likes: 2
From: Tulsa Oklahoma
This is getting interesting....cardo0 maybe post your engine bay for us to see.
maymyveytteliveforever, great thread, I am about to go through this process myself...
Hard to argue with Alan71's engine bay. Wow!
maymyveytteliveforever, great thread, I am about to go through this process myself...
Hard to argue with Alan71's engine bay. Wow!