


Galvanized Frame
Team Owner


Joined: Jan 2006
Posts: 37,637
Likes: 3,118
From: Crossville TN
I would think that an epoxy paint or powdercoat would be best for your galvanized frame. POR is made for rusty frames...not CLEAN ones. Other 'normal' paints may not stick well. If the galvanized surface is cleaned well with lacquer thinner, Prep-Sol, etc. epoxy should stick just fine. If you consider powdercoating, have a freshly galvanized sample piece coated first...just to be certain of good results.
The ORIGINAL and bestest


Joined: Oct 2000
Posts: 10,009
Likes: 240
From: Toronto Ontario
Toronto Events Coordinator
The ORIGINAL and bestest
Joined: Oct 2000
Posts: 10,009
Likes: 240
From: Toronto Ontario
Toronto Events Coordinator
Drifting


Joined: May 2005
Posts: 1,968
Likes: 44
From: East TN
My car is black everywhere, so I don't know what this would look like. I guess it's a gamble. The frame is very visible in the engine compartment so if it stayed shiny I think it would look cool. I just haven't seen many frames where the frame color contrasts with the body color. I know one member who has a really sweet late model c3 with a white body and an orange powder coated frame. I think his handle is Mike-something. I need to look at his more closely. Plus, it's not guaranteed to stay shiny. It may oxidize and that is a dull gray and that would suck. I'd rather have a cool black frame in that case.
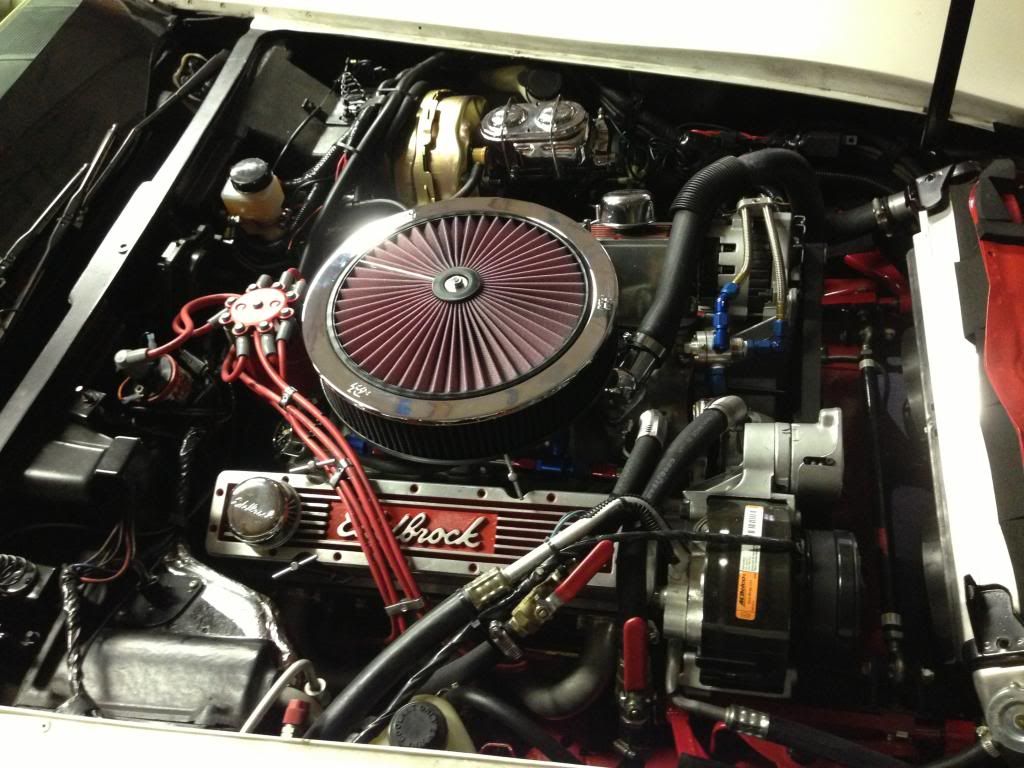
 I had mine acid dipped, zinc phosphate wash, and powdercoated with RAL 3000 Flame Red. I'm really liking my color choice. I coated the inside of the frame with Fluid Film. Here's some photos.
Under the hood you can see a lot of the chassis.


Not very noticeable from a distance.


Le Mans Master


Joined: May 2003
Posts: 8,877
Likes: 3,556
From: Fernandina Beach FL
2023 Restomod of the Year finalist
2020 C3 of the Year Winner - Modified
Mike- your car looks incredible!!!
Yep- that's Avner- in Israel. IIRC he was telling me the labor is very inexpensive. He's working on his motorcycle Cafe Racer project right now-putting Ducati parts on a Honda CBX frame.
Roger Honegger
I think it was "customvette"
Pic link
http://s101.photobucket.com/user/cus...art=all&page=1
I think it was "customvette"
Pic link
http://s101.photobucket.com/user/cus...art=all&page=1

Thread Starter
Pro

Joined: Apr 2009
Posts: 650
Likes: 1
The Chevelle folks have a lot of experience with HDG. That is where I got my information and the courage to move forward with mine. I had my frame race welded per the Chevy Power book. Additionally I had the frame welds reinforced at the rear kick ups. The reason for that is the acid bath before the frame gets galvanized. My frame was considered pristine, but you never know. Any badly rusted areas would have just disappeared in the acid bath which is not good!! So the extra welding gave me a little peace of mind. Frame is solid and straight.

Thread Starter
Pro
Joined: Apr 2009
Posts: 650
Likes: 1
Wow!!!! So this guys was super serious. I can identify with his thinking, LOL. OCD for sure. Barring any accidents, his car can be passed down for generations. My plan is to have my bird cage sand blasted and painted. I think that will do the trick. The only reason I galvanized is because of the rust resistance on the INSIDE of the frame rails with the structural foam inside. I figure there will be some moisture in there somewhere between the foam and the frame and I don't want that rusting from the inside out.
Thread Starter
Pro
Joined: Apr 2009
Posts: 650
Likes: 1
[QUOTE=MIKE80;1587605116]Thanks! I looked into galvanizing, but decided to go a different route. Yours look great, but I would get some paint on it before it oxidizes. I had mine acid dipped, zinc phosphate wash, and powdercoated with RAL 3000 Flame Red. I'm really liking my color choice. I coated the inside of the frame with Fluid Film. Here's some photos.
Under the hood you can see a lot of the chassis.
Ha ha I knew it was Mike something. Yeah man, I have always liked your C3. It's really nice and I like the fact that you drive it. It's not a garage queen. Those pics are great. Thank you. It gives me a perspective on how much frame you see from many different perspectives. It's hard to recall when you have a black frame and a black car. Things kind of get lost in the shadows.
Thanks for these.
I had mine acid dipped, zinc phosphate wash, and powdercoated with RAL 3000 Flame Red. I'm really liking my color choice. I coated the inside of the frame with Fluid Film. Here's some photos.Under the hood you can see a lot of the chassis.
Ha ha I knew it was Mike something. Yeah man, I have always liked your C3. It's really nice and I like the fact that you drive it. It's not a garage queen. Those pics are great. Thank you. It gives me a perspective on how much frame you see from many different perspectives. It's hard to recall when you have a black frame and a black car. Things kind of get lost in the shadows.
Thanks for these.
Corvette Stories
The Best of Corvette for Corvette Enthusiasts

Top 10 Most Expensive Corvettes Ever Sold on Bring A Trailer
Brett Foote
10 Things Every Corvette Owner Needs (2026 Edition)
Michael S. Palmer
8 Most "Only Corvette Owners Understand" Quirks and Problems
Pouria Savadkouei
10 Reasons the C6 Z06 is Still A Performance Benchmark After 20 Years
Joe Kucinski
How Much Horsepower Every Corvette Engine "LOST" in 1972
Joe Kucinski
Top 10 DOs and DON'Ts for Protecting Your Convertible Top!
Michael S. Palmer
Top 10 Most Explosive Corvettes Ever Made: Power-to-Weight Ratio Ranked!
Joe Kucinski
150 hp to 1,250 hp: Every Corvette Generation Compared by the Specs That Matter
Joe Kucinski
8 Coolest Corvette Pace Cars (and Replicas) of All Time
Verdad Gallardo
Thread Starter
Pro
Joined: Apr 2009
Posts: 650
Likes: 1


Drifting

Joined: Aug 2013
Posts: 1,453
Likes: 88
From: Easton Pennsylvania


Drifting
Joined: May 2005
Posts: 1,968
Likes: 44
From: East TN
Ha ha I knew it was Mike something. Yeah man, I have always liked your C3. It's really nice and I like the fact that you drive it. It's not a garage queen. Those pics are great. Thank you. It gives me a perspective on how much frame you see from many different perspectives. It's hard to recall when you have a black frame and a black car. Things kind of get lost in the shadows.
Thanks for these.
Thanks for these.
 No problem. Yeah, I wish I had more time to drive the vette

Le Mans Master
Joined: Dec 2009
Posts: 6,397
Likes: 649
From: Saskatoon Saskatchewan
That's the coolest looking frame I've ever seen! What a huge bonus to have the inside of the frame protected as well. I was unaware that this could be done. If I ever do a frame off that will certainly be what I do to my frame.
Thread Starter
Pro
Joined: Apr 2009
Posts: 650
Likes: 1
It's nice to have both the inside and outside of the frame protected in addition to the acid bath that takes place before the galvanizing. Knowing it's got zero rust is a huge plus. But I still feel galvanizing is overkill. The only reason I galvanized is because I'm putting structural foam in the frame. If you aren't doing that, then a good frame cleaned and painted is all you would need.
The ORIGINAL and bestest
Joined: Oct 2000
Posts: 10,009
Likes: 240
From: Toronto Ontario
Toronto Events Coordinator
Thread Starter
Pro
Joined: Apr 2009
Posts: 650
Likes: 1
Man where do I start. I've done so much research on this subject I'm

I'll assume you just want to know how it pertains to our C3 chassis and not it's history or real world application. If you want that too, then I'll post some links. Just know that Chrysler, Ford, BMW, Mercedes and others all use it in some form or another in their production chassis. There are mainly two types of expanding foam out there: Open cell (absorbs water) and closed cell (water resistant). I'll be using a polyurethane based, closed cell 16lb/sq ft density structural foam. This stuff is like a rock. It's a two part application that you mix together. After you initially join the two substances you have about 45 seconds until the chemical reaction begins and it starts to expand. This time varies due to ambient air temperature so beware of that. Additionally, the more dense the foam, the less expansion ratio you have. The place I'm getting the foam from offers densities in 2lb, 4lb, 8lb and 16lb densities.
Here's a link to the site:
http://www.uscomposites.com/foam.html
I still haven't worked out how I'm going to get the foam into the chassis in enough time before it expands. I know I'll be doing it in stages. In the site's FAQ, it states you can layer the foam as long as you wait 20 minutes for the first layer to cure. My plan is to put in all the known bolts (brake line bolts, rack bolts, etc..) into the chassis with release agent applied. I'll stand the chassis up on its nose with the *** end pointing straight up perpendicular to the floor. Then apply the foam in stages taking advantage of holes like this one that run up both sides of the frame:

Have a clear tube inserted and awaiting the mixed agent as I pour it in the tube with help of a funnel. All other holes and orifices will be covered with plastic and then duct taped. I'll go a little at a time until I've completed the process working my way up.
I plan to foam from the front spring hats all the way back to the rear kick-ups.
I can post more links on the subject if you are interested. I will be doing a very comprehensive right up of my experience.
Thread Starter
Pro
Joined: Apr 2009
Posts: 650
Likes: 1