C3 Tech/Performance V8 Technical Info, Internal Engine, External Engine, Basic Tech and Maintenance for the C3 Corvette
Sponsored by:
Sponsored by:

Loose Rear Spring HELP!

Thread Tools
 
Search this Thread
 
Old Oct 1, 2015 | 11:15 PM
  #1  
Wg72C3's Avatar
Wg72C3
Thread Starter
Intermediate
 
Joined: Aug 2014
Posts: 49
Likes: 9
From: Miami Florida
Default Loose Rear Spring HELP!

I own a 72 SB with a 4 speed. I drive it as much as I can and began to notice a thump coming from the rear as I changed gears, especially 1st and 2nd. Thought it was time for a rear differential lube change, bought all the supplies, took the spare tire and carrier off. I was surprised to find that 2 of the bolts holding the leaf spring to the differential were gone, 1 was completely loose and only 1 was still holding the leaf in place! If I hadn't noticed and continued driving it this way, this could have been very, very bad!

What is the best way to remove the remaining bolt, re-align the bracket, and install the bolts? Should the wheels be on the ground / supported, and then remove the last bolt?


Reply
Old Oct 1, 2015 | 11:22 PM
  #2  
slickfx3's Avatar
slickfx3
Safety Car
10 Year Member
 
Joined: Oct 2008
Posts: 4,022
Likes: 30
From: Los Angeles CA
Default

the weight of the car is pushing the spring towards the carrier, you can leave the car on the ground, looks like an easy fix, go get your replacement bolts and don't forget the lock washers LOL

looks good down there, very little rust, maybe that is the reason why they backed out( no rust holding it in LOL)

Last edited by slickfx3; Oct 1, 2015 at 11:25 PM.
Reply
Old Oct 1, 2015 | 11:22 PM
  #3  
toobroketoretire's Avatar
toobroketoretire
Melting Slicks
 
Joined: Apr 2009
Posts: 2,632
Likes: 112
From: Great Plains Iowa
Default

Set it on safety stands and install new bolts torqued to 55 ft/lbs.
Reply
Old Oct 1, 2015 | 11:59 PM
  #4  
havesometo's Avatar
havesometo
Drifting
10 Year Member
 
Joined: Dec 2012
Posts: 1,360
Likes: 59
From: Meldrim Georgia
Default

Originally Posted by slickfx3
the weight of the car is pushing the spring towards the carrier, you can leave the car on the ground, looks like an easy fix, go get your replacement bolts and don't forget the lock washers LOL

looks good down there, very little rust, maybe that is the reason why they backed out( no rust holding it in LOL)
Reply
Old Oct 2, 2015 | 12:54 AM
  #5  
CanadaGrant's Avatar
CanadaGrant
Safety Car
15 Year Member
Liked
Loved
Community Favorite
 
Joined: Apr 2006
Posts: 4,057
Likes: 421
From: BC
Default

Originally Posted by toobroketoretire
Set it on safety stands and install new bolts torqued to 55 ft/lbs.
I believe the torque on the leaf spring center plate bolts is 70 ft/lbs and it is done with the weight of the car on the wheels, not jack stands.
Reply
Old Oct 2, 2015 | 06:48 AM
  #6  
Bob K's Avatar
Bob K
Melting Slicks
Supporting Lifetime Gold
20 Year Member
Photogenic
Liked
Community Favorite
 
Joined: Nov 2002
Posts: 2,884
Likes: 260
From: Jamison Pa
St. Jude Donor '11-'25
Default Rear spring torque

CanadaGrant is correct. The weight of the car should be on the spring with the car sitting on the ground. If not you risk breaking the ears off of the rear diff cover.

Bob K.
Reply
Old Oct 2, 2015 | 10:48 AM
  #7  
Wg72C3's Avatar
Wg72C3
Thread Starter
Intermediate
 
Joined: Aug 2014
Posts: 49
Likes: 9
From: Miami Florida
Default

Thanks for the responses everyone. I put the car back onto the ground, with the rear on ramps, and this took the pressure off the bolts. I removed the loose bolt that is seen dangling in the background (it was being held up by the exhaust!) and bought 2 bolts to install on the front of the pumpkin. Once these are loosely in place, I will remove the last bolt on the rear and buy 2 bolts to install on the rear. I will then torque them all down including lock washers and thread lock on all the bolts too!

The car is almost all original with only 87k miles. The bottom is in good shape, only light surface rust, mostly just dirty. I haven't wanted to get a pressure washer down in there as I have found many of the original factory markings in this area, including above and in front the gas tank. Plus, don't want to get with water up into the half-shafts.

Thanks, I'll update the post when Im done.
Reply
Old Oct 2, 2015 | 12:08 PM
  #8  
MelWff's Avatar
MelWff
Race Director
20 Year Member
Liked
Loved
Community Favorite
 
Joined: May 2006
Posts: 18,741
Likes: 2,583
Default

you may want to run a tap through the holes in the differential cover to clean the threads and lessen the chance of stripping or breaking of the cover.
Reply
Corvette Stories

The Best of Corvette for Corvette Enthusiasts

story-0

10 Ugly Corvettes That We Still Kinda Love

 Joe Kucinski
story-1

Top 10 Most Expensive Corvettes Ever Sold on Bring A Trailer

 Brett Foote
story-2

10 Things Every Corvette Owner Needs (2026 Edition)

 Michael S. Palmer
story-3

8 Most "Only Corvette Owners Understand" Quirks and Problems

 Pouria Savadkouei
story-4

10 Reasons the C6 Z06 is Still A Performance Benchmark After 20 Years

 Joe Kucinski
story-5

How Much Horsepower Every Corvette Engine "LOST" in 1972

 Joe Kucinski
story-6

Top 10 DOs and DON'Ts for Protecting Your Convertible Top!

 Michael S. Palmer
story-7

Top 10 Most Explosive Corvettes Ever Made: Power-to-Weight Ratio Ranked!

 Joe Kucinski
story-8

150 hp to 1,250 hp: Every Corvette Generation Compared by the Specs That Matter

 Joe Kucinski
story-9

8 Coolest Corvette Pace Cars (and Replicas) of All Time

 Verdad Gallardo
Old Oct 2, 2015 | 11:54 PM
  #9  
USA-OSC's Avatar
USA-OSC
Advanced
 
Joined: Sep 2015
Posts: 74
Likes: 6
From: oregon
Default

Originally Posted by Wg72C3
Thanks for the responses everyone. I put the car back onto the ground, with the rear on ramps, and this took the pressure off the bolts. I removed the loose bolt that is seen dangling in the background (it was being held up by the exhaust!) and bought 2 bolts to install on the front of the pumpkin. Once these are loosely in place, I will remove the last bolt on the rear and buy 2 bolts to install on the rear. I will then torque them all down including lock washers and thread lock on all the bolts too!

The car is almost all original with only 87k miles. The bottom is in good shape, only light surface rust, mostly just dirty. I haven't wanted to get a pressure washer down in there as I have found many of the original factory markings in this area, including above and in front the gas tank. Plus, don't want to get with water up into the half-shafts.

Thanks, I'll update the post when Im done.
I would certainly be trying to figure out why these bolts backed out in the first place. Seems unusual if indeed it is mostly original.
Reply
Old Oct 3, 2015 | 01:23 AM
  #10  
Frank_Nesta's Avatar
Frank_Nesta
Racer
10 Year Member
All Eyes On Me
Liked
Loved
 
Joined: Mar 2011
Posts: 480
Likes: 42
From: Los Angeles CA
Default

I am trying to remember are the front and rear bolts different lengths? Are the front bolts blind holes and the rears are through holes.
Reply
Old Oct 3, 2015 | 01:17 PM
  #11  
Alan 71's Avatar
Alan 71
Team Owner
15 Year Member
Active Streak: 120 Days
Community Influencer
Top Answer: 5
 
Joined: Sep 2006
Posts: 31,285
Likes: 4,375
From: Westminster Maryland
Default

Hi Frank,
The four bolts have 1 part number shown in the AIM which means they're all the same length.
The front 2 holes are blind so bolts that are too long CAN damage the rear cover.
Regards,
Alan


Last edited by Alan 71; Oct 3, 2015 at 02:06 PM.
Reply
Old Oct 3, 2015 | 02:01 PM
  #12  
CV62Air's Avatar
CV62Air
Racer
10 Year Member
 
Joined: Aug 2013
Posts: 264
Likes: 58
From: Virginia
Default

Originally Posted by MelWff
you may want to run a tap through the holes in the differential cover to clean the threads and lessen the chance of stripping or breaking of the cover.

I got this kit a few years ago and have used it so often on my old rusty projects, including replacing those same bolts in my diff cover.


Craftsman 48 pc. SAE & Metric Thread Restorer Kit-42275 - Tap And Die Sets - Amazon.com Craftsman 48 pc. SAE & Metric Thread Restorer Kit-42275 - Tap And Die Sets - Amazon.com
Reply
Old Oct 3, 2015 | 08:35 PM
  #13  
mikem350's Avatar
mikem350
Melting Slicks
15 Year Member
Liked
Loved
Community Favorite
 
Joined: Feb 2006
Posts: 3,105
Likes: 96
From: Sunrise FL
Default

Use oil on the taps, and bolts when you install them
Reply
Old Oct 16, 2015 | 04:07 PM
  #14  
Wg72C3's Avatar
Wg72C3
Thread Starter
Intermediate
 
Joined: Aug 2014
Posts: 49
Likes: 9
From: Miami Florida
Default

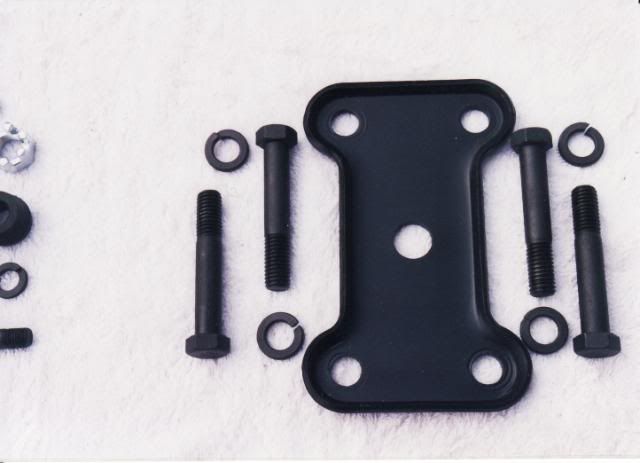
Thank you everyone for your great posts. I decided to replace all 4 of the bolts as the one seen in the above picture dangling above the exhaust suffered some damage to the threads. I ordered the bolt kit from one of the vendors and while I waited stripped, primed and painted the bracket satin black.

Also while I waited, I drained the pumpkin with a hand pump / siphon, and put 2 fresh quarts of 85W-140 conventional gear oil with the GM additive.

When I received the bolts, I noted they were a little longer than the originals. No bid deal on the rear bolts as they the bolts pass through the "ears", however the front one are right below the case. After measuring, I used an extra lock washer as insurance to avoid any damage to the case. Torqued all the bolts, took her for a spin, and she drives fantastic. Vibration and "thump" from the rear during gear shifts are gone.

Thank you all once again!

Name:  IMG_1919.JPG
Views: 381
Size:  1.82 MB
Reply
Old Oct 16, 2015 | 04:11 PM
  #15  
Wg72C3's Avatar
Wg72C3
Thread Starter
Intermediate
 
Joined: Aug 2014
Posts: 49
Likes: 9
From: Miami Florida
Default

BTW, I don't own a tapping kit, but I did clean out the bolt holes with a 1/2" OD cylindrical wire brush I bought at Home Depot. Cleaned all the holes with compressed air and its incredible the rust and gunk that came out. Holes were nice and clean for the new bolts.
Reply
Old Oct 16, 2015 | 05:10 PM
  #16  
havesometo's Avatar
havesometo
Drifting
10 Year Member
 
Joined: Dec 2012
Posts: 1,360
Likes: 59
From: Meldrim Georgia
Default

Good job glad it worked out for you.
Reply
Old Oct 16, 2015 | 08:39 PM
  #17  
vette_jim's Avatar
vette_jim
Instructor
 
Joined: Nov 2014
Posts: 161
Likes: 17
From: Georgia
Default

Another way to clean threads that works pretty well: Find a similar bolt that fits the threaded hole you are working on, use a cutoff wheel and cut a groove through the threads plus slightly deeper the length of the bolt. Flip it over 180 degrees and do the same. Wire brush it well to remove burrs. Run it in & out of hole, the debris collects in the grooves you cut. Use good judgment here, you don't want to jam a weakened bolt and have it break off.

Last edited by vette_jim; Oct 16, 2015 at 10:22 PM. Reason: Mispell
Reply

Get notified of new replies

To Loose Rear Spring HELP!


All times are GMT -4. The time now is 09:44 AM.

story-0
10 Ugly Corvettes That We Still Kinda Love

Slideshow: 10 ugly Corvettes that we still kinda love.

By Joe Kucinski | 2026-06-03 10:34:17


VIEW MORE
story-1
Top 10 Most Expensive Corvettes Ever Sold on Bring A Trailer

A lot of money has changed hands at the online auction house over the years.

By Brett Foote | 2026-06-03 10:21:50


VIEW MORE
story-2
10 Things Every Corvette Owner Needs (2026 Edition)

Slideshow: 10 great gifts Corvette enthusiasts actually want for Father's Day!

By Michael S. Palmer | 2026-06-03 15:43:40


VIEW MORE
story-3
8 Most "Only Corvette Owners Understand" Quirks and Problems

Slideshow: These are the quirks, annoyances, and oddly lovable problems that every Corvette owner eventually learns to live with.

By Pouria Savadkouei | 2026-05-28 09:31:39


VIEW MORE
story-4
10 Reasons the C6 Z06 is Still A Performance Benchmark After 20 Years

Slideshow: 10 reasons why the C6 Z06 is still a performance benchmark after 20 years.

By Joe Kucinski | 2026-05-27 17:20:09


VIEW MORE
story-5
How Much Horsepower Every Corvette Engine "LOST" in 1972

Slideshow: How much horsepower every Corvette engine lost in 1972.

By Joe Kucinski | 2026-05-27 16:54:53


VIEW MORE
story-6
Top 10 DOs and DON'Ts for Protecting Your Convertible Top!

Slideshow: How to Protect A Convertible Top: 10 DOs & DON'Ts

By Michael S. Palmer | 2026-04-03 00:00:00


VIEW MORE
story-7
Top 10 Most Explosive Corvettes Ever Made: Power-to-Weight Ratio Ranked!

Slideshow: The 10 most explosive Corvettes ever built based on power-to-weight ratio.

By Joe Kucinski | 2026-05-20 07:23:03


VIEW MORE
story-8
150 hp to 1,250 hp: Every Corvette Generation Compared by the Specs That Matter

Slideshow: From C1 to C8 we compare every Corvette generation by the numbers.

By Joe Kucinski | 2026-05-12 16:54:12


VIEW MORE
story-9
8 Coolest Corvette Pace Cars (and Replicas) of All Time

Slideshow: Some Corvette pace cars became collectible legends, while others perfectly captured the look and attitude of their era.

By Verdad Gallardo | 2026-05-11 09:50:51


VIEW MORE