


1975 Headlight door warning switch question

Thread Starter
Instructor

Joined: Apr 2017
Posts: 205
Likes: 4
Sure, fix one thing end up chasing other issues. I swear working on these cars is like eating popcorn.... can't fix one thing without uncovering another issue.
So I fixed all my instrument lights. Even fixed the dreaded fasten seat belt warning light.
Had a vacuum issue with the lights, fixed that. BUT now the headlight warning light stays lit.
SO up with the lights, and when I look for the warning switches, I sure do find them..... BUT they are just hanging down - they aren't attached to anything. Both are broken anyway. Seems that the threaded post that "should" be on the rear of the switch is broken off on both.
My question is where do they attach to the assembly? Picture would be great.
I'm going back down under to see if the threaded part just happens to still exist somewhere, but I don't really know where to look.
Thanks,
Len
Team Owner


Joined: Sep 2006
Posts: 31,123
Likes: 4,196
From: Westminster Maryland
Hi Len,
The plastic threaded end of the switch has sometimes been broken off the switch's body.
Normally the switch extends through the link and is held in place with a thin nut.
Regards,
Alan
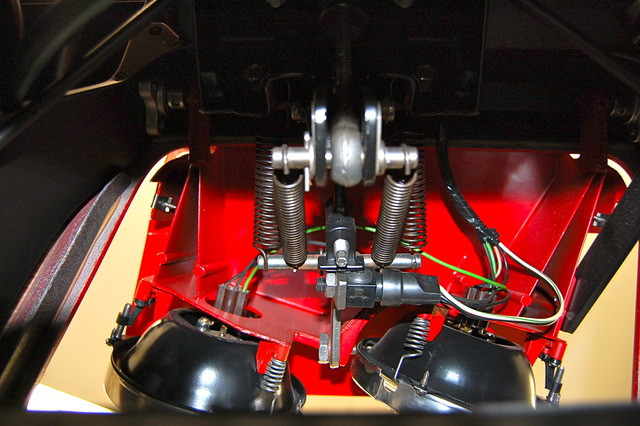
This is a switch taken apart to repair…. you can see the treaded 'snout' that goes through the link and the nut tightens on.

The plastic threaded end of the switch has sometimes been broken off the switch's body.
Normally the switch extends through the link and is held in place with a thin nut.
Regards,
Alan
This is a switch taken apart to repair…. you can see the treaded 'snout' that goes through the link and the nut tightens on.
Last edited by Alan 71; Aug 14, 2017 at 12:20 PM.
Team Owner

Joined: Jan 2006
Posts: 37,637
Likes: 3,113
From: Crossville TN
Working on your car as you do, you really NEED a copy of the 1975 Assembly Instruction Manual (AIM). It has drawings of most of the installation for the vehicle assembly. Not nearly as good as Alan71's photos, but adequate to find what you need.
Thread Starter
Instructor
Joined: Apr 2017
Posts: 205
Likes: 4
I wish there was a good INDEX of the AIM to make finding drawings easier.
Funny, I was at a corvette shop this weekend and I was asking about some interior console parts and even they had a difficult time finding things in AIM.
If you've been through it before, then AIM can be very helpful, but for a first go around "some" of it can be very obtuse.
Just my 2C FWIW.
Thanks,
Len
Safety Car


Joined: Apr 2006
Posts: 4,057
Likes: 421
From: BC
When installing those switches you just snug up the nut enough so the switch doesn't move. If you over tighten just a bit the plastic lug just snaps off. That and knocking the switch with your hand while working under there is the main reason for requiring a replacement.
Corvette Stories
The Best of Corvette for Corvette Enthusiasts

2027 Corvette vs The World: Every C8 vs Its Closest Competitor
Joe Kucinski
10 Most Common Corvette Problems of the Last 20 Years!
Joe Kucinski
5 MOST and 5 LEAST Popular Corvette Model Years in History!
Joe Kucinski
2027 Corvette Buyer's Guide: Everything You Need to Know!
Joe Kucinski
10 Things C8 Corvette Owners Hate (But Won't Tell You)
Joe Kucinski
10 Best Corvettes Coming to Barrett-Jackson Palm Beach 2026!
Brett Foote
Every Corvette Grand Sport Explained! (C2, C4, C6, C7, & C8)
Joe Kucinski
Grand Sport & Grand Sport X Launch Alongside All-New 535hp LS6 V8!
Michael S. Palmer
5 Reasons Bad Drivers Crash & 5 Ways to Avoid a Costly Mistake!
Joe KucinskiTeam Owner
Joined: Jan 2006
Posts: 37,637
Likes: 3,113
From: Crossville TN
The AIM is confusing the first few times you use it. But, once you get the 'lay of the land', it's very useful. It doesn't have everything in it [only the work content performed at the final assembly plant], but it's a God-send when you are taking things apart or reinstalling them.
FYI--
The "Sections" index is at the front; that will get you close to most base-configuration topics. And the AIM is designed to show you how that base-configuration vehicle is constructed.
If you have optional equipment (auto trans, engine upgrade, power features, etc), those options are in the back of the book in alphabetical order of their option CODE (ie, LS5 engine). Those sheets show the differences from the base-configurations given earlier in the manual.
It takes some time/practice to get the hang of using the AIM. Once you understand what it is (and what it is NOT) and how to use it, you will get a lot of value from it.
Last edited by 7T1vette; Aug 14, 2017 at 02:59 PM.

Drifting


Joined: Nov 2013
Posts: 1,806
Likes: 258
From: Dublin Ohio
I had one literally fall apart. Bought a new one and it took about 2 minutes to change once I snapped the old one in half to get it out.
Threaded part goes through the hole, nut goes on, plug in the connector.
I suppose if you don't have an old one in place you may need a picture to go by.
Threaded part goes through the hole, nut goes on, plug in the connector.
I suppose if you don't have an old one in place you may need a picture to go by.
Last edited by BarryB72; Mar 19, 2018 at 03:16 PM.
Team Owner
Joined: Sep 2006
Posts: 31,123
Likes: 4,196
From: Westminster Maryland
Hi Rick,
Replacing the switch is pretty straight forward. You do need to be aware that the switch is plastic and so is quite fragile.
Access from under the front apron through the breathing holes is probably your best bet.
While pulling the electrical connection loose support the switch with your other hand.
Then use a small wrench to loosen the nut on the switch's threaded snout. Because the snout is plastic, the nut, (metal), is usually easy to get off.
The hole in the 'link' for the snout has an odd shape to it, so the new switch can only go in place in one orientation, and it can't 'turn' as you tighten the nut.
Tighten the nut and then support the switch again as you put the connector back in place.
The other side is the same routine!
Good Luck!
Regards,
Alan
Last edited by Alan 71; Mar 20, 2018 at 10:23 AM.
Team Owner


Joined: Jun 2001
Posts: 23,358
Likes: 1,057
From: Virginia USA
I have the AIM for my car. I do find it helpful, although it can be confusing at times. Page 382 (12C) shows the switch.
I wish there was a good INDEX of the AIM to make finding drawings easier.
Funny, I was at a corvette shop this weekend and I was asking about some interior console parts and even they had a difficult time finding things in AIM.
If you've been through it before, then AIM can be very helpful, but for a first go around "some" of it can be very obtuse.
Just my 2C FWIW.
Thanks,
Len
LINK to Index
Thread Starter
Instructor
Joined: Apr 2017
Posts: 205
Likes: 4
Rick,
If you look up from under the car at the headlight "buckets", have someone turn the lights on so you can see how the assembly operates. Be sure to KEEP YOUR HANDS AWAY from anything, just observe (wear safety glasses just in case).
If you're lucky the wires may still be attached. If not, and if the switches are missing, all you are looking for is a keyed hole where the switches go (one for each headlamp).
The wires plug into the ends of the switches and should be near the headlamps.
Let us know how it works out.