When you click on links to various merchants on this site and make a purchase, this can result in this site earning a commission. Affiliate programs and affiliations include, but are not limited to, the eBay Partner Network.
I'm having a hard time getting my '68 out of reverse. Everything was apart on the car. New engine and Muncie four speed with stock shifter. I was able to get threw all of the gears before. Now a few months later it wouldn't go into reverse. The adjustment rod lock nut had some play now I can get into reverse but not out of it. I have went back and forth moving the reverse rod with no luck. Any tips would be appreciated.
Did you rebuild the shifter?
Did you use the alignment tool to set up the linkage rods?
Did something come loose?
Here is a picture of the alignment tool It keeps the shifter from moving so you can adjust the linkage properly.
I did rebuild the shifter and nothing is loose. I was unaware of the alignment tool at the time. Is yours home made or purchased? Doesn't look easy to get in place with the body on.
Home made and it can be a struggle to get it in with the shifter in the car. The hole I drilled in it was for a piece of safety wire so I could get it out without much hassle after installing the shifter and setting up the linkage rods.
FYI - I don't know about a '68 but there are probably two sets of holes in levers that the linkage connect to. The three (can't remember if the reverse lever has two holes or not) that are on the side of the transmission. If you set it up your linkage to the other holes it make the shifter throw shorter......for quicker shifts.
Hi t,
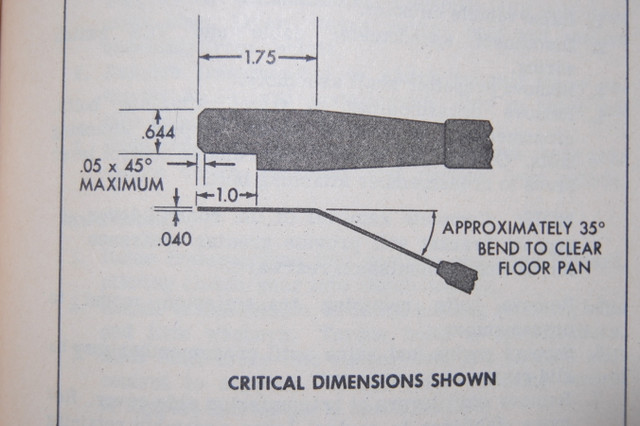
Here's the diagram/dimensions from the 71 CSM. You can use them to make the tool from a putty knife.
The bend makes it possible to get it in place with the body on the chassis.
Regards,
Alan
You can pick up an alignment tool from the vendors for a few bucks. I made my own, but then bought one - it was much thicker gauge metal and made for a more precise adjustment.
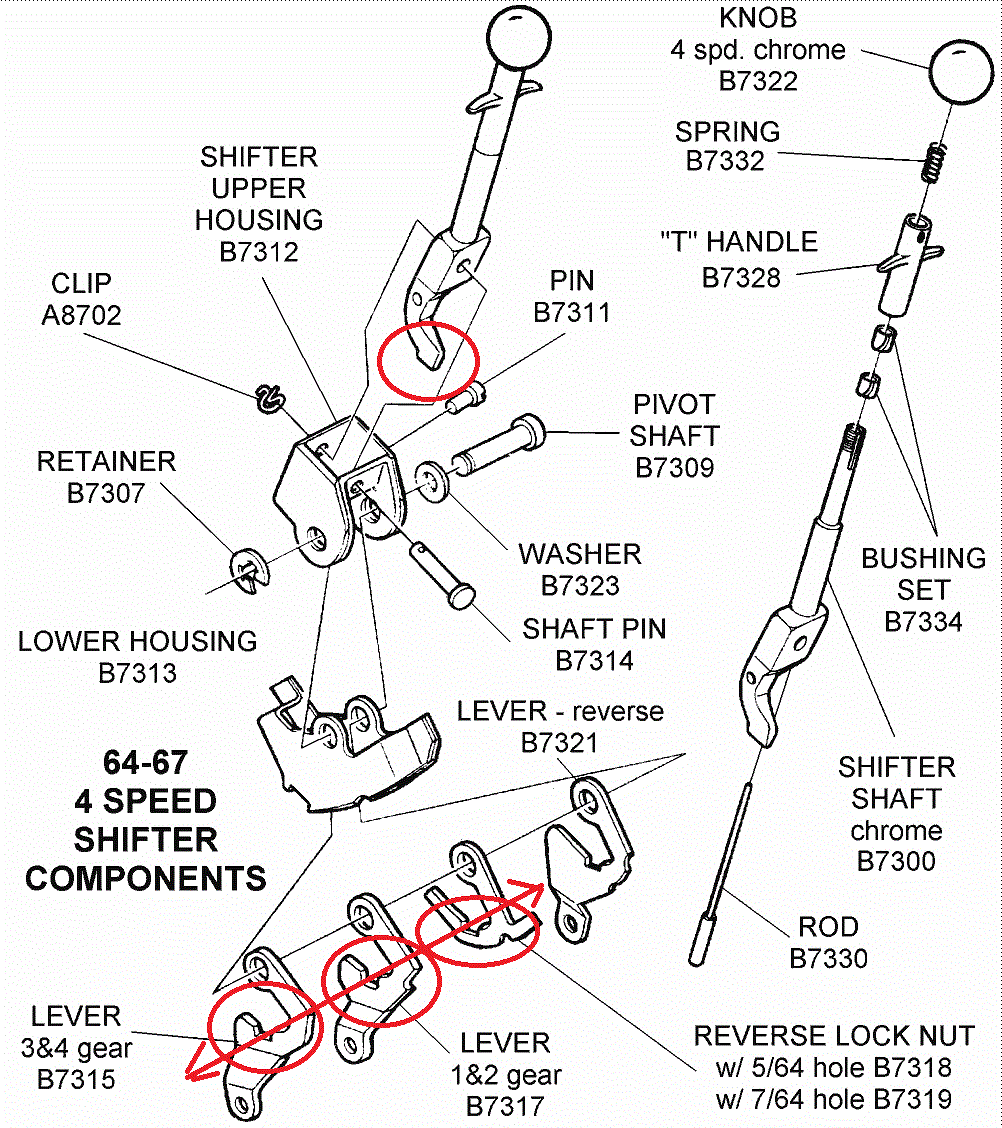
Linkage adjustment can be done with or without the tool, without the tool is done by feel and can work very well if you understand what you are doing. It helps to have an idea of what the shifter linkage looks like see picture below.
On the bottom of the shifter handle there is a flat portion that lines up and passes though/across each of the open square portions in the linkage lever plates; this is also the area where the locating gauge would align the plates. Note about the shifter handle, the shift pattern is opposite at the bottom below the pivot point, as you put the shifter in first gear, forward left position, the bottom of the shifter is moved to the opposite right rear position. So the leaver plates are as follows from left to right: one plate for 3 & 4 on left, the center one for 1 & 2 and right side one for reverse. With the engine off pull up on the reverse lock out leaver and run through the gears to let them set in to their natural gear position. Then set the shifter in the neutral position and pull up on the reverse lock out leaver again then you should be able to move the shifter handle from side to side and feel as the bottom of the shifter handle passes through each of the three plates that they should not touch or bump the edges of the square pass through sections in the plates (don�t expect the plates to be perfectly lined up just feel that it passes though without bumping the edges of the plates. If you are bumping a plate you will need to adjust the transmission linkage nut just a thread turn or a few turns at a time until if feels clear. If you are bumping a plate on the forward front side (as if pulling the handle) you will need to extend the linkage rod, if you are pumping at the rear (as if pushing the handle) you will need to shorten the rod length, you should not have to pull or push the handle. It should be perfect when you are able to move the handle side to side with out bumping the plates. On another note if you are hitting the console at the front or back equally adjust the three transmission linkage rods (same number of thread turns) to center the shifter throw, if you are hitting in the forward 1, 3 or R shorten the rods or extend for 2 and 4th gears in equal thread length turns. Before you change any linkage count the number of turns to unthread the linkage bar so if you are unsuccessful you can return everything to the original starting point without father miss adjustment.
Linkage adjustment can be done with or without the tool, without the tool is done by feel and can work very well if you understand what you are doing. It helps to have an idea of what the shifter linkage looks like see picture below.
On the bottom of the shifter handle there is a flat portion that
lines up and passes though/across each of the open square
portions in the linkage lever plates; this is also the area where the locating gauge would align the plates. Note about the shifter handle, the shift pattern is opposite at the bottom below the pivot point, as you put the shifter in first gear, forward left position, the bottom of the shifter is moved to the opposite right rear position. So the leaver plates are as follows from left to right: one plate for 3 & 4 on left, the center one for 1 & 2 and right side one for reverse. With the engine off pull up on the reverse lock out leaver and run through the gears to let them set in to their natural gear position. Then set the shifter in the neutral position and pull up on the reverse lock out leaver again then you should be able to move the shifter handle from side to side and feel as the bottom of the shifter handle passes through each of the three plates that they should not touch or bump the edges of the square pass through sections in the plates (don�t expect the plates to be perfectly lined up just feel that it passes though without bumping the edges of the plates. If you are bumping a plate you will need to adjust the transmission linkage nut just a thread turn or a few turns at a time until if feels clear. If you are bumping a plate on the forward front side (as if pulling the handle) you will need to extend the linkage rod, if you are pumping at the rear (as if pushing the handle) you will need to shorten the rod length, you should not have to pull or push the handle. It should be perfect when you are able to move the handle side to side with out bumping the plates. On another note if you are hitting the console at the front or back equally adjust the three transmission linkage rods (same number of thread turns) to center the shifter throw, if you are hitting in the forward 1, 3 or R shorten the rods or extend for 2 and 4th gears in equal thread length turns. Before you change any linkage count the number of turns to unthread the linkage bar so if you are unsuccessful you can return everything to the original starting point without father miss adjustment.
That is a very good step by step. It makes perfect sense to me now. I will give it a shot and see how it goes. I ordered a alignment tool as well but I think I can get it done without it. Thanks for all the info. I will keep you posted.