C3 Tech/Performance V8 Technical Info, Internal Engine, External Engine, Basic Tech and Maintenance for the C3 Corvette
Sponsored by:
Sponsored by:

4 SPD backup switch placement

Thread Tools
 
Search this Thread
 
Old 09-02-2017, 03:58 PM
  #1  
swag
Instructor
Thread Starter
 
swag's Avatar
 
Member Since: Jul 2016
Location: Littleton Colorado
Posts: 195
Received 1 Like on 1 Post
Default 4 SPD backup switch placement

I was checking the other day and noticed that my backup lights weren't working.

From what I can tell, the hardware is missing for the backup switch.

Possibly the wiring too?

From what I can tell from the diagrams, it looks like the switch needs to be bolted in the two red squares. Correct?

Also, I found some wires that were tied up kind of near there.

Is this possibly the backup wire?

Thank you all!
Attached Images   
Old 09-02-2017, 04:21 PM
  #2  
TimAT
Le Mans Master
 
TimAT's Avatar
 
Member Since: Oct 2006
Location: Gladstone MO
Posts: 7,121
Received 424 Likes on 385 Posts
C3 of Year Finalist (appearance mods) 2019

Default

You are correct-the backup light switch and mounting is not at home. A wiring diagram for 68 will confirm the wire color(s) for the backup lights.
Alan71 has some great pictures of the assembly.
The following users liked this post:
swag (09-02-2017)
Old 09-02-2017, 04:44 PM
  #3  
jb78L-82
Le Mans Master
 
jb78L-82's Avatar
 
Member Since: Oct 2007
Location: Rhode Island
Posts: 7,114
Received 740 Likes on 617 Posts

Default

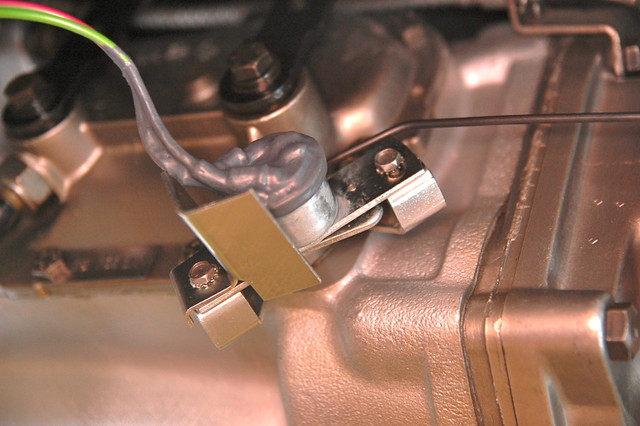
I was just underneath my car this afternoon to adjust the backup light switch adjustment (it can be moved with those 2 screws). Those wires are definitely the wires (green/red) for the switch but there is metal rod that attached to the switch from the reverse lever that your picture is missing. You will need that rod as well. I don't have a picture but maybe Allen or some one else does....
The following users liked this post:
swag (09-02-2017)
Old 09-02-2017, 05:13 PM
  #4  
GUSTO14
Le Mans Master
 
GUSTO14's Avatar
 
Member Since: Sep 2003
Location: eastern NC
Posts: 8,801
Received 1,962 Likes on 1,283 Posts

Default

This is what the installed back-up switch looks like on my '63. It should be similarly installed on your 4-speed. My shifter is not stock, it is a Hurst, but it attaches to the stock reverse lever in the same manner.


Good luck... GUSTO
The following 2 users liked this post by GUSTO14:
swag (09-02-2017), The Punisher (09-05-2017)
Old 09-02-2017, 05:14 PM
  #5  
Alan 71
Team Owner
 
Alan 71's Avatar
 
Member Since: Sep 2006
Location: Westminster Maryland
Posts: 30,173
Likes: 0
Received 2,878 Likes on 2,515 Posts

Default

Hi S,
(Hi Gusto, you posted while I was typing!)
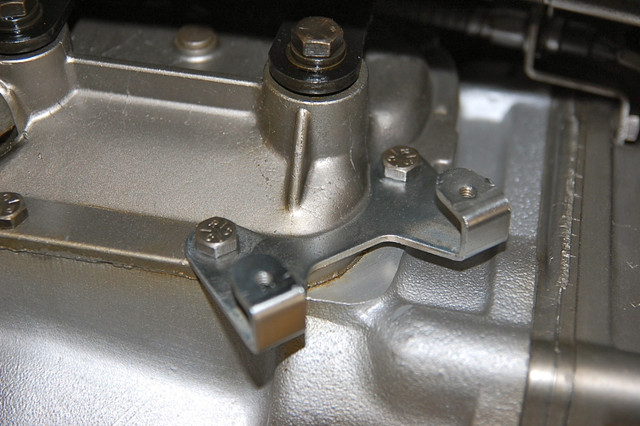
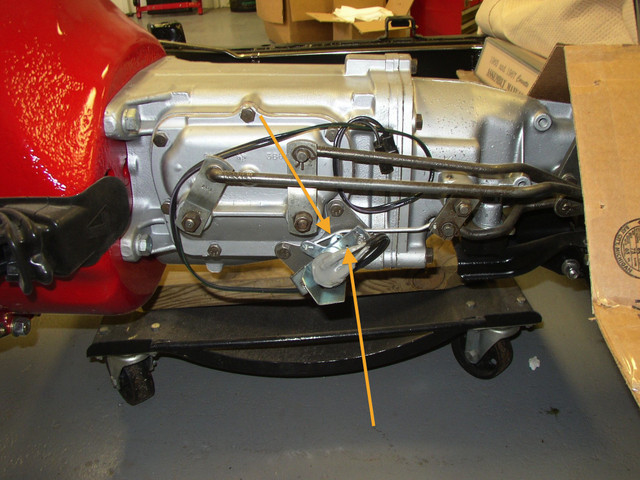
Here's the bracket and the switch mounted to there bracket.
The wire pig tail is part of the switch.
The wires run up to a connection on the firewall.
Regards,
Alan


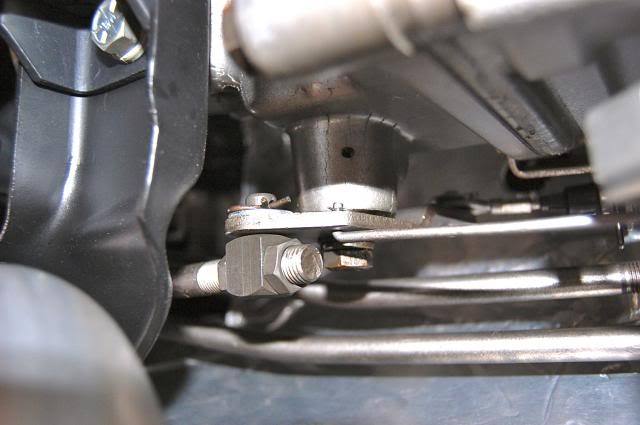
Here's the push rod's connection to the reverse shift lever.

Last edited by Alan 71; 09-02-2017 at 05:29 PM.
The following users liked this post:
swag (09-02-2017)
Old 09-02-2017, 05:19 PM
  #6  
redvetracr
Race Director
 
redvetracr's Avatar
 
Member Since: Aug 1999
Location: WI
Posts: 18,125
Likes: 0
Received 174 Likes on 160 Posts

Default

do the parts in your diagram look like these? switch/rod/bracket? this one is available, if you or anyone else is interested send a PM (I have the same for a Super T-10 also)
Attached Images  
The following users liked this post:
swag (09-02-2017)
Old 09-02-2017, 05:26 PM
  #7  
GUSTO14
Le Mans Master
 
GUSTO14's Avatar
 
Member Since: Sep 2003
Location: eastern NC
Posts: 8,801
Received 1,962 Likes on 1,283 Posts

Default

When you order your new back-up switch, be sure to order the Backup & Neutral Safety Switch Shield. It will not come with the switch and you're gonna want it to protect the wires to the switch from debris.

Backup and neutral safety switch shield.

1953-60 w/automatic
1963-74 w/4-speed

Years: 1953 - 1974

photo courtesy Paragon Corvette Reproductions
https://www.paragoncorvette.com/p-35...ch-shield.aspx

Good luck... GUSTO
The following 2 users liked this post by GUSTO14:
EarlyC34me (10-03-2017), swag (09-02-2017)
Old 09-02-2017, 08:25 PM
  #8  
swag
Instructor
Thread Starter
 
swag's Avatar
 
Member Since: Jul 2016
Location: Littleton Colorado
Posts: 195
Received 1 Like on 1 Post
Default

Perfect! Thank you all!

I think I have all the parts needed so hopefully the install goes easy. It's kind of crowded in there with the muffler. I need smaller hands!
Old 09-02-2017, 08:28 PM
  #9  
swag
Instructor
Thread Starter
 
swag's Avatar
 
Member Since: Jul 2016
Location: Littleton Colorado
Posts: 195
Received 1 Like on 1 Post
Default

Originally Posted by GUSTO14
When you order your new back-up switch, be sure to order the Backup & Neutral Safety Switch Shield. It will not come with the switch and you're gonna want it to protect the wires to the switch from debris.

Backup and neutral safety switch shield.

1953-60 w/automatic
1963-74 w/4-speed

Years: 1953 - 1974

photo courtesy Paragon Corvette Reproductions
https://www.paragoncorvette.com/p-35...ch-shield.aspx

Good luck... GUSTO

Ugh, I missed ordering that part! Darn!
Old 09-02-2017, 09:34 PM
  #10  
GUSTO14
Le Mans Master
 
GUSTO14's Avatar
 
Member Since: Sep 2003
Location: eastern NC
Posts: 8,801
Received 1,962 Likes on 1,283 Posts

Default

Originally Posted by swag
Ugh, I missed ordering that part! Darn!
Easy enough to add after you install the switch...

Good luck... GUSTO
Old 09-03-2017, 02:16 PM
  #11  
swag
Instructor
Thread Starter
 
swag's Avatar
 
Member Since: Jul 2016
Location: Littleton Colorado
Posts: 195
Received 1 Like on 1 Post
Default

Ok, making good progress. I did a continuity test on the mystery green wire and it was a success. I've wired those up and they are ready to take the switch plug.

Also, got the switch plate attached.

So, one question, On the switch, what is top and what is bottom? Or does it not matter?

Thank you all!
Old 09-03-2017, 02:41 PM
  #12  
Alan 71
Team Owner
 
Alan 71's Avatar
 
Member Since: Sep 2006
Location: Westminster Maryland
Posts: 30,173
Likes: 0
Received 2,878 Likes on 2,515 Posts

Default

Hi S,
Yes it does matter.

If you look carefully you'll see that there are 2 'tabs' on the switch that pivot. Each has a small hole.
The tabs should be positioned so that the hole in the SHORT tab is in line with the hole in the switch's plate. I put a paper clip through those holes to hold the tab at that point.
Then mount the switch to the bracket with the LONG 'tab' up.
Then mount the rod from the hole in the LONG tab to the hole in the reverse lever and secure it with the 2 tiny 'hairpin' clips.
Then remove the paper clip so that when the reverse lever is moved it can cycle the switch.
Regards,
Alan

This is shown in the AIM.
71 UPC12 Sheet C3, Back-up Switch. View B.

Gusto's photo shows the holes in the shorter tab and the plate that the paper clip goes through pretty well.

Last edited by Alan 71; 09-03-2017 at 02:53 PM.
Old 09-03-2017, 05:52 PM
  #13  
swag
Instructor
Thread Starter
 
swag's Avatar
 
Member Since: Jul 2016
Location: Littleton Colorado
Posts: 195
Received 1 Like on 1 Post
Default

Originally Posted by Alan 71
Hi S,
Yes it does matter.

If you look carefully you'll see that there are 2 'tabs' on the switch that pivot. Each has a small hole.
The tabs should be positioned so that the hole in the SHORT tab is in line with the hole in the switch's plate. I put a paper clip through those holes to hold the tab at that point.
Then mount the switch to the bracket with the LONG 'tab' up.
Then mount the rod from the hole in the LONG tab to the hole in the reverse lever and secure it with the 2 tiny 'hairpin' clips.
Then remove the paper clip so that when the reverse lever is moved it can cycle the switch.
Regards,
Alan

This is shown in the AIM.
71 UPC12 Sheet C3, Back-up Switch. View B.

Gusto's photo shows the holes in the shorter tab and the plate that the paper clip goes through pretty well.

Thanks for the tips! I think I have it all put together. I painted the insides of the reverse lights so I am waiting for those to dry before testing.

Since the ends of the wires were snipped off, I soldiered one of these connectors on the back:

Amazon Amazon

These connectors make connecting to the switch easy.

(If you know of a better source, let me know)

I only had one so I still will need to get under the car when I get a new set of connectors. I need to get under there anyway to put the new shield on when I get it.

I'll try tomorrow (crossing fingers) and see if the backup lights work.

Thanks again
Old 09-04-2017, 11:55 AM
  #14  
swag
Instructor
Thread Starter
 
swag's Avatar
 
Member Since: Jul 2016
Location: Littleton Colorado
Posts: 195
Received 1 Like on 1 Post
Default

Originally Posted by swag
Thanks for the tips! I think I have it all put together. I painted the insides of the reverse lights so I am waiting for those to dry before testing.

Since the ends of the wires were snipped off, I soldiered one of these connectors on the back:

https://www.amazon.com/gp/product/B0...?ie=UTF8&psc=1

These connectors make connecting to the switch easy.

(If you know of a better source, let me know)

I only had one so I still will need to get under the car when I get a new set of connectors. I need to get under there anyway to put the new shield on when I get it.

I'll try tomorrow (crossing fingers) and see if the backup lights work.

Thanks again

Success! Everything is working.

Just waiting for the parts before I can complete it.

Thank you all
Old 09-10-2017, 08:19 PM
  #15  
swag
Instructor
Thread Starter
 
swag's Avatar
 
Member Since: Jul 2016
Location: Littleton Colorado
Posts: 195
Received 1 Like on 1 Post
Default

Hi, just the final update on this issue.

I got the shield and installed it today.

Also, I didn't realise it but the backup light switch wires directly connected to the connector in going into the firewall. So, I took out the custom wiring I did and connected them directly.

I double checked and everything is still working.

Now, onto my next issue of issue.


Thanks again to Alan, gusto, redvet, Tim and JB!
Old 09-10-2017, 08:58 PM
  #16  
GUSTO14
Le Mans Master
 
GUSTO14's Avatar
 
Member Since: Sep 2003
Location: eastern NC
Posts: 8,801
Received 1,962 Likes on 1,283 Posts

Default

Greg, good luck with the next project. Hopefully it will be resolved as easily as this one.

My sister lives in Littleton, just off of W Bowles Ave. She's lived there for 30+ years and loves the area. She also has a 1970 Thunderbird she bought almost new there in Denver many years ago and refuses to part with it. They still drive it from time to time as well.

GUSTO
Old 09-10-2017, 09:05 PM
  #17  
swag
Instructor
Thread Starter
 
swag's Avatar
 
Member Since: Jul 2016
Location: Littleton Colorado
Posts: 195
Received 1 Like on 1 Post
Default

Originally Posted by GUSTO14
Greg, good luck with the next project. Hopefully it will be resolved as easily as this one.

My sister lives in Littleton, just off of W Bowles Ave. She's lived there for 30+ years and loves the area. She also has a 1970 Thunderbird she bought almost new there in Denver many years ago and refuses to part with it. They still drive it from time to time as well.

GUSTO
Thanks, I try to take them one by one... I have some things I am waiting for winter. Requires taking the dash apart (hence I won't be able to drive).


That's great, I think I might have seen her around? Is it possibly red?

I don't blame her for not wanting to part with it!

If you make it to Denver/Littleton sometime, we should go grab beers.

Thanks

Last edited by swag; 09-10-2017 at 09:16 PM.

Get notified of new replies

To 4 SPD backup switch placement

Old 09-10-2017, 09:46 PM
  #18  
GUSTO14
Le Mans Master
 
GUSTO14's Avatar
 
Member Since: Sep 2003
Location: eastern NC
Posts: 8,801
Received 1,962 Likes on 1,283 Posts

Default

Originally Posted by swag
Thanks, I try to take them one by one... I have some things I am waiting for winter. Requires taking the dash apart (hence I won't be able to drive).


That's great, I think I might have seen her around? Is it possibly red?

I don't blame her for not wanting to part with it!

If you make it to Denver/Littleton sometime, we should go grab beers.

Thanks
Yes it is red and takes up fully half their two car garage. You can hear the cars at Bandimere Speedway on a quiet evening as well.

A short trip to Golden is always on the list of must visit places.

GUSTO
Old 10-02-2017, 08:46 PM
  #19  
swag
Instructor
Thread Starter
 
swag's Avatar
 
Member Since: Jul 2016
Location: Littleton Colorado
Posts: 195
Received 1 Like on 1 Post
Default

Just an update. Looks like the switch I put in has a bad circuit. Every Time I put the car in reverse now, it blows the fuse.

To verify it was the new switch, I connected the red wire with the green and the fuse was fine. Also, the reverse lights were working.

Really surprised it was bad (or went bad quickly).

I ordered another one from lectric so hopefully that one is better built.
Old 10-02-2017, 09:14 PM
  #20  
71VetteLover
Pro
 
71VetteLover's Avatar
 
Member Since: Sep 2017
Location: Modesto California
Posts: 516
Likes: 0
Received 71 Likes on 71 Posts
Default

Originally Posted by swag
Just an update. Looks like the switch I put in has a bad circuit. Every Time I put the car in reverse now, it blows the fuse.

To verify it was the new switch, I connected the red wire with the green and the fuse was fine. Also, the reverse lights were working.

Really surprised it was bad (or went bad quickly).

I ordered another one from lectric so hopefully that one is better built.

I would test the switch with a battery powered test light first to see if it really is a bad switch. I can't imagine a new switch having a direct short inside it so that makes me wonder if the HOT wire is finding a ground somewhere near the switch.

And when it comes to terrific pictures of just about EVERYTHING Alan71 has them so he's a real asset to the forum.


Quick Reply: 4 SPD backup switch placement


All times are GMT -4. The time now is 08:07 PM.