


Painting Wheel Hubs
Thread Starter
Pro


Joined: Nov 2014
Posts: 503
Likes: 66
From: Florida
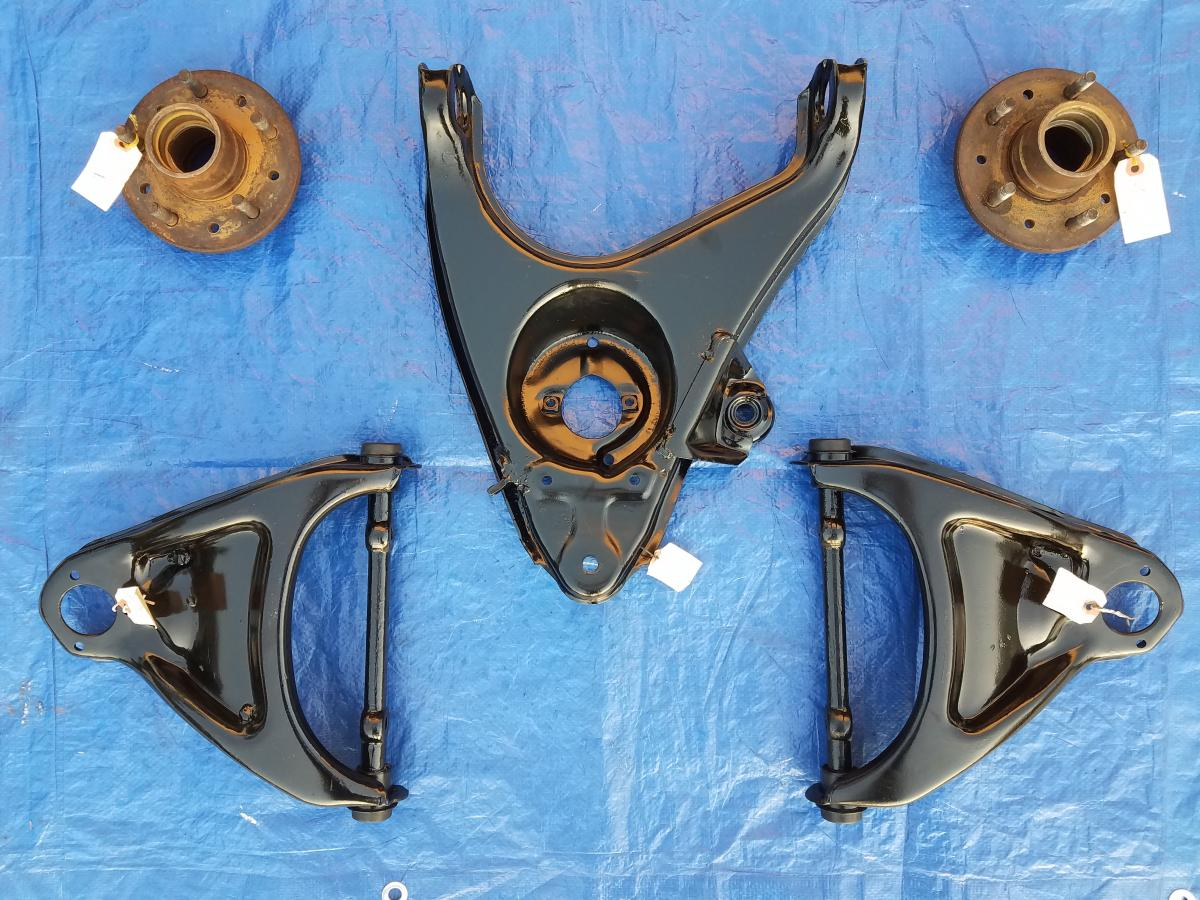
Suspension work continued this weekend after the hurricane delay last weekend. I was able to press in the upper control arm bushings using a ball joint installation tool set rented from Advance Auto. It took a combination of using the ball joint press, large c-clamps, big hammer and several large sockets. Whew, that was probably the toughest job done on the car so far. Cleaned up and painted one of the lower control arms as well and drilled the rivet heads off to remove the front rotors from the hubs.
Today I tried punching out the remainder of the rivets in the hubs but they would not budge after soaking with penetrating fluid all weekend. I ended up drilling out almost all of the remainder of the rivets and finally was able to punch them through. The drilling ob-longed several of the rivet holes in the hubs, but I am not re-installing rivets again since the rim and lug nuts will hold on the rotor. Also removed the old bearing races and did initial clean up of hubs.
Well, off to cleaning and wire bushing the hubs and second lower control arm, then pressing in the lower control arm bushings and painting.
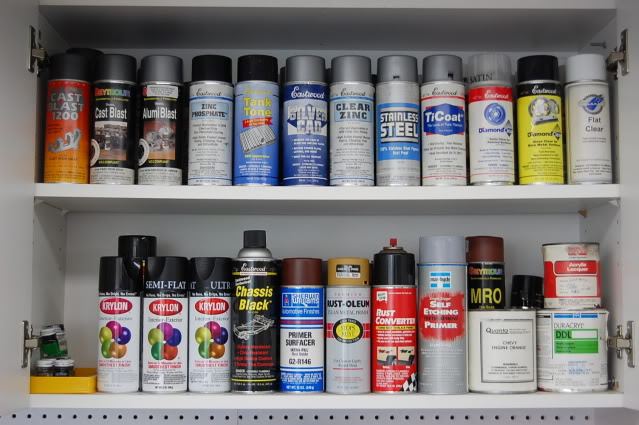
Does anyone have a recommendation as to what kind of paint to use on the wheel hubs? After I wire brush the old rust off I would like to help prevent them from rusting. I have a can of black engine paint with ceramic, good for up to 500 degrees. Not sure if I need something with a higher temperature rating?
Thanks
Today I tried punching out the remainder of the rivets in the hubs but they would not budge after soaking with penetrating fluid all weekend. I ended up drilling out almost all of the remainder of the rivets and finally was able to punch them through. The drilling ob-longed several of the rivet holes in the hubs, but I am not re-installing rivets again since the rim and lug nuts will hold on the rotor. Also removed the old bearing races and did initial clean up of hubs.
Well, off to cleaning and wire bushing the hubs and second lower control arm, then pressing in the lower control arm bushings and painting.
Does anyone have a recommendation as to what kind of paint to use on the wheel hubs? After I wire brush the old rust off I would like to help prevent them from rusting. I have a can of black engine paint with ceramic, good for up to 500 degrees. Not sure if I need something with a higher temperature rating?
Thanks
Team Owner


Joined: Sep 2006
Posts: 31,160
Likes: 4,236
From: Westminster Maryland
Hi R,
Perhaps hi-temp Cast blast.
I believe it's good to about 1200 degrees.
Regards,
Alan
Top Shelf, on the left.
The new cans may have a different label.
Perhaps hi-temp Cast blast.
I believe it's good to about 1200 degrees.
Regards,
Alan
Top Shelf, on the left.
The new cans may have a different label.
Last edited by Alan 71; Sep 21, 2017 at 08:53 AM.

Instructor

Joined: Nov 2014
Posts: 161
Likes: 17
From: Georgia
I would go with cast as Alan says. I wrestled with those rivets too on the rear..penetrating oil..pound. ..pound...pound...nothing . I got out the air hammer with a pointed bit...ground the point down a bit to blunt it....100 lb pressure. ...got all 5 out in less than a minute.

Race Director

Joined: Apr 2009
Posts: 19,294
Likes: 2,753
From: Charlotte NC
 PERFECT...I feel you did the right thing. When I am getting the rivets out I do the same thing. I almost drill through the rivet and when I use my punch..I can get the rivet shank out with little effort and no fear of damaging the surface of the spindle or bearing hub.
Does anyone have a recommendation as to what kind of paint to use on the wheel hubs? After I wire brush the old rust off I would like to help prevent them from rusting. I have a can of black engine paint with ceramic, good for up to 500 degrees. Not sure if I need something with a higher temperature rating?
But as always...do as you wish.
DUB
Burning Brakes


Joined: Jan 2010
Posts: 884
Likes: 84
From: New Boston, NH
I use cast bast and I am very careful of the surface where the rotor contacts the bearing hub. I do not care about paint in that area. Due to the fact that I check and correct the rotor run-out and use shims when needed for aiding the brake system...applying a lot of paint on that machined surface is something I do not want to do. If I apply anything it is an ultra thin film of anti-seize compound.
But as always...do as you wish.
DUB[/QUOTE]

I would be very careful adding paint to the surface where the rotor contacts the hub as that could complicate the proper setting of rotor run-out.
Bryan
But as always...do as you wish.
DUB[/QUOTE]
I would be very careful adding paint to the surface where the rotor contacts the hub as that could complicate the proper setting of rotor run-out.
Bryan
Last edited by BEJ; Sep 22, 2017 at 10:17 AM. Reason: correcting poor grammar
Le Mans Master


Joined: May 2003
Posts: 8,872
Likes: 3,548
From: Fernandina Beach FL
2023 Restomod of the Year finalist
2020 C3 of the Year Winner - Modified
Dub and Bryan-And while I was at it- had my machinist surface them and I put in new studs...cast bast but not on the machined surfaces-


Burning Brakes
Joined: Jan 2010
Posts: 884
Likes: 84
From: New Boston, NH
Those are beautiful, and seems like a nice set up. To be sure though, I think that I am going to need you to send me one just like it so that I can do thorough testing.
Bryan
Thread Starter
Pro
Joined: Nov 2014
Posts: 503
Likes: 66
From: Florida
PERFECT...I feel you did the right thing. When I am getting the rivets out I do the same thing. I almost drill through the rivet and when I use my punch..I can get the rivet shank out with little effort and no fear of damaging the surface of the spindle or bearing hub.The lower control arm bushings are NOTHING like the upper A-arm bushings. You can damage the lower A-arm easily and collapse the area where the bushing go if you do not correctly support the A-arm when pressing them in. There are special tools that keep the lower a-arm from collapsing when pressing in these bushings. I use my hydraulic press and it works like a champ with these home made spacers. Three of them are required.
I use cast bast and I am very careful of the surface where the rotor contacts the bearing hub. I do not care about paint in that area. Due to the fact that I check and correct the rotor run-out and use shims when needed for aiding the brake system...applying a lot of paint on that machined surface is something I do not want to do. If I apply anything it is an ultra thin film of anti-seize compound.
But as always...do as you wish.
DUB
Thank you DUB!
Not painting the mating surfaces for the hub and rotor make sense. A little heavy on the paint of the mating surfaces in the wrong place could cause an uneven surface. Great idea using some anti-seize compound.
As far as the lower control arms I have the bushings in the freezer today for pressing in tomorrow. I made a spacer to install between the two walls of each side of the control arm. Something similar to the tools they sell for 100 bucks online. I used a flat bar of 1/8 inch steel shaped into a semi-circle just tight enough to fit into the space, along with a few steel wedges to give it all a tight fit. when I press in the bushings that should keep the two sides from pinching together.

Again, I appreciate all the help on this forum, always great ideas when we are working on our classic C3's!
Last edited by Reaper19; Sep 23, 2017 at 04:36 PM.
Corvette Stories
The Best of Corvette for Corvette Enthusiasts

Corvette ZR1X Will Be Pacing the Indy 500, And Could Probably Race, Too!
Verdad Gallardo
Top 10 Corvettes Coming to Mecum Indy 2026!
Brett Foote
Top 10 C9 Corvette MUST-HAVES to Fix These C8 Generation Flaws!
Michael S. Palmer
10 Revolutionary 'Corvette Firsts' Most People Don't Know
Joe Kucinski
5 Reasons to Upgrade to an LS6-Powered Corvette; 5 Reasons to Stay LT2
Michael S. Palmer
2027 Corvette vs The World: Every C8 vs Its Closest Competitor
Joe Kucinski
10 Most Common Corvette Problems of the Last 20 Years!
Joe Kucinski
5 MOST and 5 LEAST Popular Corvette Model Years in History!
Joe Kucinski
2027 Corvette Buyer's Guide: Everything You Need to Know!
Joe Kucinski
Race Director
Joined: Apr 2009
Posts: 19,294
Likes: 2,753
From: Charlotte NC
You are correct for having a half circle go in between the two walls where the bushing goes.,..but do not forget about the long one that goes in the middle so the entire lower control arm does not collapse....in case you had not though of that. And that center 'C' tube needs a hole in is so the front mount portion of the center shaft can go throguh it also.
Or at least that is how I do it with my hydraulic press.
DUB
Or at least that is how I do it with my hydraulic press.
DUB
Instructor
Joined: Nov 2015
Posts: 246
Likes: 20
From: St. Louis (more or less) Missouri

Advanced
Joined: Oct 2010
Posts: 80
Likes: 2
From: near Nuremberg Bavaria
(And on a side note: Thanks for outing yourself as one of us who put their tools back in storage with the manufacturer's labels all facing in the same direction...
)
Thread Starter
Pro
Joined: Nov 2014
Posts: 503
Likes: 66
From: Florida
Completed installing the lower control arm bushings this weekend. They were actually easier to press in than the upper . Maybe because I already completed the uppers and went through the learning curve. I did end up making a spacer to use between the two walls of the arm and a split spacer for the inside of the arm. I used a ball joint press to press in the one side before installing the shaft then used a combination of socket, spacers, 2 inch aluminum angle and very large c-clamps my father gave to me several years ago for projects such as this.
Here is a picture of my home made setup.
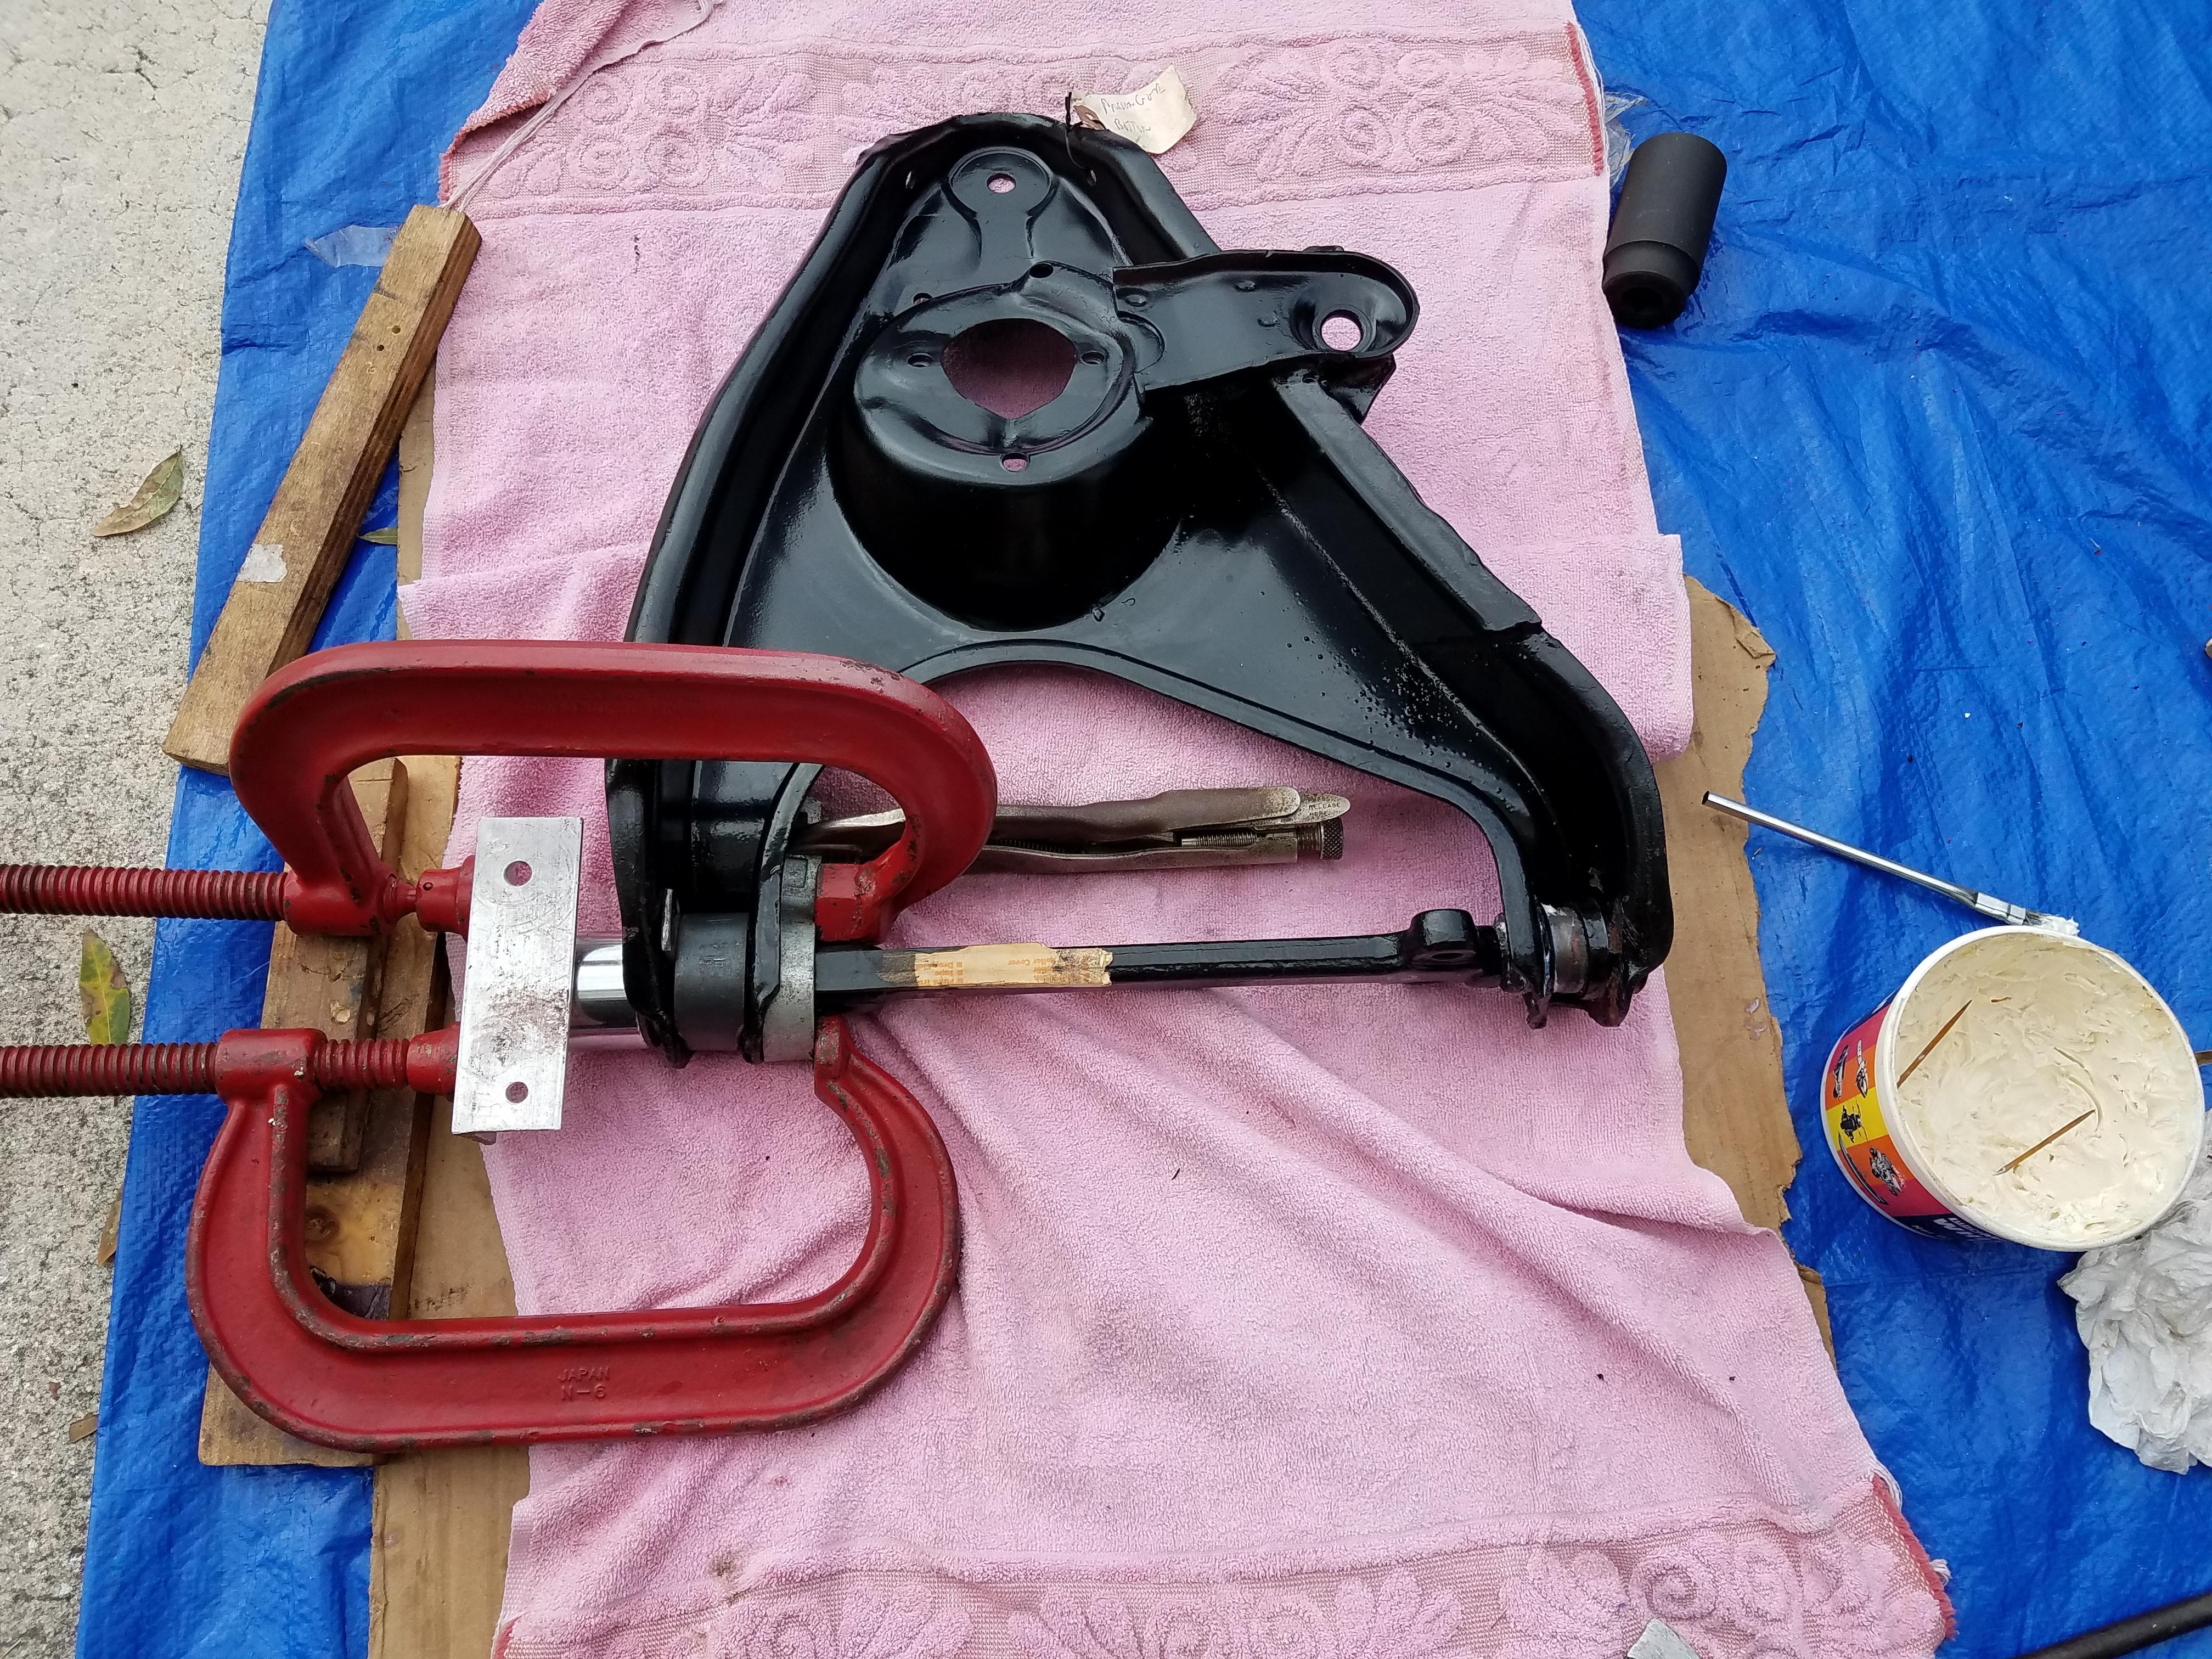
. Maybe because I already completed the uppers and went through the learning curve. I did end up making a spacer to use between the two walls of the arm and a split spacer for the inside of the arm. I used a ball joint press to press in the one side before installing the shaft then used a combination of socket, spacers, 2 inch aluminum angle and very large c-clamps my father gave to me several years ago for projects such as this.Here is a picture of my home made setup.
Thread Starter
Pro
Joined: Nov 2014
Posts: 503
Likes: 66
From: Florida
Thanks DUB for your assistance and direction. Glad this step is over and I can now move on to cleaning up the rest of the parts and start putting things back together.
Race Director
Joined: Apr 2009
Posts: 19,294
Likes: 2,753
From: Charlotte NC
Glad to be of any help to you on this repair.
Not knowing if you know this or not...but the cupped washers and bolts at the ends of the upper and lower control arm shafts MUST be tightened when the car is on the ground and settled. Do not tighten them when the control arms are hanging down or tighten them before you install them.
YEP..and that part is fun also and can sometimes take more time than anything else.Getting some parts cleaned up and painted and looking great...then makes it so that just about every part around it stands out if it is not 'touched' in some way and made to look decent again.
The 'trick' is knowing where to stop so it does not run into a 'off-frame'.
DUB


Le Mans Master
Joined: May 2003
Posts: 8,872
Likes: 3,548
From: Fernandina Beach FL
2023 Restomod of the Year finalist
2020 C3 of the Year Winner - Modified
https://www.vansteel.com/index.cfm?f...&subgroup=3038
For the 13" - requires 17" wheels- about $1600
For the 14" -requires 18" wheels - about $1700