When you click on links to various merchants on this site and make a purchase, this can result in this site earning a commission. Affiliate programs and affiliations include, but are not limited to, the eBay Partner Network.
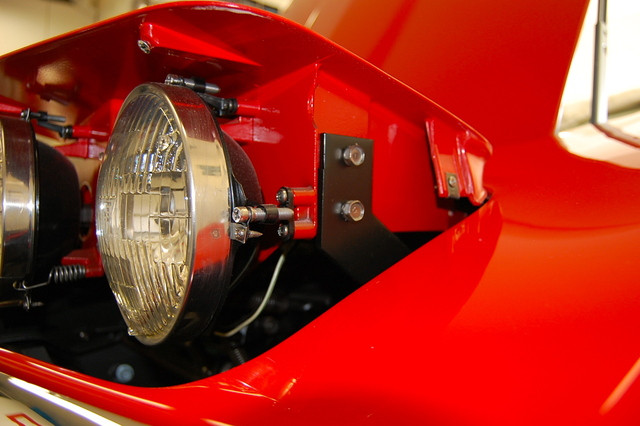
I'm trying to adjust the headlight aim on my '77. The LH low beam is aimed too low and it seems I'm out of adjustment. I want to remove the headlight surround to see what's going on but I can't get it off. Took out the four screws and tried to pull it out forward but the bottom of the surround won't go up high enough to clear. The outside/fender end does seem to be lower than the right but it's not even close to clearing on either side. Is there a trick to getting it off that I'm not seeing?
Hi rev,
Perhaps it's the 'up' adjustment for the door that's preventing the door from opening far enough so the bezel can clear the opening in the hood surround.
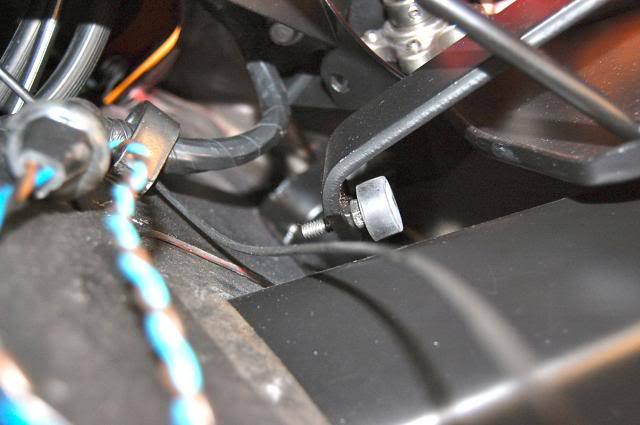
There is a long/flat arm attached to the outer side of each headlight housing that has an adjustment at it's end. You need to make that adjustment so the door will open a little further.
Regards,
Alan
This is the top of the arm that's now hidden by the bezel.
Alan,
Thought of that, it does look like the door should be opening more, but I don't think I can get to that adjustment with the bezel in place and can't get the bezel off without adjusting the door. Catch 22.
you have the light bulb out , can you not get a flat ring spanner down the side and get at the two 7/16 bolt heads ? I never tried it , but it might be possible ?!!! just watch you don't wind the bolt out and into the bezel and crack it !
or if you cant turn the adjuster enough , wind that right out/off might give you enough room to lift it a bit more.
or maybe its not getting to the stop at all ,if so undo the big pivot bolt and release the mechanism .
Hi R,
Have you tried to reach the adjustment from below?
I think that would give you a chance.
(Does a 77 have the 2 holes in the bottom of the valance for air flow to the radiator? On earlier cars you could reach up through those� not easy, but possible. The access is very good through the grill opening too, but that involves removing the grill on that side. I don't know how involved that is for 77?)
Also, I believe you have an easier access with the door closed because the that drops the adjustment down.
Regards,
Alan
If that limit bolt is the issue, and you can't get to it from the top, you might find this thread useful: https://www.corvetteforum.com/forums...ght-bezel.html
I removed the front grilles on my '79 to access the bolt and raise the headlights enough to remove the bezel surround.
Thanks for all the suggestions. I'm going to see what kind of access I have from underneath first chance I get, haven't even looked under there yet. It would be nice if I can get to that up adjustment bolt from the bottom without a whole lot of disassembly.
Regarding my original reason for needing to get the bezel off, it appears that there isn't anything obviously wrong with the upper headlight aim adjustment, the plastic bracket isn't stripped or broken and the adjustment screw seems to operate as it should. I wonder if the whole reason I can't raise the headlight aim sufficiently (with the adjustment maxed out) is because the headlight door isn't coming up quite as high as it should. Doesn't seem likely. Any suggestions as to why that might be?
The reason the door doesnt open further is because of something in the past history of the car involving a repair to that area of the car which left the doors out of adjustment.
I had the same problem after completely rebuilding my front lights.
Probably the actuator rod is screwed in a turn or two too much and the lights don't open enough.
Just to close this out a little, found the up adjustment bolt and lock nut. Accessed it from the bottom with a lot of difficulty. Working blind, can't look in and reach in at the same time. Removing the front grill didn't help, from below was the way. Adjusted the door to come up a little higher, it needed it anyway, the bezel came right out.
Didn't see anything that would be causing my original issue, running out of adjustment when trying to move the LH light aim upward. Everything in there looks in great shape, saw no issues. Maybe getting the doors to open a little more will help.
have you checked the support frame around the headlights? I had the same issue as you, and no adjustment could get them high enough. The front mounting tabs are known to break off.
have you checked the support frame around the headlights? I had the same issue as you, and no adjustment could get them high enough. The front mounting tabs are known to break off.
Not sure what you mean by support frame but I'll check the light housing structure specifically next chance I get, but everything in there was rust free and still painted, other than the springs of course. The lights open and close perfectly.
I am in the process of doing a restoration on our 74 C3 Coupe and see that the top machine screws on the left side headlight surround are broken off flush and the head of one of the ones on the right side is stripped. No, I didn't do it! Any suggestions on how to remove them? I would really hate to have to buy new headlight assemblies if there is a relatively easy way to get them out. The total length of the remnants can't be more than 1/4" long, Just need a way to get them. Any help is surely appreciated.
I had a similar problem with the self taping screws on my headlight bezel. One screw on each bezel would not come out. I guess they were rusted in the aluminum head light bezel. First I tried the reverse drill set from HD, with no luck. I then proceeded to very very very SLOWLY drill out the screw head so that I could remove the bezel. Also you don’t want to scratch the paint on the bezel, so I put on a TON of blue painters tape all around the frozen screw, before I started drilling. Once I was able to remove each bezel, I used tiny Cobalt drill bits to remove the headless frozen screws. I bet it took me an hour or more on each screw. After I was able to get 90 percent of the old screw out, I used a small self tapping screw to make new treads. It took lots of time and I must have used at least ten or more bits on each stuck screw. Let me know if you want me to tell you the size of the drill bit I used. I ended up finding the Cobalt Drill Bits at Lowe’s, because HD didn’t have them. Good Luck, go slow.
Thank you for the reply! I was kind of leaning that way but was a little leery about trying to drill in steel surrounded by aluminum. Yes, the drill size would be great!
Thank you for the reply! I was kind of leaning that way but was a little leery about trying to drill in steel surrounded by aluminum. Yes, the drill size would be great!
Brett
I had to repair one of my screws. I replaced it with a size 8-32 helicoil. You use an 11/64" drill bit to insert the helicoil, then use a matching machine screw. Worked out great and looks OEM!
VS
Brett Start with this size, once you have a good hole, use a bigger size to remove the screws head.
The first order of business is to remove the bezels, by removing or drilling out the screw heads. I used the 5/64 Cobalt from Lowe�s.
Once the bezels are removed you have a little more room for error. Also, I put several layers of tape on ALL adjacent painted parts in case the drill bit moved. I replaced the drill bits after a few minutes once they became dull. Because the drill bits were so small, I didn�t need to use the helicopter as mention by VS.
Eli