


TH400 tail seal replacement

Thread Starter
Burning Brakes


Joined: Feb 2016
Posts: 872
Likes: 114
From: Round Hill Virginia
Hi,
I've got a small leak at the tail seal (where it bolts to the tranny) bottom area and would like to replace it while the chassis is being restored. I think it should be replaced anyway, maybe it just needs to be driven. I replaced the speedo, modulator, and dipstick seals.
It appears it's straight forward; remove the bolts, remove the tail/cover, replace the seal, bolt everything back together. Are there any alignment things I need to consider etc? Before I bolt everything down, should I slip the yoke on to help keep centered while bolts are torqued down? I'll have to double check but I think the spec is 25ftlbs.
Any guidance I can get would be much appreciated.
Le Mans Master


Joined: Oct 2006
Posts: 7,123
Likes: 433
From: Gladstone MO
C3 of Year Finalist (appearance mods) 2019
The tail housing is located into the trans case by a lip that's deep enough alignment is not a problem. The seal/gasket is a square cut rubber ring. A little bit of Vaseline on it will lube so it will slide in.
The rear tail shaft seal, just pop that one out, pack the cavity on the back of the seal with grease so that little spring can't pop out and use a big socket to drive it back in.
The rear tail shaft seal, just pop that one out, pack the cavity on the back of the seal with grease so that little spring can't pop out and use a big socket to drive it back in.
Le Mans Master
Joined: Oct 2006
Posts: 7,123
Likes: 433
From: Gladstone MO
C3 of Year Finalist (appearance mods) 2019
If you flip the seal over, it's around the inside of the lip. And I see that one has a paper gasket between the tail housing and the case. Some transmissions use that square ring. Either one works well. Very unusual to see a leak there unless a bolt gets loose or there is a rough spot.
Thread Starter
Burning Brakes
Joined: Feb 2016
Posts: 872
Likes: 114
From: Round Hill Virginia
The other issue I may be contending with on this is the lower bolt (side you can't see in the photo) is the threads on the trans case are very soft and I think it's really only biting on the last bit of threads. There's room for a longer bolt...but ugg. I would think twice about just running a heli-coil but it's right on an 'ear' so it's thin - I worry that the new bore side will blow out or penetrate into the wall of the trans. Has anyone done this, or is there a weak thread solution?
Le Mans Master
Joined: Oct 2006
Posts: 7,123
Likes: 433
From: Gladstone MO
C3 of Year Finalist (appearance mods) 2019
A heli-coil will work just fine. Just make sure the drill is straight and use the tap gently. It won't be so thin that it will break on it's own, and the heli-coil will be stronger than the tapped threads in the case were.
There is really no "stress" there, other than the rear mount and just the weight of the trans on it. And the lip on the housing should bear that weight anyway.
There is really no "stress" there, other than the rear mount and just the weight of the trans on it. And the lip on the housing should bear that weight anyway.
Corvette Stories
The Best of Corvette for Corvette Enthusiasts

2027 Corvette vs The World: Every C8 vs Its Closest Competitor
Joe Kucinski
10 Most Common Corvette Problems of the Last 20 Years!
Joe Kucinski
5 MOST and 5 LEAST Popular Corvette Model Years in History!
Joe Kucinski
2027 Corvette Buyer's Guide: Everything You Need to Know!
Joe Kucinski
10 Things C8 Corvette Owners Hate (But Won't Tell You)
Joe Kucinski
10 Best Corvettes Coming to Barrett-Jackson Palm Beach 2026!
Brett Foote
Every Corvette Grand Sport Explained! (C2, C4, C6, C7, & C8)
Joe Kucinski
Grand Sport & Grand Sport X Launch Alongside All-New 535hp LS6 V8!
Michael S. Palmer
5 Reasons Bad Drivers Crash & 5 Ways to Avoid a Costly Mistake!
Joe Kucinski
Thread Starter
Burning Brakes
Joined: Feb 2016
Posts: 872
Likes: 114
From: Round Hill Virginia
Just an update: waiting on the end seal before I put everything together but I did put helicoils in the bottom two holes. One needed it and I did the other just because its seemed a little sloppy. Came out very good I think. I was pleased anyway. I have the paper gasket and Im planning on using a very light skim- coat of RTV. Im not sure if I'll replace the bushing as it looks pretty good. Both groves are there and it doesn't show any obvious or uneven wear. When you slide the yoke in the bushing (end cover removed) and there is zero slop or movement. So I'll likely just replace the gasket and end seal.
Last edited by nix1981; May 19, 2018 at 04:30 PM.
Thread Starter
Burning Brakes
Joined: Feb 2016
Posts: 872
Likes: 114
From: Round Hill Virginia
Originally Posted by TimAT

When you get the seal, look at the back of it. You'll see the spring around the lip.
Last edited by nix1981; May 21, 2018 at 08:42 PM.
Thread Starter
Burning Brakes
Joined: Feb 2016
Posts: 872
Likes: 114
From: Round Hill Virginia
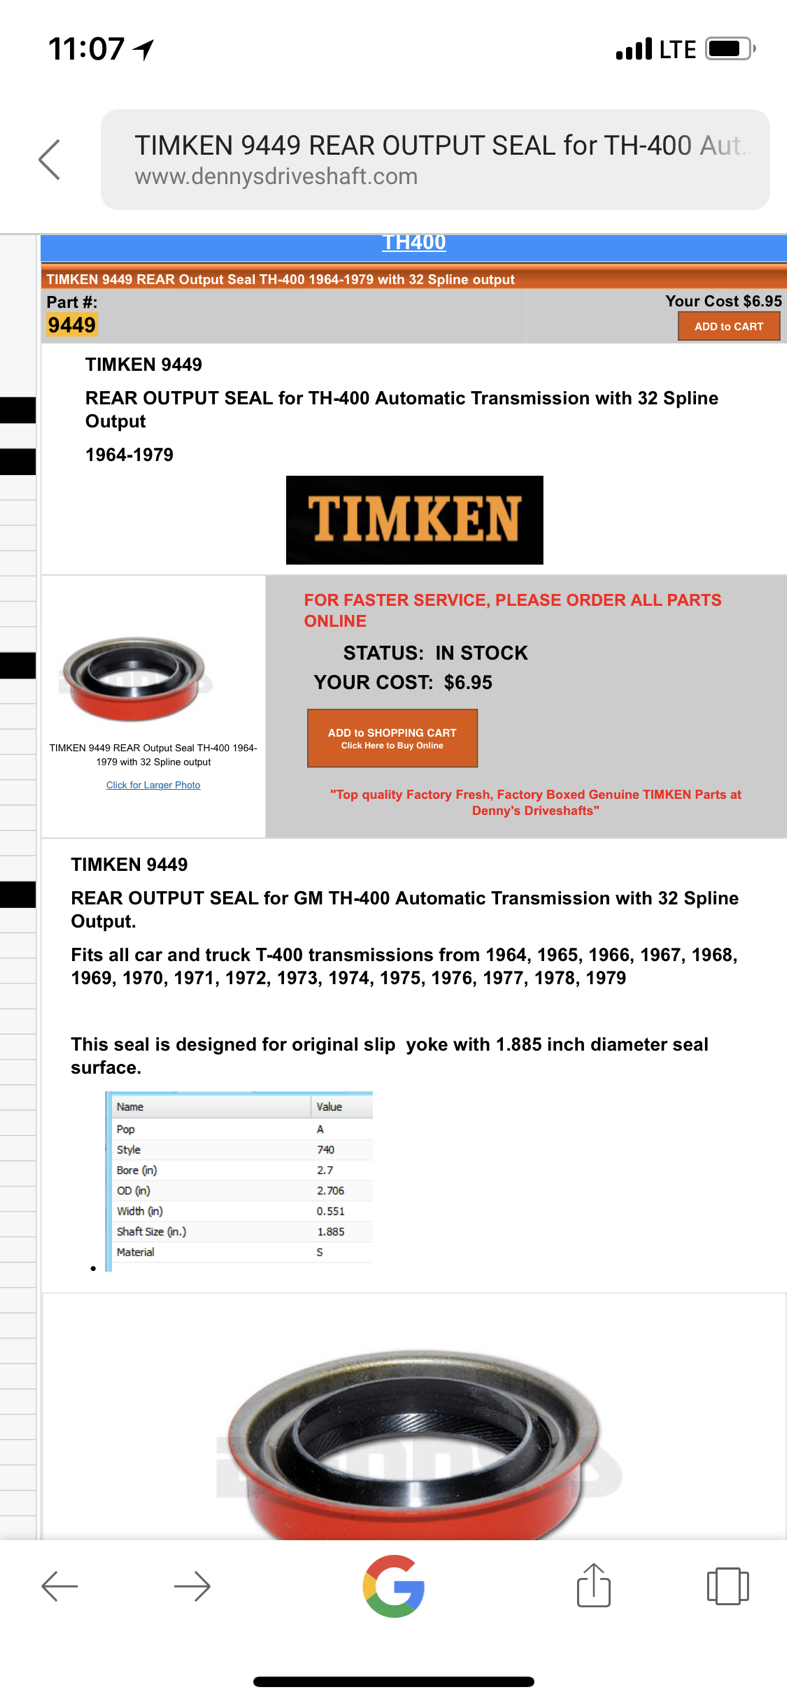
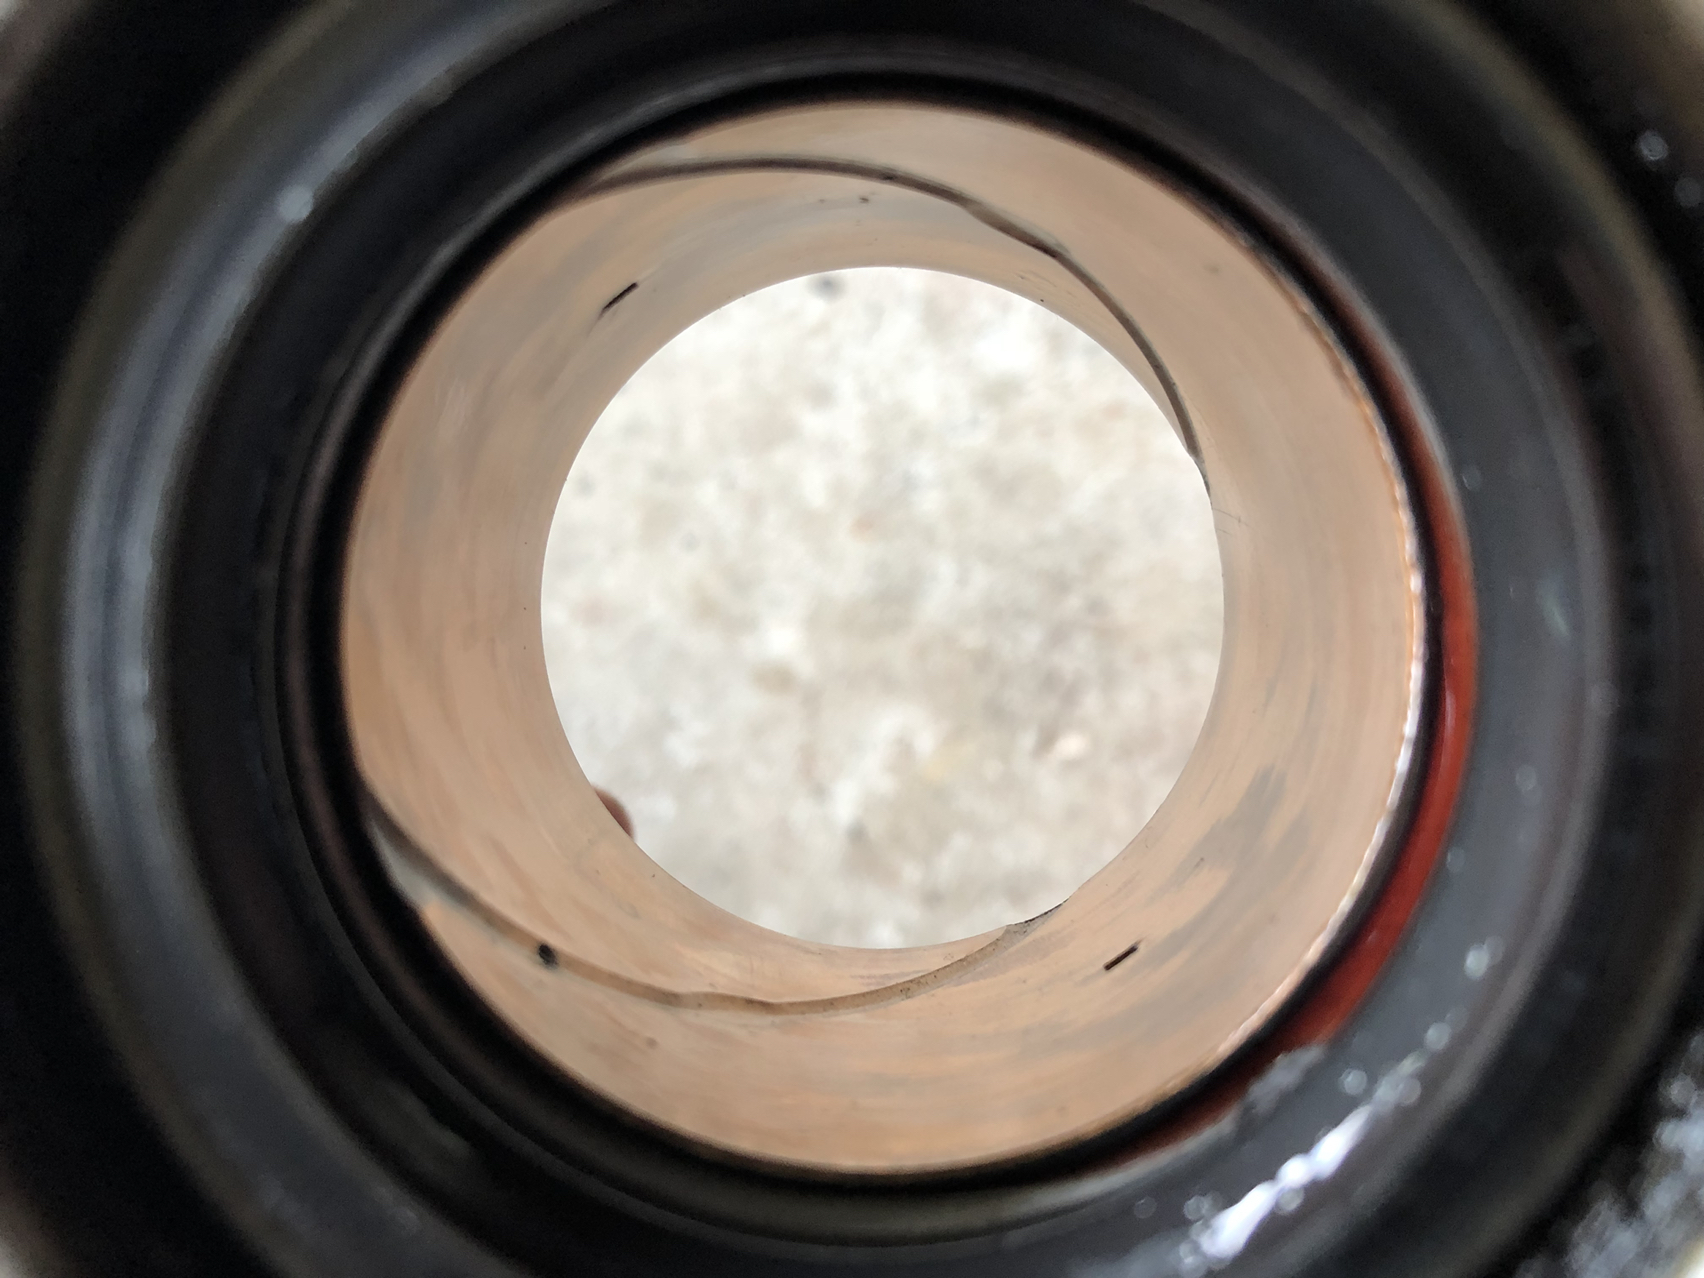
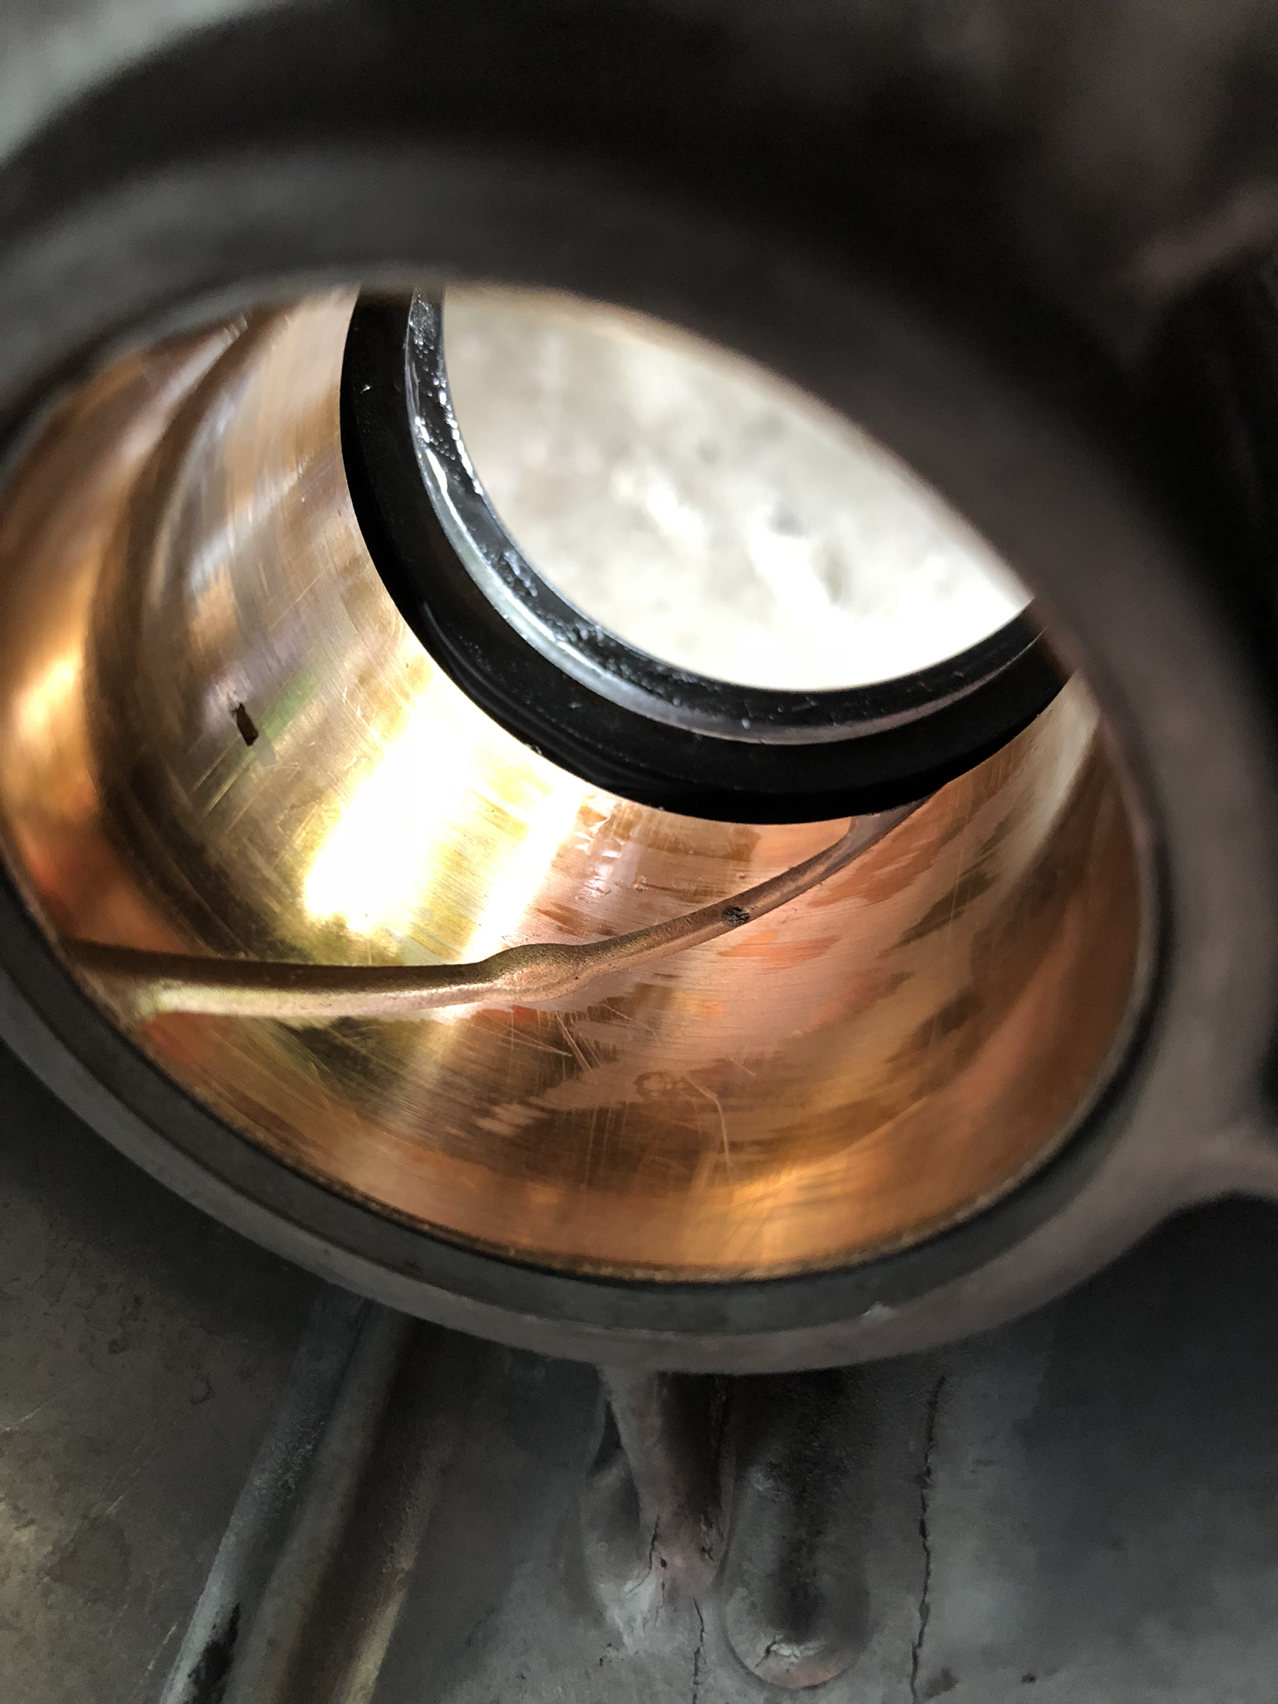
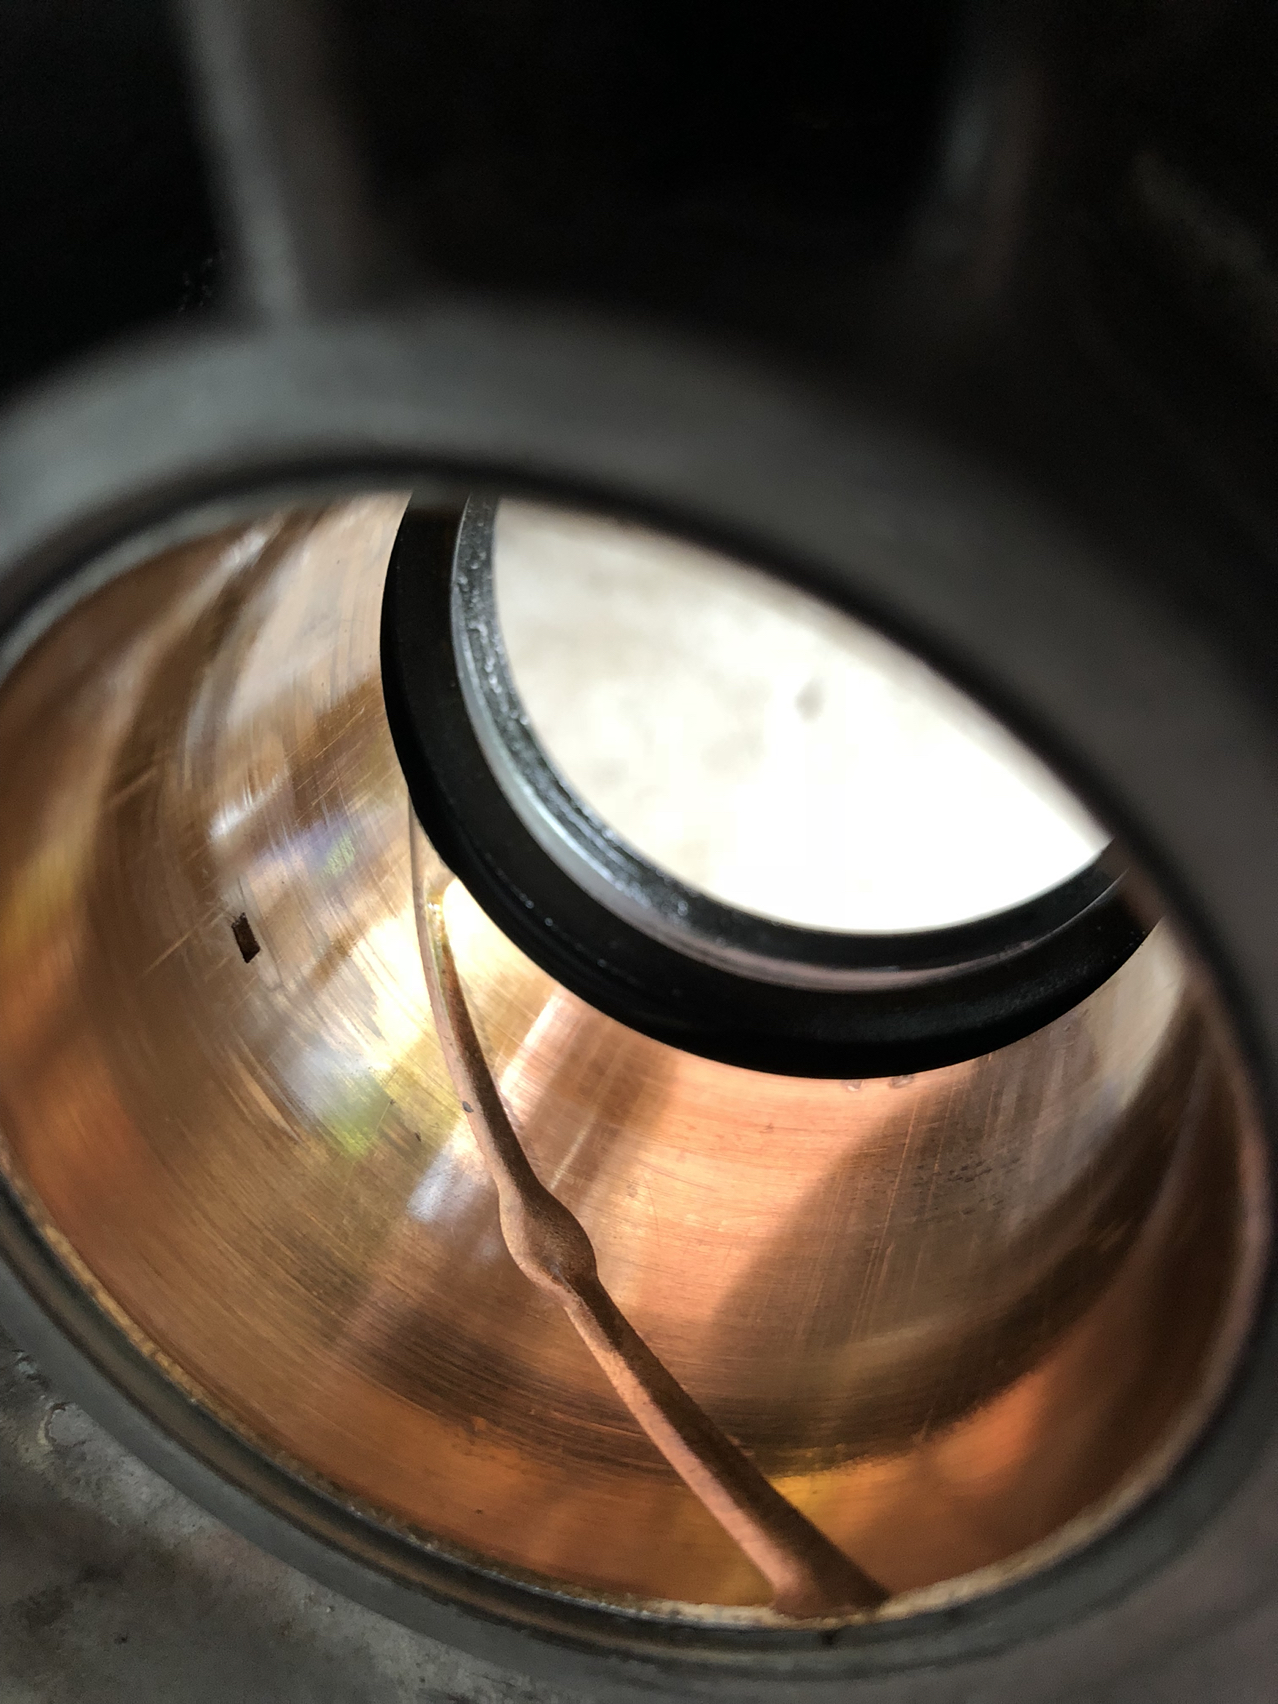
I do want to replace it even though it looks okay to me. I've never taken one out, and I don't the proper method to take it out. I called the local tranny shop (who does have a good reputation) to see if they could put the new bushing in and they said "if it's still tight and shows no wear,and I can't fit a .01 gauge in it, to just to leave it." They also said that the new ones never fit like the older ones did, and are often to tight and need to be honed. Now, I have no idea if this is the original, but based on it looking fairly new, I would say it's not. The yoke has a snug slip fit in both. The set I bought is Timken and I often find Timken being the standard and not inferior in any way.
So I may just drop it off with them to fix anyway, but if they send me on my merry way.... I'll need to do it myself.
1. Do I need to be worried or concerned about the notch/hole thats in the old, but not the new?
2. How do I remove the old bushing and install the new bushing?
3. Should I use a bit of RTV on the end seal (not a lot, just a skim coat)?
Thanks, for all the feedback. I don't think it looks difficult to do, but I want to make sure I don't screw something up inadvertently thinking I know what I'm doing... done that a few times. I'll try and post some photos of what's in there now just so you guys can see what's actually in there.
Nick
Team Owner


Joined: Jan 2006
Posts: 37,637
Likes: 3,113
From: Crossville TN
The only way to get a GOOD read on the yoke journal-to-output bushing clearance is to measure the yoke journal and the bushing I.D. to determine actual clearance. Unless some failure trash circulated through that transmission, the bushing will NOT appear worn. But, in fact, it could be 'gently' worn oversize with many years of use.
Use dial calipers to measure the yoke journal (fore & aft at 0* & 90*) and the bushing I.D. (in the same manner) to determine what the real clearance is for that bushing. If the diametric clearance between yoke journal and bushing is .003" or less, the old bushing is adequate. Otherwise, install the new bushing.
[Note: You can measure the I.D. of the new bushing to determine clearance, BUT the actual clearance will reduce a bit due to the compression forces from the bore in which it is installed. The "free" measurement size is only to verify that the bushing is the correct one for this application.]
Not sure about the 'notches' you mentioned; but if there is an oiling path into that bushing, you don't want it to be sealed off with the new bushing.
Last edited by 7T1vette; May 22, 2018 at 04:00 PM.
Thread Starter
Burning Brakes
Joined: Feb 2016
Posts: 872
Likes: 114
From: Round Hill Virginia
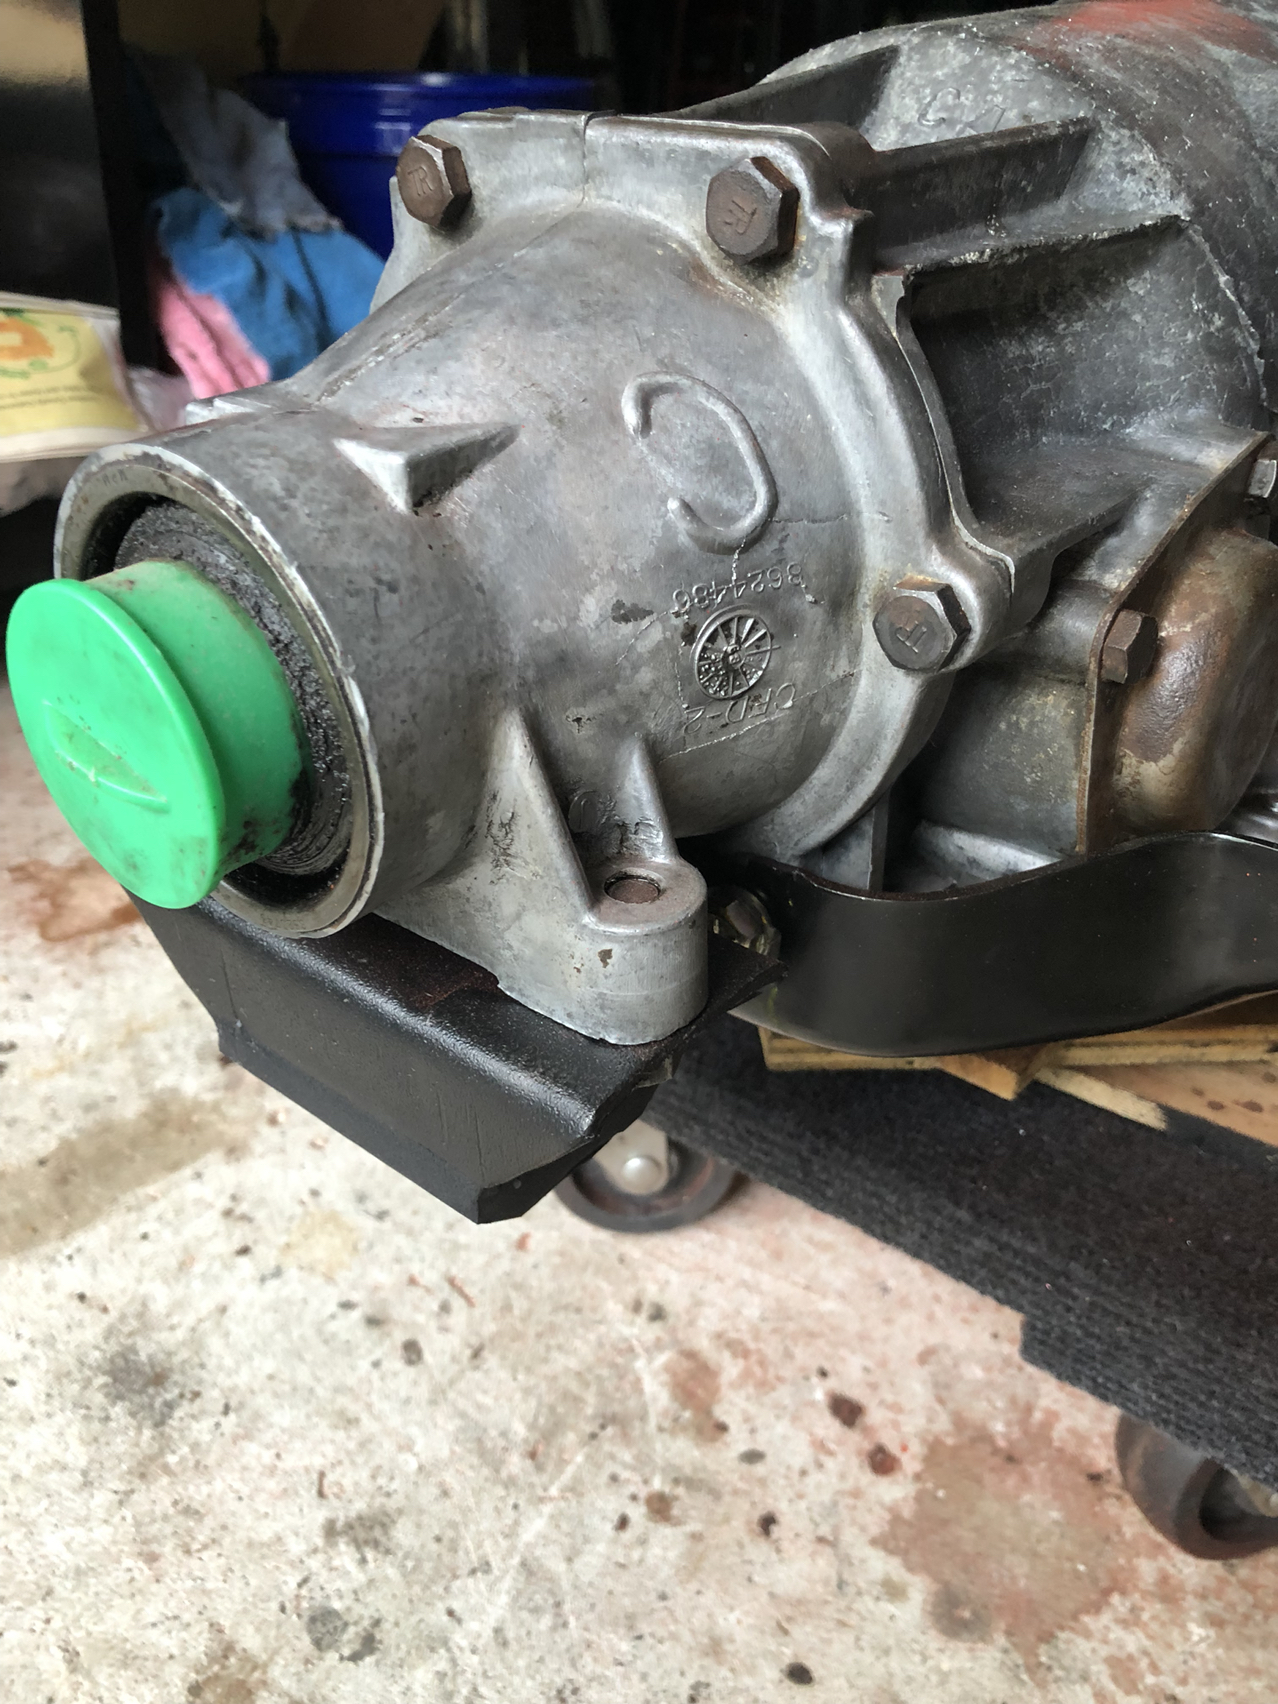
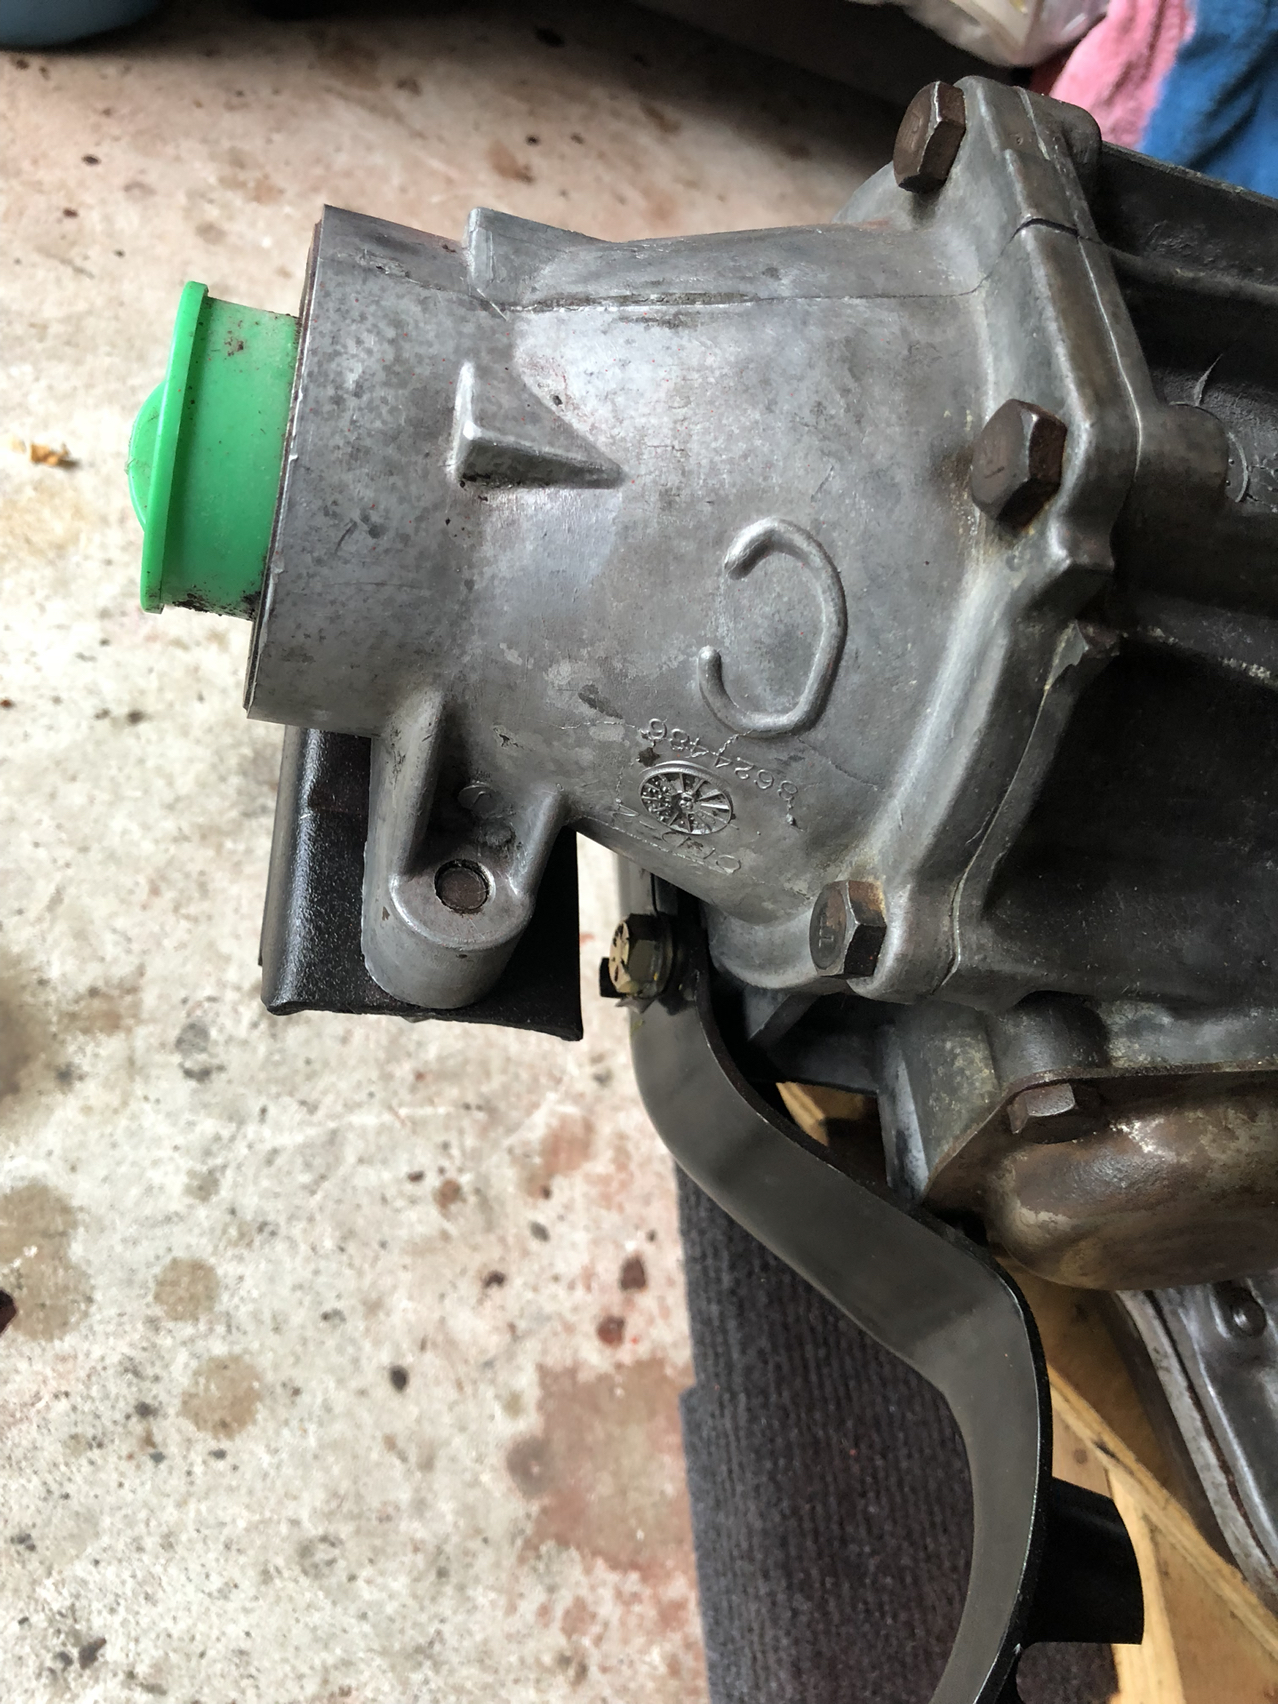
The picture Im including shows the two holes I was referring to. They're on exact opposite sides from each other. The other major difference is the length. The new one is 1" and the one installed is 1.5", which seems to correct rather than than the 1".
Team Owner
Joined: Jan 2006
Posts: 37,637
Likes: 3,113
From: Crossville TN
Again, you need to check for size of the existing bushing and compare it to the yoke journal. I agree that a 1.5" long bushing is better than a 1" long bushing. Those two holes are oiling holes. Aftermarket probably went after shorter bushing without holes (figuring that sump splash would keep it lubricated) only to save money. Makes me wonder what quality of seal you got in that kit?
If the existing bushing is not worn excessively, reuse it.
P.S. That bushing is worn, but it has worn evenly and without any debris mixed with the tranny oil.
If the existing bushing is not worn excessively, reuse it.
P.S. That bushing is worn, but it has worn evenly and without any debris mixed with the tranny oil.