When you click on links to various merchants on this site and make a purchase, this can result in this site earning a commission. Affiliate programs and affiliations include, but are not limited to, the eBay Partner Network.
Good evening gents, this is my first post but I have been lurking in the background for a while reading all the posts. Im in the process of completely rebuilding the *** end of my 1977 Corvette with one of the street and slalom kits with composite spring and smart strut set up. Im also using the Van Steel Delrin crossmember mount setups. I currently have 3.08 factory gears tied to the th350 and the L48 350. Car is all original with 68K miles so everything actually came apart pretty easily using all the helpful articles I poured through on here. I do believe while I have everything down I am going to swap out the rear end gears from 3.08 to 3.70 (yes I am fully aware of the RPM issues with highway travel with these gears and current transmission). This is going to be my Saturday night light to light cruiser and cars with coffee car. I do plan on dropping in a Blueprint 383 stroker 430/430 this winter and I want it to go as fast as it looks, (I don't need the power but I WANT the power). Im very mechanically inclined but I feel like a full differential rebuild may be a little to challenging with my lack of specialty tools required to do so. I do have a friend in the automotive industry with experience rebuilding rear-ends so he will tasked with the challenge. Herein lies my question while it is torn apart does anything need to be done/replaced with the posi unit? He has said lets get it open and take a look at it , but I would like some feedback from some of you guys on things to look for or check out. I really don't want to spend $600 more on a new Eaton unit but I also don't want to be pulling this thing back apart in 5000K miles having to work on it because the posi unit failed. I know there is a gentleman (gtr1999 I believe) that is the know all be all on these units so hoping to get some wise words before fully taking on this venture. Thanks in advance guys, y'all have been big helps to this point. Very soon I will start a build page and show you the car and the interior work done to this point as well as the front end rebuild that starts as soon as I get the back back together.
Just a comment on changing from 3.08 to 3.70 gears. It will be the best single change you can do to the car, performance wise. I did that change on my 77 years ago and took a half second of my 1/4 mile ET. You can feel that by the seat of your pants.
Last edited by BKbroiler; Jun 4, 2020 at 08:29 AM.
2020 Corvette of the Year Finalist (performance mods)
2019 C3 of Year Winner (performance mods)
2016 C3 of Year Finalist
I would look for an entire unit. I bought a used 64 3.70 rear. Supposedly one of the years it was called the worst design and most fragile. I Drained it, pulled the back, cleaned up the interior and found the little tabs that break off that were there to keep the spring blocks for the clutches aligned. I then put it back together and drove it all over the area last year and brought it to the dragway a few times. Still works great. If your not racing it and dumping the clutch to do burnouts at every stop light or stop sign, it will probably last quite a while. I do have a 69 sitting on the shelf that I want to throw a new set of 3.70s in as a back up but have no reason to rush it. I also have the 3.55 rear right next to it as well. So maybe my confidence is high due to the back ups
If your set on use swapping the gears, and it’s not slipping, whining or making noise,, I would change the gears, bearings and seals, and leave the posi unit as is
Last edited by Rescue Rogers; Jun 4, 2020 at 11:09 AM.
If you have specific questions feel free to email me.
An original 77 differential will have bad axles, weaker clutches, and ring gear bolts that might be loose. Can you use it as is, sure you can who will stop you? the only thing that might is the diff itself. However, they are good bases to build to what ever application you intend. They have the good spiders and posi cases, but the cases should be checked for cracks. I never use a posi case as it is from the factory or new aftermarket, never use the springs or plates.
Roger - 63-4 are bad units. I certainly don't wish you any ill will but I would never use or recommend a stock 63-4 DANA or the r&p used in them. Those that have attended my seminars saw first hand how the pinions can snap, the one I have is a 64 that literally broke in half while the driving. Now the housings are fine but they need all new internals and pinion yoke. when we were kids we would get one for $50- $100 from the junk yard and use it but I sure wouldn't anymore. Anyway good luck with it and I hope you don't have any issues.
2020 Corvette of the Year Finalist (performance mods)
2019 C3 of Year Winner (performance mods)
2016 C3 of Year Finalist
Originally Posted by GTR1999
If you have specific questions feel free to email me.
An original 77 differential will have bad axles, weaker clutches, and ring gear bolts that might be loose. Can you use it as is, sure you can who will stop you? the only thing that might is the diff itself. However, they are good bases to build to what ever application you intend. They have the good spiders and posi cases, but the cases should be checked for cracks. I never use a posi case as it is from the factory or new aftermarket, never use the springs or plates.
Roger - 63-4 are bad units. I certainly don't wish you any ill will but I would never use or recommend a stock 63-4 DANA or the r&p used in them. Those that have attended my seminars saw first hand how the pinions can snap, the one I have is a 64 that literally broke in half while the driving. Now the housings are fine but they need all new internals and pinion yoke. when we were kids we would get one for $50- $100 from the junk yard and use it but I sure wouldn't anymore. Anyway good luck with it and I hope you don't have any issues.
thanks! I haven’t had any issues at all, maybe if I ran some street slicks at the track it might explode but it’s been great. Before I got it I read about all the issues but the price was low and 3:70s have been like hens teeth in recent years. 2 years ago you couldn’t find them but 4:11s were very common! Now there isn’t any 4:11s now that I have a 5 speed.... like I said, if it blows I have a 3:55 I can put in while I rebuild one of the other 2 cases I have
Rear end rebuild update. I got the differential tore apart and inspected. Keep in mind this is my first time through this process. To my delight everything looks to be in very good condition, compared to some of the nightmares I have read about. I have posted multiple pictures of the progress above couldn't figure out how to add this commentary to the picture post so sorry for the double post. The axles appear to be in very good shape, both c clips were still attached and in very good condition. The Richmond 3.70 gears came in today so I will spend tomorrow evening cleaning everything up to get it ready. The posi case also looks to be in good condition so im still unsure if I should replace the clutches while I have it apart seems almost stupid not to? if you look you can see a couple of images of the clutches and they appear to look like carbon fiber, but cant swear I know what they looked like from the factory. I don't believe this unit had ever been opened before with the grudge build up but maybe so. somebody did however drill an 1/16th hole in the bottom of the case and sealed it up with a metal screw and caulk I will use this location to drill and tap a lower drain plug. Please let me know if you see anything out of place and let me know what you think about the axles and the posi clutches. Also if you see this GTR1999 did you say you do not use or need the spring plate assembly? Thanks for your help guys I will keep posting updates as I go. Thanks Brad
Forgot to mention I took some measurements and this is what I came up with let me know if this sounds right. With a feeler gauge and the axles pulled as far out as they would go with the c clips attached I have .025 on the drivers side and .023 on the passengers side between the end of the axle and the posi rod. and I used and end play gauge and seems like im getting 12 thousandths (hope im saying that right).
Last edited by corvettes77; Jun 8, 2020 at 09:51 PM.
Not to put words in Gary's mouth but in another post he commented the maximum is .050 so you are nowhere near that. Hopefully he will respond or send him an email directly.
Concerning the spring plate Gary does a some what elaborate blue printing process that eliminates the plate, he would have to give your more detail.
I just took a look and looks like a stock diff. The date code on the RG looks like Sept 1976. If you do a common "rebuild" of bearings and clutches, setup stock you are not gaining much. For the 200hp 77 350 it would be ok, for over 400 hp that you will probably use, well may not so much.
The axles still have the chamfers on them but there is also wear there. You have to get them tested to see what the face hardness is. Check the dimension from the face to ring to see where it is. If it's in the 180-200 range but soft you can get them hardened and reuse them which would be better then the hit or miss quality of new or rebuilt today.
The clutches are the weaker type I would use solid steel over those or fiber coated. I would also polish and tune the posi which eliminates the spring pack but it takes time and patience to do right and you might need to surface grind shims to size.
I do not use Richmond, Motive, or Yukon gears, I use US Gear but that is your choice. I am sure the manufacturers will tell you their gears are fine and many are sold.
DId you mark the bearing caps
Thanks everybody that has chimed in so far. Mr. Gary to answer the questions you have asked I took photos of the main bearing caps before I removed them they were stamped with different numbers so I will be able to decipher which one goes where. I did order a full Timken bearing and race set for the rebuild. I did go with the Richmond gears but that was solely based on price. Most ring and pinion gear set I found were $330 plus just for the 2 pieces, but after looking online I found this one set in 3.70 brand new for $130.00 which was less than half of every other brand and even the other Richmond gear ratio sets. I figured they would show up used or with something wrong with them but to my surprise they showed up brand new in the box. so that said im gonna take a chance and hope if they are noisy the dual exhaust will drone them out! Im taking the axles in tomorrow for a hardness testing, what is acceptable and what would indicate if they needed to be hardened? I have no problem doing the shim grinding to be able to get rid of the spring plate. Is the process im trying to do in tuning the posi the one shown in Toms video on YouTube? I have ordered a new set of clutches so as soon as they come in I will start putting it all back together.
For all-around use with a 3.70 rear gear, a swap out of the THM-350 to a 200-4R or 700-R4 overdrive auto trans would be the best of all worlds. Without it, you will NOT be happy to drive on the highway, unless you never have to do it.
Good luck with the project. Sinkin' your teeth in 'full-bore' with the rear suspension....
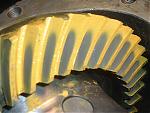
Okay making some headway finally, but could really use some advise. I decided to tackle this with out the help from a mechanic friend because I kept getting the run around. I am to the point of trying to button this up but have a couple things i could use some help on. Its temporarily back together with the new ring and pinion gears. The pinion depth shows to be with in .002 of the stated specs with the shims installed. First possible issue, when installing the pinion preload I kept tightening slowly and checking with a beam wrench( didnt realize the difference in beam wrenches and ended up ordering a 3/8 one that went to 800 inch pounds so it's not real detailed in the 20 inch pound range but it seems to start turning before it gets to the 25 inch pound mark so I think I'm between 17 and 22 ish) it doesnt necessarily turn easily, it spins freely but takes just a little pressure. So next I installed the carrier and fitted it with shims so that it's fairly tight I'm thinking to tight because I dont have any backlash at all. I went ahead and temporarily installed the caps so I could get a pattern readout which you can see in the photos. With it put together it takes a 2 hands to rotate the yolks its takes some pressure to turn it which doesnt seem right. Does the pattern look correct? If I reduce the shims on the bearings is there a side I should take them from based on the pattern? I'm guessing that the new timken bearings are slightly wider than stock? The reason I ask this is the factory shims that came out are around .243 in thickness but the new shims used are closer to .215 per side and its tight ( same case and carrier). Gonna set this aside for the afternoon and turn my attention to the trailing arm rebuild as I just got my parts back from powder coating, until I get some feedback from you guys. Thanks in advance.
Last edited by corvettes77; Jun 28, 2020 at 01:02 PM.
That sounds like it's way out of wack, to be nice.
The TW you are using is way out of range, you can't guess here as you end up with a total failure in the car once load is applied.
While the preload, final preloads, will be snug it won't take 2 hands to move it. You can't pattern until the lash and preload are in. This is general differential procedure here. You have to get the pinion bearings between 15-20, I set them between 17.5-20 and you have to have a scale range no higher then 30 in/lb, otherwise you're wasting your time and money.
Richmond runs a loose lash of about 010", your side shims sound out as well. Now I have not used the imported Richmond gears, in fact the only Richmond gears I setup are the 12 bolt conversions Tom had made. I can't say they if are good or bad but I will say they wouldn't be what I would use in my vette.
Clearly you need to stop and go back to the beginning of setup. Differential work is not just bolting parts together, you have to have the patience, tools and understanding of what is needed. When you measured the pinion depth how did you do that? If off the top of the pad those are not at the center of the bearing and will give a false reading. I do not use a depth tool, I go by pattern. Depth tools have to be off the center of the bearing.
I'm really appreciative of being able to learn some good information about differential rebuilding in this thread. It's great seeing forum members help each other out. Looking forward to seeing everything work out. Good luck, Russ
I figured i would have to disassemble and start over because I didn't feel that it should be that tight. My question now is I know I will need a new crush sleeve since I feel like there is a good chance it was overtightened. Can over tightening lead to damage to the pinion bearings would it be a good idea to change those as well even though they are still brand new? When you say my side shims sound out as well can you elaborate on that? I have ordered a much smaller beam wrench with a much smaller inch pound scale so i can get a lot more accurate this second time around. I measured the pinion depth by installing both axles without the posi carrier installed and measured off the centerline of the axle to the flat portion of the head of the pinion. I installed a small round piece of metal ( a cut nail) between the axles center points and measured to it with a micrometer to get an exact measurement. I know not the most professional way but it seemed to work. The best I can come up with from the pattern it gave me is that I over tightened the pinion drawing it to far in, unless of course you think thats not the problem in which case im all ears. Thanks
I doubt the bearings are bad unless you dropped or hammered on them. You probably didn't put a lot of pressure on them when turning. If there is any doubt get new bearings- they can be bought online, from any parts store, or bearing supplier. They are not special by any means. Use Timken and confirm the numbers on them to the new ones.
You do not install the crush sleeve until you know the pattern and lash are done. That means a lot of setup and break downs. Once you have the correct pattern with the new bearings you final install the pinion, using the sleeve and pinion seal- that is the only time.
The crush sleeve may still be good I can't say, if you install it PRIOR to the seal in the final install and check it by bringing it to the bearings and there is no endplay in the pinion see how tight the bearings are. Say you bring in the yoke and it bottoms on the bearing and there is no endplay, no more room to compress it unless you apply more load and the bearings are in the 15-20 in/lb range than you are good. If on the other hand the preload is over 20 you need a new sleeve.
Shim the posi case so that is is snug to remove with an 18" bar. That will allow good patterning but is not in the preload mode yet. Once you have the pattern known you add equal size shims to each cap shim set to maintain the lash but increase the total preload 8-10 over what you had for the pinion- ie: pinion set to 17 then the total with the posi shims should be 25-27 in/lb. There should be not binding or grinding moving it.
So I'm about 30 hours into the shimming of this differential and I dont feel like I have made and ounce of difference. I have had the pinion out and bearing pulled at least 9 times trying different shims and the carrier out at least 30 times trying different shims. After my last post I broke everything down and started from scratch. I did have it to tight the first time through which is why I had so much problem turning it, I have since corrected that problem. I watched a bunch of videos on pinion depth setting and ways to measure it and i feel certain that i am with in .003 of the suggested depth, to the point i was hand sanding .001 from the shims. Once this was done and with a new much smaller scale beam wrench I am turning each direction at 17.5 lbs of preload. Installed the carrier shimed, re shimed, added more to one side then vise versa, and no matter what I do it doesnt pattern right. The new problem I seem to have now is that every 360 degrees I turn it in either direction I have a tough spot at the same point I'm assuming this is the bigger pinion bearing as I have had to take the bearing puller to it so many times, so I need to pick up a new bearing for it and see if it fixes the problem. Went and talked to a local transmission/ differential shop they gave me some pointers as well tried those and still nothing. I'm finally to the point where I'm pissed I took this project on, but at the same point want to see it through just dont know how many more hours I can throw at it before enough is enough. Hoping maybe you guys can shed some light on what you see or think I should try as the whole project is on hold as this is the building block for the entire backend. I've included some pics of the current pattern.
So remeassured everything again this morning, broke it all down hand filed .005 off of the pinion shim and reassembled it. Played with the carrier shims a bit and this is about has good of a pattern as I have had. I dont have much lash though looks like I'm only measuring about .003 (manufacture recommends .007 to .009 for street use. Not 100% sure how to increase this. I've moved shims fro left to right and right to left in different increments and it always seems to stay the same or get to the point where there is 0 lash. I'm starting with about .022 in shims on both sides and I'm moving .005 back and forth and doesnt seem to offer much of a change. Gonna try moving .010 increments here shortly and see if this makes a difference.




 rear end rebuild