LT-4 Suspension Rebuild "LOTS of Pictures"
 11-16-2009, 11:51 PM
#141
Racer

Member Since: Sep 2009
Location: Sherbrooke Quebec
Posts: 408
Likes: 0
Received 0 Likes
on
0 Posts

I'm doing my ZR1 as I wrote this and I too notice that steel wool does work well!
Amazing job sir!
Martin
PS: I was actually wondering about poly bushing, but now I think I'll go with it!

 11-26-2009, 06:29 PM
#142
Racer
Member Since: Sep 2009
Location: Sherbrooke Quebec
Posts: 408
Likes: 0
Received 0 Likes
on
0 Posts
Well today I went to pull the front spring out of the car. Not a hard job, but I do understand why it's so important to get the car high off of the ground. If the car isn't high enough, the curvature of that spring will leave you stranded. Lucky for me, I had my car up high enough to help with the removal of the tranny prior to the motor pull so it worked out well.
Here's a shot of the car without the engine, spring still in place.
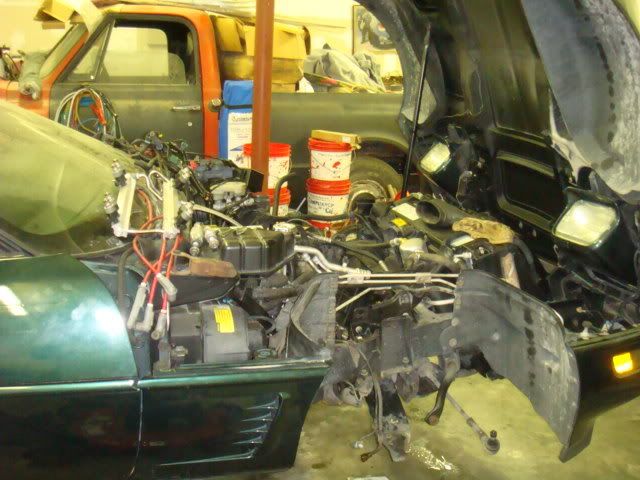
Here's a shot of both sides of this dirt monster as she sits right now.
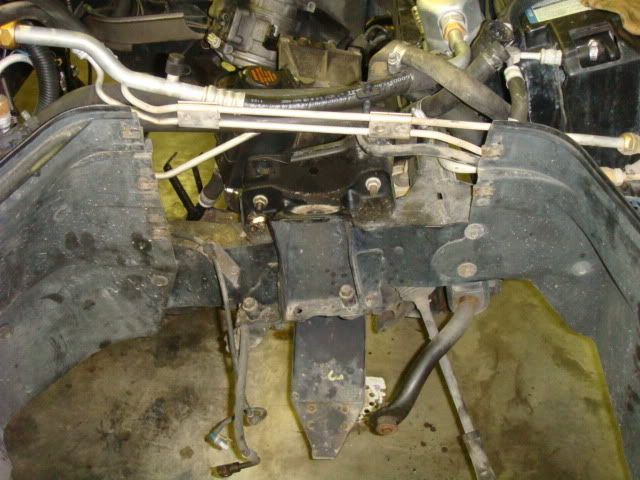
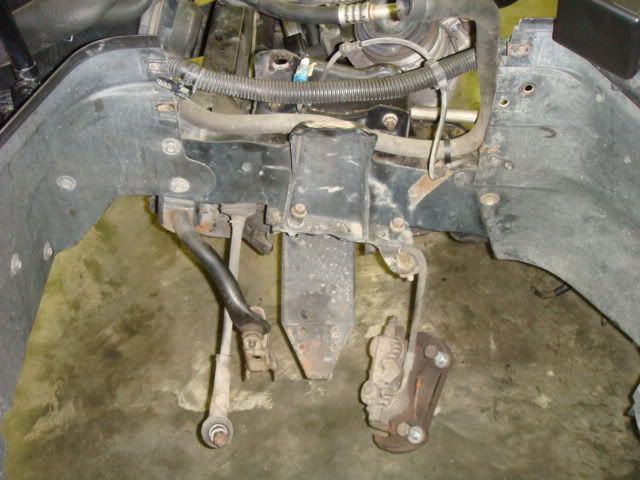
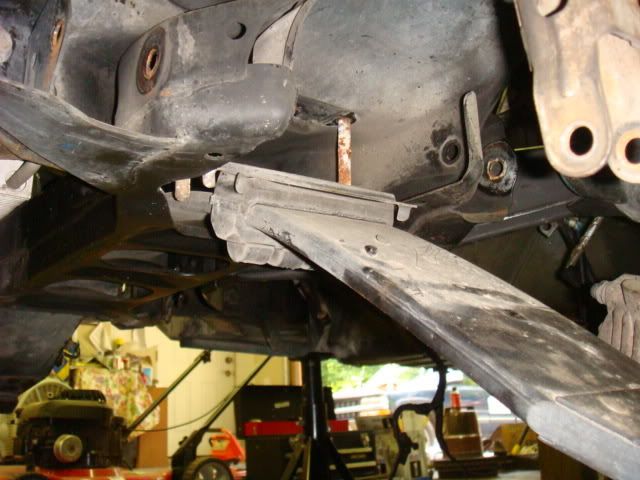
An underside shot of the spring in place
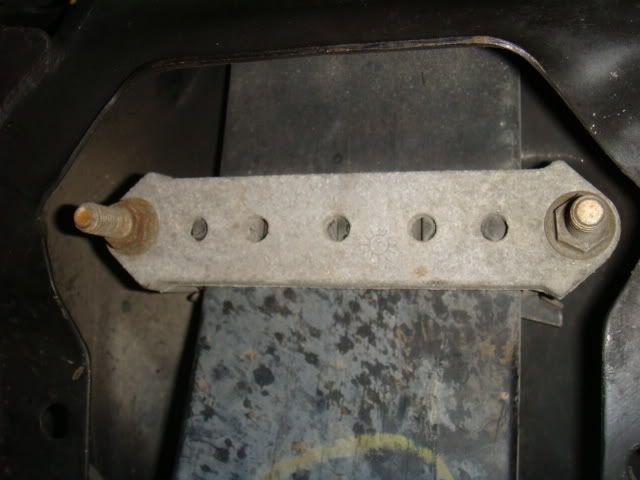
And a shot of the spring retainers just before I losened the four 5/8" bolts and dropped the retainers.
Once I got all four bolts out, the rest was easy. I just picked a side and carefully pulled the spring out from the chassis. It sits in a channel, so be careful not to ding or damage the spring.


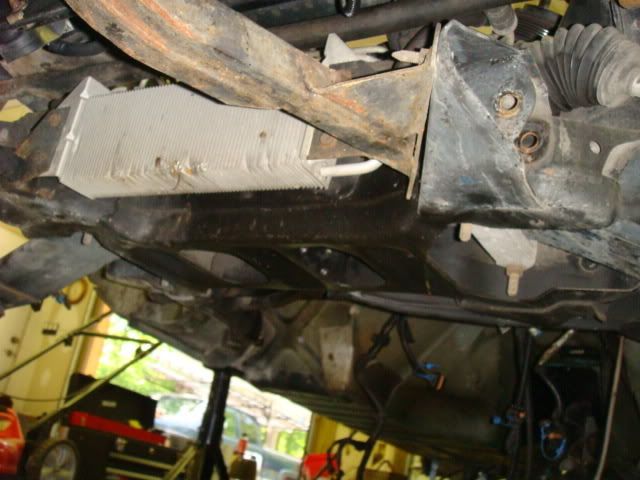
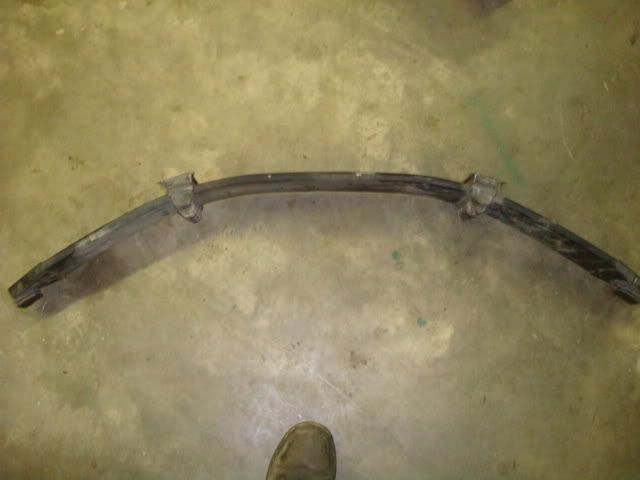
And here she is, out of the car sitting on the ground just waiting for a good cleaning and some lowering pads.
Noland
Here's a shot of the car without the engine, spring still in place.
Here's a shot of both sides of this dirt monster as she sits right now.
An underside shot of the spring in place
And a shot of the spring retainers just before I losened the four 5/8" bolts and dropped the retainers.
Once I got all four bolts out, the rest was easy. I just picked a side and carefully pulled the spring out from the chassis. It sits in a channel, so be careful not to ding or damage the spring.
And here she is, out of the car sitting on the ground just waiting for a good cleaning and some lowering pads.
Noland
By only removing the rubber cussion at each end of the leaf (the ones that sits in the A arm) would drop the car for "about" how many millimeter?
Martin
12-26-2009, 09:30 AM
#143
Drifting

Member Since: Sep 2002
Location: Suwanee,Ga
Posts: 1,642
Likes: 0
Received 0 Likes
on
0 Posts

Good pictures!
Two things I would recommend:
#1..... I would discourage heating the Arms. Use a solvent and a longer lever arm, or an impact air wrench to get the nuts off. This aluminum is a good material, but heating can have a damaging affects on it�s strength.
The upper arms are VERY weak in that direction, and you have to press them in that weak direction, and can distort them extremely easily.
You can move the ends together with you arm strength, they are that weak, however VERY strong in the direction they do the work in.
#2... The press is a handy tool, but unless you have a pretty well design spacer bar you can still mess the arms. I recommend a good C clamps and either the air wrench or on longer lever arm.
Put the Clamp in the vise and give it low impact.
The C clamps are available from a lot of parts stores [free loners @ Advanced anyway] for ball joint removals. So they two birds with one stone.
A search in the hardware store will find Steel electrical or cast plumbing fittings that will work perfectly as dies.
TJM
 01-17-2010, 05:19 PM
#145
Racer
Member Since: Sep 2009
Location: Sherbrooke Quebec
Posts: 408
Likes: 0
Received 0 Likes
on
0 Posts
I already bouth the lowering kit but decided to only remove the 2x 5mm shims (installed at Bowlingreen with the green spoted leaf) between the leaft and cross member on each side of the car to start with. I want the car lower but not too much due to our sh**ty roads up here. Since those shims make 10mm when they are stack up together I figure this is what I'm going to loose if not a bit more which is where I wanted her to be (�� ") up front. As for the rear, I can put my fist between the wheel and the fender, so a good 2" maybe, I'll figure it out when I get there now I'm replacing all the bushings first.
All the best!
01-19-2010, 01:49 AM
#146
Drifting

Just to get this information out there as I'm going through the car, this first post will be the work on the front suspension. I've pulled the front apart with the exception of the spring, which I will do either this evening or tomorrow in order to get the wedges attached and curing. This was a high mileage LT4 that just wasn't treated the best, so I'm doing everything to make her better than new. I'm using the Energy Suspension Master Set # 3-18122 for the 84-95 Corvette which I ordered through Summit. I was looking at Prothane before I started this journey, and discovered that Prothane has received some bad press about the fitment and inconsistencies with the tolerances of there bushings. Due to the number of and various folks on this forum that have had success with ES, it was a no-brainer for me to take this route. I also ordered the 3-5151G Rear Polyurethane sway bar bushing 84-96 corvette 24mm in Black, and 3-5154G Front Polyurethane sway bar bushing 84-96 Corvette 26mm Black from Summit, but they are on back order and not in stock.
I am replacing every last bushing, bearing, and seal in this cars suspension while I�m here I�m also lowering the car with the kit that I ordered from Mid America. I�m doing a C-5 front brake upgrade with slotted and cross drilled rotors. Keeping the C4 brakes in the rear (6-Speed�s REALLY need that parking brake). Braided lines, and cleaning everything up. I�m not going to change shocks right now, because the Bilstein�s that are on the car are less than 8K miles and are just going to be cleaned up to look good. I�ll continue to post the different aspects of this build as I go.
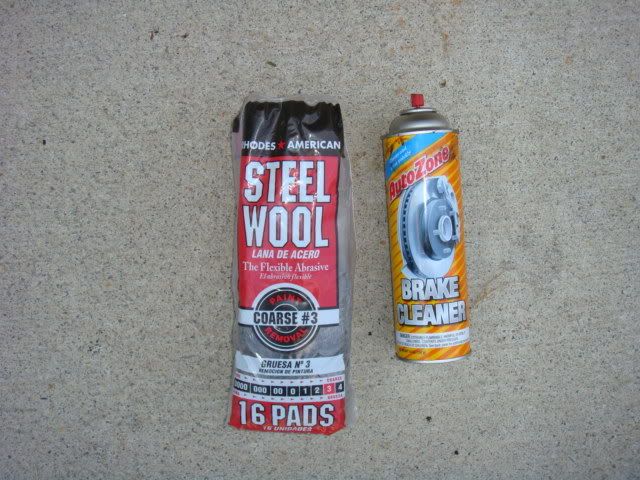
These are the tools of the trade for today, I just went to Wally-World and picked up a cheap bag of steel wool. I also grabbed a few cans of brake cleaner to help cut through the nasty buildup of grease and God-Knows what else.
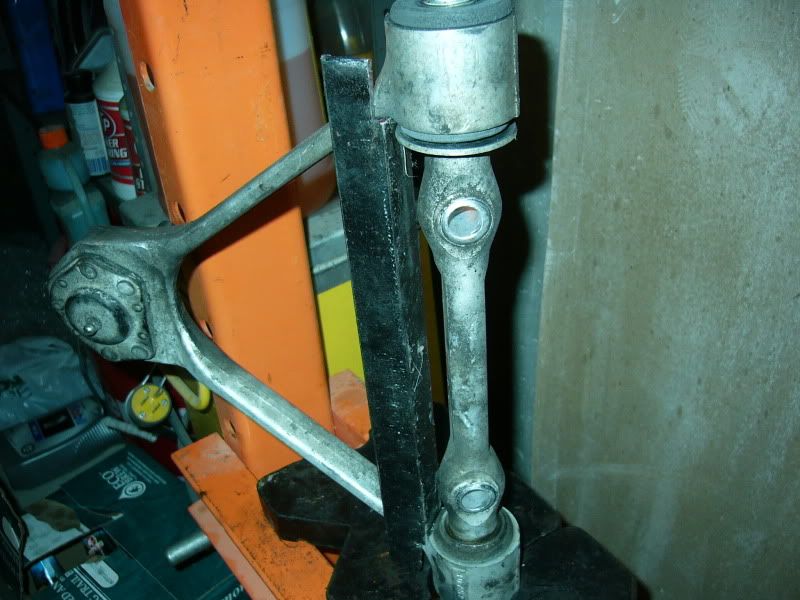
I�m currently cleaning up the upper and lower A-arms and front knuckle so that I can replace the ball joints with new units that I ordered from Corvette Central.
Here's a few shots of the one side that I've completed and the other side that's waiting for a bath .HUGE HUGE HUGE difference and really doesn't take much to get this stuff clean, especially with the steel wool pads.
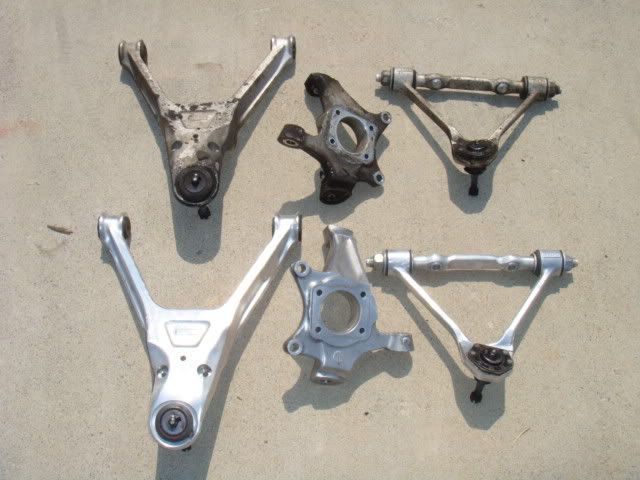
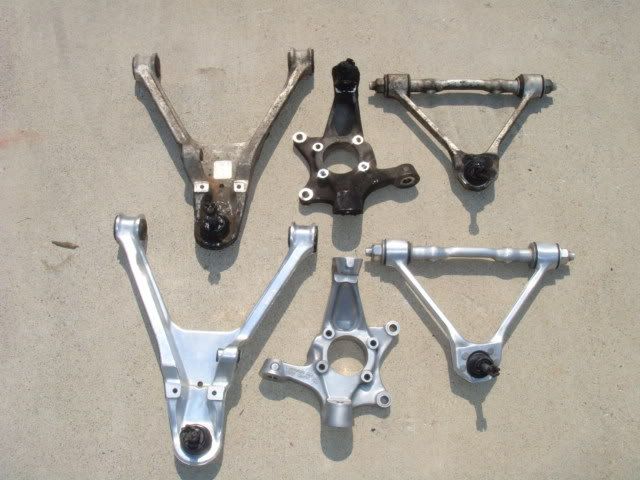
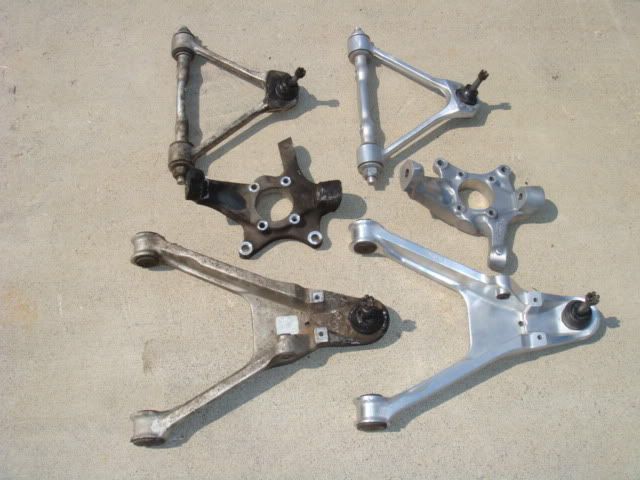

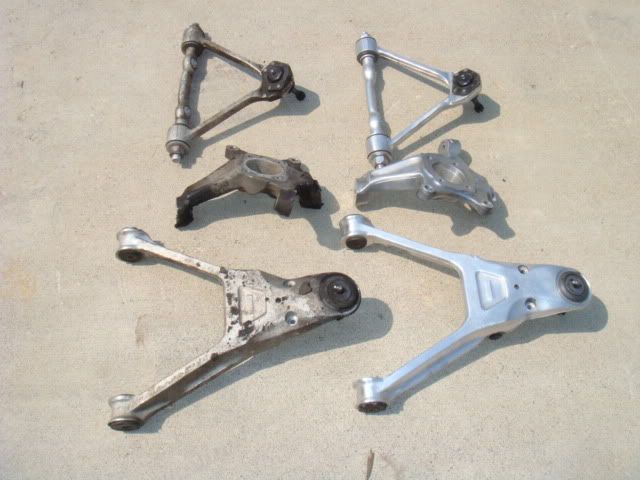
I was going to go with the full blown polish it til it makes you cry shine, but realized that with the way I'm going to drive this thing, it wouldn't last long at all. Too much effort for a non-show car. So I'm doing it right to clean it up and hopefully will be able to stay on top of the natural aluminum and not have to deal with metal polish day in and day out. Even with the steel wool and brake cleaner, the metal shines pretty nice and is a HECK of alot nicer looking! Enjoy the pics!
R/Noland
I am replacing every last bushing, bearing, and seal in this cars suspension while I�m here I�m also lowering the car with the kit that I ordered from Mid America. I�m doing a C-5 front brake upgrade with slotted and cross drilled rotors. Keeping the C4 brakes in the rear (6-Speed�s REALLY need that parking brake). Braided lines, and cleaning everything up. I�m not going to change shocks right now, because the Bilstein�s that are on the car are less than 8K miles and are just going to be cleaned up to look good. I�ll continue to post the different aspects of this build as I go.
These are the tools of the trade for today, I just went to Wally-World and picked up a cheap bag of steel wool. I also grabbed a few cans of brake cleaner to help cut through the nasty buildup of grease and God-Knows what else.
I�m currently cleaning up the upper and lower A-arms and front knuckle so that I can replace the ball joints with new units that I ordered from Corvette Central.
Here's a few shots of the one side that I've completed and the other side that's waiting for a bath .HUGE HUGE HUGE difference and really doesn't take much to get this stuff clean, especially with the steel wool pads.
I was going to go with the full blown polish it til it makes you cry shine, but realized that with the way I'm going to drive this thing, it wouldn't last long at all. Too much effort for a non-show car. So I'm doing it right to clean it up and hopefully will be able to stay on top of the natural aluminum and not have to deal with metal polish day in and day out. Even with the steel wool and brake cleaner, the metal shines pretty nice and is a HECK of alot nicer looking! Enjoy the pics!
R/Noland
Looks great, also what I use for the final polish of the aluminum pieces is #0000 steel wool, works great.
Also Simple Green and #0000 steel wool, works great for the inside of the wheels also.
Just thought I would get my 2 cents in
Keep up the great progress.
07-21-2010, 02:50 PM
#147
Burning Brakes

I'm glad this was a stickie...
Here's my help: I made a perfect brace for the upper A Arm in about 5 minutes with a piece of angle iron and hacksaw. It's worked much better than any extension I had
And for aluminum cleaning get a spray bottle of Aluminum Brightner from Napa PN 1458. This stuff worked better than anything I had from parts washer to oven cleaner.
 10-19-2010, 04:12 PM
#150
Drifting
Thread Starter

R/Noland
P.S. Oh yeah, It looks like I'm going to do this all over again on Grand Sport #0091.

 02-15-2011, 06:47 AM
#152
Le Mans Master


Member Since: Feb 2011
Location: Chatham NY
Posts: 5,796
Received 96 Likes
on
62 Posts
St. Jude Donor '13, '15-'16,'18-'19-'20-'21-'22-'23-'24


I recently purchased a 96 LT1 and the front end sits about an inch lower than it should. The seller told me it was never lowered as far as he knew, so my question is there something I can look for to confirm it was actually lowered by choice? There is nothing obviously broken and it sits too low for my taste, want to restore it to normal and it only has 52k on it, thanks.
 02-24-2011, 05:08 PM
#153
Drifting
Thread Starter
I recently purchased a 96 LT1 and the front end sits about an inch lower than it should. The seller told me it was never lowered as far as he knew, so my question is there something I can look for to confirm it was actually lowered by choice? There is nothing obviously broken and it sits too low for my taste, want to restore it to normal and it only has 52k on it, thanks.
The front end is basically lowered in a combination of one of two ways, or both.
1. The front spring pads are removed or modified in a manner to allow them to sit down further in the lower control arm. This can be done by completely removing the spring�s rubber spring pads, shaving the rubber contact area of the pads down or various parts of all the above in order to make the end of the spring sit lower in the lower control arm.
2. Modify the front spring cushion seat and spring retainer in order to allow the spring to sit up closer to the frame of the car. This movement of the front spring up higher in the suspension allows the spring to make contact with the lower control arms at a height higher from ground than the stock location. This is what the C4 front lowering kits provide. The installer removes the spring cushion seats and replaces them with the urethane rubber wedges and shaves the spring retainers down by the same measurement in order to lower the front end.
Now, there are other methods that can be accomplished as well as complete removal of the front spring to employ coil over shocks, but the above is for the stock setup.
I say the best way to tell, is to see if the spring has been modified, do a search on the Tech thread and look for lowering threads and see how the spring is altered, then compare it to your car to see where you stand. If you can remove the spring from the car, that would provide you the best method of determining what the condition and status of the front spring is (Given the assumption that your car has a front spring). Either way, good luck mission and your statement about your car being too low was the first time that I've ever heard that one.
R/Noland
02-25-2011, 11:24 AM
#154
Le Mans Master
Member Since: Feb 2011
Location: Chatham NY
Posts: 5,796
Received 96 Likes
on
62 Posts
St. Jude Donor '13, '15-'16,'18-'19-'20-'21-'22-'23-'24
Thanks BHM, just like a little more clearance over the tire. The worst part is here in upstate NY we still have snow and salty roads and even though my car sits in a dry heated garage it is not in my garage so I have to go visit. Very frustrating when it's your first vette in a few years and I wanna go play but can't. Oh yeah there is a stack of 4 new tires waiting in my front room, the weather can't break soon enough!


 04-06-2018, 09:33 PM
#157
 04-07-2018, 09:20 PM
#159
Safety Car

Just FYI -
There is an add-on fix for people using Chrome or Fire Fox as their web browsers that will fix all Photobucket images.
Chrome - https://chrome.google.com/webstore/detail/photobucket-hotlink-fix/kegnjbncdcliihbemealioapbifiaedg?hl=en
FireFox - https://addons.mozilla.org/en-US/firefox/addon/photobucket-fix/
Everybody to be able to once again see all of this hard work.
Will
04-07-2018, 09:40 PM
#160
Just FYI -
There is an add-on fix for people using Chrome or Fire Fox as their web browsers that will fix all Photobucket images.
Chrome - https://chrome.google.com/webstore/d...bifiaedg?hl=en
FireFox - https://addons.mozilla.org/en-US/fir...otobucket-fix/
Everybody to be able to once again see all of this hard work.
Will