


Cam Install Help Needed??
Thread Starter
Le Mans Master


Joined: Aug 2004
Posts: 5,141
Likes: 7
From: Metairie Louisiana
The Right Stuff (that's what it's called) is in a spray cheese type can. It's a little expensive but really good sealer for using on the ends of the intake valley (some call it the China Wall) and around the timing cover ends. It says on the can, you can start and drive without having to wait 24 hours for it to dry. I used it last summer on an intake. Didn't wait like it says. No leaks.

This is also what another forum member suggested to me below...
"Use "The Right Stuff" on everything except the timing cover, timing cover gasket, and water pump gasket. Follow the directions on the can.
For the timing cover, timing cover gasket, and water pump gasket, apply a thin coat of Permatex #2 with your finger....just lightly coat the gasket, cover, and block surface.
I used Permatex #2 on the curved portions of the oil pan, but wished I had used "The Right Stuff". I think it's better for the oil pan application. I used "The Right Stuff" on the intake and have zero leaks. "
I found these on the manufacturers website...

Permatex� the Right Stuff� Gasket Maker
Return equipment to service immediately when you make leak-proof gaskets in just one minute with the Right Stuff.� This latest elastomeric rubber gasket technology is blowout resistant and outperforms pre-cut gaskets. Specified on production lines by GM, Ford, DaimlerChrysler and Mercedes-Benz. Temperature range -75�F to 450�F (-59�C to 232�C) continuous, 500�F (260�C) intermittent.; resists ATF, coolant, oil and other shop fluids. Protects against leaks caused by vibration and thermal expansion. Sensor-safe.
Suggested Applications: Automotive and marine gaskets, valve covers, gearbox covers, pumps, compressors, oil pans, thermostat housings, water pumps

Permatex� Form-A-Gasket� No. 2 Sealant
Slow-drying, non-hardening sealant designed for sealing cut gaskets and stamped parts. Allows for easy disassembly if required. Temperature range -65�F to 400�F (-54�C to 204�C); resists common shop fluids and fuels. Use where sealing is more important than adhesion.
Suggested Applications: Valve cover gaskets, oil pan gaskets
Last edited by rickneworleansla; Feb 19, 2009 at 12:21 PM.
Thread Starter
Le Mans Master
Joined: Aug 2004
Posts: 5,141
Likes: 7
From: Metairie Louisiana
Do you just rely on the timing chain to hold the crank in place while removing the balancer and hub? I guess I was wondering if it should be prevented from turning. I thought I saw someone chaining it to a side frame rail or something.
I got all my parts in now. I should be starting this evening or tomorrow. I thought my valve spring kit was supposed to come with shims and instructions for installing. It just has the springs, seats, and retainers in the package. Should I be concerned with spring height and shims?
Is cleaning, soaking, or oiling of any parts required?(rockers, lifters, springs, etc.) I've read many different opinions on that. Most say regular oil on cam journals and assembly lube on lobes. Any brand recomended? I also read dipping or soaking lifters after cleaning in some solution is common. I saw comp has a spray for the springs and rockers. I didnt see it at Autozone though.
Is there any sort of break in method needed? I read keeping it abouve 2000rpms for the first few minutes. Someone said something about using dino oil for startup. I thought that was only for a rebuild.? While I'm thinking of it, whats the best grade mobile 1 to use at 114k miles?
What size vacuum lines do I need for the opti? One of them is cut.
Last edited by rickneworleansla; Feb 20, 2009 at 11:01 AM.
Thread Starter
Le Mans Master
Joined: Aug 2004
Posts: 5,141
Likes: 7
From: Metairie Louisiana
Update...
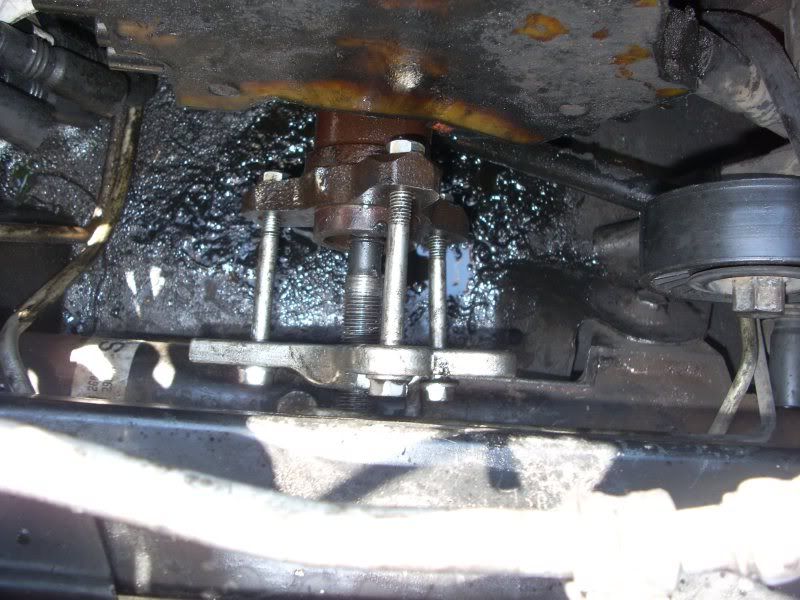
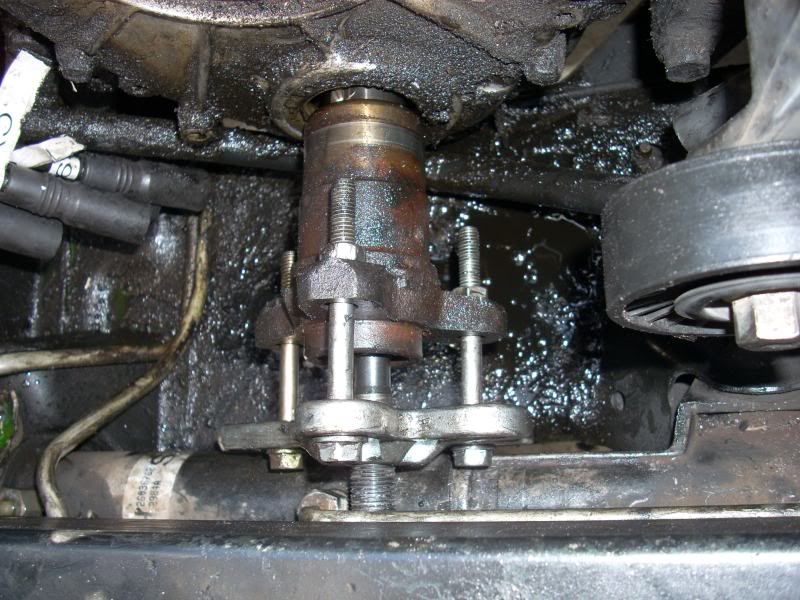
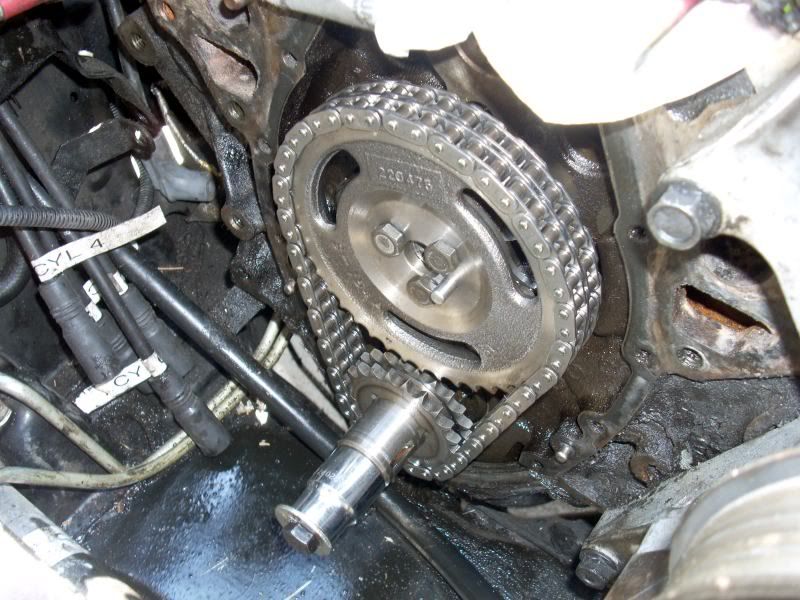
What a PITA! It took about four different bolt sizes and adjustments. I broke the first puller and had to run to the auto store for a new one and some more bolt sizes and nuts. It took the whole day just to get the hub and timing cover off. I drained the oil pan and ubolted just the first six bolts on it to drop the front. I also had to remove the three bolts holding the power steering resovoir. It was enough to get the timing cover off. Tomorrow I will finnaly be ablt to pull the timing gears and chain and swap the cam. I'm going to first remove the intake and valve covers so I can remove the lifters, pushrods, and roller rockers. I set the circle on the crank timing gear at 12 o' clock and the cam timing gear is at 6 o' clock. I'm going to undo the 3 bolts on the cam gear and hopefully it will slide off easy. Then I can pull the old cam and install the new cam. Then I am going to slide my coyles gears and chain on in the same position. Circle of crank gear at 12 o' clock and circle of cam gear at 6 o clock. Does that sound correct? Where can I find a longer hub bolt with the fine threads to get it back on? How do you know when the hub is completely seated?I was told it was a grade 8 bolt.
I also went to over 5 different auto stores not one had a micrometer for sale. I tried NAPA, Autozone, Advance, Pep Boys, Oreilly, Car Quest, etc.. DO I really need to check the spring heigth on the new springs?
Todays Pics...
Last edited by rickneworleansla; May 24, 2010 at 08:39 AM.
Thread Starter
Le Mans Master
Joined: Aug 2004
Posts: 5,141
Likes: 7
From: Metairie Louisiana
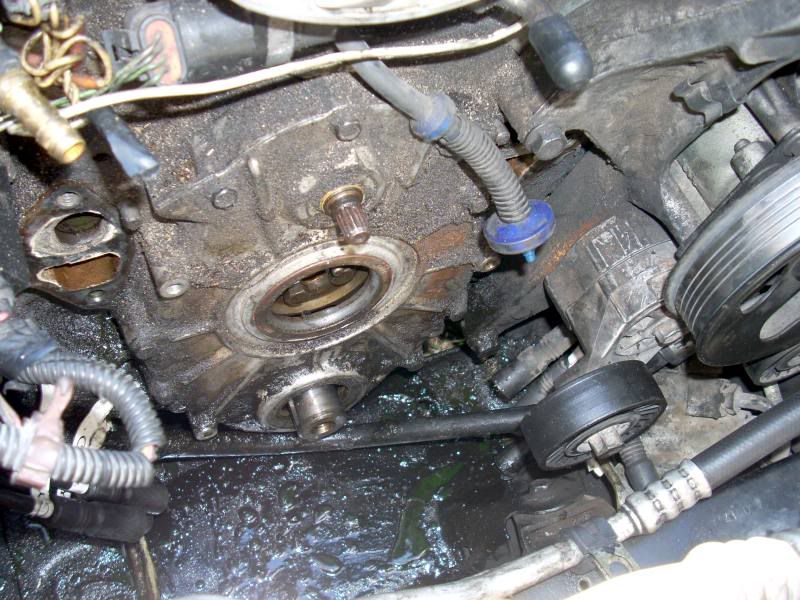
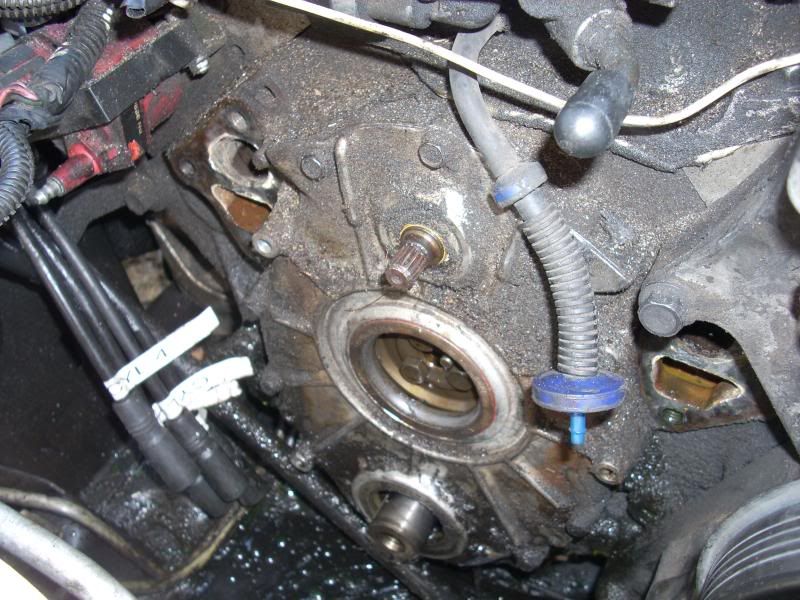
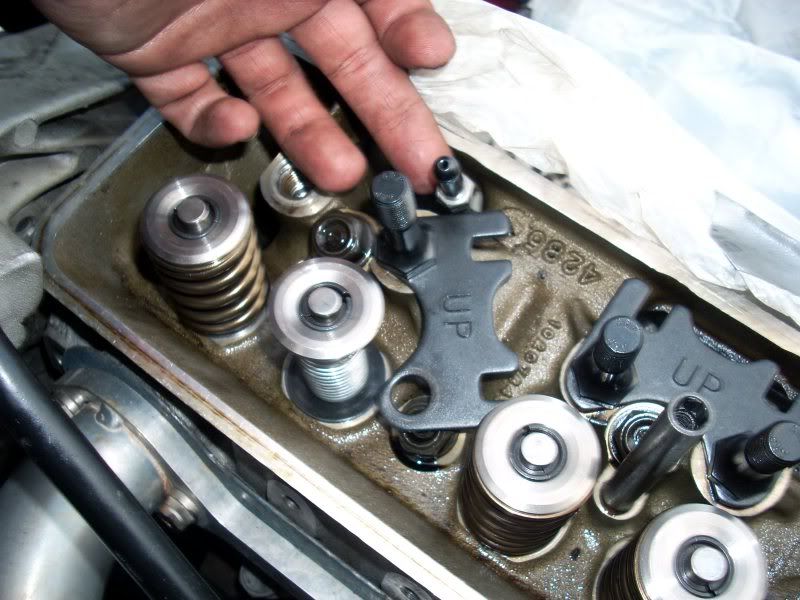
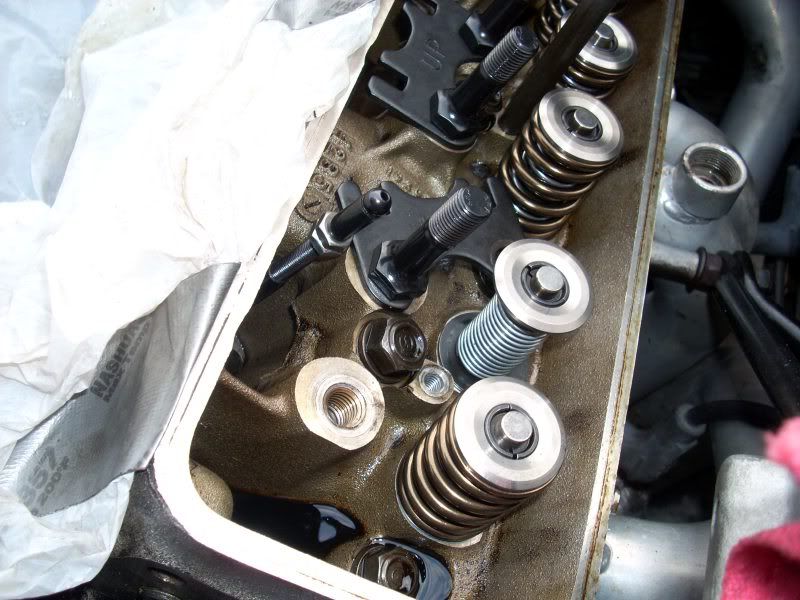
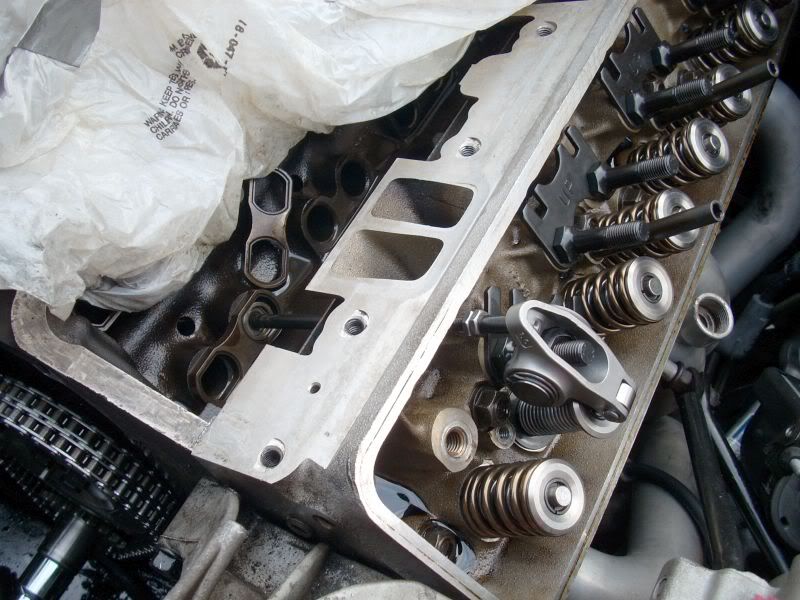
Yesterday went pretty well. I pulled the timing gears and chain. I also removed the intake, rockers, pushrods, lifters, oil pump stub, and scraped the old gaskets off. I then pulled the old cam and installed the new one. Today I'm going to put the Cloyes gears and chain on, attempt to remove the old springs and instrall the new ones, and pull all the old plugs. Then I'll install the lifters and measure for pushrod length. I'll have to order pushrods overnight shipping after measuring so I think I'm going to get pushed back until the weekend for finishing this project. I have work Thursday and Friday so I may be renting or burrowing a car for a couple of days. Thanks again for everyones help.
Here are yesterdays pictures...


Here are yesterdays pictures...
Last edited by rickneworleansla; May 24, 2010 at 08:39 AM.
Team Owner

Joined: Aug 2005
Posts: 34,988
Likes: 515
From: Riverside County Southern California
Co-winner 2020 C4 of the Year - Modified
2018 Corvette of Year Finalist
2017 C4 of Year
2016 C7 of Year Finalist
St. Jude Donor '09 thru '20
Race Director


Joined: Jan 2002
Posts: 12,263
Likes: 86
From: O'Fallon Missouri
You should have oiled up that camshaft before you installed it. I wouldn't recommend the dry install.
Also as dirty as that engine is, I would change the oil fairly soon after it's up and running.
Also as dirty as that engine is, I would change the oil fairly soon after it's up and running.
Last edited by STL94LT1; Feb 24, 2009 at 01:39 PM.
Thread Starter
Le Mans Master
Joined: Aug 2004
Posts: 5,141
Likes: 7
From: Metairie Louisiana

Corvette Stories
The Best of Corvette for Corvette Enthusiasts

Top 10 Most Expensive Corvettes Ever Sold on Bring A Trailer
Brett Foote
10 Things Every Corvette Owner Needs (2026 Edition)
Michael S. Palmer
8 Most "Only Corvette Owners Understand" Quirks and Problems
Pouria Savadkouei
10 Reasons the C6 Z06 is Still A Performance Benchmark After 20 Years
Joe Kucinski
How Much Horsepower Every Corvette Engine "LOST" in 1972
Joe Kucinski
Top 10 DOs and DON'Ts for Protecting Your Convertible Top!
Michael S. Palmer
Top 10 Most Explosive Corvettes Ever Made: Power-to-Weight Ratio Ranked!
Joe Kucinski
150 hp to 1,250 hp: Every Corvette Generation Compared by the Specs That Matter
Joe Kucinski
8 Coolest Corvette Pace Cars (and Replicas) of All Time
Verdad GallardoLe Mans Master

Joined: Feb 2000
Posts: 9,715
Likes: 27
From: Kempner Texas
Proform, CompCams and others sell a pressure tester used in a bench vice pretty inexpensively. I wouldn't go through all the trouble you've been through and not make sure the valve train is set up correctly.
In my experience, far too many guys skip setting up the valve train correctly, only to regret it later. If, for example, the engine begins to break up or float the valves at 5000 rpms or so, you'll spend many hours tearing back into the engine again.
My advice is to do it right the first time.
Just my thoughts.
Jake
Race Director
Joined: Jan 2002
Posts: 12,263
Likes: 86
From: O'Fallon Missouri


Thread Starter
Le Mans Master
Joined: Aug 2004
Posts: 5,141
Likes: 7
From: Metairie Louisiana
Today I reinstalled the timing gears and chain. I heated the crank gear as recommended and then put the old gear and a 1.75" pipe coupler behind it. I then used a socket extension with a big socket that I was able to hammer with a small maul from in front the cross frame. So... Socket extension, big socket, flat piece of metal with handle, pipe coupler, and old gear all lined up seemed to work pretty well.  I think a big socket with the right length extension would have probably worked great. Is the cam retaining plate screw supposed to be that close to my Cloyes timing gear? It spins but it's damn close. I opened up my old original opti today and I was surprised how well it help up for 118k miles and 13 years. I also pulled all the spark plugs and started to remove the first spring. That's when I found out you were correct. The overhead compressor does not work on dual valve springs.
At that point I drove about an hour away to pick up the correct spring compressor tool. They also had a micrometer and shims. There goes another $190. They only had the expensive $100 Morel compressor in stock. At least I can now get the correct pushrods ordered tomorrow. That is once I figure out how to measure with the pushrod length checker I bought.? Anyone? Also how do I use the micrometer? It looks like I have to put both ends where the spring goes then unscrew until the keepers lock in on the valve. Does that sound correct? I bought various size screws as recommended to reinstall the hub but how do I keep the crank from spinnig while tightening? I used an iron brick underneath the hub when removing to keep it from spinning. I really dont want to take anything else apart. Thanks
Todays pictures...


I think a big socket with the right length extension would have probably worked great. Is the cam retaining plate screw supposed to be that close to my Cloyes timing gear? It spins but it's damn close. I opened up my old original opti today and I was surprised how well it help up for 118k miles and 13 years. I also pulled all the spark plugs and started to remove the first spring. That's when I found out you were correct. The overhead compressor does not work on dual valve springs. At that point I drove about an hour away to pick up the correct spring compressor tool. They also had a micrometer and shims. There goes another $190. They only had the expensive $100 Morel compressor in stock.
At least I can now get the correct pushrods ordered tomorrow. That is once I figure out how to measure with the pushrod length checker I bought.? Anyone? Also how do I use the micrometer? It looks like I have to put both ends where the spring goes then unscrew until the keepers lock in on the valve. Does that sound correct? I bought various size screws as recommended to reinstall the hub but how do I keep the crank from spinnig while tightening? I used an iron brick underneath the hub when removing to keep it from spinning. I really dont want to take anything else apart. ThanksTodays pictures...
Last edited by rickneworleansla; May 24, 2010 at 08:40 AM.
Race Director
Joined: Jan 2002
Posts: 12,263
Likes: 86
From: O'Fallon Missouri
Le Mans Master
Joined: Feb 2000
Posts: 9,715
Likes: 27
From: Kempner Texas
I just posted a response on the thread on the other Forum of the methods I've used in the past.
I didn't think I needed to duplicate it here but in essence: Since I'm going on 64 years of age and have been screwing on these suckas domce I was in my 20s, I found some work-arounds. Some of them I came up with, while others were told to me by Old-school guys.
I my earlier days, I didn't have all the specialized tools to do certain things, so I figured out how to do the job without them. Don't get me wrong, there are some jobs that absolutely require the specialized tool, like a torque wrench, but there are many others when some creative thinking can get the same job done without them.
Keep us updated.
Jake
Burning Brakes

Joined: Nov 2006
Posts: 1,102
Likes: 1
From: Portsmouth Virginia 396LT4 435RWHP/400RWTQ Best so far 11.26 @ 123mph
Rick,
I found the cam retainer plates screws on mine making contact with the 3145 cam sprocket requiring just a little grinding on the head of the screws to remove the crown about a 1/32" on the grinder without taking too much of the torx head preventing proper tightening of the screw and striping due to reduced torx bit area contact.Also found clearance grinding of the timing cover required in way of crank gear end chain due to contact.I installed the cover without the gasket to help clearance it enough to be sure. Once clearance is achieved,gasket just provides additional buffer in case theirs any additional forward crankshaft thrust after assemble.Use blue dykem on the contact areas and rotate the crank to better check the cover for interference.
Rick Geer
Le Mans Master
Joined: Feb 2000
Posts: 9,715
Likes: 27
From: Kempner Texas
Rick,
I found the cam retainer plates screws on mine making contact with the 3145 cam sprocket requiring just a little grinding on the head of the screws to remove the crown about a 1/32" on the grinder without taking too much of the torx head preventing proper tightening of the screw and striping due to reduced torx bit area contact.Also found clearance grinding of the timing cover required in way of crank gear end chain due to contact.I installed the cover without the gasket to help clearance it enough to be sure. Once clearance is achieved,gasket just provides additional buffer in case theirs any additional forward crankshaft thrust after assemble.Use blue dykem on the contact areas and rotate the crank to better check the cover for interference.
Rick Geer
I found the cam retainer plates screws on mine making contact with the 3145 cam sprocket requiring just a little grinding on the head of the screws to remove the crown about a 1/32" on the grinder without taking too much of the torx head preventing proper tightening of the screw and striping due to reduced torx bit area contact.Also found clearance grinding of the timing cover required in way of crank gear end chain due to contact.I installed the cover without the gasket to help clearance it enough to be sure. Once clearance is achieved,gasket just provides additional buffer in case theirs any additional forward crankshaft thrust after assemble.Use blue dykem on the contact areas and rotate the crank to better check the cover for interference.
Rick Geer
Ya gotta do what ya gotta do.
Jake
Thread Starter
Le Mans Master
Joined: Aug 2004
Posts: 5,141
Likes: 7
From: Metairie Louisiana
Yesterday went pretty well. I checked the spring height with my micrometer and everything was ok there. I then Installed all my new studs and springs. I also checked for pushrod length. Maybe someone can verify I did it correctly...
I set my pushrod length checker at the stock height of 7.200" and installed it with the roller rocker and weaker spring from Ace hardare. I could only install one side of the retainer to fit the checker in there.
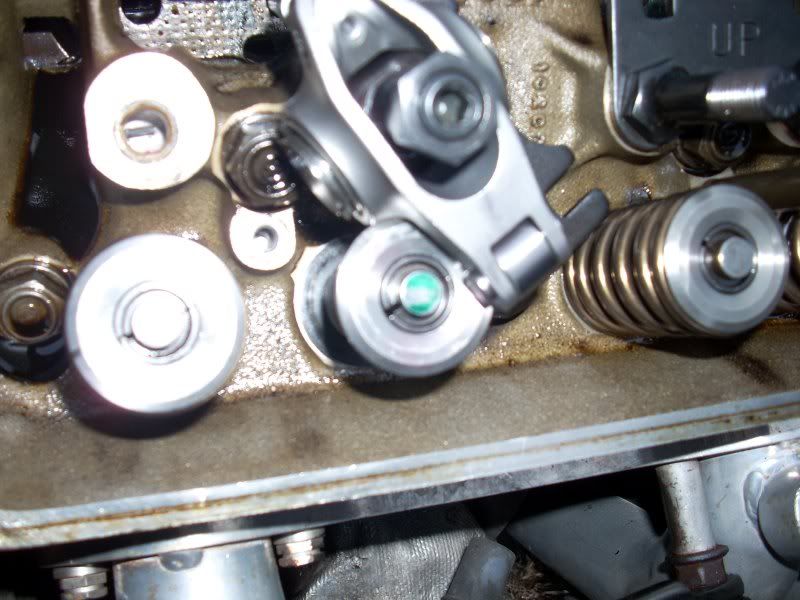
I marked the top of the valve stem with a green highlighter. I then placed the rocker arm on the stud. I twisted the pushrod checker in my fingers while tightening down the rocker arm bolt. When the pushrod checker was no longer able to move I tightened the nut an additional half turn then tightened down the retainer.
I then turned the crank over by hand about four times while watching the timing mark.
I then removed the rocker arm to see where the wear pattern was on the valve stem. It was more toward the exhaust side indicating that the pushrod length was too long. I kept shortening the pushrod length checker and repeating the process until the wear patter was in the middle.
This was what the wear looked like the last time I did it. I'm bringing the pushrod checker to a local machine shop today to get it measured with a digital caliper. Most auto stores I tried did not have one long enough. I'll let you know what lenght it is.

I'm now back at work for the next two days so I wont be able to get back at it until Saturday.
Thanks
I set my pushrod length checker at the stock height of 7.200" and installed it with the roller rocker and weaker spring from Ace hardare. I could only install one side of the retainer to fit the checker in there.
I marked the top of the valve stem with a green highlighter. I then placed the rocker arm on the stud. I twisted the pushrod checker in my fingers while tightening down the rocker arm bolt. When the pushrod checker was no longer able to move I tightened the nut an additional half turn then tightened down the retainer.
I then turned the crank over by hand about four times while watching the timing mark.
I then removed the rocker arm to see where the wear pattern was on the valve stem. It was more toward the exhaust side indicating that the pushrod length was too long. I kept shortening the pushrod length checker and repeating the process until the wear patter was in the middle.
This was what the wear looked like the last time I did it. I'm bringing the pushrod checker to a local machine shop today to get it measured with a digital caliper. Most auto stores I tried did not have one long enough. I'll let you know what lenght it is.
I'm now back at work for the next two days so I wont be able to get back at it until Saturday.
Thanks
Last edited by rickneworleansla; May 24, 2010 at 08:41 AM.
Thread Starter
Le Mans Master
Joined: Aug 2004
Posts: 5,141
Likes: 7
From: Metairie Louisiana
I measured the pushrod checker with a digital caliper at a local engine shop. It was 7.132 inches. I ordered the trickflow pushrods in 7.150 length overnight shipping. That was the closest in size I could find. I could either go down to 7.100 or up to 7.150 inches.
Thread Starter
Le Mans Master
Joined: Aug 2004
Posts: 5,141
Likes: 7
From: Metairie Louisiana
I tried installing my lifters, pushrods, and roller rockers and adjusting for zero lash. I first brought cylinder 1 to TDC and started adjusting. I discovered that one of the rr nuts would not turn a half past once the pushrod stopped spinning. The plunger/bowl appears to be stuck on several of the lifters. How do I unstick a stuck lifter. I need to get this done this weekend. Please help.
Thanks
Thanks
Last edited by rickneworleansla; Feb 27, 2009 at 07:50 PM.
Race Director
Joined: Jan 2002
Posts: 12,263
Likes: 86
From: O'Fallon Missouri
The lifters may be soft from not being pumped with oil. Are you sure they are stuck and not bottoming out? I like to move the pushrods up and down to find 0 lash. The spinning method can be decieving.
Thread Starter
Le Mans Master
Joined: Aug 2004
Posts: 5,141
Likes: 7
From: Metairie Louisiana
Comparing it to another lifter it looks like it is stuck in a raised position. I can't push it in with one of the pushrods like I can the other ones. No telling how long these sat on the shelf at summit.