


Cam Install Help Needed??
Race Director

Joined: Apr 2000
Posts: 15,344
Likes: 4,009
From: Texas
I already have the FSM's for my year. I've been reading through it today. Some things I learned after I had posted. They have all the J-#### tools listed and some useful diagrams. They left out the rookie do-it-yourself tips and tricks. I also couldnt find the section on hub removal with a block of wood and a hammer. Hopefully you guys can fill in. 
Is it possible to lower just the front of the pan for timing cover removal and reuse the gasket?
Thanks
Is it possible to lower just the front of the pan for timing cover removal and reuse the gasket?
Thanks
In order to get to the bolts to simply lower the pan, you'll already have 95% of the work done. Pay $30 for a FelPro gasket and do it right.
Race Director

Joined: Jan 2005
Posts: 10,641
Likes: 13
From: Slidell Louisiana
So is the gear a wear item? It looks like something I may be able to reuse? What is this nylon coupler piece here? http://shbox.com/1/op_shaft.jpg I was told that the oil pan would have to come off and the pump removed to get to this. I really don't want to have to do that so I guess thats out.
I found these pics of the gear.
1 2
I think this is the shaft and coupler I was told about.
I may just order a set of trickflow pushrods along with the cheaper length checker tool. My cam guy sells a lot of these setups so I think he can get close. The heads have been cleaned up and resurfaced only when I blew a gasket. I'm also using a better FelPro gasket. If the pushrods are not the right size I'll have to send them back to Summit and hopefully the correct ones can be shipped over night. I have Thunder racing about 1.5 hours away in Baton Rouge also. Thanks for the offer on the tool. Very nice of you.
The cam I ordered is a billet custom grid. I think I'm going to skip degreeing the cam.
I bought the Cloyes timing chain a while back. I was told it would fit but some grinding of the timing cover may be needed for some years. Then another member with a 95 mentioned it going right in.? Not sure. I really dont have any idea about how to install this since its different then the part coming off. Anyone?
Yes that is the oil pump drive people are telling you to replace and LT1s do have them. It is true that LT1s have a nylon faux distributor (oil pump drive) but it only acts as a replacement of the gen 1s distributor IOT drive the oil pump, so there still is a drive rod and nylon coupler.
Last edited by aboatguy; Feb 15, 2009 at 12:06 AM. Reason: To clarify false info others have posted
Race Director
Joined: Jan 2005
Posts: 10,641
Likes: 13
From: Slidell Louisiana
It's possible but risky. I'll bet that if you asked 100 people and they answered honestly, 75+ would tell you the thing leaked after they were done. If the pan has never been off, the possibility of getting a 14 year old gasket to reseal (assuming it doesn't tear where the factory uses RTV in the corners) is pretty damn small.
In order to get to the bolts to simply lower the pan, you'll already have 95% of the work done. Pay $30 for a FelPro gasket and do it right.
In order to get to the bolts to simply lower the pan, you'll already have 95% of the work done. Pay $30 for a FelPro gasket and do it right.

replacing the timing cover with out dropping the pan will probably result in the pan gasket getting pushed into the pan.
Im in your neck of the woods too bad I'll be travelling that week.
Last edited by aboatguy; Feb 15, 2009 at 12:08 AM.
Thread Starter
Le Mans Master

Joined: Aug 2004
Posts: 5,141
Likes: 7
From: Metairie Louisiana
Update:
I called PCMFORLESS and emailed Bryan. I should be able to get the new tune emailed in time for the install. I asked for one tune NA and another with the 50sh, 75sh, 100sh, and 125sh of N2O. I also inquired about reusing my SV0 25# injectors or upgrading to a bigger injector and fuel system.
Thunder Racing in Baton Rouge can send the pushrods regular one day shipping. Hopefully I can get to the point of checking length and ordering them by next Monday to receive them by Tuesday. I need to call back now and make sure they keep various sizes in stock.
I called the local Checy parts dealer. They want $62 for the new oil pan gasket and $77 for the oil pump drive stub. I was told the drive stub may benifit from being replaced due to the different wear pattern of the new cam. Sounds expensive for a Oil pan gasket. I'm going to start calling around for the FelPro one. The guy knew nothing about using LS7 lifters in an LT1. I aksed him to look up a 2008 LS7 corvette and he said it lists the same part number for an LS1 (#17122490). Is that the correct part number? I need to get these ordered today to have them by Friday.
I'm still a little confused on the oil pump drive shaft. I spotted it in one of the FSM diagrams. I was told ARP makes one or maybe Melling. Anyone have a part number? Should I even bother with it? How difficult? It looks like you just unbolt the oil pump, remove the old one, and insert the new one. Is there enough clearance to get it out on stands?
Thanks to everyone!
Last edited by rickneworleansla; Feb 16, 2009 at 12:46 PM.
Le Mans Master

Joined: Feb 2000
Posts: 9,715
Likes: 27
From: Kempner Texas
My Vette's a 96, so that may be the difference as to why that Cloyes will work on some and not others. Mine has a CPS and I didn't want to run an electric WP.
When I checked Summit's site, the 9-3145 designed for align (line) honed blocks states it won't fit the LT1.
If you still want to run the one you have, I'd first install it, then turn the engine a few revolutions by hand and listen and feel for any sign of the chain rubbing on the inside of the cover.
Once you remove the cover, you should be able to see any witness marks that the chain made.
There are two connections to the oil pump. One is the stub shaft which is the nylon (not sure that's what it's made of, but we'll call it nylon for the sake of this discussion). It's rather short and has a gear attached to it and that gear meshes with the gear on the camshaft. It's accessed by removing the intake manifold and unscrewing a single bolt. then it merely pulls straight up with a little wiggling..
The other one is a steel shaft, may 8/10 inches long. One end meshes with the stub shaft and the other end meshes with the oil pump. The end that meshes with the oil pump has a collar on it.
The stock collar is usually plastic and over time, after being exposed to hot oil, it becomes brittle and breaks off. I guess the collar is designed to prevent the steel shaft from jumping out of index with the oil pump. The high performance shafts have a steel collar instead of plastic.
With a new cam, I recommend replacing both the stub (because it will have a new gear) and the longer steel shaft.
Jake
Last edited by JAKE; Feb 16, 2009 at 02:15 PM.
Thread Starter
Le Mans Master
Joined: Aug 2004
Posts: 5,141
Likes: 7
From: Metairie Louisiana
 New update:
I just ordered almost everything needed from Summit Racing. They had the FelPro Gaskets cheaper than Chevy. I got Felpro intake gaskets($23), Felpro one piece oil pan gasket($42), GM Valve Cover gaskets($22), SLP hardened Oil Pump driveshaft($12), LS7 lifters(#12499225 $121), NGK TR6 spark plugs($3 each), Pushrod Length Checker($12 #TFS9000). Everything should be here in about 3 days. I have most of the front gaskets that I never got to use when I did the water pump install.
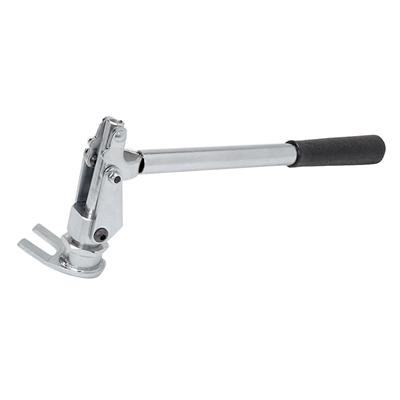
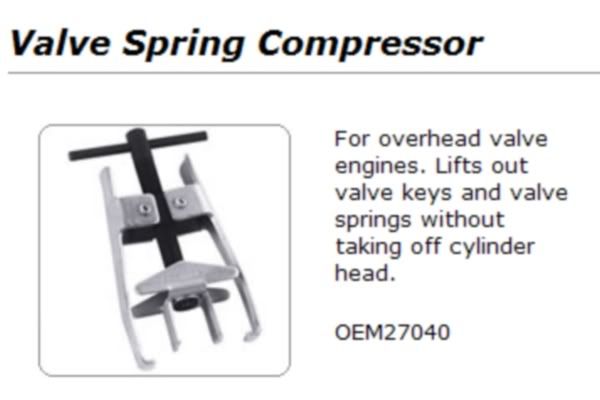
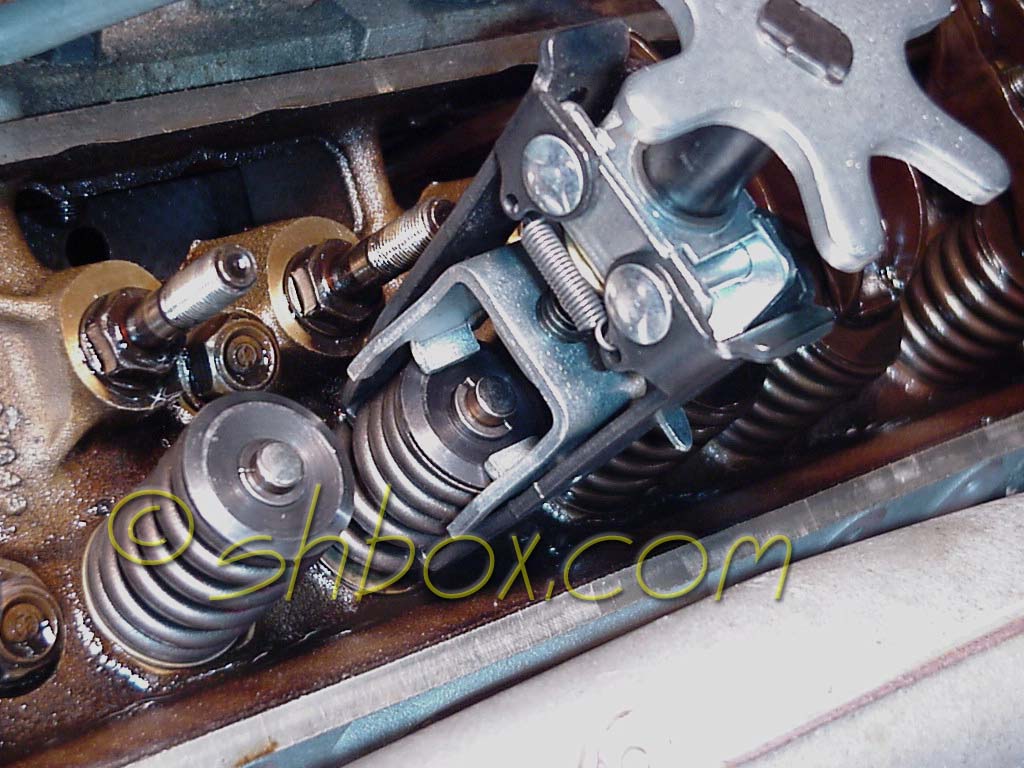
I need to order the water pump gaskets and oil pump drive stub from GM. I also need to order a new vacuum line from the optspark to the intake. The old one is cut through from the belt/pully. This seems to be fairly common. I wrapped it with electric tape last time. I'm stopping by the parst dealership right now for these. I also need to pick up some longer bolts to remove the cam without scratching the journals. I have a harbor freight puller for the balancer/hub but I'm not sure if/how well this will work. I need to go back and look through some old threads. See pic below. Should I look for the other type with three legs? I also need a spring compressor. What's the cheapest/best option that I can pick up locally? I need a ft/lbs torque wrench and an in/lbs torque wrench. The ft/lbs has to go high enough so I can do my wheel bearrings in a few weeks which I believe is 250 ft/lb. Suggestions on what torque wrenches to pick up locally?

Last edited by rickneworleansla; May 24, 2010 at 08:37 AM.
Race Director


Joined: Jan 2002
Posts: 12,263
Likes: 86
From: O'Fallon Missouri
I use a similar puller to pull my balancer's hub.
Here is the valve spring compressor that I use, picked it up from Summit. You can borrow it if you would like? or Summit has them for ~$45.
Here is the valve spring compressor that I use, picked it up from Summit. You can borrow it if you would like? or Summit has them for ~$45.
Corvette Stories
The Best of Corvette for Corvette Enthusiasts

Top 10 Most Expensive Corvettes Ever Sold on Bring A Trailer
Brett Foote
10 Things Every Corvette Owner Needs (2026 Edition)
Michael S. Palmer
8 Most "Only Corvette Owners Understand" Quirks and Problems
Pouria Savadkouei
10 Reasons the C6 Z06 is Still A Performance Benchmark After 20 Years
Joe Kucinski
How Much Horsepower Every Corvette Engine "LOST" in 1972
Joe Kucinski
Top 10 DOs and DON'Ts for Protecting Your Convertible Top!
Michael S. Palmer
Top 10 Most Explosive Corvettes Ever Made: Power-to-Weight Ratio Ranked!
Joe Kucinski
150 hp to 1,250 hp: Every Corvette Generation Compared by the Specs That Matter
Joe Kucinski
8 Coolest Corvette Pace Cars (and Replicas) of All Time
Verdad Gallardo
Thread Starter
Le Mans Master
Joined: Aug 2004
Posts: 5,141
Likes: 7
From: Metairie Louisiana
Thanks for the offer STL4LT1.
Is the Autozone rental like the one above? Will it work with the valve train parts I've ordered? That sounds like the way to go. Maybe I can return the coil Spring Compressors I burrowed from AutoZone about 4 years ago and get my $75 back. 
The Oil Pump stub is nowhere to be found. I've called every parts store on the planet. No one carries it but GM. I even called the local AC Delco distributor and they are also out. GM said they would have to order it from the out of state warehouse which could take anywhere from 3 days to 1.5 weeks. They can't give me an exact delivery date due to plant closing, restructuring, and ****ty weather. It looks like I'm stuck with reusing the old part. Hopefully it isnt broken or worn too bad. I found a company called Herron Performance that will soon be making a billet piece for about $130, not soon enough for me though.
Is the Autozone rental like the one above? Will it work with the valve train parts I've ordered? That sounds like the way to go. Maybe I can return the coil Spring Compressors I burrowed from AutoZone about 4 years ago and get my $75 back. The Oil Pump stub is nowhere to be found. I've called every parts store on the planet. No one carries it but GM. I even called the local AC Delco distributor and they are also out. GM said they would have to order it from the out of state warehouse which could take anywhere from 3 days to 1.5 weeks. They can't give me an exact delivery date due to plant closing, restructuring, and ****ty weather. It looks like I'm stuck with reusing the old part. Hopefully it isnt broken or worn too bad. I found a company called Herron Performance that will soon be making a billet piece for about $130, not soon enough for me though.
Thread Starter
Le Mans Master
Joined: Aug 2004
Posts: 5,141
Likes: 7
From: Metairie Louisiana
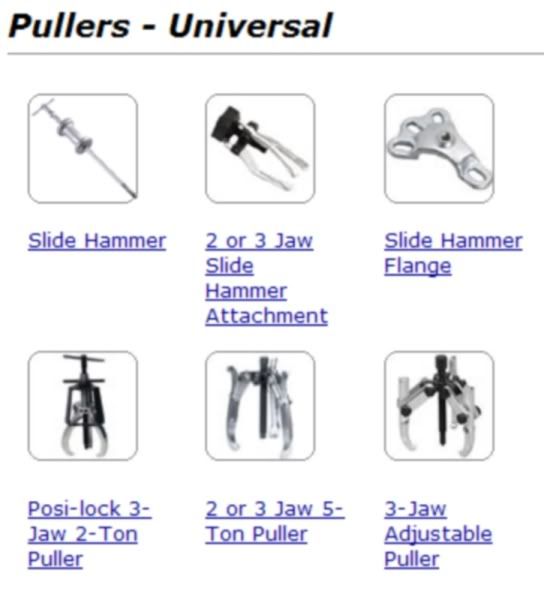
So here's the pullers that are available from Autozone to rent. Which one will work best? I want a second as a backup, just in case.
Here is the valve spring compressor available to rent.
I may even rent the torque wrenches from Autozone until I buy some really good ones at a latter date.
I was told by GM today that the cavuum hose from the opti to the intake has been discontinued. I have to go look at it again but if I'm not mistaken any regular hose should work if I just reuse the fittings. Anyone know the diameter and length?
Last edited by rickneworleansla; May 24, 2010 at 08:38 AM.
Race Director
Joined: Jan 2002
Posts: 12,263
Likes: 86
From: O'Fallon Missouri
I used that valve spring compressor on my first valve spring change. To put it bluntly, it sucked. Also, don't think it will work for dual springs.
You'll need one of the three-jaw pullers to pull the lower timing gear from the crankshaft.
You'll need one of the three-jaw pullers to pull the lower timing gear from the crankshaft.
Last edited by STL94LT1; Feb 16, 2009 at 09:54 PM.
Race Director
Joined: Jan 2002
Posts: 12,263
Likes: 86
From: O'Fallon Missouri
Thread Starter
Le Mans Master
Joined: Aug 2004
Posts: 5,141
Likes: 7
From: Metairie Louisiana
So it looks like the '2 or 3 jaw - 5 ton puller' above may be the way to go.? Will this one fit in there? Does anyone else know if the compressor shown will work with the dual springs? This was the only one show on their website but I guess it's possible they may have other types also.
I was just going to drop them in. I was not aware that the height had to be checked. What is the procedure for this? What is needed?
Later today I'm going to write out the whole process from start to finish on paper in order to visualize everything and find any gaps of understand and questions I may have. This will also make doing a writeup later on much easier.
Thanks
Last edited by rickneworleansla; Feb 17, 2009 at 10:36 AM.
Le Mans Master
Joined: Feb 2000
Posts: 9,715
Likes: 27
From: Kempner Texas
Without the expensive tools used by the shops, here's what I've done in the past:
I first put each new spring into my bench vice, one at a time, using padding on each end of the spring to protect against nicks. Then I crank the vice down until the spring is in coil bind. I leave it that way for a few minutes.
(I learned this little trick many years ago from AirFlow Research. It helps reduce seat pressure loss that occurs when new springs are installed and the engine is run for a while.)
I then determine the seat pressure I want for the springs.
I then install each spring in a pressure tester and crank it down until I get the pressure I want.
I then measure the height of the spring at that pressure.
I then install the retainer and keepers/locks on each valve stem and measure the distance from the seat on the head to the underside of the retainer.
Usually the distance from the seat on the head to the retainer will be greater than the desired install height of the spring.
I then do the math and determine how many shims will be needed to reduce that clearance to the measurement I made of the spring at its installed height.
I then install the spring, retainer and keeper/locks and give the valve stem tip a BIG WHACK with a rubber mallet.
Then I move on to the next spring. It's best to do all 16 individually since differences can exist between springs and each valve location on the heads.
If you want to check the open pressure of the spring, you can first set the seat pressure height, then crank the spring pressure tester down to the amount of the max lift of the cam you're running and read the pressure that results.
There are specalized tools for doing all this, but you can use a vice-mounted spring tester to get your pressure readings; I believe ProForm sells it.
You can also use a rigid length of coat-hangar or welding rod cut to the exact height of the spring when it's set at the seat pressure you want. Cut the wire to that exact length. Then use that wire to determine how many shims you'll need to fill the gap between the spring seat on the head and the retainer. Just make sure the wire is perpendicular when using it on the head.
Hold the wire straight up and down (perpendicular), then add shims until all the gap is eliminated.
More than one way to skin a cat.
Jake
Thread Starter
Le Mans Master
Joined: Aug 2004
Posts: 5,141
Likes: 7
From: Metairie Louisiana
Some more questions:
Do I really have to wait 24 hours for the RTV to cure on the intake manifold or is there a quick drying RTV I can use?
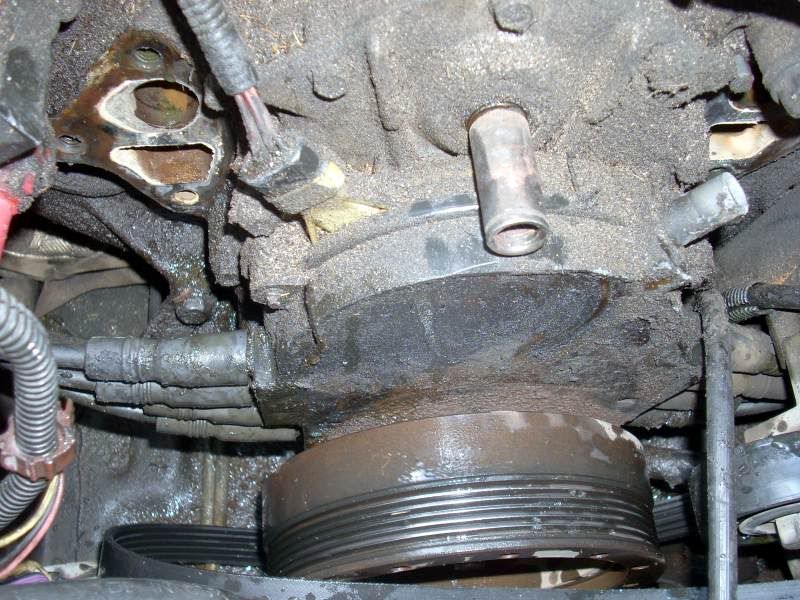
I already have an electric water pump installed but I left the coupler and everything else on the block side. How do I remove the coupler and whatever else is on the block side before and after removeing the timing cover? What else has to come off? The picture below is how it looks now except that the EWP has been reinstalled in front of it. Someone told me what size freeze plug was needed for the hole in the timing cover and now I cant find it. Does anyone know? I'd rather do it that way than using a half dollar and JB weld.
Do I really have to wait 24 hours for the RTV to cure on the intake manifold or is there a quick drying RTV I can use?
I already have an electric water pump installed but I left the coupler and everything else on the block side. How do I remove the coupler and whatever else is on the block side before and after removeing the timing cover? What else has to come off? The picture below is how it looks now except that the EWP has been reinstalled in front of it. Someone told me what size freeze plug was needed for the hole in the timing cover and now I cant find it. Does anyone know? I'd rather do it that way than using a half dollar and JB weld.
Last edited by rickneworleansla; May 24, 2010 at 08:38 AM.
Race Director
Joined: Jan 2002
Posts: 12,263
Likes: 86
From: O'Fallon Missouri
The coupler just pulls off, if it's even still on. You should have pulled that off during the e.water pump install.
The water pump drive is pressed into the block. Once you get the intake, timing cover, and upper timing gear off. You can just tap the assembly forward and it will fall right out.
The water pump drive is pressed into the block. Once you get the intake, timing cover, and upper timing gear off. You can just tap the assembly forward and it will fall right out.
Thread Starter
Le Mans Master
Joined: Aug 2004
Posts: 5,141
Likes: 7
From: Metairie Louisiana
The coupler just pulls off, if it's even still on. You should have pulled that off during the e.water pump install.
The water pump drive is pressed into the block. Once you get the intake, timing cover, and upper timing gear off. You can just tap the assembly forward and it will fall right out.
The water pump drive is pressed into the block. Once you get the intake, timing cover, and upper timing gear off. You can just tap the assembly forward and it will fall right out.
Thanks
I think I found my answer about the Autozone tool on a dual coil spring. This was from an F-body write up from member shoebox...
"I ended up with this KD tool. It is a little hard on the hands, but I wore my Mechanix gloves. There was just enough lip on the tool to grip the flat, inner spring, too. Being careful to center the tool on the spring made a big difference."
Drifting

Joined: Mar 2008
Posts: 1,756
Likes: 0
From: Wichita KS
The Right Stuff (that's what it's called) is in a spray cheese type can. It's a little expensive but really good sealer for using on the ends of the intake valley (some call it the China Wall) and around the timing cover ends. It says on the can, you can start and drive without having to wait 24 hours for it to dry. I used it last summer on an intake. Didn't wait like it says. No leaks.